Logik L17LID648 User manual

1
L17LID648
17” HD Ready Digital LCD TV
with Integrated DVD Player

2
PLACEMENT INFORMATION
• Donotusethisunitinplaceswhichareextremelyhot,cold,dusty,orhumid.
• Placetheunitonaatandevensurface.
• Donotrestricttheairowofthisunitbyplacingitsomewherewithpoorairow,bycoveringitwithacloth,or
byplacingitonbeddingorcarpeting.
• Undertheenvironmentwithradiofrequencyinterference,thepicturemaybeinuenced.
SAFETY INFORMATION
• Whenconnectingordisconnectingthecord,griptheplugandnottheACcorditself.Pullingthecordmay
damageitandcreateahazard.
• Whenyouarenotgoingtousetheunitforalongperiodoftime,disconnecttheACcord.
• Themainsplugisusedasthedisconnectingdevice.Itshallremainreadilyoperableandshouldnotbeobstructed
duringintendeduse.Tobecompletelydisconnectedfromthesupplymains,themainsplugoftheapparatus
shouldbedisconnectedfromthemainssocketoutletcompletely.
• Theapparatusshouldnotbeexposedtodrippingorsplashingandthatnoobjectslledwithliquids,suchas
vases,shouldbeplacedonapparatus.
• Leaveaminimumof200mmaroundtheapparatusforventilation,and200mmbesidetheDVDmechanism;
• The ventilation openings should not be impeded by covering with items such as newspaper, table-cloths,
curtainsetc.
• Nonakedamesourcessuchaslightedcandlesshouldbeplacedontheapparatus;
• Attentionshouldbedrawntotheenvironmentalaspectsofbatterydisposal;
• Theuseofapparatusinmoderateclimates.
• Undertheinuenceofelectrostaticphenomenon,theproductmaymalfunctionandrequireusertopower
reset.
CONDENSATION INFORMATION
• Whentheunitisleftinaheatedroomwithwarmanddamp,waterdropletsmayforminsidetheunitdueto
condensation,thismaycausemalfunctionoftheunit.Lettheunitstandfor1-2hoursbeforeturningthepower
on,orgraduallyheattheroomandlettheunitdrybeforeuse.
RATING PLATE LOCATION
• Theratingplateisonthebackofproduct.
ThesymbolforClassII
(Doublelnsulation)
CAUTION
INVISIBLELASERRADIATIONWHENOPEN
ANDINTERLOCKSDEFEATED.
AVOIDEXPOSURETOBEAM
Thissymbolmeansthattheunitcomplies
with European safely and electrical
interferencedirectives.
WARNING :TOPREVENTFIREORSHOCKHAZARD,DONOTEXPOSETHISUNITTORAINORMOISTURE.
DONOTPLACEOBJECTSFILLEDWITHLIQUIDSONORNEARTHISUNIT.
CAUTION : DANGEROFEXPLOSIONIFBATTERYISINCORRECTLYREPLACED.REPLACEONLYWITH
THESAMEOREQUIVALENTTYPE.
Thisproductcontainsa
lowpowerlaserdevice.
SAFETY PRECAUTIONS
CAUTION
RISK OF ELECTRIC SHOCK
DO NOT OPEN
WARNING:TOREDUCETHERISKOFELECTRIC
SHOCK,DONOTREMOVECOVER(ORBACK).
NOUSER-SERVICEABLEPARTSINSIDE.REFER
SERVICINGTOQUALIFIEDPERSONNEL.
Theexclamationpointwithinatriangle
alertsyoutothepresenceofimportant
operating,maintenance and servicing
instructionsinthisuser’smanual.
The lightning ash with an arrowhead
withinatrianglealertsyoutouninsulated
dangerous voltage within the product’s
enclosure that could cause an electric
shock.
WARNING: Should any problems occur, disconnect the AC cord and refer servicing to a qualied
technician.
PREPARATION CONNECTIONS USING THE FEATURES SPECIFICATIONTROUBLESHOOTING
USING THE DVD
FEATURES
PREPARATIONCONNECTIONSUSING THE FEATURES
USING THE DVD
FEATURES
TROUBLESHOOTINGSPECIFICATION

3
MAINS PLUG
UNITS SUPPLIED WITH MOULDED MAINS PLUG
1.IfthemainsplugttedtotheACcordsuppliedisnotsuitableforyourmainsoutletitmaybenecessarytocut
itoff.Carefullydisposeoftheseveredplug.Undernocircumstancesmustitbeinsertedintoamainssocket,
otherwiseadangerouselectricshockcouldresult.
2.Ifthefuseinthettedmainsplugshouldfail,replaceitwithaBS1362approved
fuseratedat3ANeverusetheplugwithoutthefusecovertted.
WIRING A MAINS PLUG
Asthewiresinthemainsleadmaynotcorrespondwiththecolouredmarkings
identifyingtheterminalsinyourplugproceedasfollows:
• Thewirewhichiscolouredbluemustbeconnectedtotheterminalwhichis
markedwiththeletterNorcolouredblack.
• Thewirewhichiscolouredbrownmustbeconnectedtotheterminalwhich
ismarkedwiththeletterLorcolouredred.
• No connectionisto be made to the earth terminal oftheplugwhichis
markedwiththeletterEorcolouredgreenorgreenand
yellowormarkedbythesafety earthsymbol.
Thestandard(BS1363)mainsplugmustbettedwitha3Ampfuseapproved
toBS1362.Ifanyotherplugorconnectionisuseda3Ampfusemustbetted
intheplugoradaptororinthedistributionboard.
Caution: Moisture Condensation
Iftheequipmentismovedfromacoldplacetoawarmone,waterintheairwillcondenseonsomepartsandmay
causedamageormalfunctioniftheequipmentisoperated.
Allowatleasttwohoursfortheequipmenttoacclimatisebeforeswitchingiton.
This unit is designed to operate from a 230V - 240V AC ~ 50Hz mains supply.
PleasenotethatwhentheSTANDBY/ONswitchisinthestandbypositionthisdoesnotcompletelydisconnectthe
unitfromthemainssupply.Iftheequipmentisnottobeusedforadayormore,disconnectitatthewalloutlet.
Thissymbolmeansthattheunitisdoubleinsulated.Noconnectiontoearthisnecessary.
SAFE USE OF YOUR EQUIPMENT
ThisequipmenthasbeendesignedandmanufacturedtomeetUKsafetystandardsbutlikeanyelectricalequipment
caremustbetakentoobtainthebestresultsfromtheequipmentandassureyourownsafety.Hereareafew
tipstohelpyoudothis:
READthisinstructionmanualbeforeyouattempttousetheequipment.
NEVERtmakeshiftstandsorlegswithwoodscrews.Useonlyapprovedsupportsandfastenersspeciallydesigned
fortheequipment.
NEVERletanyone,especiallychildren,pushobjectsintoholes,ventilationslotsoranyotheropening;thiscould
resultinfatalelectricshock!
ALWAYSdisconnecttheACpowercordwhenyouarenotgoingtousetheunitforalongperiodoftime.
ENSUREadequateventilationoftheequipmentisnotobstructed,forexamplebycurtainsaboveorsoftfurnishings
underneathit.
ENSUREthatallelectricalconnections(includingthemainsplug,extensionleadsandinterconnectionsbetween
piecesofequipment)areproperlymadeinaccordancewiththeinstructionsgiven.Switchoffthemainsupply
whenmakingorchangingconnections.
CONSULTyourdealerifyouareeverindoubtabouttheinstallation,operationorsafetyofyourequipment.
DON’Tcontinuetooperatetheequipmentifitisdamagedinanywayorifitdoesnotfunctionnormally.
Withdrawthemainsplugandconsultyourdealer.
DON’Tleaveequipmentswitchedonwhenitisunattendedunlessitispartofit’snormalfunctiontooperatein
yourabsence,forexampleavideocassetterecorderwithtimedrecordingfacility.
LISTENtoheadphonesatmoderatevolumelevels;highvolumelevelscanpermanentlydamageyourhearing.
Thewiresinthismainsleadare
colouredinaccordancewiththe
followingcode.
BLUE-NEUTRAL
BROWN-LIVE
IMPORTANT SAFETY INSTRUCTIONS
PREPARATION CONNECTIONS USING THE FEATURES SPECIFICATIONTROUBLESHOOTING
USING THE DVD
FEATURES
PREPARATIONCONNECTIONSUSING THE FEATURES
USING THE DVD
FEATURES
TROUBLESHOOTINGSPECIFICATION

4
TABLE OF CONTENTS
PREPARATION CONNECTIONS USING THE FEATURES SPECIFICATIONTROUBLESHOOTING
USING THE DVD
FEATURES
PREPARATIONCONNECTIONSUSING THE FEATURES
USING THE DVD
FEATURES
TROUBLESHOOTINGSPECIFICATION
PREPARATION .................................................................................................................................................... 2
SafetyPrecautions...............................................................................................................................................2
ImportantSafetyPrecautions...............................................................................................................................3
TableofContents.................................................................................................................................................4
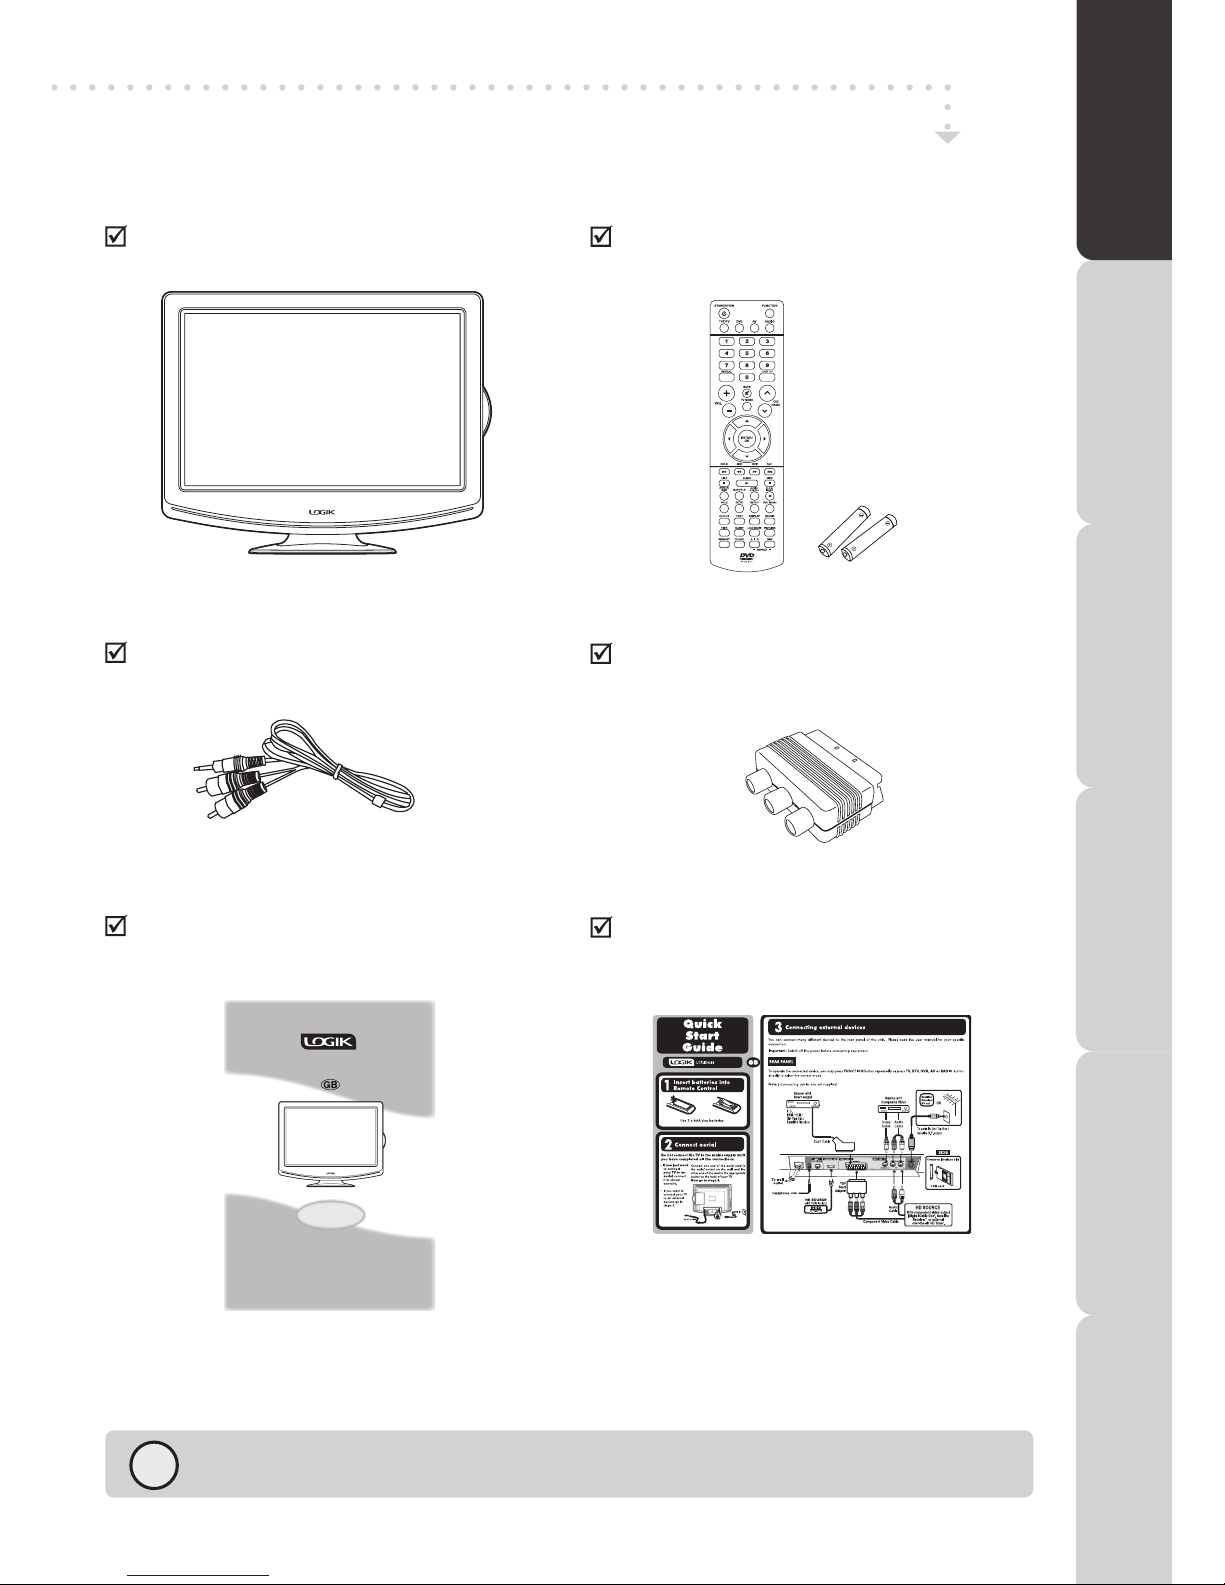
PackageContents................................................................................................................................................5
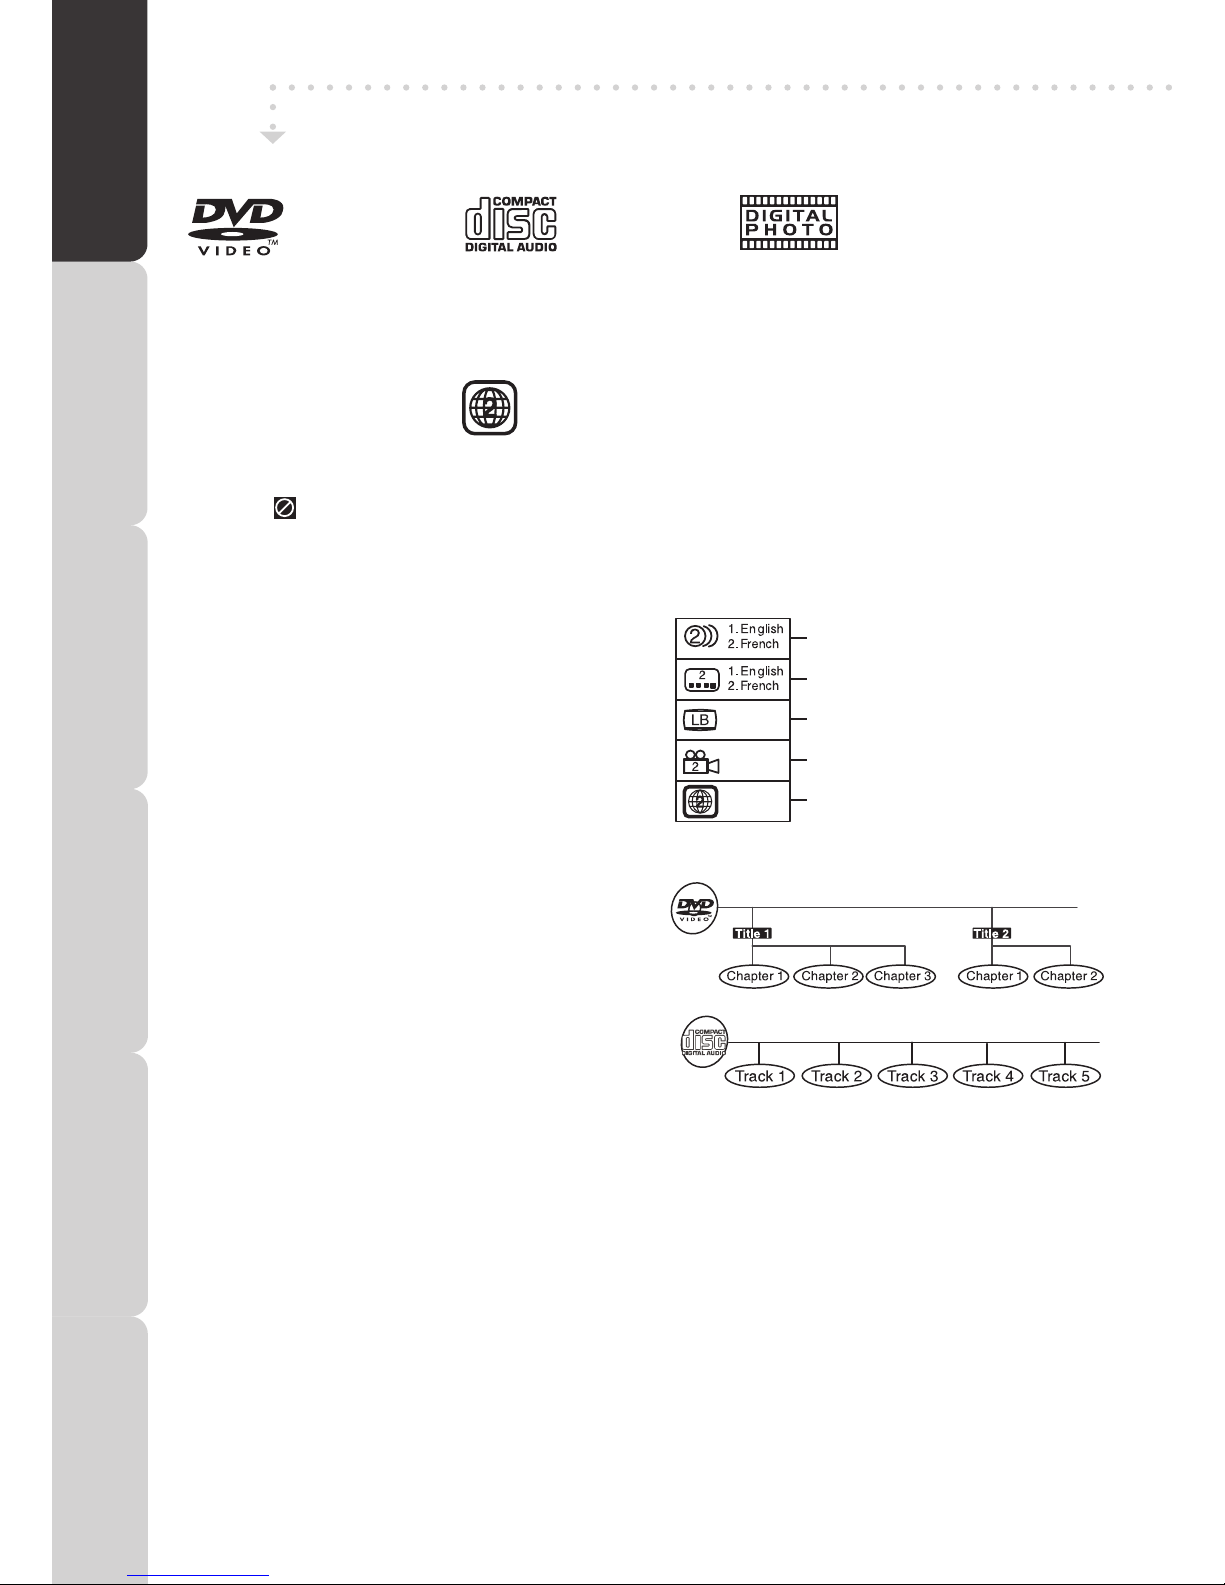
DiscFormats........................................................................................................................................................6
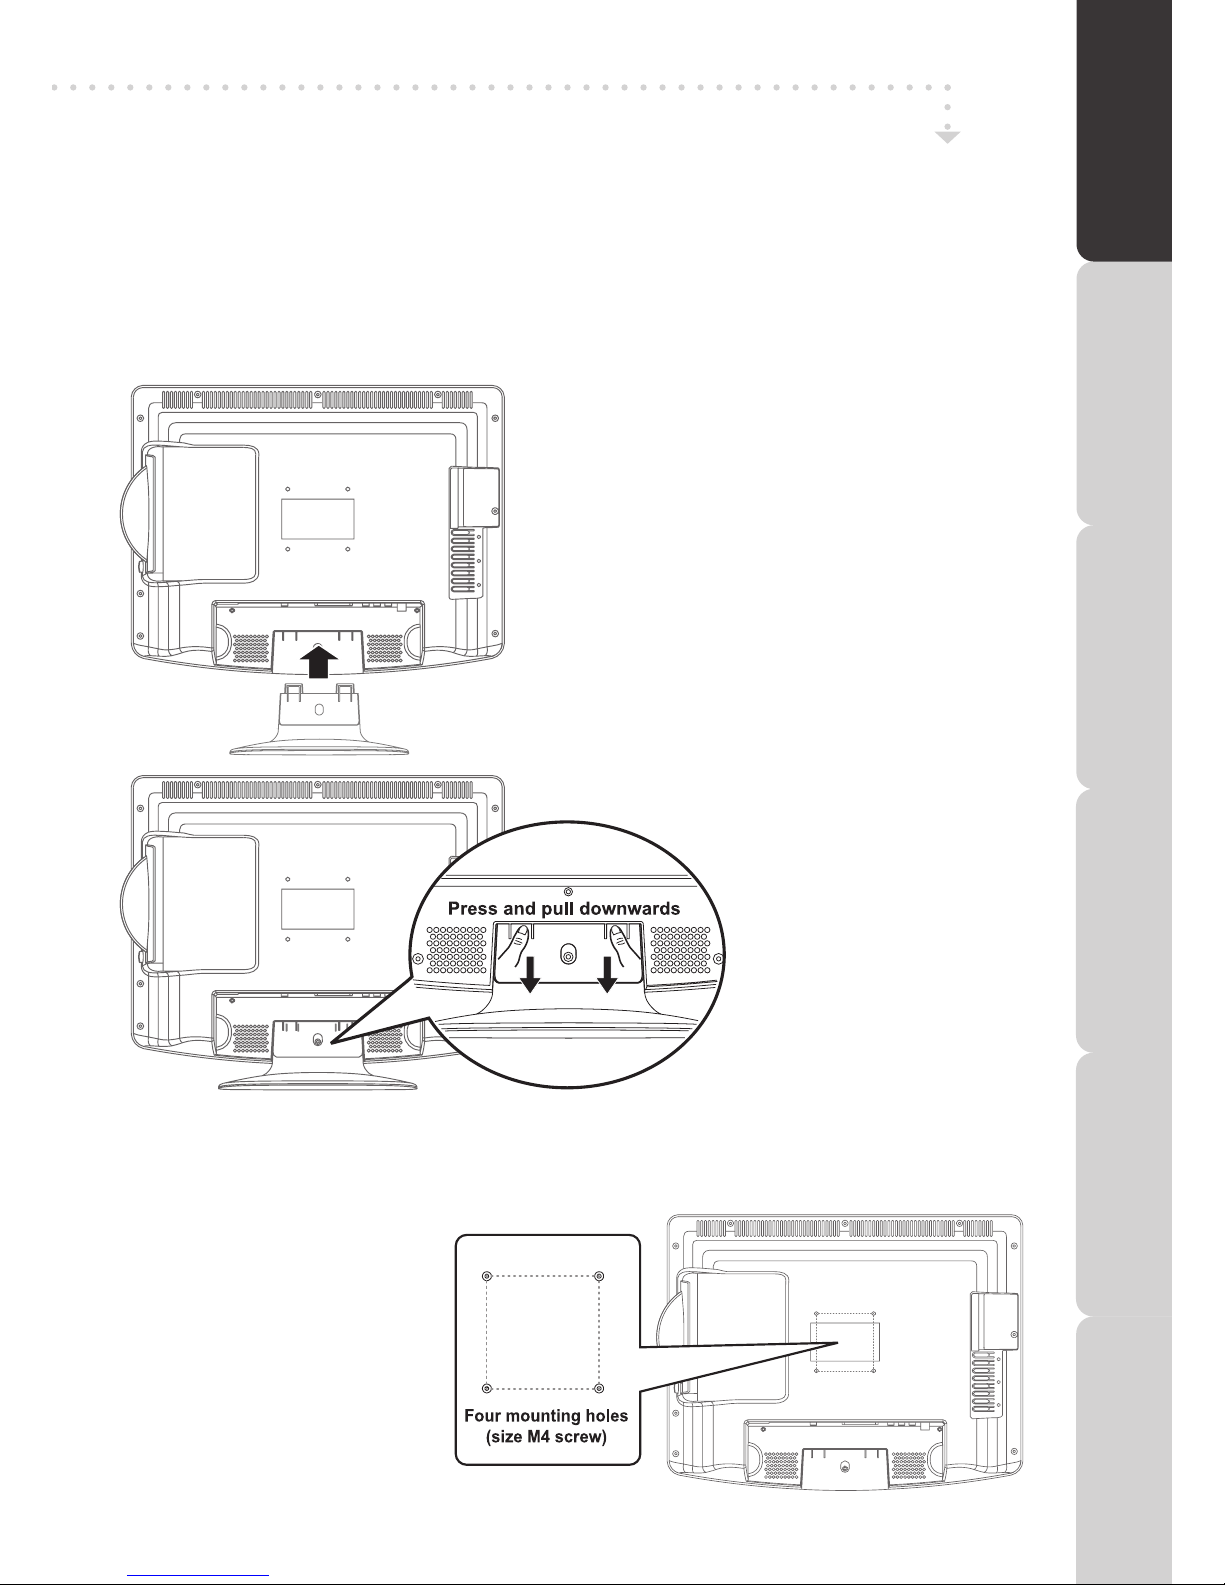
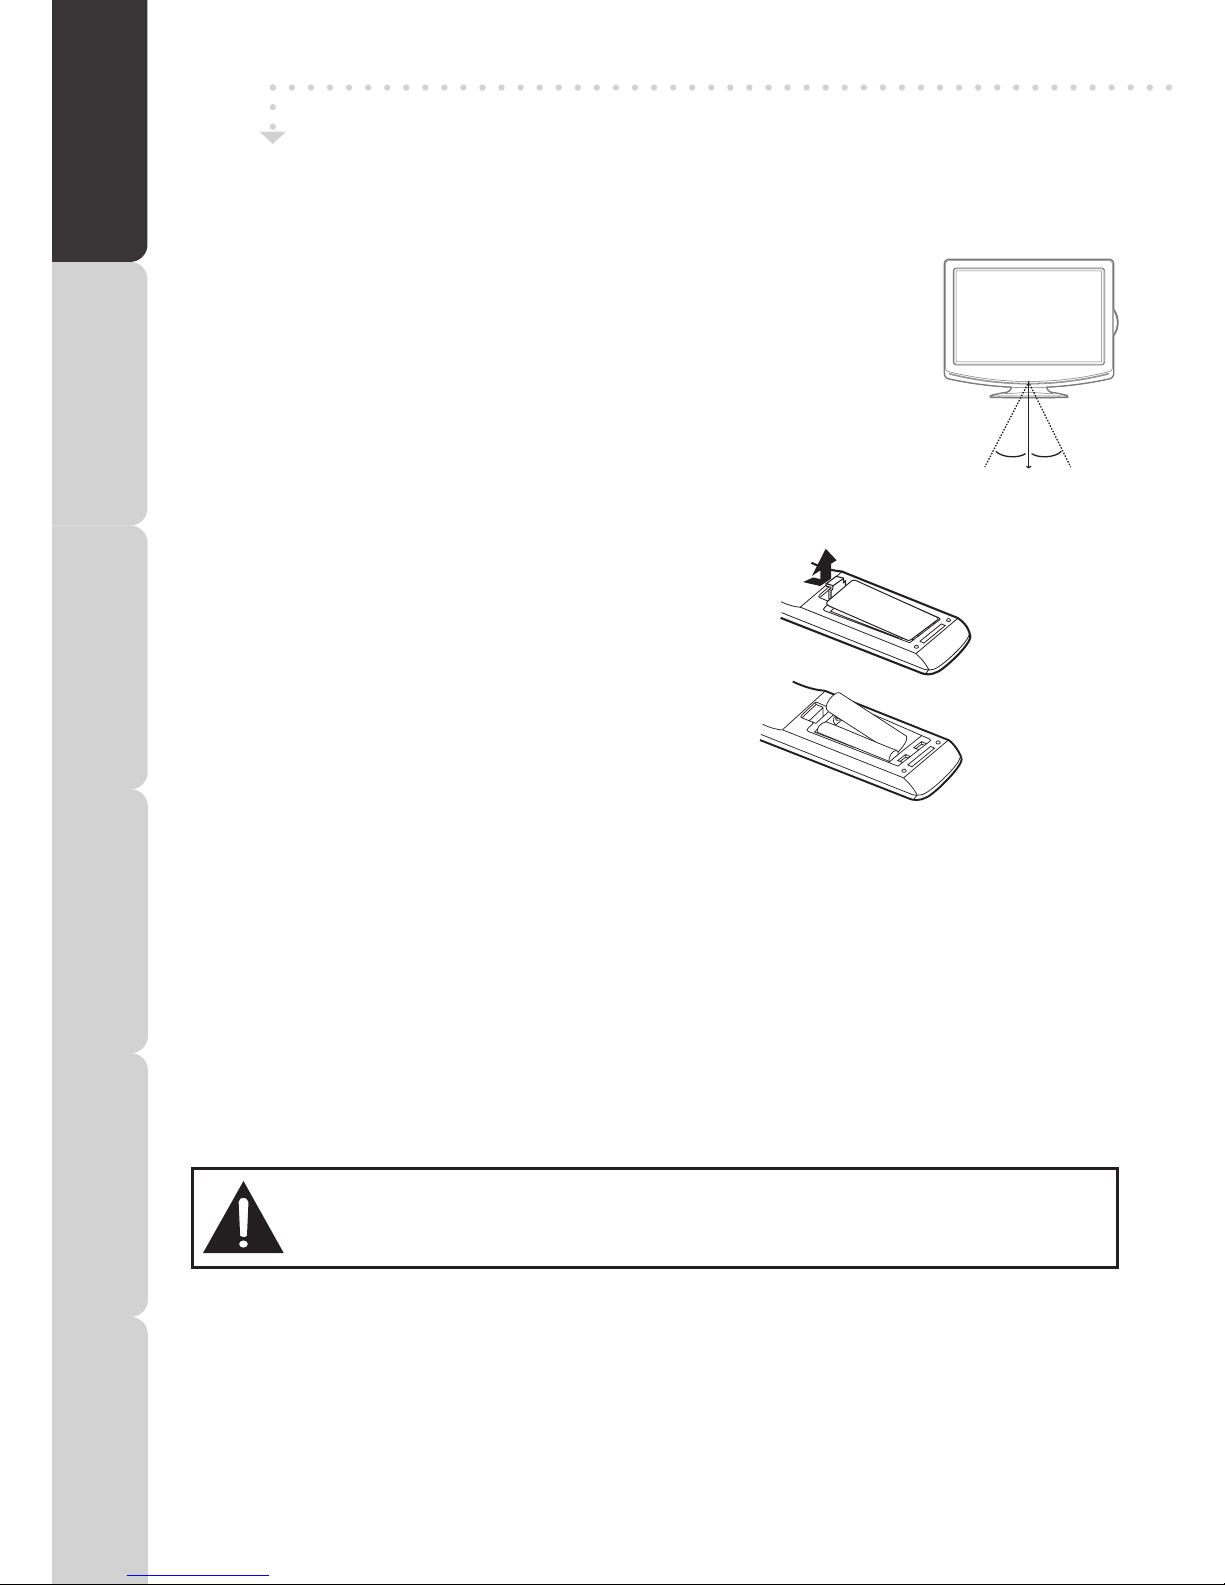
Installation............................................................................................................................................................7
GettingStarted.....................................................................................................................................................8
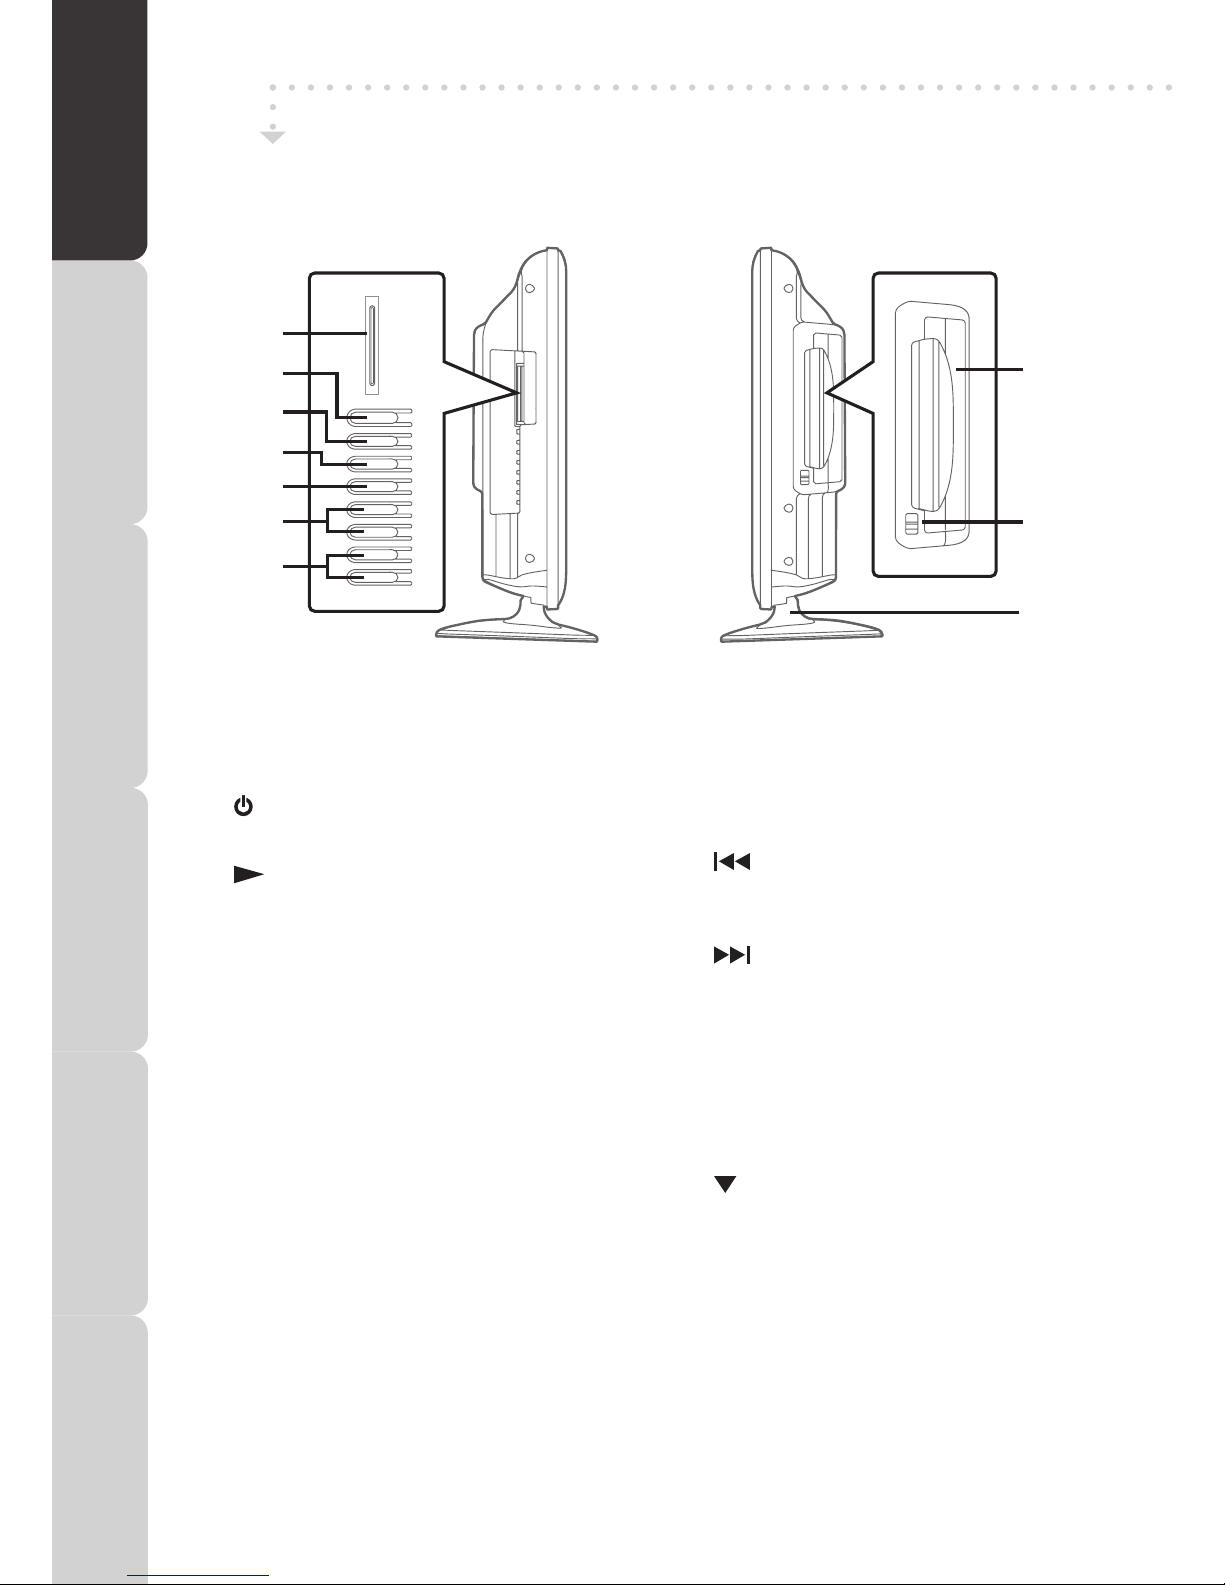
LCDTV.........................................................................................................................................................9-10
RemoteControl...........................................................................................................................................11-12
CONNECTIONS ................................................................................................................................................ 13
ConnectingaTVAerial/Cable/Satellite............................................................................................................13
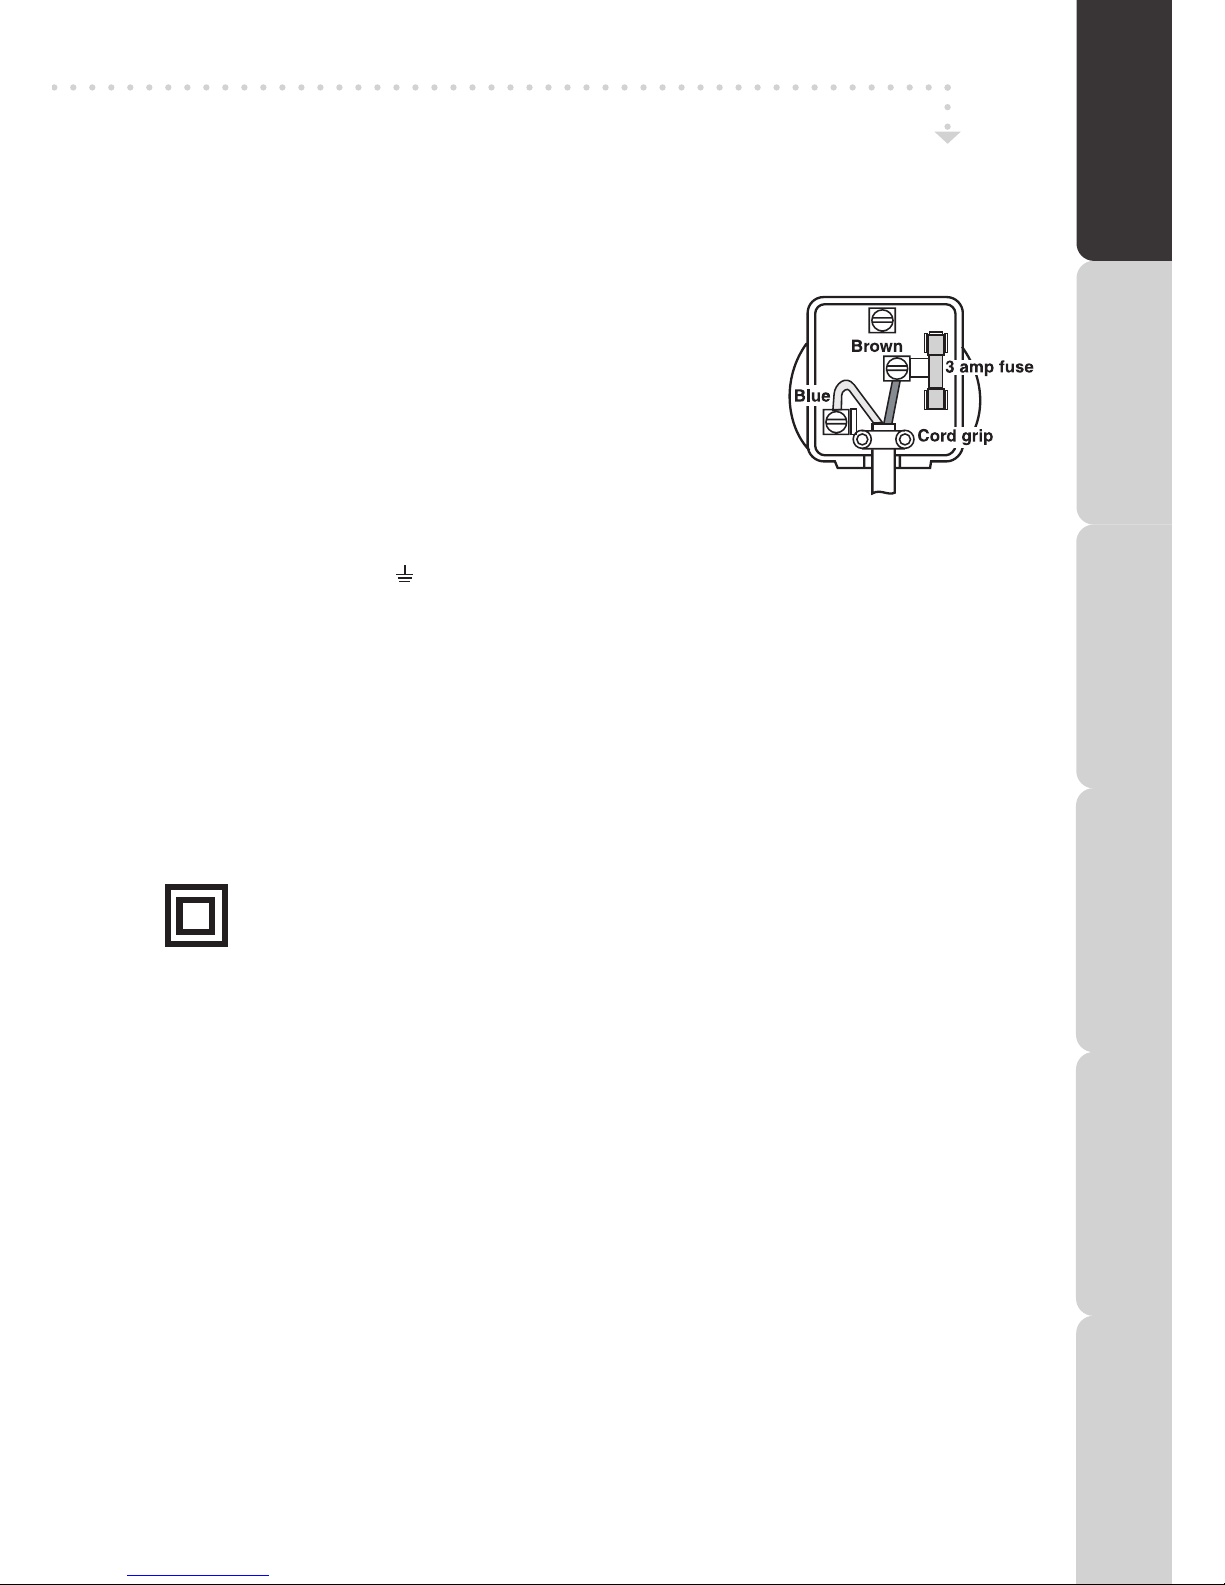
ConnectingaPowerCord................................................................................................................................13
CommonInterface...........................................................................................................................................13
Connectingtodeviceswithacomposite(yellowRCA-type)videooutput.......................................................14
Connectingtodeviceswithavideoinput........................................................................................................14
Connectingtosourceswithscart....................................................................................................................14
ConnectingaHighDenition(HD)Source(YUV)...........................................................................................15
ConnectingHDMI............................................................................................................................................16
UsingHeadphones..........................................................................................................................................16
DoblyDigital(ForDVD).......................................................................................................................................16
USING THE FEATURES ................................................................................................................................... 17
BasicOperation..................................................................................................................................................17
TurningtheUnitonfortheFirstTime..............................................................................................................17
TV/DTV/RADIOSetup............................................................................................................................18-22
TVSetting................................................................................................................................................18-19
ElectronicProgrammeGuide(EPG)forDTV............................................................................................19
AudioLanguageforDTV...........................................................................................................................19
PictureMenu...................................................................................................................................................20
SoundMenu....................................................................................................................................................20
TimeMenu......................................................................................................................................................21
SetupMenu.....................................................................................................................................................21
LockMenu.......................................................................................................................................................22
Teletext...............................................................................................................................................................23
USING THE DVD FEATURES ........................................................................................................................... 24
CustomisingtheDVDfunctionsettings.......................................................................................................24-25
Languagesetup..............................................................................................................................................24
Videosetup.....................................................................................................................................................24
Systemsetup...........................................................................................................................................24-25
DVDFeatures..............................................................................................................................................26-30
CD/DVDoperation...........
........................................................................................................................
..26-27
Playingadisc..............................................................................................................................................26
Playingapictureledisc.............................................................................................................................26
Pausingplayback(stillmode)......................................................................................................................26
Stoppingplayback.......................................................................................................................................26
Skippingtoadifferenttrack.........................................................................................................................26
Fastforward/fastreverse.............................................................................................................................27
Slow-motionplay(DVD)..............................................................................................................................27
Audioselection(DVD).................................................................................................................................27
Subtitleselection(DVD)..............................................................................................................................27
AngleSelection(DVD)................................................................................................................................27
SpecialFunction...........
..................................................................................................................................
.28
Displayfunction.........................................................................................................................................28
Locatingaspecictitle(DVD).......................................................................................................................28
Locating a specic chapter/track ............................................................................................................. 28
Locatingaspecictime.............................................................................................................................28
Repeat Playback ...................................
..............................................................................................
...... 29
Repeatingachapter/title............................................................................................................................29
Repeatingasingletrack/wholedisc...........................................................................................................29
Repeatingaspecicsection(DVD)(CD)..................................................................................................29
DVD Programmable Playback .....
................................................................................................................
.. 30
Programmable memory ........................................................................................................... 30
Title/chapter programmed playback (DVD) .................................................................................. 30
Maintenance...........................................................................................................................................................31
TROUBLESHOOTING ............................................................................................................ 32 - 33
SPECIFICATIONS ......................................................................................................................... 34

5
PACKAGE CONTENTS
Makesureallofthefollowingcontentsareincluded.
TheseitemsareallyouneedtosetupandoperatetheLCDTVinitsbasicconguration.
Ifthereareanyitemsmissing,pleasecontactPartmaster(UKonly).
Tel:08706001338
LCDTV(L17LID648)
User’sManual
(P/N811-711791W040)
RemoteControl/AAAbatteriesx2
(P/N043-A55656W170)
YUVSCARTadaptor
(P/N138-RGB040W000)
QuickStartGuide
(P/N810-711795W040)
!
LINEOUTcable
(P/N122-000020W102)
PREPARATION CONNECTIONS USING THE FEATURES SPECIFICATIONTROUBLESHOOTING
USING THE DVD
FEATURES
PREPARATIONCONNECTIONSUSING THE FEATURES
USING THE DVD
FEATURES
TROUBLESHOOTINGSPECIFICATION
L17LID648
17” HD Ready Digital LCD TV
with Integrated DVD Player

6
Thisunitcanplayback:
TITLES, CHAPTERS AND TRACKS
• DVDsaredividedinto“titles”and“chapters”.Ifthe
disc has more than one movie on it, each movie
wouldbeaseparate“title”.“Chapters”aresections
oftitles.
• AudioCDsaredividedinto“tracks”.A“track”isusually
onesongonanAudioCD.
ICONS USED ON DVDS
Samplelcons
Note:
• WhenplayingbackaCD-G(Graphics)orCDEXTRA
disc,theaudioportionwillbeplayed,butthegraphic
imageswillnotbeshown.
DVDS
[8CM/12CM
DISC]
AUDIO CDS
[8CM/12CM
DISC]
CD-R/CD-RW
Compatible
REGION MANAGEMENT INFORMATION
RegionManagementInformation:ThisunitisdesignedandmanufacturedtorespondtotheRegionManagement
InformationthatisencodedonDVDdiscs.IftheRegionnumberprintedontheDVDdiscdoesnotcorrespondto
theRegionnumberofthisunit,thisunitcannotplaythatdisc.
Theregionnumberofthisunitis .
Note:
• Numbersidentifyeachtitle,chapter,andtrackonadisc.Mostdiscshavethesenumbersrecordedonthem,
butsomedonot.
Notes on Unauthorized Discs
YoumaynotbeabletoplaybacksomeDVDdiscsonthisunitiftheywerepurchasedfromoutsideyourgeographic
areaormadeforbusinesspurposes.
DISC FUNCTION OR OPERATION THAT IS NOT AVAILABLE
Whenthe symbolappearsonthescreen,itindicatesthatthefunctionoroperationattemptedisnotavailable
atthattime.ThisoccursbecausetheDVDdiscmanufacturerdeterminesthespecicfunctions.Certainfunctions
maynotbeavailableonsomediscs.BesuretoreadthedocumentationprovidedwiththeDVD.
NOTES ON COPYRIGHT
Itisforbiddenbylawtocopy,broadcast,show,broadcastoncable,playinpublic,orrentcopyrightedmaterial
withoutpermission.
ApparatusClaimsofU.S.PatentNos.6,836,549;6,381,747;7,050,698;6,516,132;and5,583,936licensedfor
limitedviewingusesonly.
ThisproductincorporatescopyrightprotectiontechnologythatisprotectedbyU.S.patentsandotherintellectual
propertyrights.UseofthiscopyrightprotectiontechnologymustbeauthorizedbyMacrovision,andisintended
forhomeandotherlimitedviewingusesonlyunlessotherwiseauthorizedbyMacrovision.Reverseengineering
ordisassemblyisprohibited.
DISC FORMATS
Languageselectionsforaudio
Languageselectionsforsubtitles
Screenaspectratio
Multiplecameraangles
Regioncodeindicator
PREPARATION CONNECTIONS USING THE FEATURES SPECIFICATIONTROUBLESHOOTING
USING THE DVD
FEATURES
PREPARATIONCONNECTIONSUSING THE FEATURES
USING THE DVD
FEATURES
TROUBLESHOOTINGSPECIFICATION

7
INSTALLATION
MOUNTING ON THE WALL
This unit is VESA-compliant, and is
designed to be wall-mounted with
a VESA-compliant 75mm x 75mm
mounting kit designed for flat-panel
TVs(soldseparately).Mountthisunit
according to the instructions included
inthemountingkit.
Note:
Removethebasestandbeforemounting
theunitonthewall.
INSTALLING / REMOVING THE BASE STAND
WARNING:TheLCDDisplayisveryfragile,andmustbeprotectedatalltimeswhenremovingthebasestand.Be
surethatnohardorsharpobject,oranythingthatcouldscratchordamagetheLCDdisplay,comesintocontact
withit.DoNOTexertpressureonthefrontoftheunitatanytimebecausethescreencouldcrack.
1. Disconnectallcablesorcordsconnectedtotheunit.
2. Laytheunitdownonaatsurfacewiththebacksidefacingup.Pleasemakesuretoplaceasoftcushioned
material(suchasapilloworthickpieceoffoam)beneaththescreen.
4. To remove the base stand, keep
pressing the locking area of the
basestandandpulldownwardsto
releasethebasestand.
3. Toinstallthebasestand,placethebasestandonthe
mountingslot,pushthestandtillitlocks.
75mm
75mm
PREPARATION CONNECTIONS USING THE FEATURES SPECIFICATIONTROUBLESHOOTING
USING THE DVD
FEATURES
PREPARATIONCONNECTIONSUSING THE FEATURES
USING THE DVD
FEATURES
TROUBLESHOOTINGSPECIFICATION

8
30˚ 30˚
5M
USING THE REMOTE CONTROL
• PointtheremotecontrolattheREMOTESENSORlocatedontheunit.
• Whenusingthisunitinaverybrightlylitarea,theinfraredREMOTECONTROLSENSORmaynotwork
properly.
• Therecommendedeffectivedistanceforusingtheremotecontrolisabout16feet
(5metres).
INSERTING BATTERIES IN THE REMOTE CONTROL
BATTERY REPLACEMENT
Whenthebatteriesbecomeweak,theoperatingdistanceoftheremotecontrolwillbegreatlyreducedandyou
willneedtoreplacethebatteries.
Note:
• Removethebatteriesfromtheremotecontrolwhenitisnottobeusedforalongperiod.Otherwiseitcould
causecorrosionorbatteryleakageandmayresultinphysicalinjuryand/orpropertydamageincludingre.
• Donotmixoldandnewbatteries.DonotmixALKALINE,standard(CARBON-ZINC)orrechargeable(NICKEL-
CADMIUM)batteries.
• Corrosion,oxidation,battery-leakageandanyothergraduallyacidicdefectofthisnaturewillinvalidatethe
guarantee.
• Whendiscardingbatteries,environmentalproblemsmustbeconsideredandlocalrulesorlawsgoverningthe
disposalofthesebatteriesmustbefollowedstrictly.
CAUTION:
Dangerofexplosionmayberesultedifbatteriesareincorrectlyreplaced.Replaceonlywiththesameorequivalent
type.
WARNING:
• Donotdisposeofbatteriesinareortheymayleakand/orexplode.
• Thebatteryshallnotbeexposedtoexcessiveheatsuchassunshine,reorthelike.
GETTING STARTED
+
_
+
_
1.Press and lift the back cover up to open the battery
compartmentoftheremotecontrol.
2. Insert two AAA size batteries. Make sure to match the
(+)and(–)endsofthebatterieswiththe(+)and(–)ends
indicatedinthebatterycompartment.Snapthecoverback
intoplace.
PREPARATION CONNECTIONS USING THE FEATURES SPECIFICATIONTROUBLESHOOTING
USING THE DVD
FEATURES
PREPARATIONCONNECTIONSUSING THE FEATURES
USING THE DVD
FEATURES
TROUBLESHOOTINGSPECIFICATION

9
1 2 3
4) Power Cord
5) PHONES jack
6) DVD VIDEO OUT jack
7) HDMI in jack
8) SCART jack (AV IN 2)
9) VIDEO IN jack (AV IN 1)
10) AUDIO IN jacks (Left/Right)
(AV IN 1)
11) TV Aerial port
LCD TV
FRONT VIEW
BACK VIEW
1) Speakers
2) Remote Sensor/ Standby
Indicator
•IndicateswhethertheunitisONorin
STANDBY(OFF)mode.
•AmberRedLightOn:
TheunitisinSTANDBY.
•AmberRedLightOff:
TheunitisturnedON.
• Donotblockthissensorortheremote
controlwillnotworkproperly.
3) Colour LCD Screen
7 910 1186
45
PREPARATION CONNECTIONS USING THE FEATURES SPECIFICATIONTROUBLESHOOTING
USING THE DVD
FEATURES
PREPARATIONCONNECTIONSUSING THE FEATURES
USING THE DVD
FEATURES
TROUBLESHOOTINGSPECIFICATION

10
13
12
14
16
18
15
17
19
20
21
LCD TV
SIDE VIEW
12) COMMON INTERFACE slot
13) / I button
Turnstheunitonandoff.
14) PLAY button
Presstostartorresumeplaybackofadisc.
15) MENU button
Presstodisplaytheon-screenTVmenu.
16) FUNCTION button
SelectDTV,TV,AV1,AV2/SCART,YUV/SCART,
DVDorHDMI.
17) CH buttons
Presstochange the TV channels and highlight
selections(Up&Down)onthemenuscreen.
button
Presstoselectprevioustitle,chapterortrackon
adisc.
button
Press to select next title, chapter or track on a
disc.
18) + VOL – controls
Adjustthevolumelevel.
19) Disc Door
Pushgentlytoclosethediscdoor.
20) button
Presstoopenthediscdoor.
21) Removable Stand
PREPARATION CONNECTIONS USING THE FEATURES SPECIFICATIONTROUBLESHOOTING
USING THE DVD
FEATURES
PREPARATIONCONNECTIONSUSING THE FEATURES
USING THE DVD
FEATURES
TROUBLESHOOTINGSPECIFICATION

11
REMOTE CONTROL
1) STANDBY/ON button
Press to turn ON the unit or press again to switch to
STANDBY(OFF)mode.
2) TV/DTV button
PresstoswitchtoTV/DTVmode.
3) DVD button
PresstoswitchDVDmode.
4) Number (0 - 9) buttons
UsetochangetheTV/DTVchannels.
5) REVEAL button
Presstorevealanswersonaquizorgamepagesfrom
Teletext.
6) MUTE button
Presstomutethesound.
Pressagaintocancelmute.
7) VOLUME + / – buttons
Presstoadjustthevolumelevel.
8) buttons
Allowyoutohighlightselection,adjustsettingandconrm
selectiononthemenuscreen.
9) MIX :Press to select Teletext with a TV
programme.
:Fastreverseplayback.
EXIT :Presstoexitthemenuandreturndirectly
tonormalviewing.
:Fastforwardplayback.
10) HOLD : Presstostoptheautomaticpagechange
fromTeletext.
: Presstoselectprevioustitle,chapteror
trackonadisc.
11) ANGLE button
Presstoswitchthecameraangleofthevideopresentation
whensceneswithmultiplecameraanglesarerecorded
onaDVD.
SIZE button
Presstosettheletterssizeofteletextonthescreen.
12) SUBTITLE button
Presstoselectoneofthesubtitlelanguagesprogrammed
onaDVD/DTV.
13) TITLE Button
PresstoselectthetitlemenuscreeninDVDmode.
14) GOTO button
Press to skip directly to a specic location on a DVD/
CD.
15) button
PresstoselectMono/StereoorDualI/DualII.
16) TEXT button
PresstoentertheTeletextmode.
PressagaintoexitTeletextmode.
17)
TIME button
EnterandexittheTIMEmenu.
18) SLEEP button
PresstosettheSLEEPtimer.TheunitwillremainON
for the time that is set, and will automatically shut off
afterwards.
19) MEMORY button (red button)
Pressto perform title/chapterprogrammedplayback in
DVDmode.
20) CLEAR button (green button)
Presstoclearinputselectionsandcancelcertainplayback
functions.
21) REPEAT A-B button (yellow button)
Press to perform point-to-point repeat
playbackonaDVDorCD.
REPEAT DISC button (blue button)
Repeatchapter/titleofaDVD.
RepeatsingletrackorwholeCD.
PREPARATION CONNECTIONS USING THE FEATURES SPECIFICATIONTROUBLESHOOTING
USING THE DVD
FEATURES
PREPARATIONCONNECTIONSUSING THE FEATURES
USING THE DVD
FEATURES
TROUBLESHOOTINGSPECIFICATION

12
REMOTE CONTROL
22) FUNCTION button
PresstoswitchbetweenDTV,TV,AV1,AV2/SCART,
YUV/SCART,DVDorHDMI.
23) RADIO button
Presstoselectdigitalradioprogrammes.Pressagainto
exittonormalDTVprogrammesmode.
24) AV button
PresstoselectsourceconnectedtoAV1,AV2/SCART,
YUV/SCARTorHDMI.
25) LAST CH button
Presstoswitchrepeatedlybetweenthelasttwochannels
displayed.
26) TV MENU button
Presstodisplaytheon-screenTVmenu.
27) CH/PAGE / buttons
- PresstochangetheTV/DTVchannels.
- PresstogoforwardorbackwardthepageofTeletext
screeninTVmode.
- PresstogoforwardorbackwardthepageofProgramme
Edit&FavouriteinTV/DTVmode.
28) FAV :Press to display the favourites
programmesinTV/DTVmode.(You
should setup your favourite TV/
DTV channels in Programme Edit
menu.
:Presstoselectnexttitle,chapteror
trackonadisc.
29) :Presstostopplayingadisc.
LIST :Presstodisplaythechannellistin
TV/DTVmode.
:Presstostartandresumeplayback
ofadisc.
GUIDE:Press to display the Electronic
Programme Guide (EPG) in DTV
mode.
:Presstopauseplaybackandsingle
frameadvance.
INFO :Press to display the channel
informationinDTVmode.
30) SLOW :Press to play a DVD in slow-
motion.
INDEX :Presstoselectthepagenumberof
theindexfromTeletext.
31) AUDIO button
PresstoselectaudiosoundtracksofaDVDorchange
theoutputmodeofaCD.
CANCEL button
PresstocanceltheTeletextmenu.
32) DVD MENU button
Press to enter the main menu of the disc you are
watching.
33) SETUP button
Presstoenter and exit the SETUP menu of the DVD
player.
34) SOUND button
Presstoselectfrompresetsoundsettings(Standard,
Music,Theatre,Voice,Personal)tomatchthetypeof
showyouarewatching.
35) DISPLAY button
Presstochangediscstatusinformationdisplayedonthe
screen.
36) PICTURE button
Press to select from preset screen display settings to
match the type of show you are watching (Standard,
Movie,Dynamic,Soft,Personal).
37) LCD MODE button
PresstosetthesizeofLCDdisplaybetweenAuto,16:9,
4:3,Expand,Zoom,LCDOff.LCDOffcanbeselected
whenlisteningtodigitalradio.
38) RED/GREEN/YELLOW/BLUE button
PresstoselecttherelevantpagequicklyfromTeletext.
PREPARATION CONNECTIONS USING THE FEATURES SPECIFICATIONTROUBLESHOOTING
USING THE DVD
FEATURES
PREPARATIONCONNECTIONSUSING THE FEATURES
USING THE DVD
FEATURES
TROUBLESHOOTINGSPECIFICATION

13
CONNECTING A TV AERIAL/CABLE/SATELLITE
To view television channels correctly, a signal must be
receivedfromoneofthefollowingsources:
-Anindoororoutdooraerial
-Acablesystem
-Asatellitesystem
Note:
Forreceivingover-the-airTVbroadcasts,werecommend
thatyouuseanexternalxedaerial.Shouldyourequire
the use of a temporary aerial, please ensure that you
purchaseanaerialwithsufcientabilitytoreceiveinweak
signalareas. Onlywhen youarein closeproximityto a
transmitterwillatemporaryaerialreproduceasignalas
stronglyasaxedaerial.
CONNECTING A POWER CORD
• ConnecttheACpowercordintoawalloutlet.
• Pressthe / Ibuttonontheunitorremotecontrolto
turnontheunit.
Note:
• BesuretheACpowercordisdisconnectedandtheTV
isswitchedoffbeforemakingconnections.
• Make sure that all the components are connected
correctly.
• Whenyouarenotgoingtousetheunitforalongperiod
oftime,disconnectthepowercord.
• The apparatus should not be exposed to dripping or
splashingandthatnoobjectslledwithliquids,suchas
vases,shouldbeplacedonapparatus.
• Themainsplugis used as the disconnecting device.
Itshouldremainreadilyaccessibleandshouldnotbe
obstructedduringuse.Tobecompletelydisconnectedfromthesupplymains,themainsplugoftheapparatus
shouldbedisconnectedfromthemainssocketoutletcompletely.
CONNECTIONS
COMMON INTERFACE
TheunitisequippedwithaCIslot.TheCIslotallowsyoutoinsertaCAM(ConditionalAccessModule)withan
appropriatesubscriptioncardforsomepayforviewservices.
It is required to subscribe to a pay channel company to view the pay channels of the Digital Terrestrial
broadcasting.
FullyinserttheCAM(ConditionalAccessModule)intotheCI(CommonInterface)slotonthebottomoftheunit
withitslabelsidefacingyou.
Important notes:
• SwitchofftheTVandunplugfromtheACpowermainsbeforeinsertorremovetheCAM.
• TheCAMshouldbecorrectlyinserted,itisimpossibletoinsertfullyifreversed.TheCAMortheTV
terminal may be damaged if the CAM is forcefully inserted.
• Some CAMs may require setting up. Refer to the module instruction manual for details of the
settings.
PREPARATION CONNECTIONS USING THE FEATURES SPECIFICATIONTROUBLESHOOTING
USING THE DVD
FEATURES
PREPARATIONCONNECTIONSUSING THE FEATURES
USING THE DVD
FEATURES
TROUBLESHOOTINGSPECIFICATION
Satellite, Cable, or TV aerial cable
to TV AERIAL CABLE Terminal
(cable not included)
TV
AERIAL

14
VIDEO OUT
DVD
CONNECTING TO DEVICES WITH A COMPOSITE (YELLOW RCA-TYPE)
VIDEO OUTPUT
ToconnecttoA/VdevicessuchasaVCR,camcorderorvideogamesystem.
- Connect to a VCR / Video Game System
/ Camcorder
ConnecttheAUDIO/VIDEOcable(notincluded)
asshown.
Makesureyouconnectthecablefromtheother
equipment(AUDIOandVIDEO OUT)tothisunit
(AUDIOandVIDEO IN).PresstheFUNCTIONor
AVbuttontoselectAV1mode.
Note:
Please refer to the user manual for the other
equipmentformoreinformation.
ToAUDIO/
VIDEOOUTjacks
ToAUDIO/
VIDEOIN
jacks
(AV IN 1)
CONNECTIONS
CONNECTING TO SOURCES WITH SCART
DeviceswithRGBoutputmustbeconnectedto
theSCARTinput:
Connects the SCART from the source to the
correspondingSCARTonthisunit(SCARTcable
notincluded)asshown.
Make sure you connect both to SCART to
SCART.
To operate the connected device and play the
source,rstpresstheFUNCTIONorAVbutton
toselecttheAV2/SCARTmode.
SCART
CABLE If your VCR permits, then
connect your aerial to your
VCR and VCR RF to your
TV
CONNECTING DEVICES WITH A VIDEO INPUT
ConnecttheAUDIOcable(included)andVIDEO
cable(notincluded)asshown.
Makesureyouconnectthecablefromtheother
equipment (AUDIO and VIDEO IN) to this unit
(Headphone jack and VIDEO OUT). Press the
FUNCTIONorDVDbuttontoselectDVDmode.
Note:
Please refer to the user manual for the other
equipmentformoreinformation.
VIDEO
CABLE AUDIOCABLE
PREPARATION CONNECTIONS USING THE FEATURES SPECIFICATIONTROUBLESHOOTING
USING THE DVD
FEATURES
PREPARATIONCONNECTIONSUSING THE FEATURES
USING THE DVD
FEATURES
TROUBLESHOOTINGSPECIFICATION
TV
AERIAL

15
CONNECTIONS
Note:
WhenconnectingaDVDplayertothetelevision,thepictureresolutionisdependentupontheresolution
ofboththeDVDplayerandtheTV.Forbestresults,selectthehighestresolutionoftheDVDuptothe
TVmaximumof1080psuchasforBlu-rayplayer.
CONNECTING A HIGH-DEFINITION (HD) SOURCE (YUV)
High-Denition(HD)DeviceswithcomponentvideooutputmustbeconnectedtotheYUVinput.
Connectthecomponentvideocableandaudiocable(notincluded)asshown.
MakesureyouconnecttheYUVScartadaptortothisunit,thenconnectcomponentvideocableand
audiocablefromtheotherequipment(COMPONENT VIDEO OUTandAUDIO OUT)tothisunit(SCART
andAUDIO IN).
Tooperatetheconnecteddeviceandplaythesource,rstpresstheFUNCTIONbuttontoselectthe
YUV/SCARTmode.
* May require a subscription for
receiving HD channels. Check
with your cable/satellite service
providerfordetails.
ToAUDIO
INjacks
ToAUDIOOUTjacks
YUVSCART
adaptor
(included)
ToCOMPONENT
VIDEOOUTjacks
ToSCART
jacks
PREPARATION CONNECTIONS USING THE FEATURES SPECIFICATIONTROUBLESHOOTING
USING THE DVD
FEATURES
PREPARATIONCONNECTIONSUSING THE FEATURES
USING THE DVD
FEATURES
TROUBLESHOOTINGSPECIFICATION

16
DolbyDigitalisasoundsystemdevelopedbyDolbyLaboratoriesInc.Thisunitautomaticallyrecognizes
DVDsthathavebeenrecordedwithDolbyDigital.
NotallDolbyDigitalsourcesarerecordedwith6channels.
SomesourcesmarkedDolbyDigitalmayberecordedinDolbySurround,a2channelsystem.Lookfor
thislogoonyourunit.
ManufacturedunderlicensefromDolbyLaboratories.
‘Dolby’andthedouble-DsymbolaretrademarksofDolbyLaboratories.
DOLBY DIGITAL (FOR DVD)
USING HEADPHONES
• Turn down the volume before connecting
headphonestotheunit,thenadjustthevolume
toyourdesiredlevel.
• When headphones are connected, no sound
willcomefromthefrontspeakers.
Note:
• Avoid listening to sound at high levels for
prolongedperiodsoftime.Thismaybeharmful
toyouandmaycausehearingloss. Earphones / Headphones
(1/8”[3.5mm]diameterplug)
CONNECTING HDMI
HDMI(HighDenitionMultimediaInterface)supportsbothvideoandaudioonasingledigitalconnection
forusewithDVDplayers,DTV,set-topboxesandotherdigitalAVdevices.HDMIwasdevelopedto
providethetechnologiesofHighBandwidthDigitalContentProtection(HDCP)aswellasDigitalVisual
Interface(DVI)inonespecication.HDCPisusedtoprotectdigitalcontenttransmittedandreceived
byDVI-compliantorHDMI-compliantdisplays.
HDMIhasthecapabilitytosupportstandard,enhancedorhigh-denitionvideoplusstandardtomulti-
channelsurround-soundaudio.HDMIfeatureincludeuncompresseddigitalvideo,oneconnector(instead
ofseveralcablesandconnectors),andcommunicationbetweentheAVsourceandAVdevicessuch
asDTVs.
CONNECTIONS
HDMI, the HDMI logo and High-
DenitionMultimediaInterfacearetrademarksor
registeredtrademarksofHDMIlicensingLLC.
Connect the HDMI cable (not included) as
shown.
Make sure you connect the cable from the
equipment(HDMI OUT)tothisunit(HDMI IN).
To operate the connected device and play the
source,rstpresstheFUNCTIONbuttontoselect
theHDMImode.
ToHDMI
OUTjack
ToHDMIIN
jack
PREPARATION CONNECTIONS USING THE FEATURES SPECIFICATIONTROUBLESHOOTING
USING THE DVD
FEATURES
PREPARATIONCONNECTIONSUSING THE FEATURES
USING THE DVD
FEATURES
TROUBLESHOOTINGSPECIFICATION

17
TURNING THE UNIT ON
WhentheACpowercordisconnected,thestandbyindicatorlightson.Pressthe / Ibuttontoturn
theuniton,thestandbyindicatorwillblinkforabout10secondsforloading,andwillnallylightoffuntil
theabovescreensshown.PresstheFUNCTIONbuttontoselectthedesiredmode(DTV,TV,AV1,
AV2/SCART,YUV/SCART,DVDorHDMI).IfyouselectDVDmode,theDVDlogowillappearonthe
screen.
Note:
Whentheunitisnotgoingtobeusedforalongtime,disconnecttheACpowersupplycordfromAC
outlet.
TURNING THE UNIT ON FOR THE FIRST TIME
Thersttimeyouturntheuniton,itwillgostraightintoAutoscanmode.Simplyfollowthescreen
promptsasbelowtotuneinthechannels.
1.Usethe / buttontoselectthescreenmenulanguageyouprefer.
2.Use the button to move to Auto Tuning, press the ENTER/OK button to enter Auto Tuning
menu.
3.Usethe / buttontoselecttheCountryyouarein.
4.Use the button to move to Start. Press the ENTER/OK button conrm Start. The system will
automaticallystarttoscanandpresetallavailableprogrammes.
5.Afterscanninghasnished,theTVwilldisplaytherstprogrammesstoredofDTVprogramme.
BASIC OPERATION
PREPARATION CONNECTIONS USING THE FEATURES SPECIFICATIONTROUBLESHOOTING
USING THE DVD
FEATURES
PREPARATIONCONNECTIONSUSING THE FEATURES
USING THE DVD
FEATURES
TROUBLESHOOTINGSPECIFICATION

18
TV SETTING (only in ATV or DTV or RADIO mode)
1. PresstheFUNCTIONorTV/DTVbuttontoselectDTV/TV
mode; or press RADIO button to select DTV digital radio
programmes.
2. PresstheTV MENUbutton.
3. Usethethe or buttontoselecttheTVSetting.
4. Usethe or buttontoselecttheoptions(Auto Tuning,
DTV Manual Tuning, ATV Manual Tuning, Programme
Edit, CI Information),presstheENTER/OKbuttontoenter
thesettings.
5. PresstheTV MENUbuttontoreturntopreviousmenu,repeat
step4toadjustothersettings.
6. Toexitthesetupmenuandreturntothenormalscreen,press
theEXITbutton.
• AutoTuning:Automaticallyscan,sortandstoreallavailableprogrammes.
• DTVManualTuning:PerformmanualsearchforDTV(DigitalTV)programmes.
• ATVManualTuning:PerformmanualsearchandnetuneforATV(AnalogTV)programmes.
• ProgrammeEdit:AllchannelsstoredarelistedintheProgrammeEditmenu,youcaneditthechannels
bythefollowingsteps:
• CIInformation
DisplayCAMandSmartcardinformation;selectthelanguageifavailable.
TV / DTV / RADIO SETUP
1. Usethe or buttontoselectachannel.(PresstheCH/PAGE / buttontoskiptoprevious/next
page.)
2. PresstheRED / GREEN / YELLOW / BLUEbuttonortheFAVbuttontoeditthechannel.
• DELETE
PresstheREDbuttontodeletetheselectedchannel,presstheENTER/OK
buttontoconrm.PresstheTV MENUbuttontostopdelete.
• RENAME (for ATV mode only)
PresstheGREENbuttontorenametheselectedchannel.Usethe or
buttontoselectthecharacterstorepresentthestationname,usethe or
buttontomovethenextpositionofcharacter,presstheTV MENUbuttonto
conrm.
• MOVE (for ATV mode only)
PresstheYELLOWbuttonandusethe or buttontomovetheselected
channel,thenpresstheTV MENUbuttontoconrm.
• SKIP
PresstheBLUEbuttontoskipornotskiptheselectedchannel.
• FAV (Favourite)
PresstheFAVbuttontosetorcanceltheselectedchannelasoneofthefavouriteprogrammes.
BCC ONE
BCC TWO
Discovery
PREPARATION CONNECTIONS USING THE FEATURES SPECIFICATIONTROUBLESHOOTING
USING THE DVD
FEATURES
PREPARATIONCONNECTIONSUSING THE FEATURES
USING THE DVD
FEATURES
TROUBLESHOOTINGSPECIFICATION

19
BBC ONE
BBC ONE
BBC TWO
five
BBC THREE
QVC
UK Gold
Breakfast
Breakfast
No Info.. Arth..
Mio..Old ..No In..
Arthur No Information
No Information
Casual & Co QVC Outlet
Closedown
No Information
This is BBC THREE
Best of Friend s
Animal 24:7 Homes Under the..
• Programmetimeandnamewillbedisplayed,usethe buttonselectaprogramme,press
theINFObuttontodisplaydetailedinformationifavailable.PresstheINFObuttonagaintoreturn.
• PresstheYELLOWbuttontohighlightprogrammedate,usethe / buttontodisplayinformation
forotherdates.PresstheYELLOWbuttonagaintoreturn
• PresstheENTER/OKbuttontoconrmtheselectedchannel.
• PresstheEXITbuttontoexittheElectronicProgrammeGuide(EPG)menu.
Note:
GuideinformationdisplaymaybedifferentaccordingtotheDTVprogrammes.
• Usethe or buttontoselectanaudiolanguageoraudio
formatifavailable,pressthe or buttontoselectsoud
trackbetweenL/R(Stereo),L/L(MonoLeft)andR/R(Mono
Right).PresstheENTER/OKbuttontoconrm.
• Pressthe orEXITbuttontoexittheAudioLanguage
menu.
Note:
For analogue TV, press the button to select Mono /
StereoorDualI/DualIIdirectly.
AUDIO LANGUAGE FOR DTV
WhilewatchingaDTVprogramme,youcanpressthe
buttontodisplaytheAudioLanguagemenu,andselectaudio
language,audioformatandsoundtrack.
ELECTRONIC PROGRAMME GUIDE (EPG) FOR DTV
WhilewatchingaDTVprogramme,youcanpresstheGUIDEbuttontodisplaytheElectronicProgramme
Guide(EPG)menu,andcheckforprogrammeinformation.
TV / DTV / RADIO SETUP
PREPARATION CONNECTIONS USING THE FEATURES SPECIFICATIONTROUBLESHOOTING
USING THE DVD
FEATURES
PREPARATIONCONNECTIONSUSING THE FEATURES
USING THE DVD
FEATURES
TROUBLESHOOTINGSPECIFICATION

20
PICTURE MENU
1. PresstheTV MENUbutton.
2. Usethe or buttontoselecttheoptions(PictureMode,
Contrast,Brightness,Colour,Sharpness,Tint,Colour
Temp),adjustthembyusingthe or button.
3. PresstheTV MENUbuttontoreturntopreviousmenu.
4. Toexitthesetupmenuandreturntothenormalscreen,
presstheEXITbutton.
• PictureMode
Select from four preset screen display settings
(Standard, Movie, Dynamic and Soft), or select
Personal in which your own settings of Contrast,
Brightness,ColourandSharpnessarestored.
YoucanalsoselectPictureModesimplybypressingthePICTUREbuttonontheremotecontrol.
• Contrast
Adjustthecontrastofthepicture.Theblackportionsofthepicturebecomericherindarknessand
thewhitebecomebrighter.
• Brightness
Adjustthebrightnessofthepicture.
• Colour
Adjustthecolourofthepicture.
• Sharpness
Adjustthesharpnessleveltoimprovedetailinthepicture.
• Tint(only for AV mode with NTSC signal)
Adjustthetintofthepicture.(Towardpurple/Towardgreen).
• ColourTemp
Selectthecolourtemperatureofthepicture.SelectNormal(balanced)/Warm(redwhite)/Cold(blue
white)mode.
TV / DTV / RADIO SETUP
SOUND MENU
1. PresstheTV MENUbutton.
2. Usethe or buttontoselecttheSOUND.
3. Usethe or buttontoselecttheoptions(Sound
Mode, Treble, Bass, Balance), adjust them by
usingthe or button.
4. PresstheTV MENUbuttontoreturntopreviousmenu.
5. To exit the setup menu and return to the normal
screen,presstheEXITbutton.
Experiment with different sound settings until you
find the settings you prefer.
• SoundMode
Select from four preset sound settings (Standard,
Music, Theatre and Voice), or select Personal in which your own settings of Treble, Bass and
Balancearestored.
YoucanalsoselectSoundModesimplybypressingtheSOUNDbuttonontheremotecontrol.
• Treble
Adjustthetreblerange.
• Bass
Adjustthebassrange.
• Balance
Adjustthebalanceleveltowardtheleftorrightspeakers.
PREPARATION CONNECTIONS USING THE FEATURES SPECIFICATIONTROUBLESHOOTING
USING THE DVD
FEATURES
PREPARATIONCONNECTIONSUSING THE FEATURES
USING THE DVD
FEATURES
TROUBLESHOOTINGSPECIFICATION
Table of contents
Other Logik TV manuals

Logik
Logik LCXW32HD1 User manual

Logik
Logik L26DVDB20 User manual

Logik
Logik L22FEDV12 User manual

Logik
Logik L26FE12 User manual

Logik
Logik L323CD11 User manual

Logik
Logik L423ED11 User manual

Logik
Logik L23IP11 User manual

Logik
Logik LCX17LN2 User manual

Logik
Logik L323ED11 User manual

Logik
Logik LOG32LW782 User manual

Logik
Logik LCXW30NN6 User manual

Logik
Logik L24FE13 User manual

Logik
Logik LCXW19LN2D User manual

Logik
Logik L26DVDB21 User manual

Logik
Logik L423CD11 User manual

Logik
Logik L32LW783 User manual

Logik
Logik L22FEDN12 User manual

Logik
Logik L32HED12 User manual

Logik
Logik L26FE12I User manual

Logik
Logik L19HE12 User manual