Logik L32HED12 User manual

32” HD Ready LED TV
with DVD Player
Instruction Manual
L32HED12
L32HED12_IB_Running Change_120613_Annie.indd 1 12年6月13日 下午6:58

L32HED12_IB_Running Change_120613_Annie.indd 2 12年6月13日 下午6:58

Contents
Preparation.........................................................................................................................................................................................5
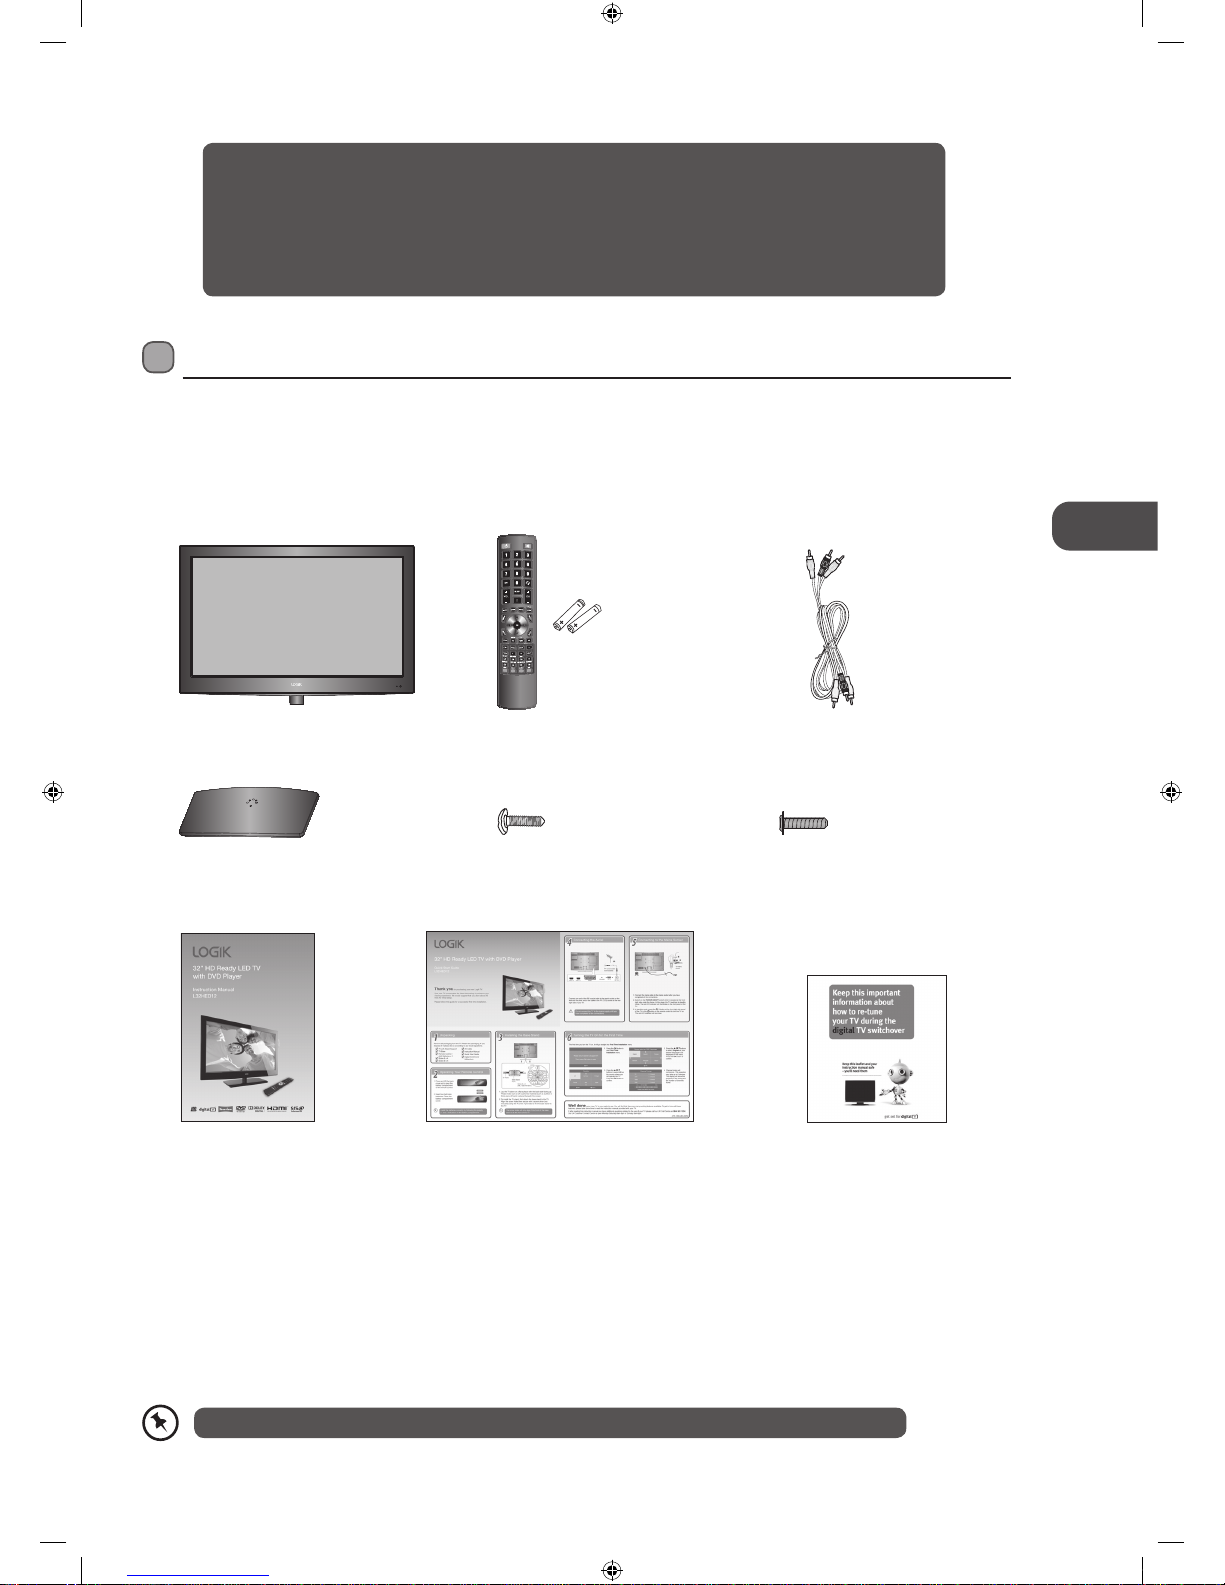
Unpacking the TV ...............................................................................................................................................................................................................5
Installing / Removing the Base Stand .........................................................................................................................................................................6
Front / Right Side View and Controls...........................................................................................................................................................................7
Rear View and Sockets......................................................................................................................................................................................................8
Installing Batteries in the Remote Control ................................................................................................................................................................9
Remote Control Operation Range................................................................................................................................................................................9
Remote Control .................................................................................................................................................................................................................10
Connections......................................................................................................................................................................................13
Making Video and Audio Connections.....................................................................................................................................................................13
Connecting an AV Device Using an HDMI Cable...................................................................................................................................................13
Connecting a Computer Using a VGA Cable ..........................................................................................................................................................14
Connecting an AV Device Using a Component (YPbPr) Cable ........................................................................................................................14
Connecting an AV Device Using a SCART Cable ...................................................................................................................................................15
Connecting an AV Device Using Composite Cable ..............................................................................................................................................15
Connecting a Coaxial Audio Receiver Using an Audio Cable...........................................................................................................................16
Initial Setup ......................................................................................................................................................................................17
Turning the TV On for the First Time .........................................................................................................................................................................17
− Target Region Setting.........................................................................................................................................................................................18
− Selecting the Input Source................................................................................................................................................................................18
− Channel Selection ...............................................................................................................................................................................................19
− Display Channel Information ...........................................................................................................................................................................19
− Volume Adjustment.............................................................................................................................................................................................19
Customising TV Settings .................................................................................................................................................................20
Channel Setting (TV, DTV or Radio Mode).............................................................................................................................................................. 20
− Auto Tuning ........................................................................................................................................................................................................... 20
− DTV Manual Tuning (DTV Mode).....................................................................................................................................................................21
− ATV Manual Tuning (ATV Mode)......................................................................................................................................................................21
− Channel Edit (DTV Mode).................................................................................................................................................................................. 22
− Channel Edit (ATV Mode).................................................................................................................................................................................. 23
− Signal Information (DTV Mode)...................................................................................................................................................................... 24
− CI (Common Interface) (DTV Mode).............................................................................................................................................................. 24
− Software Update (Over Air Download) (DTV Mode)............................................................................................................................... 25
− Software Update (USB)...................................................................................................................................................................................... 26
Picture Setting .................................................................................................................................................................................................................. 26
Sound Setting ................................................................................................................................................................................................................... 28
− Stereo / Dual Sound Reception (ATV Mode).............................................................................................................................................. 29
− Speaker Sound Output Selection (DTV Mode)......................................................................................................................................... 29
Time Settings..................................................................................................................................................................................................................... 29
Option Setting ...................................................................................................................................................................................................................31
− OSD Language.......................................................................................................................................................................................................31
− TT Language...........................................................................................................................................................................................................31
− Audio Language (DTV Mode).......................................................................................................................................................................... 32
− Subtitle Language (DTV Mode)...................................................................................................................................................................... 33
− Hearing Impaired................................................................................................................................................................................................. 33
− PVR File System (DTV Mode)............................................................................................................................................................................ 34
− Aspect Ratio........................................................................................................................................................................................................... 35
− Blue Screen ............................................................................................................................................................................................................ 36
− Backlight ................................................................................................................................................................................................................. 36
− HDMI CEC (Consumer Electronics Control) (HDMI Mode).................................................................................................................... 37
− Restore Factory Default..................................................................................................................................................................................... 38
Lock Setting ....................................................................................................................................................................................................................... 38
− Lock System........................................................................................................................................................................................................... 38
− Set Password ......................................................................................................................................................................................................... 39
− Block Channel ....................................................................................................................................................................................................... 40
− Parental Guidance ................................................................................................................................................................................................41
− Key Lock .................................................................................................................................................................................................................. 42
L32HED12_IB_Running Change_120613_Annie.indd 3 12年6月13日 下午6:58

Using the Features ...........................................................................................................................................................................43
EPG (Electronic Programme Guide) (DTV Mode)................................................................................................................................................. 43
− Switch On / O EPG............................................................................................................................................................................................. 43
− Select a Programme ........................................................................................................................................................................................... 43
Teletext (ATV Mode)........................................................................................................................................................................................................ 44
− To Turn on Teletext Function...........................................................................................................................................................................44
Digital Teletext (DTV Mode)......................................................................................................................................................................................... 45
− Teletext within Digital Service........................................................................................................................................................................ 45
Entertainment ..................................................................................................................................................................................46
Connecting a USB Storage Device............................................................................................................................................................................. 46
Viewing Photos................................................................................................................................................................................................................. 46
Listening to Music............................................................................................................................................................................................................ 47
Viewing Movies ................................................................................................................................................................................................................ 48
My Text................................................................................................................................................................................................................................. 49
PVR (Personal Video Recorder).......................................................................................................................................................50
Time Shift Function (DTV Mode)................................................................................................................................................................................ 50
Recording DTV Programme onto a USB Storage Device ...................................................................................................................................51
Timer Programming ....................................................................................................................................................................................................... 52
Play Recorded Programme .......................................................................................................................................................................................... 53
Using the DVD Features...................................................................................................................................................................54
Using the Built-in DVD Player...................................................................................................................................................................................... 54
Compatible Disc Types .................................................................................................................................................................................................. 54
− Supported Formats............................................................................................................................................................................................. 54
− Region Code .......................................................................................................................................................................................................... 54
Basic DVD Playback Functions.................................................................................................................................................................................... 55
Playing Multimedia Discs.............................................................................................................................................................................................. 57
Using the DVD Language Setup Page...................................................................................................................................................................... 58
Using the DVD Screen Setup Page ............................................................................................................................................................................ 59
Using the DVD Audio Setup Page.............................................................................................................................................................................. 60
Using the DVD Custom Setup Page .......................................................................................................................................................................... 60
Using the DVD Exit Setup Mode Page ......................................................................................................................................................................61
Maintenance.....................................................................................................................................................................................62
Hints and Tips...................................................................................................................................................................................63
Display Modes ..................................................................................................................................................................................65
YPbPr Mode ....................................................................................................................................................................................................................... 65
PC Mode .............................................................................................................................................................................................................................. 65
HDMI Mode ....................................................................................................................................................................................................................... 65
Specifications ...................................................................................................................................................................................66
Safety Warnings ...............................................................................................................................................................................68
L32HED12_IB_Running Change_120613_Annie.indd 4 12年6月13日 下午6:58

GB
5
Preparation
Preparation
Unpacking the TV
Remove all packaging from the TV. Retain the packaging. If you dispose of it please do so according to local regulations.
The following items are included:
Screw A x 4
(P.N.: 100-014-4011)
Screw B x 4
(P.N.: 104-114-4031)
AV Cable
(P.N.: 617-151-1230)
Remote Control / AAA Batteries x 2
(P.N.: 845-055-00B01 & 413-100-0007)
Instruction Manual
(P.N.: 002-B55-LOGIK)
Quick Start Guide
(P.N.: 002-L38-LOGIK)
Digital TV Switchcover Addendum
(P.N.: 002-I00-LOGIK)
Thank you for purchasing your new Logik 32" HD Ready LED TV with DVD Player.
Your new TV has many features and incorporates the latest technology to enhance your viewing
experience. We recommend that you spend some time reading this instruction manual so that you fully
understand these features. You will also find some hints and tips to help you resolve any issues.
Read all the safety instructions carefully before use and keep this instruction manual for future reference.
If items are missing, or damaged please contact Partmaster (UK only). Tel: 0844 800 3456 for assistance.
Video
Video
R
R
L
L
TV with Stand Support
TV Base
(P.N.: 154-700-EA3273)
L32HED12_IB_Running Change_120613_Annie.indd 5 12年6月13日 下午6:58

GB
6
Preparation
4. To remove the stand assembly, untighten the 4 screw
B holding the stand assembly to the rear of the TV.
Slide the stand assembly out.
5. Mounting on the wall. This TV is designed to be
wall-mounted with a standard 200 mm x 100 mm
mounting kit (sold separately) designed for flat-panel
TVs. Mount this TV according to the instructions
included in the mounting kit. Due to space restrictions,
we recommend that you make all connections (refer to
page 13-16 and page 46 for details) before mounting
on to the wall.
1. Disconnect all cables connected to the TV.
2. Lay the TV down on a flat surface with the back side facing up. Please make sure a soft cushioned material (such as a pillow or
thick piece of foam) is placed beneath the screen.
3. To install the TV stand, first attach
the base stand to the TV by using
screw A. Align the screw holes
then secure with a screw driver
(not included) using the 4 screw A
provided to fix the base stand to
the TV.
Installing / Removing the Base Stand
200 mm
100 mm
Four mounting holes
(size M5 screw)
The screw holes will
only align if the front
of the base stand is at
the front of the TV.
The LCD display is very fragile, and must be protected at all times when installing and removing the base stand. Be
sure that no hard or sharp object, or anything that could scratch or damage the LCD display, comes into contact with it.
DO NOT exert pressure on the front of the TV at any time because the screen could crack.
• Please read this instruction manual carefully while setting up your TV.
• If you require additional assistance please call our UK Call Centre on 0844 561 1234. Our UK
Customer Contact Centre is open Monday-Saturday 8am-8pm or Sunday 8am-6pm.
Keep all the spare screws should you want
to use the stand assembly option.
Remove the stand assembly before mounting the TV onto the wall.
Screw A x 4
(P.N.: 100-014-4011)
Screw B x 4
(P.N.: 104-114-4031)
TV Front Base Stand
Front
screw
unscrew
L32HED12_IB_Running Change_120613_Annie.indd 6 12年6月13日 下午6:58

GB
7
Preparation
Front / Right Side View and Controls
Item Description
1POWER LED
Illuminates blue when the TV is turned on. Illuminates red when the TV is in standby
mode. The LED will alternatively flash red and blue when the timer programming has
started in the standby mode.
2IR (Infrared Receiver) Receives IR signals from the remote control.
Do not put anything near the sensor, as its function may be affected.
3 Disc Slot Insert the disc with the label side facing towards the rear of the TV. (12 cm discs only.
Don't insert 8 cm discs.)
4 Press to eject disc. (DVD mode)
5 Press to start playback or pause. (DVD mode)
6 VOL + / – Adjusts the volume.
Press to select and adjust a setting in the OSD menu.
7 CH + / – Press to select a channel or select a sub-menu from the OSD menu.
8MENU Displays the OSD (on screen display) menu.
9 SOURCE
Press to select among different input signal sources:
DTV / ATV / DVD / AV / SCART / YPBPR / HDMI1 / HDMI2 / HDMI3 / PC / USB.
Confirmed the selection on OSD menu.
10 / I Switches the TV on from standby mode.
Switches the TV back to standby mode.
6
7
3
4
5
8
9
10
1 2
L32HED12_IB_Running Change_120613_Annie.indd 7 12年6月13日 下午6:58

GB
8
Preparation
Rear View and Sockets
Socket Description
1POWER ON/OFF Switches on the POWER ON/OFF switch to turn the TV to standby mode.
2 HDMI1 / 2 / 3 Connects to a High-Definition (HD) signal output device, such as a set-top box, blu-ray
disc player or AV receiver.
3 SCART Connects to a VCR, DVD Player, or other AV device with a SCART output socket.
4 PC IN / PC AUDIO Connects to a computer or other devices with a VGA interface.
5 RF Connects to the aerial socket on the wall with the RF coaxial cable.
6 Y, PB, PR / AUDIO (L/R) Connects to a DVD player, Digital Set-Top-Box, or other AV devices with component
(YPbPr) video and audio output sockets.
7 VIDEO / AUDIO (L/R) Connects to the Composite VIDEO and AUDIO (L/R) output sockets on external video
devices.
8 CI (Common Interface) Slot Allows the insertion of a Common Access Module. (Refer to page 24 for details.)
9 USB Allows the insertion of a USB storage device to play video, audio, photo and text files
(USB mode) and record DTV programmes on to a USB storage device.
10 DIGITAL AUDIO OUT
(COAXIAL) Connects to the audio socket on the digital/standard 5.1 audio system.
2 43 5
1
DIGITAL
AUDIO OUT
(COAXIAL)
USB
OUTPUT 5V 500mA
HDMI3 IN AUDIO
HDMI1 IN
HDMI2 IN
PC IN
6
7
8
2
9
10
L32HED12_IB_Running Change_120613_Annie.indd 8 12年6月13日 下午6:58

GB
9
Preparation
Remote Control Operation Range
Point the remote control at the TV no more than 5 metres from the
remote control sensor on the TV and within 60° in front of the TV.
The operating distance may vary depending on the brightness of the
room.
Installing Batteries in the Remote Control
1. Press and lift the back cover to open the battery compartment of the
remote control.
2. Insert two AAA size batteries. Make sure to match the (+) and ( - ) ends
of the batteries with the (+) and ( - ) ends indicated in the battery
compartment.
3. Close the battery compartment cover.
30° 30°
5M
Handling the Batteries
• Improper or incorrect use of batteries may cause
corrosion or battery leakage, which could cause
fire, personal injury or damage to property.
• Only use the battery type indicated in this manual.
• When the batteries are exhausted, the remote will
not function. Replace both batteries at the same
time with new ones.
• Do not install new batteries with used ones and do
not mix different types of batteries.
• Do not dispose of used batteries as domestic
waste. Dispose of them in accordance with local
regulations.
Handling the Remote Control
• Take care of your fingernails when you press and
hold the battery release tab.
• Do not drop or cause impact to the remote control.
• Do not spill water or any liquid on the remote
control.
• Do not place the remote control on a wet object.
• Do not place the remote control under direct
sunlight or near sources of excessive heat.
• Remove the battery from the remote control
when not in use for a long period of time, as it
could cause corrosion or battery leakage and may
result in physical injury and/or property damage
including fire.
L32HED12_IB_Running Change_120613_Annie.indd 9 12年6月13日 下午6:59

GB
10
Preparation
1.
Switches the TV between on and standby mode.
2. MUTE
Mutes and restores your TV sound.
3. 0-9 Number Button
• Selects a programme. (ATV / DTV mode)
• Selects numbered items in a menu. (DVD mode)
4. LIST
• Displays channel list. (ATV / DTV mode)
• Selects a track number above 10. For example, to select track
23 press twice followed by 3. (DVD mode)
5. RECALL
Returns to the previous viewing channel. (ATV / DTV mode)
6. SLEEP
Sets the TV sleep timer: OFF / 10 / 20 / … / 180 / 240 min.
7. VOL + / –
Adjusts the volume.
8. CH + / –
Selects a channel.
9.
• Displays the present channel information such as the current
time and channel name. (ATV / DTV mode)
• Displays the present disc information. (DVD mode)
10. S.MODE
Selects sound mode: Standard / Music / Movie / Sports /
Personal.
11. ASPECT
Watches the screen in various formats: Auto / 4:3 / 16:9 / Zoom /
Smart Zoom / Subtitle.
12. GUIDE
Display the EPG (Electronic Programme Guide). (DTV mode)
TITLE
Displays the DVD title content. (DVD mode)
13. P.MODE
Selects picture mode: Dynamic / Standard / Mild / Personal.
14. MENU
Displays the OSD (On Screen Display) menu.
15. INPUT
Selects among the dierent input signal sources:
DTV / ATV / DVD / AV / SCART / YPBPR / HDMI1 / HDMI2 / HDMI3
/ PC / USB.
16.
Allows you to navigate the OSD menus and adjust the system
settings to your preference.
OK
Conrms the selection in the OSD menus.
17. BACK
Returns to the previous menu in the OSD menus.
18. Exit
Exits the OSD menu.
Remote Control
12
5
8
12
15
18
9
13
3
4
7
11
14
16
17
6
10
L32HED12_IB_Running Change_120613_Annie.indd 10 12年6月13日 下午6:59

GB
11
Preparation
19. FAV
Displays the favourite channel list. (ATV / DTV mode)
SETUP
Displays and exit the DVD setup menu. (DVD mode)
20.
Turns on / o the SRS Tru Surround HD function.
21. TV.RD
Short-cut to switch input source to TV / Digital radio
channels. (DTV mode)
Ejects a disc. (DVD mode)
22. AD (Audio Description)
Turns on / o the Audio Description (AD) function (only
applicable when the TV programme has this feature).
(DTV mode)
23. ANGLE
Selects dierent angles for the video. (DVD mode)
24. STEP
Plays back the forward frame by frame. (DVD mode).
25. ZOOM
Zooms in on the displayed frame. (DVD mode)
26. REC
Records the current programme. (DTV mode)
27.
• Starts the timeshift playback. (DTV mode)
• Starts playback or pause. (Media / DVD mode)
28. PROG
Programmes the DVD. (DVD mode)
29. Stop
• Press once to stop, but keep your place in the movie.
Press twice to stop completely. (DVD mode)
• Stops the playback or recording. (Media mode)
30. T.SHIFT
Starts the time-shift function. (DTV mode)
31. TEXT
Turns on and o the teletext function. (ATV / DTV mode)
Reverses playback rapidly. (DVD / Media mode)
32. CANCEL
Exits the teletext mode. (ATV mode)
Advances playback rapidly. (DVD / Media mode)
33. S (Subtitle)
• Selects subtitles which are broadcast with the
programme. (DTV mode)
• Selects subtitles on the DVD. (DVD mode)
34. SIZE
26
30
33
34
24
25
29
28
32
31
2220
2119
23
27
L32HED12_IB_Running Change_120613_Annie.indd 11 12年6月13日 下午6:59

GB
12
Preparation
Enlarges the picture on the TV in teletext. (ATV mode)
35. REVEAL
Reveals hidden information such as the answer to a quiz
in teletext. (ATV mode).
Skips to the beginning of the next chapter / track /
photo. (DVD / Media mode)
36. HOLD
Freezes a multi-page passage on screen in teletext. (ATV
mode)
Skips to the beginning of the previous chapter / track /
photo. (DVD / Media mode)
37. SUBPAGE
Displays the subpage on the teletext screen. (ATV mode)
MENU
Displays the DVD menu. (DVD mode)
38. INDEX
Selects the page number of the index from teletext. (ATV
mode)
AUDIO
• Switches between the audio languages (only
applicable when the TV programme / disc has this
features). (DTV / DVD mode)
• Selects stereo / Dual Sound Reception. (ATV mode)
39. Coloured buttons
Accesses the TELETEXT items or channel edit when using
Digital / Freeview TV Channels. (ATV / DTV mode)
GOTO (RED)
Skips to a specic location on a DVD / CD. (DVD mode)
SLOW (GREEN)
Plays video slow. (DVD mode)
REPEAT (YELLOW)
Selects between dierent repeat modes. (DVD mode)
A–B (BLUE)
Repeats a segment between A and B. (DVD mode)
38
37
36
39
35
L32HED12_IB_Running Change_120613_Annie.indd 12 12年6月13日 下午6:59

GB
13
Connections
Connections
Connecting an AV Device Using an HDMI Cable
• This TV can accept High-Definition Multimedia Interface (HDMI) and supports HDCP (High-Bandwidth Digital Content
Protection) Protocol.
• This TV has a total of 3 HDMI input sockets, please make sure the correct input source is selected and corresponds to your
connected HDMI input socket.
• When you connect to the output of an HD ready player (blu-ray disc player, game console, set-top box or computer) switch to
the HDMI function and the TV will automatically detect the resolution used by the HDMI source.
• To get the best picture quality, adjust the blu-ray disc player, game console or set-top box output resolution up to 1920 x
1080p.
1. Use an HDMI cable (not included) to connect the TV’s
HDMI input socket to the external AV device’s HDMI
output socket.
2. Plug the connected devices into the mains socket
before switching on the POWER ON/OFF switch
which is located at the front right side under the
frame.
3. Press the / I button on the front right side panel of
the TV or the button on the remote control to turn
on your TV.
4. Press the SOURCE button on the front right side
panel of the TV or the INPUT button on the remote
control to display the Source List. Use the buttons
to select HDMI1 / HDMI2 / HDMI3 and then press the
OK button to confirm.
Making Video and Audio Connections
Not all AV devices have the ability to connect to a TV, please refer to the owner’s manual of your AV device for compatibility and
connection procedures.
When connecting any external AV device, do not connect the mains cable to the mains socket until all other connections are
complete.
Signal Type Separate Audio
Connection Required
HDMI1, 2 & 3
HDMI
(480i/480p/576i/576p/720p/1080i/1080p*) No
PC IN
PC
Yes
Component Video
(480i/480p/576i/576p/720p/1080i/1080p*)
Yes
SCART (RGB Input) No
Composite Video
Yes
Best Video
Performance
Although this TV is able to connect to an
HDMI device, it is possible that some devices
may not operate correctly.
DIGITAL
AUDIO OUT
(COAXIAL)
USB
OUTPUT 5V 500mA
HDMI3 IN AUDIO
Rear Right Side View of TV
Rear Right Bottom View of TV
HDMI1 IN
HDMI2 IN
PC IN
Blu-ray Player / DVD Player /
Recorder
Set-top Box
Game Console
HDMI Cable
(not included)
*1080p: Although this TV is compatible with a 1080p input, the screen is not capable of
displaying this resolution and consequently the image will be scaled to suit the screen.
L32HED12_IB_Running Change_120613_Annie.indd 13 12年6月13日 下午6:59

GB
14
Connections
Connecting an AV Device Using a Component (YPbPr) Cable
1. Use a component cable (not included) to connect the
TV’s YPbPr input sockets to an external AV device’s
component output sockets.
2. Use the supplied AV cable to connect the TV’s
AUDIO(L/R) input sockets to the external AV device’s
component audio output sockets. (Audio Left = white,
and Audio Right = red)
Component port on the TV YPb Pr
Video output ports on DVD
player
YPb Pr
Y Cb Cr
3. Plug the connected devices into the mains socket
before switching on the POWER ON/OFF switch
which is located at the front right side under the
frame.
4. Press the / I button on the front right side panel of
the TV or the button on the remote control to turn
on your TV.
5. Press the SOURCE button on the front right side
panel of the TV or the INPUT button on the remote
control to display the Source List. Use the buttons
to select YPbPr and then press the OK button to
confirm.
Connecting a Computer Using a VGA Cable
1. Use a VGA cable to connect the TV’s PC IN input socket to
a computer’s VGA output socket. Use an audio cable (not
included) to connect the TV’s PC AUDIO input socket to
the computer’s audio output socket.
2. Plug the connected devices into the mains socket before
switching on the POWER ON/OFF switch which is located
at the front right side under the frame.
3. Press the / I button on the front right side panel of the
TV or the button on the remote control to turn on your
TV.
4. Press the SOURCE button on the front right side panel
of the TV or the INPUT button on the remote control to
display the Source List. Use the buttons to select PC
and then press the OK button to confirm.
• The best resolution is 1360 x 768.
• If your computer is set to shut down after
a few minutes in the idle mode, the TV will
also switch to standby due to no signal being
received, this is to save energy. Press the
/I button on the front right side panel
of the TV or the button on the remote
control to restart the TV.
Rear Right Bottom View of TV
VGA Cable
(not included)
Audio Cable
(not included)
HDMI1 IN
HDMI2 IN
PC IN
Computer
Rear Right Side View of TV
DIGITAL
AUDIO OUT
(COAXIAL)
USB
OUTPUT 5V 500mA
HDMI3 IN AUDIO
Satellite Receiver
Video Camera
Blu-ray Player / DVD Player /
Recorder
Set-top Box
Game Console
L
R
COMPONENT
OUT
Y
Pr
Pb
AV Cable
(included)
Yellow (Video)
Red (R)
White (L)
Yellow (Video)
Red (R)
White (L)
Component
Cable
(not
included)
Pb/Cb
Pr/Cr
Y
Pb/Cb
Pr/Cr
Y
L32HED12_IB_Running Change_120613_Annie.indd 14 12年6月13日 下午6:59

GB
15
Connections
Connecting an AV Device Using Composite Cable
1. Use the supplied AV cable to connect the TV’s
AUDIO(L/R)/VIDEO input sockets to an external AV
device’s composite audio/video sockets.
(Video = yellow, Audio Left = white, and Audio
Right = red)
2. Plug the connected devices into the mains socket
before switching on the POWER ON/OFF switch
which is located at the front right side under the
frame.
3. Press the / I button on the front right side panel of
the TV or the button on the remote control to turn
on your TV.
4. Press the SOURCE button on the front right side
panel of the TV or the INPUT button on the remote
control to display the Source List. Use the buttons
to select AV and then press the OK button to confirm.
Connecting an AV Device Using a SCART Cable
1. Use a SCART cable (not included) to connect the TV’s
SCART input socket to an external AV device’s SCART
output socket.
2. Plug the connected devices into the mains socket
before switching on the POWER ON/OFF switch
which is located at the front right side under the
frame.
3. Press the / I button on the front right side panel of
the TV or the button on the remote control to turn
on your TV.
4. The TV will change the input source to SCART
automatically once the AV device is switched on.
Rear Right Bottom View of TV
HDMI1 IN
HDMI2 IN
PC IN
SCART Cable
(not included)
Satellite Receiver
VCR
DVD Player / Recorder
Set-top Box
Satellite Receiver
Rear Right Side View of TV
DIGITAL
AUDIO OUT
(COAXIAL)
USB
OUTPUT 5V 500mA
HDMI3 IN AUDIO
Video Camera
VCR
DVD Player / Recorder
Set-top Box
Game Console
AV Cable
(included)
Yellow (Video)
White (L)
Red (R)
Yellow (Video)
Red (R)
White (L)
L32HED12_IB_Running Change_120613_Annie.indd 15 12年6月13日 下午6:59

GB
16
Connections
Connecting a Coaxial Audio Receiver Using an Audio Cable
For better sound quality, you may want to play the audio through your multi-channel audio receiver.
1. Use an audio cable (not included) to connect the
TV’s DIGITAL AUDIO OUT (COAXIAL) output socket
to an external audio receiver’s audio coaxial input
socket.
2. Plug the connected devices into the mains socket
before switching on the POWER ON/OFF switch
which is located at the front right side under the
frame.
3. Press the / I button on the front right side panel of
the TV or the button on the remote control to turn
on your TV.
4. Press the SOURCE button on the front right side
panel of the TV or the INPUT button on the remote
control to display the Source List. Use the buttons
to select any desired input source and then press the
OK button to confirm.
The TV’s volume control will have no
effect. You may control the audio level via
the Audio Receiver.
Rear Right Side View of TV
DIGITAL
AUDIO OUT
(COAXIAL)
USB
OUTPUT 5V 500mA
HDMI3 IN AUDIO
Audio Cable
(not included)
Audio Receiver
L32HED12_IB_Running Change_120613_Annie.indd 16 12年6月13日 下午6:59

17
GB
Initial Setup
6. Press the buttons to navigate the menu and change the
settings. Press the OK button to confirm.
OSD Language Select your desired language to be displayed on
the menu. The default on-screen menu language
is set as English.
Country Select the country where you will operate the TV.
The default country is set as UK.
Initial Setup
Turning the TV On for the First Time
1. Connect one end of the RF coaxial cable (not
included) to the aerial socket on the wall and the
other end of the cable to the RF (75Ω) socket at the
rear right bottom view of your TV.
Do not connect the TV to the mains
supply until you have completed all the
connections.
HDMI1 IN
HDMI2 IN
PC IN
RF coaxial cable
(not included)
OR
2. Connect the mains cable to the mains socket after
you have completed all the connections.
3. Switch on the POWER ON/OFF switch which is
located at the front right side under the frame. At this
stage, the TV switches to standby mode. The red LED
indicator will illuminate on the front panel of the TV.
4. In standby mode, press the / I button on the
front right side panel of the TV or the button on
the remote control to turn the TV on. The red LED
indicator will turn blue.
• Always disconnect the TV from the mains socket when not in use for a long period of time.
• The / I button on the front right side panel of the TV or the button on the remote control is only used for
switching the TV into standby, it does not disconnect the TV from the mains power. To completely disconnect the
mains power, please remove the mains plug from the mains socket or switch off the POWER ON/OFF switch.
To the mains
socket
5. The first time you turn the TV on, it will go straight into the First Time
Installation menu. Please ensure the aerial is plugged in and then press
the OK button. (If you have already installed the TV using the Quick Start
Guide, please go to the section “Selecting the Input Source” on the next
page.)
Please select an OSD Language
Deutsch
Español Français
Português Italiano
English
Please ensure aerial is plugged in!!
Then press OK button to start
Country
France
Germany Portugal
Italy Spain
UK
Menu
L32HED12_IB_Running Change_120613_Annie.indd 17 12年6月13日 下午6:59

18
GB
Initial Setup
Selecting the Input Source
1. Press the SOURCE button on the front right side panel of the TV
or the INPUT button on the remote control to display the Input
Source list.
2. Press the buttons to select the input source that you want:
DTV / ATV / DVD / AV / SCART / YPBPR / HDMI1 / HDMI2 / HDMI3
/ PC / USB.
3. Press the OK button to confirm your selection. If you do not press
the OK button to confirm, the TV will automatically confirm the
selected input source within 4 seconds.
Alternative
Press the TV.RD button to switch to TV / digital radio
channels directly.
7. Channel tuning will commence. This operation may take up to 6 minutes.
The display will show the progress of the tuning and the number of
channels found.
8. If you want to skip the ATV tuning, press the MENU button to interrupt
the tuning half way. A pop-up screen will be displayed, press the
button to select YES to confirm. You will then go straight to DTV tuning.
You may repeat the above step if you also want to skip the DTV tuning.
An installation reminder will appear the next time you turn on the TV.
9. After tuning is complete, the channels are arranged in a preset order. If
you wish to skip channels, modify the preset order or rename channels,
select Channel Edit under the Channel menu (refer to page 22-23 for
details).
Channel Tuning
TV : 0 Channel
DTV : 0 Channel
Radio : 0 Channel
Data : 0 Channel
1 %... 471.25 MHz (TV)
Please press MENU key to skip
Input Source
DTV
ATV
DVD
AV
YPBPR
HDMI2
SCART
HDMI1
PC
HDMI3
Move
Input Source
USB
Move
Target Region Setting
Note that if you have moved regions and your TV has received signals from more than one transmitter, the Target
Region Setting will be displayed. This will enable you to select the correct regional transmission for the local news
service that you require.
Press the buttons to adjust each option's setting and then press the OK button to confirm.
Country Code This will be shown as GBR for the UK.
Primary Region This will show the regional country
(e.g. England, Wales, Scotland, NI).
Secondary Region This will allow you to set the region for your
local news service.
Tertiary Region
You may receive signals from more than
one transmitter within the Secondary
Region, (e.g Beds and Cambs may have
Luton or Sandy Heath).
Target Region Setting
Country Code GBR
Primary Region England
Secondary Region
Tertiary Region
London
(Provided image is for reference only. Please
refer to your TV model for actual details.)
L32HED12_IB_Running Change_120613_Annie.indd 18 12年6月13日 下午6:59

19
GB
Initial Setup
Channel Selection
• Press the CH + / – buttons on the remote control repeatedly or the 0-9 buttons to select the channel.
Alternative
Press the LIST button to enter the Channel List. Then use the buttons to highlight and select the channel.
Press the OK button to view the selected channel.
• If a blocked channel is selected, the password screen will be displayed. Press the 0-9 buttons to enter the password, the
channel will then be unlocked (refer to page 40 for details on Block Channel).
• Press the FAV button to view the Favourite List. Then use the buttons to highlight and select the channel. Press the OK
button to view the selected channel (refer to page 22-23 for details on Channel Edit).
• Press the button to return to the previously viewed channel.
Display Channel Information
• Press the ibutton to view the current information.
Volume Adjustment
• Press the VOL + or –button on the side panel of the TV or on the remote control to adjust the volume.
• If you wish to switch the sound off, press the MUTE button. Press the MUTE button again or the VOL + or –button to
resume audio listening.
L32HED12_IB_Running Change_120613_Annie.indd 19 12年6月13日 下午6:59

20
GB
Customising TV Settings
4. Channel tuning will commence. This operation may take up to 6 minutes.
The display will show the progress of the tuning and the number of
channels found.
5. If you want to skip the ATV tuning, press the MENU button to interrupt
the tuning half way. A pop-up screen will be displayed, press the
button to select YES to confirm. You will then go straight to DTV tuning.
You may repeat the above step if you also want to skip the DTV tuning.
An installation reminder will appear the next time you turn on the TV.
6. After tuning is complete, the channels are arranged in a preset order. If
you wish to skip channels, modify the preset order or rename channels,
select Channel Edit under the channel menu (refer to page 22-23 for
details).
3. In the Tune Type menu, press the buttons to select ATV / DTV /
DTV + ATV. Press the button and then press the buttons to
select the country where you will operate the TV. Press the OK button to
confirm.
2. Press the buttons to select Auto Tuning and then press the OK
button.
Channel Setting (TV, DTV or Radio Mode)
Auto Tuning
Use this to automatically find and store all available channels. This is normally recommended if some channels have been added
or removed by the broadcaster or if you have moved house.
1. Press the MENU button and then press the buttons to select the
CHANNEL menu and then press the OK button.
Channel Tuning
TV : 0 Channel
DTV : 0 Channel
Radio : 0 Channel
Data : 0 Channel
1 %... 471.25 MHz (TV)
Please press MENU key to skip
CHANNEL
PICTURE
SOUND
TIME
OPTION
LOCK
EXIT
Tune Type
France
Germany
Portugal
Italy
Spain
UK
Menu
ATV+DTV
Other
Customising TV Settings
Auto Tuning
ATV Manual Tuning
Software Update(OAD) Off
Software Update(USB)
Channel Edit
(ATV mode)
Auto Tuning
DTV Manual Tuning
Signal Information
CI Information
Software Update(OAD) Off
Software Update(USB)
Channel Edit
(DTV mode)
L32HED12_IB_Running Change_120613_Annie.indd 20 12年6月13日 下午6:59
Table of contents
Other Logik TV manuals

Logik
Logik L23IP11 User manual

Logik
Logik L24FE13 User manual

Logik
Logik L26FE12 User manual

Logik
Logik LCX17LN2 User manual

Logik
Logik L19HE12 User manual

Logik
Logik L423CD11 User manual

Logik
Logik L22FEDV12 User manual

Logik
Logik L423ED11 User manual

Logik
Logik L22FEDN12 User manual

Logik
Logik LCXW19LN2D User manual

Logik
Logik L32HE13 User manual

Logik
Logik L26DVDB20 User manual

Logik
Logik LCXW30NN6 User manual

Logik
Logik L26DVDB21 User manual

Logik
Logik L17LID648 User manual

Logik
Logik LOG32LW782 User manual

Logik
Logik L323CD11 User manual

Logik
Logik L32LW783 User manual

Logik
Logik L26FE12I User manual

Logik
Logik LCXW32HD1 User manual