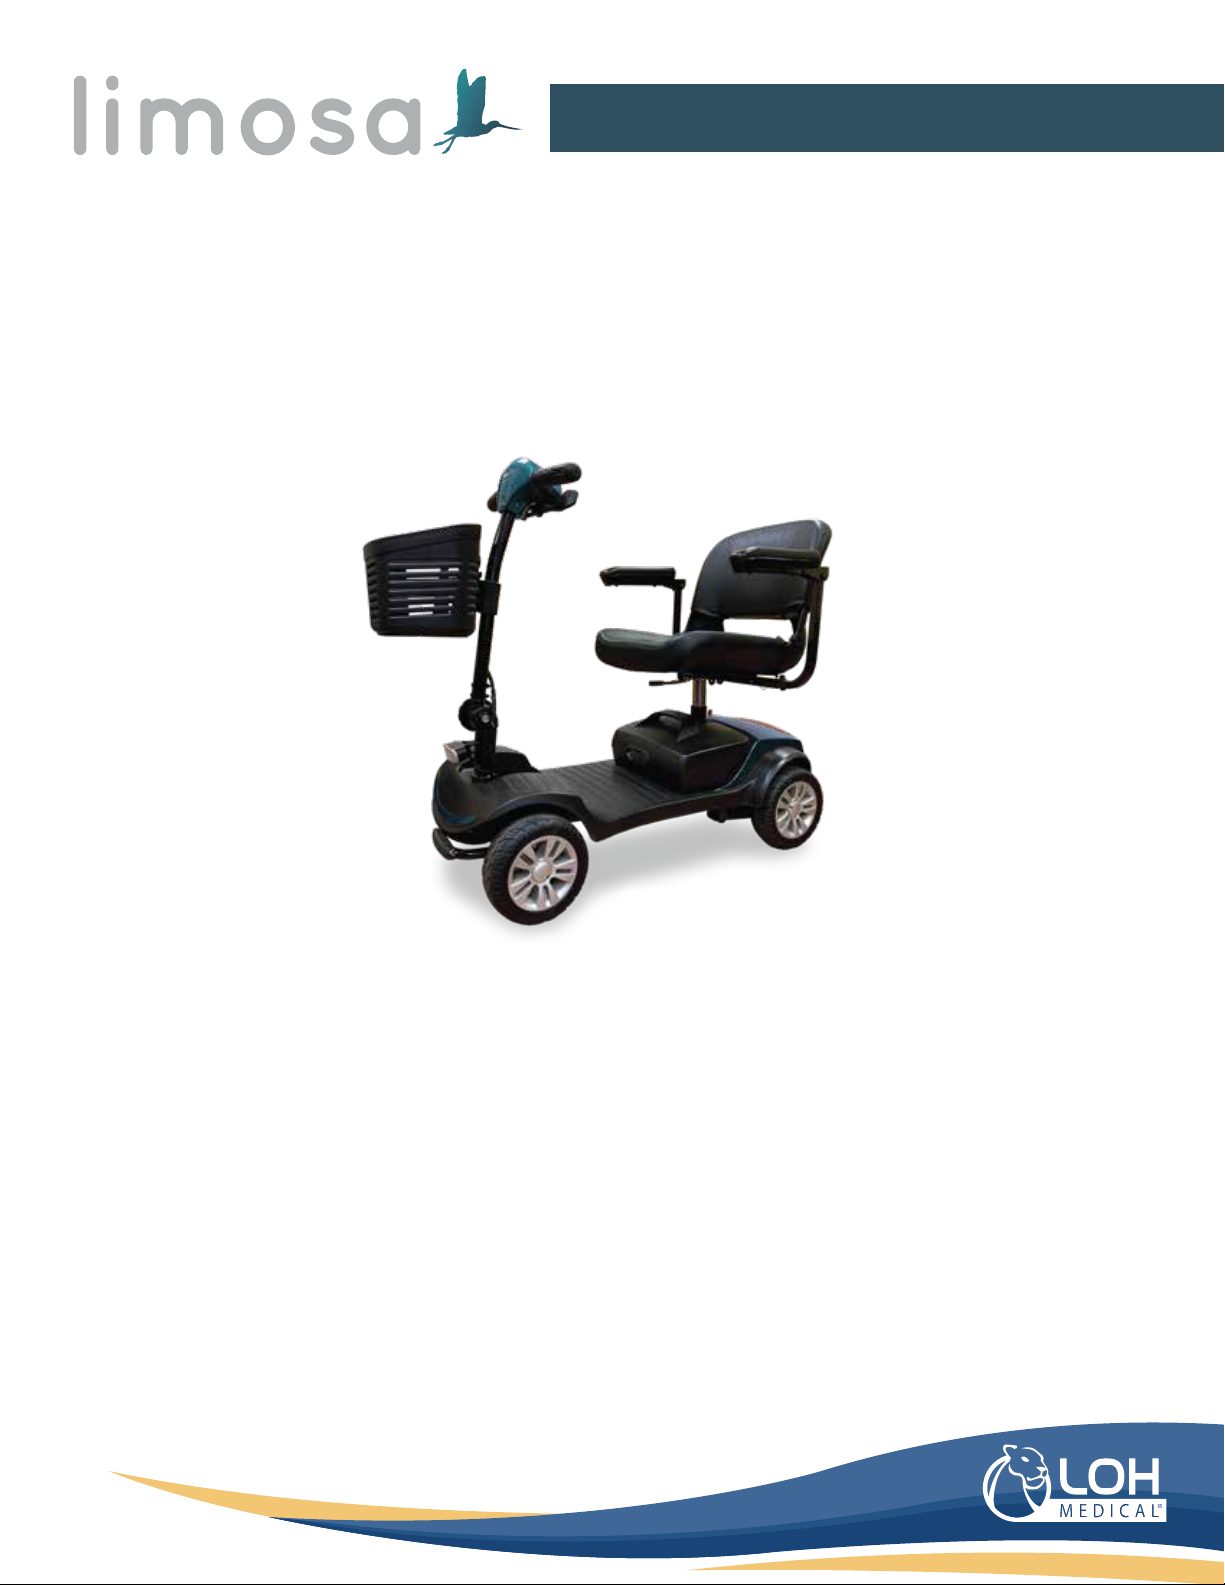
Loh Medical Limosa User manual

OWNER’S MANUAL
Compact Scooter
ver 2019.05.30E

1
How to use this manual
OWNER’S MANUAL
2
Compact Scooter
How to use this manual
Your scooter will reach you in excellent condition having been personally
inspected before leaving the factory. By following the guidelines for
maintenance your scooter will maintain its rst-class condition and give
you years of complete reliability and satisfaction.
ver 2019.05.30E

2
1.Introduction ………………………………………………………………page3
2.General Warnings ………………………………………………………page4
3.Quick Start Guide ………………………………………………………page5
4.Features ………………………………………………………………page7
5.Getting On or Off your Scooter ………………………………………page8
6. Control Panel……………………………………………………………page9
7.Tiller control function …………………………………………………page11
8. Freewheel Mechanism ………………………………………………page12
9.Seat Removal and Adjustment………………………………………page13
10.Tiller, Battery and Charging ......……………………………………page14
11.Transportation ………………………………………………………page17
12.Guidance for Safe Operation and Use ……………………………page19
13.Battery and Charging Information …………………………………page23
14.General Warnings …………………………………………………page26
15.EMC (EMI) Warnings ………………………………………………page30
16.Specifications ………………………………………………………page38
17.Routine Maintenance ………………………………………………page39
18.Service History ………………………………………………………page41
19.Trouble Shooting Guide ……………………………………………page43
20.Guarantee ……………………………………………………………page46
Contents
Warranty
OWNER’S MANUAL
3
Compact Scooter
Contents
4
5
6
8
9
10
12
13
14
15
18
20
24
27
31
39
40
42
44
47
ver 2019.05.30E

OWNER’S MANUAL
4
Compact Scooter
1. Introduction
The scooter is classied as a category C vehicle under the European
wheelchair standard EN 12184.
It is intended for the use of people of all ages who may have diculty walking
distances or for periods of time. It is ideal for outdoor use and suitable for
users up to 120kg in weight, 264lbs. Diering user weights can cause
performance variation. Maximum user weight tested using a 120kg test
dummy.
The scooter is designed to be driven on footpaths and to cross roads. It has
been manufactured to comply with the requirements of the Medical Device
Directive 93/42/EEC, the radio interference requirements of EEC Directive
89/336/EEC and the battery charger requirements of EEC Directive 73/23/EEC
and89/336/EEC. Electro Magnetic elds, such as those emitted by shop alarms
may be disturbed by use of the scooter. The function of the scooter may also
be disturbed by Electro Magnetic elds emitted by shop alarms.
We are dedicated to providing products of exacting quality that conform fully
and reliably to the requirements of their intended use. We are BS/EN ISO 9001
accredited which is the internationally recognized standard for quality
management systems. This approval ensures we provide quality in all areas of
our business from development through to nal delivery. Should you require
any further assistance then please contact your local dealer.
ver 2019.05.30E

OWNER’S MANUAL
5
Compact Scooter
2. General Warnings
DO NOT OPERATE THE SCOOTER BEFORE READING AND
UNDERSTANDING THIS INSTRUCTION MANUAL.
IF YOU ARE IN DOUBT ABOUT THE MEANING OF THESE INSTRUCTIONS,
OR ANY OF THE CAUTIONS AND WARNINGS, PLEASE CONSULT YOUR
HEALTHCARE PROFESSIONAL, DEALER OR RELEVANT TECHNICAL
PERSONNEL.
FAILURE TO FULLY UNDERSTAND THE SCOOTER OPERATION MAY RESULT
IN AN UNEXPECTED RESPONSE FROM THE EQUIPMENT WHICH CAN IN
TURN LEAD TO POSSIBLE INJURY OR DAMAGE.
NOTES
Warning and Caution notices are used in this manual and apply to hazards
and unsafe practices that could result in personal injury or damage to
property.
WARNING
With regards to restraints, seat positioning straps, posture correction or other
positional aids and accessories, it is the obligation of the qualied healthcare
professional in conjunction with the dealer to ensure the suitability of such
equipment for the safe operation of the scooter.
Serious injury can occur in the event of a fall from a mobility scooter. We DO
NOT RECOMMEND that a scooter user is transported in any type of vehicle
when seated in the scooter.
At this time, there are no approved Tie-down Systems for the transportation of
a user in ANY moving vehicle whilst seated in a scooter. It is our opinion that
users of mobility scooters should be transferred into the appropriate vehicle
seating system and use should be made of the restraints available to the auto
industry.
Intended Use
This mobility scooter would be used by disabled, sick or old person.
ver 2019.05.30E

OWNER’S MANUAL
6
Compact Scooter
3. Quick Start Guide
Assembly
When lifting always keep the back straight, bend the knees and use the lifting
handles provided.
Ensure your freewheel mechanism is fully engaged, so your scooter can not
move while assembling.
Set the tiller by rotating the Tiller folding knob while moving the tiller upwards.
Remove the basket from the footboard and place on the bracket located on
the front of the tiller.
Lift the seat onto the seat post and press down to ensure it is fully engaged.
Battery Charging
The battery MUST be charged for 12 hours before rst use. Do not be tempted
to use the scooter unless the battery has been fully charged as failure to do this
will result in battery damage. Connect the battery charger to the mains supply
and the charging socket located on the battery pack. Switch on the mains
supply and then switch on the battery charger.
RED light = Power On,
YELLOW Light = Charging
GREEN Light = Charge Complete.
Charge the scooter overnight after each use to maintain battery condition.
Typical Use
Designed for use on footpaths, for crossing roads and shopping. It should not
be driven through mud, water, snow, sand, loose gravel, long grass or any other
unsound surfaces.
Control Functions
Your scooter is equipped with the following features that can be found on the
tiller console panel:
ver 2019.05.30E

OWNER’S MANUAL
7
Compact Scooter
On/ O Switch, Battery Gauge, Speed Control, head Light, Horn and
Directional Control Levers.
If you have previously used or owned a scooter before you MUST still read the
Owners Manual carefully to fully understand the controls and safety warnings.
Transporting
Your scooter may be disassembled quickly and simply for transportation:
1. Lift o the front basket.
2. Remove the seat, leaving the seat stem in position.
3. Place the basket on the oor mat appropriately.
4. Lower the tiller, using the folding knob, to its lowest setting locking in the
basket. Make sure that there is at least 30mm between Tiller and battery pack.
5. Using the lifting handles provided carefully lift the scooter safely and
securely into the luggage compartment of the vehicle.
TIP:
Using the front bumper and rear lifting handle provided carefully lift the
scooter.
To reassemble the scooter, reverse the sequence above.
Important:
When reassembling the scooter, remember to insert the battery locking pin,
because failure to do so may result in the batteries disengaging during use.
Always secure your scooter parts before transportation. Remember to engage
the drive unit by pushing the freewheel lever forwards to stop the scooter from
moving.
ver 2019.05.30E

7
4.Features
OWNER’S MANUAL
8
Compact Scooter
4. Features
ver 2019.05.30E

OWNER’S MANUAL
9
Compact Scooter
5. Getting On or O Your Scooter
Getting onto your scooter
1. Ensure that the key switch is turned to the o
position (Photo 5.1).
2. Push forward the seat swivel lever located under
the seat on the right-hand side and rotate the seat
to face you (Photo 5.2).
3. Put the armrests into the fully down position and
use them to steady yourself as you gently lower
yourself into the seat (Photo 5.3).
4. Push forward the seat swivel lever and gently
swivel the seat to face forward (Photo 5.4).
5. Ensure that both feet are placed rmly on the
oorboard of the scooter and the seat is secure
(Photo 5.5).
Getting o your scooter
1. Bring your scooter to a stop and turn the key
switch to o.
2. Push forward the seat swivel lever located under
the seat on the right-hand side and rotate the seat
90 degrees to exit (Photo 5.2).
3. Put BOTH feet on the ground and gently leave the
seat using the arm rests to assist you out of the chair
(Photo 5.3).
8
Getting on to your scooter
1. Ensure that the key switch is turned to the off
position (Photo 5.1).
2. Push forward the seat swivel lever located
under the seat on the
Right-hand side and rotate the seat to face you
(Photo 5.2).
3. Put the armrests into the fully down position
and use them to steady yourself as you gently
lower yourself Into the seat (Photo 5.3).
4. Push forward the seat swivel lever and gently
swivel the seat to face
Forward (Photo 5.4).
5. Ensure that both feet are placed firmly on the
floorboard of the scooter and the seat is secure
(Photo 5.5).
Getting off your scooter
1. Bring your scooter to a stop and turn the key
switch to off.
2. Push forward the seat swivel lever located
under the seat on the right-hand side and rotate
the seat 90 degrees to Exit (Photo 5.2).
3. Put BOTH feet on the ground and gently leave
the seat using the arm rests to assist you out of
the chair (Photo 5.3).
5.Getting On or Off your Scooter
P5.1
P5.2
P5.3
P5.4
P5.5
ver 2019.05.30E

OWNER’S MANUAL
10
Compact Scooter
6. Control Panel
Hand Controls
All of the drive controls for the scooter are to be found on the Tiller Control Box
(Photo 6.1).
The Preset Speed Knob
Turning this knob to the left, reduces your available maximum speed. Turning
it to the right, increases the available maximum speed.
The Battery Gauge
This gives an approximation of battery charge and is illuminated for clarity.
The gauge is “RED” empty, to“YELLOW” charge required, to “GREEN” charged.
As the scooter moves over diering terrain, the Battery Gauge will dip up and
down, this is normal. For a more accurate indication, stop the scooter and note
the reading. In cold, damp weather the gauge will dip more often as the
capacity and eciency of all batteries drops in such conditions.
TIP:
If your battery gauge has gone into the “RED” section you can increase your
remaining range by reducing your maximum speed. Remember you MUST
charge your battery overnight as soon as you can to prevent battery damage.
Operating the Lights
The lights are operated by pressing the blue button on the front console
panel. Press the button once to illuminate the lights, press the button again to
switch the lights o. Switch the lights on to make yourself more visible in low
levels of light, day or night.
ver 2019.05.30E

10
P6.1
OWNER’S MANUAL
11
Compact Scooter
ver 2019.05.30E

OWNER’S MANUAL
12
Compact Scooter
7. Tiller Control Functions
Throttle Lever
The throttle lever oers nger-tip control of your scooter.
It controls the speed as well as forward and reverse motion. To move the
scooter in a FORWARD motion PULL the lever with the RIGHT HAND or PUSH
the lever with the LEFT THUMB (Photo 7.1).
To move the scooter in a REVERSE motion PULL the lever with the LEFT HAND
or PUSH the lever with the RIGHT THUMB. The lever will return by itself when
released and the scooter will slow to a stop (Photo 7.2).
The more you move the lever, the more your speed increases up to its preset
maximum. It is possible to operate your scooter using one side of the throttle
lever. To do this you must PUSH and PULL on the chosen side of the throttle
lever.
Horn Button
Pressing the horn button operates an audible warning sound. Use this
function to warn pedestrians of your presence when necessary (Photo 7.3).
Key Switch
The key switch switches the scooter ON and OFF.
Please note that the key cannot be removed when it is in the ON position
(Photo 7.4.).
11
Throttle Lever
The throttle lever offers finger-tip control of your scooter.
It controls the speed as well as forward and reverse motion. To move the
scooter in a FORWARD motion PULL the lever with the RIGHT HAND or
PUSH the lever with the LEFT THUMB (Photo 7.1).
To move the scooter in a REVERSE motion PULL the lever with the LEFT
HAND or PUSH the lever with the RIGHT THUMB. The lever will return by
itself when released and the scooter will slow to a stop (Photo 7.2).
The more you move the lever, the more your speed increases up to its
preset maximum. It is possible to operate your scooter using one side of the
throttle lever. To do this you must PUSH and PULL on the chosen side of
the throttle lever.
Horn Button
Pressing the horn button operates an audible warning sound. Use this
function to warn pedestrians of your presence when necessary (Photo 7.3).
P7.1 P7.2 P7.3
Key Switch
P7.4 P7.5 P7.6
The key switch switches the scooter ON and OFF.
Please note that the key cannot be removed when it is in the ON position
(Photo 7.4.).
7.Tiller Control Functions
ver 2019.05.30E

OWNER’S MANUAL
13
Compact Scooter
8. Freewheel Mechanism
WARNING:
Use extreme caution in the freewheel mode especially on slopes/inclines.
Letting go of your scooter while it is in freewheel, can cause the scooter to
roll unexpectedly.
ALWAYS re-engage the freewheel device after use, failure to do so may result
in injury.
Make sure that this switch is in the OFF position BEFORE Getting on or o the
scooter. Remove the key to make sure the scooter is OFF (Photo 7.5). Turning
the key to OFF while driving will cause the scooter to stop very abruptly. This is
not recommended except in an emergency, as continual use of this function
could result in damage to the scooter.
O Board Charging Socket
The socket to connect the o-board charger is located on the battery pack
(Photo 7.6).
To use the socket, swivel the plastic cover to the left or right to reveal the
socket connections. The charger output plug can now be connected ready to
accept charge current from the battery charger.
After use, ensure that the plastic swivel cover is rotated back into place. This
action helps prevent water from entering the socket connections.
WARNING.
Do not attempt to charge your scooter outdoors or in damp/wet
conditions. Failure to comply with this instruction may lead to a shock /
re hazard.
12
Make sure that this switch is in the OFF position BEFORE Getting on or off
the scooter. Remove the key to make sure The scooter is OFF (Photo 7.5).
Turning the key to OFF whilst driving will cause the scooter To stop very
abruptly. This is not recommended except in Emergency stop, as continual
use of this function could Result in damage to the scooter.
Off Board Charging Socket
The socket to connect the off-board charger is located on the battery pack
(Photo 7.6).
To use the socket, swivel the plastic cover to the left or right to reveal the
socket connections. The charger output plug can now be connected ready
to accept charge current from the battery charger.
After use, ensure that the plastic swivel cover is rotated back into place.
This action helps prevent water from entering the socket connections.
WARNING.
Do not attempt to charge your scooter outdoors or in damp/wet
conditions. Failure to comply with this instruction may lead to a shock
/ fire hazard.
Freewheel mechanism
A freewheel device disengages the power drive to
allow manual operation P8 (i.e. the scooter can be
pushed at a walking pace).This safety function can
prevent your scooter from being driven by
someone illegally when parking. By pushing
BACKWARD the lever that is located on the right
hand side of the scooter rear panel can engage the
motor for you to drive. (P8).
P 8
WARNING:
Use extreme caution in the freewheel mode especially
on slopes/inclines. Letting go of your scooter whilst it is in freewheel,
can cause the scooter to roll unexpectedly.
ALWAYS re-engage the freewheel device after use, failure to do so may
result in injury.
8.Freewheel Mechanism
Freewheel machanism
A freewheel device disengages the power drive to
allow manual operation P8 (i.e. the scooter can be
pushed at a walking pace). This safety function can
prevent your scooter from being driven by someone
illegally when parking. By pushing BACKWARD the
lever that is located on the right hand side of the
scooter rear panel can engage the motor for you to
drive. (P8).
ver 2019.05.30E

13
Removing the Seat
Please note that these instructions are to be used as a guide only.
1. Lift armrests upwards for ease of access (Photo 9.1).
2. Stand behind the seat and fold the backrest down(Photo 9.2).
3. Grasp the seat base and keeping a firm grip, lift the seat vertically,
keeping your back straight. Bend knees if required (Photo 9.3).
4. Place seat at desired location for stowage, keeping back posture straight
at all times, bend knees where required (Photo 9.4).
Note: Exercise caution when lifting the seat.
P9.1 P9.2 P9.3 P9.4
Seat Adjustment
1. To adjust seat height, remove the seat as described (Photo 9.5).
2. Move the seat post to the new position and refit the seat pin.
3. Refit the seat. (Photo 9.6)
P9.5 P9.6
9.Seat Removal and Adjustment
OWNER’S MANUAL
14
Compact Scooter
9. Seat Removal & Adjustment
Removing the Seat
Please note that these instructions are to be used as a guide only.
1. Lift armrests upwards for ease of access (Photo 9.1).
2. Stand behind the seat and fold the backrest down (Photo 9.2).
3. Grasp the seat base and keeping a rm grip, lift the seat vertically, keeping
your back straight. Bend knees if required (Photo 9.3).
4. Place seat at desired location for stowage, keeping back posture straight at
all times, bend knees where required (Photo 9.4).
Note: Exercise caution when lifting the seat.
Seat Adjustment
1. To adjust seat height, remove the seat as described (Photo 9.5).
2. Move the seat post to the new position and ret the seat pin.
3. Ret the seat. (Photo 9.6)
ver 2019.05.30E

OWNER’S MANUAL
15
Compact Scooter
10. Tiller, Battery & Charging
Armrest Adjustment
1. Pull the lock-pin out from the seat base (photo 9.7),
2. Loosen the adjustable bolt (photo 9.8).
3. Move the armrests to the desired position and re-tightening the
thumbwheel knobs to adjust the width of the armrest.
Tiller Adjustment
The scooter features an innitely adjustable tiller which allows you to lock the
tiller in the most comfortable driving position. This feature also lets you fold
the tiller down fully, for transportation and stowage.
The folding knob is located on the bottom of the tiller.
1. Support the tiller with your left hand.
2. Rotate the folding knob anticlockwise to release the tiller (Photo 10.1-10.2).
3. Move the tiller to the desired location.
4. Rotate the folding knob clockwise to lock the tiller (Photo 10.2).
Battery Removal
It is important to remove the seat and seat post rst to allow better access to
the batteries.
Lift battery vertically out of its battery tray using the handle provided (Photo
10.4).
14
Armrest Adjustment
1. Pull the lock-pin out from the seat base(photo 9.7),
2. Loose the adjustable bolt(photo 9.8).
3. Moving the armrests to the desired position andre-tightening the
thumbwheel knobs to adjust the width of the armrest.
P9.7 P9.8
Tiller Adjustment
The scooter features an infinitely adjustable tiller which allows you to lock
the tiller in the most comfortable driving position. This feature also lets you
fold the tiller down fully, for transportation and stowage.
The folding knob is located on the bottom of the tiller.
1. Support the tiller with your left hand.
2. Rotate the folding knob anticlockwise to release the tiller (Photo
10.1-10.2).
3. Move the tiller to the desired location.
4. Rotate the folding knob clockwise to lock the tiller (Photo 10.2).
P10.1 P10.2 P10.3
Battery Removal
It is important to remove the seat and seat post first to allow better access
to the batteries.
Lift battery vertically out of its battery tray using the handle provided (Photo
10.4).
10.Tiller, Battery and Charging
ver 2019.05.30E

OWNER’S MANUAL
16
Compact Scooter
Remember to keep the knees bent and the back straight.
Battery Replacement
To replace the batteries, reverse the sequence above
Important:
Remember to keep the knees bent and the back straight.
When reassembling the scooter, remember to insert the locking pin, because
failure to do so may result in the batteries disengaging during use.
Ensure the battery wells are free from dirt and grit - this will aect the
performance of the battery contacts.
O-Board Battery Charger
Your scooter is supplied with an o-board charging facility (Photo 10.5).
Please note that only chargers with a capacity of minimum 3.0 amps and
maximum of 6.0 amps supplied by your local authorized dealer should be
used.
1. Switch your scooter o at the key switch (Photo 7.5).
2. Swivel the charge connector cover located on the batter pack and connect
the charger (Photo 10.6).
3. Ensure that the charger plug is dry and intact before connecting it to the
mains and switching it on.
4. A reset button is located on the battery.
Please check that the button is pressed in (Photo 10.7).
Note:
The charger is capable of charging from 240V to 100V, and 2Amp, o-board
charger has 3 possible indications:
1. RED = Power is on.
2. YELLOW = Charging.
3. GREEN = fully charged.
Ensure the scooter is switched o before commencing the charging process.
After charging, always swivel the charging socket cover back into place. This
helps prevent water getting into the socket. (Photo 10.6)
15
Remember to keep the knees bent and the back straight.
Battery Replacement
To replace the batteries reverse the sequence above Important:
Remember to keep the knees bent and the back straight.
When reassembling the scooter, remember to insert the locking pin,
because failure to do so may result in the batteries disengaging during use.
Ensure the battery wells are free from dirt and grit - this will affect the
performance of the battery contacts.
Off-Board Battery Charger
Your scooter is supplied with an off-board charging facility (Photo 10.5).
Please note that only chargers with a capacity of minimum 3.0 Amps and
maximum of 6.0 Amps supplied by your local authorized dealer should be
used.
1. Switch your scooter off at the key switch(Photo 7.5).
2. Swivel the charge connector cover located on the batter pack and
connect the charger (Photo 10.6).
3. Ensure that the charger plug is dry and intact before connecting it to the
mains and switching it on.
4. A reset button is located on the battery.
Please check that the button is pressed in (Photo 10.7).
P10.4 P10.5 P10.6 P10.7
Note:
The charger is capable of charging from 240V to 100V, and 2Amp,
off-board charger has 3 possible indications:
1. RED = Power is on.
2. YELLOW = Charging.
3. GREEN = fully charged.
Ensure the scooter is switched off before commencing the charging
process. After charging, always swivels the charging socket cover back into
place. This helps prevent water getting into the socket.(Photo 10.6)
Please note that the scooter has a safety circuit to prevent it from being
ver 2019.05.30E

OWNER’S MANUAL
17
Compact Scooter
Hand Controls
All of the drive controls for the scooter are to be found on the Tiller Control Box
(Photo 6.1).
The Preset Speed Knob
Turning this knob to the left, reduces your available maximum speed. Turning
it to the right, increases the available maximum speed.
The Battery Gauge
This gives an approximation of battery charge and is illuminated for clarity.
The gauge is “RED” empty, to“YELLOW” charge required, to “GREEN” charged.
As the scooter moves over diering terrain, the Battery Gauge will dip up and
down, this is normal. For a more accurate indication, stop the scooter and note
the reading. In cold, damp weather the gauge will dip more often as the
capacity and eciency of all batteries drops in such conditions.
TIP:
If your battery gauge has gone into the “RED” section you can increase your
remaining range by reducing your maximum speed. Remember you MUST
charge your battery overnight as soon as you can to prevent battery damage.
Operating the Lights
The lights are operated by pressing the blue button on the front console
panel. Press the button once to illuminate the lights, press the button again to
switch the lights o. Switch the lights on to make yourself more visible in low
levels of light, day or night.
Please note that the scooter has a safety circuit to prevent it from being driven o
during charging. If your scooter fails to respond to normal control after a charging
period, please check that the battery charger has been completely disconnected
from the scooter.
The o-board charger must be kept dry in temperatures between -25°C and 40°C
and not be subjected to mechanical damage. In all cases, the charger must only be
repaired by an authorized dealer.
WARNING!
You can only use the original charger from our company. Use other brand charger
may shorten your warranty period, and using an unknown charger may cause
damage to your scooter or may cause a re.
Use extreme caution to manage the battery and charger. Don’t throw the battery
into re. You should manage the exhausted battery according to the local law.
Don’t put the battery near to any heating device, which may cause the battery to
explode.
Don’t press the battery or stab it, or let it endure any high pressure, which may
cause short circuit or overheating.
NO SMOKING OR NAKED FLAMES WHEN CHARGING BATTERIES. DO NOT TOUCH
BATTERY PACK TERMINALS WITH METAL OBJECTS.
ONLY USE APPROVED REPLACEMENT BATTERIES. IF DAMAGE TO BATTERIES OR
BATTERY BOXES IS EVIDENT, CONTACT YOUR LOCAL DEALER IMMEDIATELY - DO
NOT ATTEMPT TO SERVICE THE BATTERIES.
DEALER WARNING!
REMOVE METALLIC JEWELLERY WHEN WORKING WITH BATTERIES.
WEAR GLOVES AND GOGGLES IF MOVING LEAKING BATTERIES. REPLACE DAMAGED
OR LEAKING BATTERIES IMMEDIATELY.
Fuses
There is a reset button as described previously. If a fault occurs, the button will pop
out. Switch the scooter o, press the button in and switch the scooter back on.
There is a 30A fuse tted to the positive terminal of battery. These fuses must be
replaced by an authorized service agent.
There is also a 2.5A fuse tted in the charger and a fuse in the mains plug of the
battery charger. These fuses must be replaced by an authorized service agent.
ver 2019.05.30E

OWNER’S MANUAL
18
Compact Scooter
11. Transportation
Packaging
To re-package the mobility scooter and prevent it from moving or being
damaged in the package, follow the below steps:
1. Put the scooter into the prepared carton (Photo 11.1), like the position in
Photo 11.2.
2. Cover the carton and x the whole carton with professional ropes for
packaging. (Photo 11.1 and Photo 11.2).
Important
Our cartons comply with GB/T4857.18 (equals to ISO4180/2):
1. Comply with test dropping from 500mm height
2. Pass transport testing requirements of 2.5m stacking
Notes
1. Please make sure there is no any obvious damage to the outside of the
carton or serial no. before opening it.
2. Reverse the packaging steps to get the scooters, owner manual, warranty
card, inspection report or quality certicates, and so on.
3. Read the owner’s manual carefully to familiar with assembling or operating
your scooters.
4. Turn on the scooter and check whether it is normally operated.
17
Packaging
We package the mobility scooter may prevent it from removing in the
package, shaking in the package or any scratch, by following the below
steps:
1, put the scooter into the prepared carton (Photo 11.1), like the position in
Photo 11.2.
2,Cover the carton and fix the whole carton with professional ropes for
packaging.(Photo 11.1 and Photo 11.2).
(P11.1) (P11.2)
(P11.3) (P 11.4)
Important
Our cartons comply with GB/T4857.18(equals to ISO4180/2):
1.Comply with test dropping from 500mm height
2. Pass transport testing requirements of 2.5m stacking;
Notes
1, Please make sure there is no any obvious damage on the outside of the
carton, crushed area or serial no. before open it.
2, reverse the packaging steps to get the scooters, owner manual, warranty
card, inspection report or quality certificates, and so on.
3 read the owner’s manual carefully to familiar with assembling or operating
your scooters.
4 turn on the scooter and check whether it is normally operated.
11.Transportation
ver 2019.05.30E

OWNER’S MANUAL
19
Compact Scooter
Transportation
Your scooter may be disassembled quickly and simply for transportation.
1. Switch o the scooter, make sure the motor is engaged.
2. Remove the basket.
3. Remove the seat, leaving the seat stem in position.
4. Place the basket on the oor mat appropriately (photo 11-1).
5. Lower the tiller, using the folding knob, to its lowest setting locking in the
basket. Make sure that there is at least 30mm between Tiller and battery pack
(photo 11-5).
6. Using the lifting handles provided carefully lift the scooter safely and
securely into the luggage compartment of the vehicle (photo 11-6,7).
TIP:
1. Please put all the parts after disassembling into the original carton from us
to insure the safe transportation.
2. To reverse the above steps to reassemble your scooter.
Important:
When reassembling the scooter, remember to insert the battery locking pin,
because failure to do so may result in the batteries disengaging during use.
Always secure your scooter parts before transportation. Remember to engage
the drive unit by pushing the freewheel lever forwards to stop the scooter from
moving. Don’t sit on the scooter during transportation.
Packaging and transportation environment conditions
The mobility scooter can be transported by common transportation vehicles,
but you need to prevent them from strong impact, vibrating or any snow or
rain. This is claried in the order contract.
The packaged scooters should be put into an environment between -20ºC ~
45ºC temperature, and humidity less than 93%, no congeal or corrosive air
with good ventilation.
18
Transportation
Your scooter may be disassembled quickly and simply for transportation.
1. Switch off the scooter, make sure the motor is engaged.
2, Remove the basket.
3. Remove the seat, leaving the seat stem in position.
4. Place the basket on the floor mat appropriately(photo 11-1).
5. Lower the tiller, using the folding knob, to its lowest setting locking in the
basket. Make sure that there is at least 30mm between Tiller and battery
pack(photo 11-5).
6. Using the lifting handles provided carefully lift the scooter safely and
securely into the luggage compartment of the vehicle(photo 11-6,7).
TIP:
1. Please put all the parts after disassembling into the original carton
from us to insure the safe transportation.
2. To reverse the above steps to reassemble your scooter.
Important:
When reassembling the scooter, remember to insert the battery locking pin,
because failure to do so may result in the batteries disengaging during use.
Always secure your scooter parts before transportation. Remember to
engage the drive unit by pushing the freewheel lever forwards to stop the
scooter from moving. Don’t sit on the scooter during transportation.
P11-5 P11-6 P11-7
Packaging and transportation environment conditions
The mobility scooters can be transported by common transportation
vehicles, but you need to prevent them from strong impact, vibrating or any
snow or rain. This is clarified in the order contract.
The packaged scooters should be put into an environment between
-20〜45temperature, and humidity less than 93%, no congeal or
corrosive air with good ventilation.
ver 2019.05.30E

OWNER’S MANUAL
20
Compact Scooter
12. Guidance for Safe Operation
Basic Driving
Caution!
It is advisable during the rst few sessions of operating your scooter that the
area around you is clear of obstacles and pedestrians.
Before operating your scooter, ensure the seat height and position has been
adjusted to your satisfaction and the tiller angle has been set for optimum
safety and comfort.
Please see the “General Warnings”, “Getting on Your Scooter” and “Tiller
Adjustment” sections in this handbook.
1. Make sure you are properly seated on the scooter and that the speed
control knob is turned fully to the left.
2. Turn the key switch to the “ON”position.
3. On the tiller, use the throttle lever as described earlier. You will gently
accelerate. Release and you will gently stop. Practice these two basic functions
until you get used to them.
4. Steering the scooter is easy and logical. Be sure to remember to allow
enough clearance when turning corners so that the rear wheels clear any
obstacle.
5. Shortcutting a pavement corner can cause the back wheel to go o the
pavement, causing problems if the corner is very rough. Avoid this at all times
by steering an exaggerated curve around the obstacle.
6. When steering in a tight spot, such as entering a doorway or when turning
around, stop the scooter and then turn the handlebar to where you want to
go, then apply power gently. This will make the scooter turn very sharply. It is
also recommended that the preset speed is set to a slower setting to aid
control in tight spots.
7. Reversing requires attention - exercise caution when reversing, especially
down slopes. When reversing, always turn the handlebars in the opposite
direction to the way you want to go. The more you press the throttle lever, the
faster you will go.
Reverse speed is 50% slower than forward speed. If the scooter does not move
in reverse, carefully turn the speed control knob clockwise until the scooter
moves gently backwards.
ver 2019.05.30E
Table of contents