Lone Star Marine GX1 User guide

GX1 GX2 GX2-HD GX3 GX4 GX5 GX6
Congratulations on the purchase of your new Lone Star Marine Drum Winch. All Lone Star Marine Drum
Winches come with a 5 Year Recreational Warranty on the motor, gearbox, and solenoid, and switch gear,
plus a Lifetime Warranty on water ingress in the motor and gearbox. LSM winches are made to get wet,
making them the perfect option for deck mounts or wet wells. Please adhere to the guidelines below for
installation. Please fill out and return the warranty portion of this document along with a copy of your
purchase receipt within 30 days to activate the warranty on your new winch. Warranty transfer is only
available with original purchaser receipt.
Standard Inclusions
Your new GX Winch Kit should include an anchor winch, switch panel with circuit breaker,
solenoid, and nut and bolt kit. GX1, GX2, GX3, GX4 anchor winches include a backing
plate. GX5, GX6 anchor winches include large washers used in leu of a backing plate.
Maintenance and Use
The Lone Star Marine range of drum winches are robust and reliable and will last years and years
with very little maintenance. However, to keep your winch looking and performing at its best there
are a few simple guidelines to follow.
-Do Not use your anchor winch for any other purpose than retrieving your anchor without prior
written consent. This Warranty does not cover damage caused by misuse.
-Do Not jam the anchor into the bow sprit (anchor davit) upon retrieval. Repeatedly doing so can
shorten the life of your transmission and damage your vessel. When your anchor is close just tap
the switch until fully raised. If using chain guard leave the last meter off ahead of the chain for an
indication of proximity.
-Do Not engage the up switch after the anchor is fully locked in to the bow sprit. This may damage
the bow sprit, your vessel, or cause the transmission to lock up.

-Do Not attempt to free a fouled anchor without tying the anchor line off first. This may damage
your vessel, bow sprit, or the winch.
-Do Not engage the winch while the boat is underway. Doing so will most certainly cause damage to
the vessel and could cause injury or death. Lone Star Marine claims no liability in the event of
intentional or accidental discharge of the anchor while the boat is underway.
-Do Not attempt to remove the emergency manual release while pressure is on the drum. The drum
must be in a neutral position to use this feature.
-Always dis-engage the circuit breaker when the winch is not in use.
-Lightly rinse your winch & chain with freshwater periodically after use.
-A light spray with inox or other lubricant annually over the unit is ideal for moored vessels, vessels
little regular washing, or before layup periods.
-Release tension on the winch & dis-engage the circuit breaker before putting the boat away for
extended periods of time.
Manufacturing Guarantee
All LSM GX series winches are manufactured in Australia under strict Quality Control conditions. We
guarantee this product to be free from Mechanical & Electrical defect on the date of purchase.
Use this product at your own risk
Lone Star Marine or its distributors will not be liable in the event of damage, accident,
injury, or death as the result of use, misuse or installation of this product. Lone Star
Marine or its distributors will not be liable in the event of damage, accident, injury, or
death as the result of mechanical or electrical failure of this product. Always keep hands
away from the winch and rope while in operation. LSM winches are very powerful and
can cause series injury if hands, fingers or other body parts are caught between the drum
and cradle or caught up in the rope & chain. Please keep children and pets away from this
product while in use.
Warranty-Recreational Use
The GX series features a 5 + Life Warranty. The motor, transmission, solenoid, & switch gear are covered
against normal wear and use. The motor and transmission are also covered for Life against Water
Ingress. Warranty does not cover solenoids or switch panels with water damage. Warranty does not cover
electrical cable or rope and chain. Warranty does not cover anchor loss or rope and chain replacement.
Warranty does not cover bow sprit or vessel damage due to of use or misuse. Warranty does not cover
damage from faulty installation or undersized cable.
Warranty-Commercial Use
LSM Winches feature a 2 Year Warranty for Commercial Use. Warranty does not cover solenoids or switch
panels with water damage. Warranty does not cover electrical cable or rope and chain. Warranty does not
cover anchor loss or rope and chain replacement. Warranty does not cover bow sprit or vessel damage due
to of use or misuse. Warranty does not cover damage from faulty installation or undersized cable.

Terms and Conditions
-Always have your winch installed by a professional. LSM will not warranty damage or malfunction due
to improper installation.
-Use cable size recommended in this document for each winch. LSM does not warranty motor damage
due to undersized cable or faulty connections.
-Winches are to be used for raising and lowering your anchor only. LSM will not warrant winches used
for any other purpose without prior written consent.
-In the event of a warranty claim or fault email a description of the issue to your retailer or
picture if applicable. LSM or their distributors may request additional information and pictures. LSM
value our customers and will determine the most efficient course of action to get you back on the water
as soon as possible.
-Damaged items will be replaced or rebuilt at the discretion of LSM.
-Freight & Labour charges may be covered through our dealer network only (if applicable & at the
discretion on LSM and our Offices) and will only apply to mechanical or electrical defect from normal
wear and use.
Common Fitting Styles
Installation Notes & Advice
Changing Motor Gland Orientation
Motors are assembled
and waterproof sealed in
house. DO NOT remove
disassemble or attempt
to modify the cable
glands or bolts pictured
at the top of the motor.
GX1, GX2, GX3-Motor Glands (where the cables come out) are adjustable
to 4 different orientations (N, S, E, W) for easier fitting on your application. For
deck mounting face the glands down or away from the front of the boat. They
should not face the sun or direct water spray. To adjust the motor glands the
motor must be removed from the gearbox and repositioned using the four bolts
pictured. Note these bolts require an 8mm wrench. The gearbox collar will have
to be removed to access the 2 bolts on the drum side.

GX4, GX5, GX6 Motor Glands (where the cables come out) are adjustable to 4 different orientations
(N, S, E, W) for easier fitting on your application. To adjust the motor gland position the motor must be
removed from the transmission, turned, and re-attached. GX4, GX5, GX6 transmissions require an Allen key for
this operation. There is no need to remove the collar from the transmission or drive from the shaft. Remove
the six cap head bolts from the transmission coupling. The motor with coupling attached can then be removed
from the transmission. Once motor with coupling are removed change motor orientation by removing the 4
internal cap head bolts and re-position the coupling on the motor.
Changing Motor Orientation on Drum
All Models
Gear/Motors are adjustable to 24 different
positions. To adjust the Gear/Motor remove the
four bolts around the transmission collar and
replace bolts into new holes provided. There are
8 drilled holes in the cradle and 3 adjustment
holes per position in the collar. Note the Bearing
cover plate (underneath) must also line up to the
chosen holes. Some positions only allow 3 bolts
to be used as one hole will be in the void above
the shaft. This is ok, only 3 bolts are required for
Installation & operation.
Emergency Manual
Release
To disengage the drum
for emergency manual
release, turn the thumb
wheel counter-clock
wise. You will require
50mm (appr. 2 inches) of
clearance. Tie rope off
before disengaging if on
water. Drum must be in a
neutral position with no
pressure on the rode.
Connecting Motor to
Power
L4 connections slide into
the barrel crimps provided.
Use a swage to crush the
barrel crimp ensuring a
solid connection. Slide
epoxy filled heat-shrink
provided over join and
apply heat to insulate.
There is no permanent
positive or negative as the
motors are reverse polarity.

Have further questions on installation & use?
Visit our Lone Star Marine Winch Channel for videos on the GX Series.
Enjoy using your new winch!
This document is for private use and not to be shared or promoted publicly.
Lone Star Marine Pty Ltd ABN 67 130 544 062 All Rights Reserved
Aligning Drum to the Bow Sprit (anchor davit)
Drum should be central to the bow sprit (anchor davit). This will provide the best line lay and prevent un-even
filling of the spool and overflow to one side. The drum can be off centre by a maximum of 20% of the drum width
without issue. Mounting your winch to one side of the bow sprit (anchor davit) will result in overfilling to one
side.
Drum Cradle Orientation
GX1, GX2, GX3 anchor winches have a symmetrical bi-directional frame and can face either direction when
mounted both internally or externally.
GX4, GX5, GX6 winches have an asymmetrical frame & stiffener on the rear side of the cradle. This stiffener
should face the stern when mounted to the top deck. If mounted internally it can face either direction.
or externally.

All fields to be completed by the owner of the vessel to activate the
winch warranty.
Boat Owners Details:
Full Name: Date: / /
Address:
Phone:
Email:
Boat and Purchase Details:
Winch model purchased: GX1 GX2 GX3 OTHER-
Place of purchase: Date of purchase: / /
Boat make and model:
Boat registration:
Original purchase receipt attached: Yes No
“I have read this document in its entirety and agree to use this product at my
own risk.”
Signature: _____________________
Once completed return to:
P.O. Box 1001 Seaford
Victoria, Australia 3198
Alternatively, scan and email to sales@lonestarmarine.com.au or (North American
sales) info@hammermarine.com
Enjoy using your new winch!
3/16 Malibu Circuit
Carrum Downs, VIC 3201
(03) 8774 4582
ABN: 67 130 554 062
sales@lonestarmarine.com.au
www.lonestarmarine.com.au

GX & Gen Series Anchor Winch Troubleshooting Guide
Key Parts
•Winch Motor-This is the tubular part of the drum winch to which the leads are
attached. Your winch model number will be on a sticker on the motor. Please
ensure you have the model number when calling for assistance.
•Winch Gearbox-This is what the winch motor is attached to. The gearbox has
an input though the side that the drum shaft goes through. The gearbox is
what spins the drum.
•Solenoid-This is usually mounted behind the dash of the boat. It will have 4
posts on top that connect to the:
-1 Positive connection from the circuit breaker (front right)
-1 Negative directly from your battery (front left)
-2 connections to the winch motor. Note these are interchangeable as the
motors are reverse polarity. (rear right and left)
The 3 small connections on the front are for:
-Outside connections go to the Up/Down switch on the dash.
-Middle connection goes to the Neg post on top of the solenoid (front left)
•Circuit Breaker-In the switch panel, the resettable circuit breaker should say
MP on the front. Push the blue button to disable the circuit, push the yellow
paddle back up into the set position to engage the circuit.
•Switch-This is a toggle or rocker switch set in the facia next to the circuit
breaker. Note only the spade terminals on the left-hand side are used, all
terminals on the right-hand side should remain empty.
-Top and bottom posts should connect to the front outside terminals on the
solenoid.
-Middle post should connect to the AUX side of the circuit breaker.
•Gearbox Collar-This connects the gearbox to the side of the drum cradle.
•Drum Cradle-U shaped bracket that holds the drum
•Drum-Shaft with two circular flanges welded on each end, this is what holds
the rope & chain.
Customer Service
sales@lonestarmairne.com.au +61 (03) 8774.4582

1.1 New Install-Winch not working:
“I have installed the winch and it is not firing up.”
Please ensure all steps below have been taken in order before calling for assistance:
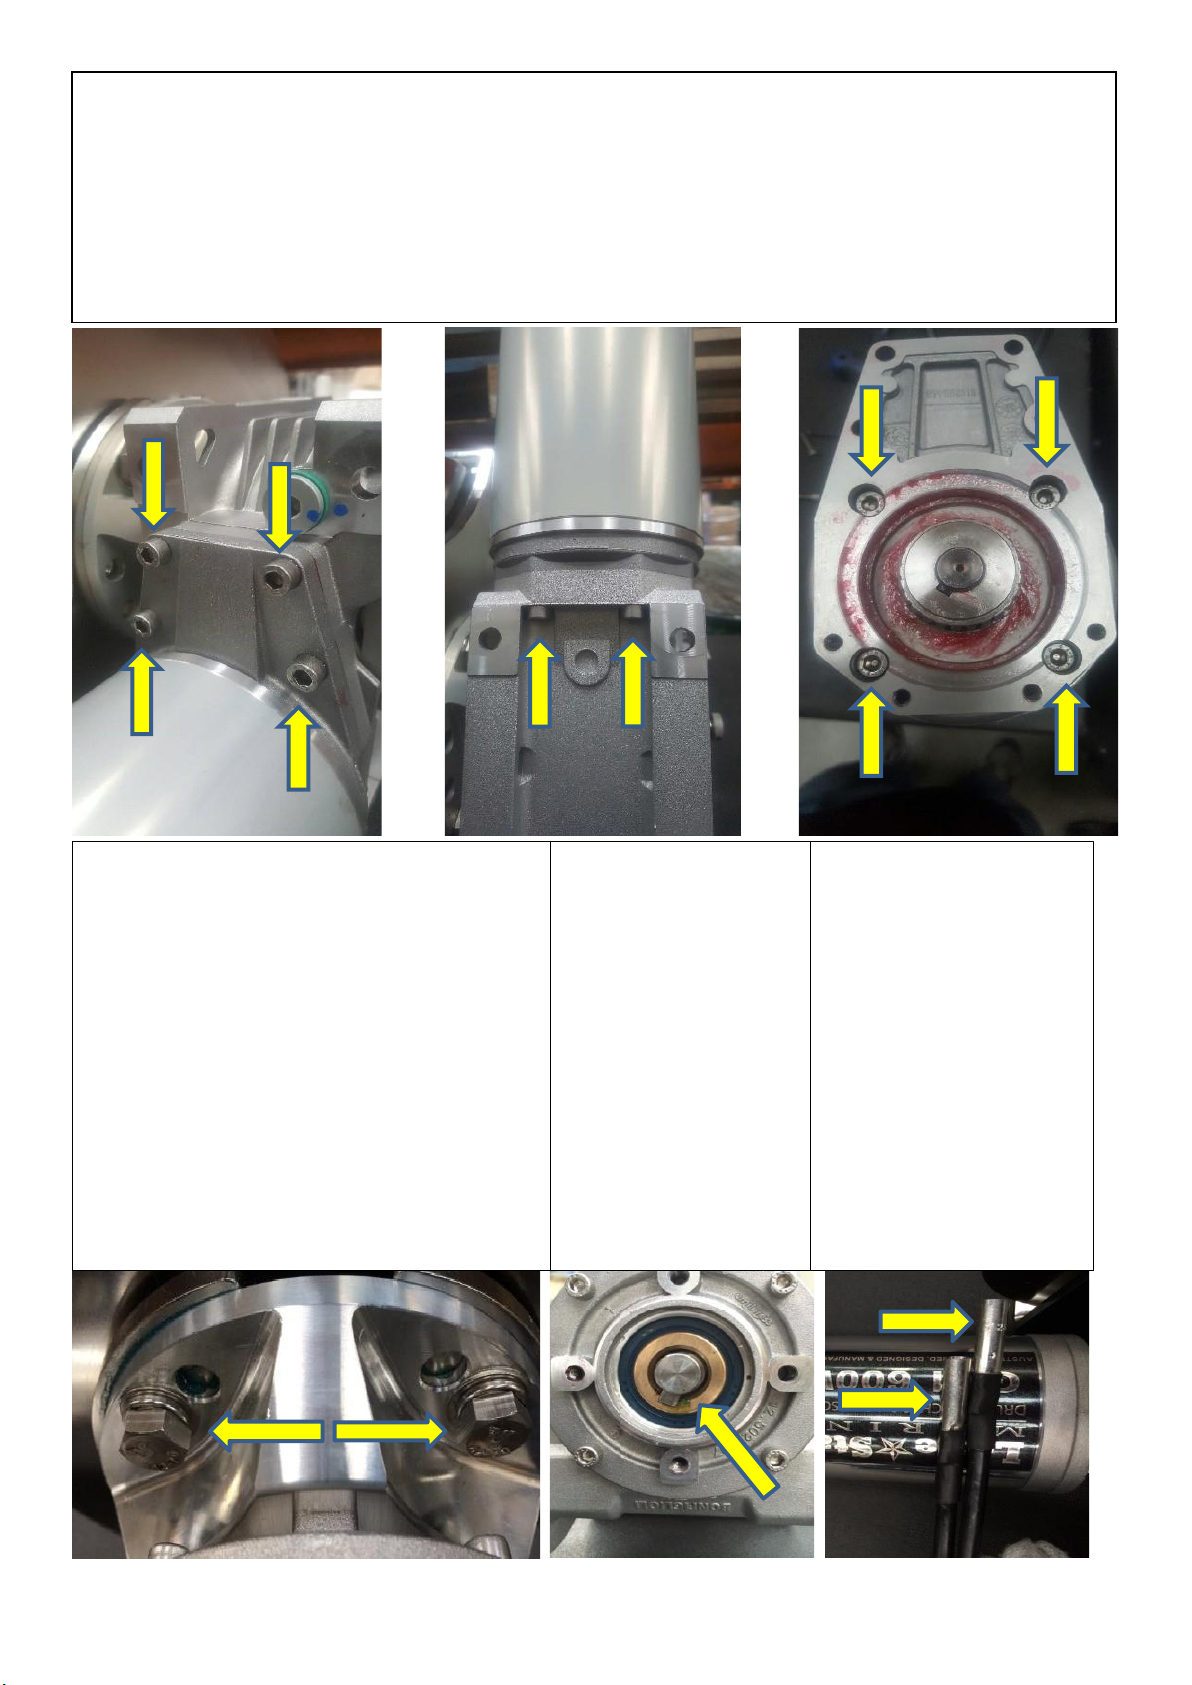
•Ensure all battery cable connections are tight.
•Ensure battery cable has been crimped into motor leads with a swage or other device. If it
has not you will not have a good connection and performance will suffer, you may also have
sporadic issues.
•Ensure solenoid has not been mounted directly to aluminium. If the boat is aluminium,
mount the solenoid to Teflon or other non-conductive material, then mount that to the boat.
•Ensure solenoid is mounted with terminals facing up
•Ensure switching wire connections between rocker switch and solenoid are properly
crimped and tight.
•Ensure a jumper lead is connected from AUX post on the circuit breaker to the middle
spade pin on the left hand side, back of the rocker switch.
1.2 Previous Install-Winch not working:
“Was working fine last season, but now it will not function.”
•Is the solenoid engaging?
Is the solenoid clicking when the up or down switch is engaged?
If the solenoid is making a “brrrrrrr” sound of multiple partial clicks per second, this is a
power supply issue. It means your solenoid is not getting enough power through it to turn
the winch motor. 95% of the time this is due to:
-Bad connections either at the battery, circuit breaker, or solenoid.
-Low Battery Voltage.
-Corroded connections or cable inside the sheath.
Please check all connections, battery voltage, and ensure cable is not corroded inside the
sheath before calling for assistance.
If the solenoid is making a single click sound carry on to next step below.
•Solenoid appears to be engaging, a single click can be heard when the up or down button
is pressed. Note: this still does not guarantee the solenoid is functioning correctly continue
to instructions below.
1.3 Checking Motor, Circuit Breaker, & Solenoid
Note the steps below MUST be completed in order for a correct diagnosis.
•To Check the Winch Motor
-Grab a spare battery and take it to the area where the solenoid is mounted
-Disconnect the leads from the solenoid that go to the winch motor. Note these are on the
two rear posts on the solenoid.
-Touch them to the battery. The winch should fire up in one direction. When reversed it
should fire up in the other direction.
Note: If the motor works in both direction the issue will lie with the power supply, solenoid, or
circuit breaker.
•Checking the solenoid and circuit breaker
-Reconnect the motor leads to the solenoid
-On the back of your circuit breaker there is a battery pos coming in on the left-hand stud
(BAT), and a battery positive going out on the right-hand stud (AUX). Disconnect the lead
from the left-hand stud and add it to the right-hand stud. Ensure the nut is done up tight
connection the leads together.
-Engage the operating switch up and down. If the winch works your issue is with the circuit
breaker. Contact Lone Star for a replacement.
-If it does not work the issue is most likely within your solenoid. Contact Lone Star for
replacement.

Wiring
Diagram
mm squ. or 3B&S t
Type 1 wire is 25
inned
copper cable. G
with
es
ch
X4 & GX5 win
exceptionally long rear runs (
han 8 m) may
mor
t
e
o
not use cable
r
require larger 35mm squ. cable.
D
S
M winch install.
smaller than recommended for an
y L
Do not use non tinned automoti
ve
g
rade cable.


This manual suits for next models
6
Table of contents
Popular Winch manuals by other brands

MSA
MSA SURE STRONG SCE1074021050 Instruction for operation and maintenance

Comeup
Comeup GTD-800 manual

Robust
Robust RB-EH 250 Original operating instructions

Atlantic Products
Atlantic Products BW230C Installation instructions & operating manual

Mile Marker
Mile Marker PEC8 Installation and operator's manual

Comeup
Comeup CWG-10151 quick start guide

HAUL MASTER
HAUL MASTER 95541 Owner's manual & safety instructions

DK2
DK2 EW8020 Assembly & operating instructions

Quadratec
Quadratec Q-Performance Stealth Series Assembly and installation manual

Ramsey Winch
Ramsey Winch PATRIOT 9500 UT owner's manual

KC
KC 30.000 manual

Warn
Warn M15000 installation instructions