Loos & Co Cableware Locoloc HC-S724H User manual

HC-S724H
Handheld Battery-Powered Cutter
Operator’s Manual
Locoloc
®
Cutting Tools


www.loosnaples.com Toll Free: 800-321-LOOS (5667)
Title Page
Specications 1
Standard Accessories 2
Safety Guideline 3
Power Supply Connection 4
General Information Guide 5
Operating Instructions 8
Blade Sharpening 9
Tool Troubleshooting 10
Battery Troubleshooting 12
Warranty 13
CONTENTS

www.loosnaples.com Toll Free: 800-321-LOOS (5667)
SPECIFICATIONS
CUTTING TOOL
Output: 8 ton
Weight: 11 lbs.
Size: 13.2”L x 14.7”H x 3.3”W
Jaw Opening: .95”
FEATURES
CAPACITIES
Wire Rope: 7/8” (22 mm)
Rebar (Sc 40): 5/8” (16 mm)
Rebar (Sc 60): 1/2” (12 mm)
Ground Rod: 5/8” (16 mm)
ACSR: 477 MCM
Guy Wire : 5/8” (16 mm)
EHS Guy Wire : 7/16” (11 mm)
Soft Steel Bolts: 1/2” (12 mm)
Chain: DO NOT CUT
• Lightweight and Portable
• Works in Any Position
• 180° Rotational Head
1

www.loosnaples.com Toll Free: 800-321-LOOS (5667)
STANDARD ACCESSORIES
2
BATTERY CARTRIDGE
BATTERY CHARGER
CARRYING CASE

www.loosnaples.com Toll Free: 800-321-LOOS (5667)
SAFETY GUIDELINES
This guide presents the setup, use, maintenance and troubleshoot-
ing of the charger along with instructions for conditioning your bat-
teries.
Before using the battery charger, read all instructions and caution-
ary markings on the battery charger, battery and on any product
using the battery.
To reduce the risk of injury, use this charger only with
authorized products. Other batteries or adapters may cause
personal injury and/or damage.
• Do not expose the charger to rain, snow, or direct sunlight.
• Use the charger at room temperature 68°F (20°C) to 77°F
(25°C).
• Place the charger in a well-ventilated area, free of foreign
objects/matter.
• To reduce risk of electric shock, unplug the charger from
the outlet before cleaning or changing adapters.
• Dispose of used batteries in accordance with local
hazardous material laws.
• Do not disassemble, incinerate, modify, or short-circuit
batteries, charger, or related components.
WARNING
3

www.loosnaples.com Toll Free: 800-321-LOOS (5667)
4
The power supply uses a nominal 120 volt circuit. The power supply
manages and conditions the power input to the charger. The power
supply does not use a resettable or replaceable fuse. If a power
surge occurs the power supply temporarily interrupts the current
supply until the condition is corrected. If the power light on the pow-
er supply fails to light, an extreme surge may have occurred and
the power supply may trigger an internal fuse that must be serviced
by the manufacturer. Return the power supply for repair or replace-
ment immediately.
POWER SUPPLY CONNECTION
Never alter an AC cord or its plug. If it does not t into your
outlet, have a proper outlet installed by a qualied electri-
cian. An improper connection can cause an electric shock.
To reduce the risk of electric shock, the charger must be
grounded.
Before using an adapter, ensure that the outlet box is
grounded. If you are not sure the box is grounded, have
it checked and repaired, if necessary, by a qualied elec-
trician.
WARNING
120-volt

www.loosnaples.com Toll Free: 800-321-LOOS (5667)
The following steps are guidelines for safe operation of the cutters.
Please take the time to review them as these are helpful hints that
have been accumulated over the years.
1. After inserting a battery pack, check if it is securely in place by
pushing it gently, and a “click” will be heard. To remove battery,
press the latch and pull out the battery pack.
2. Open the xed cut head, insert cable, then close the xed cut
head and press the trigger.
3. Once the cut is done, press the release button to retract the
blade.
4. Stay within the maximum cutting limits of each tool as listed.
5. Try to keep the cutter head clean. When cleaning, use a spray
lubricant to avoid a build up of dirt and sand which damage the
cutter head.
6. Stop cutting when the blade reaches the extreme end of its
advance. If the material being cut (usually wire rope or soft
cables) seems to be cut but does not break free of the tool, this
indicates that the blade is jammed on a small piece of cable.
Refer to “troubleshooting” to free the blade (Page 11).
7. All tools require proper care. Occasional cleaning and
degreasing in solvent, and sharpening blade and cutter head,
will keep these tools operating without problems
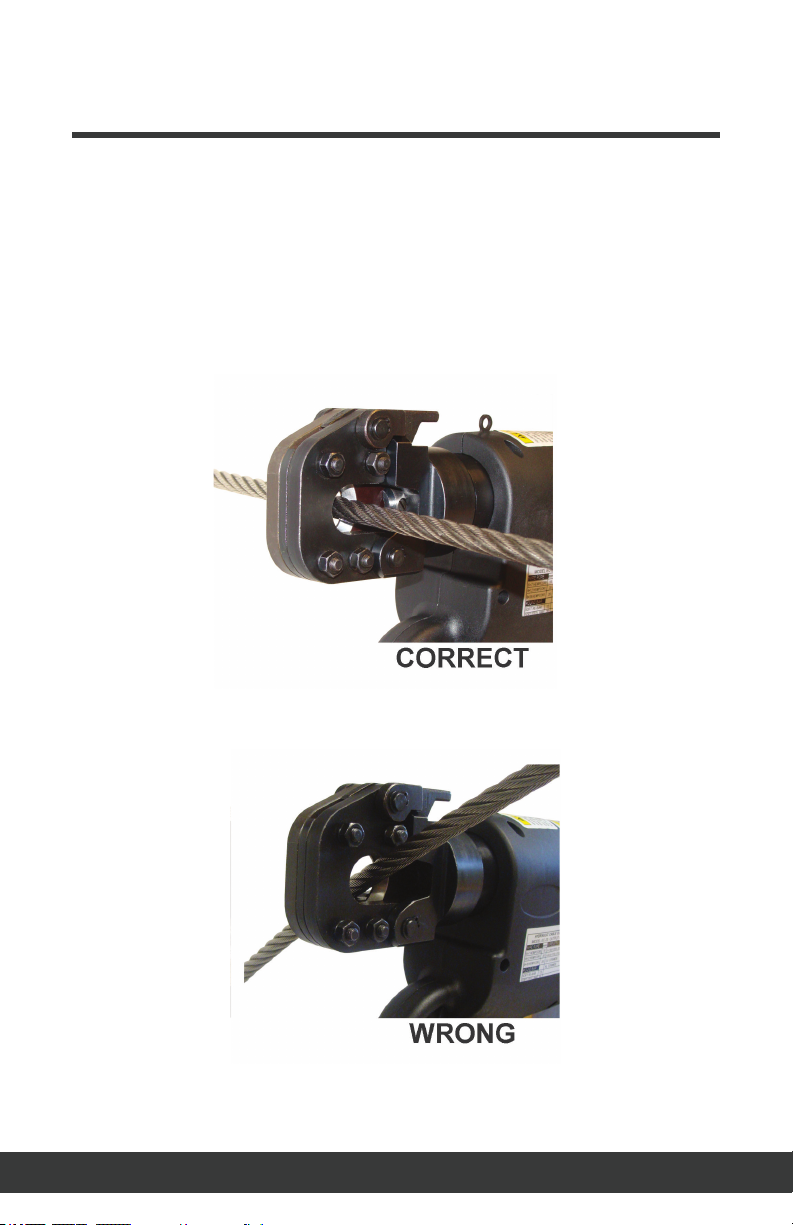
8. The most common problem encountered is blade breakage.
Most breakage occurs because the cutter head is not
5
GENERAL INFORMATION GUIDE

www.loosnaples.com Toll Free: 800-321-LOOS (5667)
6
securely latched before cutting. If the latch is not secured,
the blade will push open the cutter head and damage both the
body head and blade. This causes the outside ear to the blade
to break on an angle. In some cases, the whole cutter head
may crack in half. Cutting material that is not specied may
also cause blade damage. In time, these blades will fatigue and
crack and must be replaced.
9. There may be a residue of oil present on new tools when they
are removed from the original shipping container. This is to
protect the tool from corrosion during shipment and storage, and
should not be considered defective. The tool can be cleaned
with a spray degreaser or soapy water.
10. If tool is jammed, avoid beating directly on the tool with a
hammer, especially avoid attening the piston cylinder. Use a
hammer in conjunction with a block of wood or soft material to
free the blade. See troubleshooting on pages 10 and 11.
11. All tools can be reconditioned and overhauled. Call Huskie
and obtain an RGA# for returning tools (see page 15 for more
information.)
12. Always return tools to their carrying case to protect them from
sand and dirt.
13. Always carry a spare blade (Part No. 24-08), preferably attached
to the carrying case.
14. When cutting, keep area clear of spectators as hardened metals
may y apart when severed.
GENERAL INFORMATION GUIDE

www.loosnaples.com Toll Free: 800-321-LOOS (5667)
7
GENERAL INFORMATION GUIDE
15. Always cut the material at a 90° angle to the blade. Any other
angle may cause the blade and head shear to fracture. See
illustration below.
16. Head rotates 180° for proper cut angle.

www.loosnaples.com Toll Free: 800-321-LOOS (5667)
OPERATING INSTRUCTIONS
1. Before cutting, make sure the material being cut is within
the proper cutting capacity of the tool being used.
2. Open cutter head by lifting latch.
3. Insert material between cutter head and blade and secure
latch. It is important that you check the latch for proper en-
gagement before continuing with the cut. Failure to secure
the latch can result in severe tool damage and personal
injury.
4. Align the material 90 degree angle to the blade. This will
ensure a proper cut with minimal distortion. If the material
is cut at any other angle, severe blade damage may occur.
Refer to diagram on page 7 for proper alignment.
5. Once the cut is made, the release lever under trigger can be
depressed to retract the blade.
6. These cutters do not have a by-pass cartridge like our com-
pression tools, so they should be released once the cut is
made and not continued to be advanced. If the tool is ad-
vanced under pressure with no load, it is dicult to release
the blade. Refer to the troubleshooting on page 10 if this
condition occurs.
7. Always wear eye protection and any other specied safety
equipment when cutting. Be sure surrounding area is clear,
as hardened metals may y apart when severed.
8. Do not use to cut Bridge Strand. Contact Loos Naples
for these cutters.
8

www.loosnaples.com Toll Free: 800-321-LOOS (5667)
BLADE SHARPENING INSTRUCTIONS
9

www.loosnaples.com Toll Free: 800-321-LOOS (5667)
TOOL TROUBLESHOOTING
10

www.loosnaples.com Toll Free: 800-321-LOOS (5667)
11
1. Problem: Small wire strands or pieces of cable or debris get
jammed between the cutter head and blade, not allowing the
blade to retract.
Solution:
A)
Hold release lever down while tapping on the ram
with a block of wood and a hammer. If this does not
work or tool continues to hang up, proceed to step “B”.
B)
Remove blade screw and release the ram. Then disassemble
cutter head and remove burrs from both blade and head shear,
using a at grinding stone on the rolled edge. Do not sharpen
like a knife - leave cutting edge at! See illustration on page 9.
2. Problem: Blade is advanced under pressure with no load and
the release lever seems to be stuck.
Solution:
A) Use both hands to depress release trigger using body weight
and the ground or other strong surface for support.
TROUBLESHOOTING CUTTER
FIXED CUT HEAD BLADE
RELEASE
BUTTTON
BATTERY
TRIGGER
BATTERY LATCH

www.loosnaples.com Toll Free: 800-321-LOOS (5667)
BATTERY TROUBLESHOOTING
12

www.loosnaples.com Toll Free: 800-321-LOOS (5667)
13
WARRANTY
Huskie Tools products carry a warranty that makes us a leader in the tool
industry.
PRODUCT WARRANTY
Series 7 Pro Line battery operated products 5 Years
IL-7ND 3 Years
ECO-Series products 1 Year
Power Tools 3 Years
Batteries (BP-185) 3 Years
Chargers (CH-185, CH-285) 3 Years
The warranty does not cover any damages incurred from a Huskie tool
including damages to property, bodily injuries, and lost wages resulting
from such injuries. This warranty solely covers the repair or replacement
of tools supplied by Huskie. These remedies are exclusive, and the total
liability of Huskie Tools, LLC. whether based on contract, warranty, neg-
ligence, indemnication, strict liability or otherwise, shall not exceed the
purchase price of the tool. In no event shall Huskie Tools, LLC. be liable
for consequential, incidental or special damages.
HUSKIE TOOLS, INC. MAKES NO OTHER WARRANTIES OF ANY
KIND, EXPRESSED OR IMPLIED, AND ALL IMPLIED WARRANTIES
INCLUDING ANY WARRANTY OF MERCHANTABILITY AND FITNESS
FOR A PARTICULAR PURPOSE ARE DISCLAIMED.

www.loosnaples.com Toll Free: 800-321-LOOS (5667)
14
WARRANTY (CONT.)
Huskie reserves the right to determine all warranty claims. Huskie will
not waranty tools containing parts or batteries not originally supplied by
Huskie. Failure due to misuse, improper maintenance, misapplication, not
following instructions or warnings, abuse or repairs attempted by anyone
other than Huskie Tools, Inc. or an authorized service center renders this
warranty null and void.
Repair and Warranty Claims
All claims must be sent to Huskie for inspection and authorization. A
Return Goods Authorization (RGA) is required before shipping tools to
Huskie. Secure the authorization by telephoning or writing to Huskie’s
main oce with details of the claim. Non-warranty repairs are handled
using the same procedure. Repairs exceeding 50 percent of the cost of a
new tool will be advised before repairs are made.
Payment Terms
Upon credit approval, Huskie’s standard payment terms are net-30 days.
Visa, Mastercard, Discover, and American Express are also accepted.
Freight
All Huskie Tools are FOB, Glendale Heights, Illinois. Goods will be shipped
pre-paid and added, unless otherwise specied. Freight shipments over
$17,000 are pre-paid.
Quotations
Special quantity quotations should be phoned in to discuss the scope of
your tool requests.

www.loosnaples.com Toll Free: 800-321-LOOS (5667)
15
WARRANTY (CONT.)
Complete Support Services
Our customers have direct access to us for training, service, and
problem solving. As specialists in tools, we maintain a trained repair sta
and a large stock of parts. This contrasts with many tool suppliers who
carry tools as a sideline without oering support services. Here are some
reasons why our customers love to do business with us:
• Quick delivery
• We maintain inventory in our headquarters
• Training and troubleshooting services
• Fast repair service
• Design and engineering service for special tools
HOW TO GET SERVICE UNDER THE TERMS OF THE
LIMITED WARRANTY
Return your product directly to Huskie Tools, Inc. as our
representative network is not prepared to service the product under
the terms of this warranty.
1. Write, call, or fax Huskie stating the tool’s purchase date and problem.
You will be given an RGA # to assure that your merchandise will be prop-
erly handled upon its receipt.
2. CAUTION: Make sure the product is packaged adequately so as to
prevent damage or loss during transit. The shipment must be prepaid and
we recommend that it be insured. A cover letter indicating the reason for
the return should be included in order to facilitate repairs.
3. To ll out an RGA online, go to HuskieTools.com and click on “Repairs.”
198 N. Brandon Drive, Glendale Heights, IL 60139
Phone: (800) 860-6170 Fax: (800) 345-3767
HuskieTools.com


Rev. 7/11/2019
INST-36
901 Industrial Blvd • Naples, FL 34104
Tel: (239) 643-LOOS • Fax (239) 643-4558
E-mail: [email protected] • Website: www.loosnaples.com
Table of contents
Other Loos & Co Cutter manuals