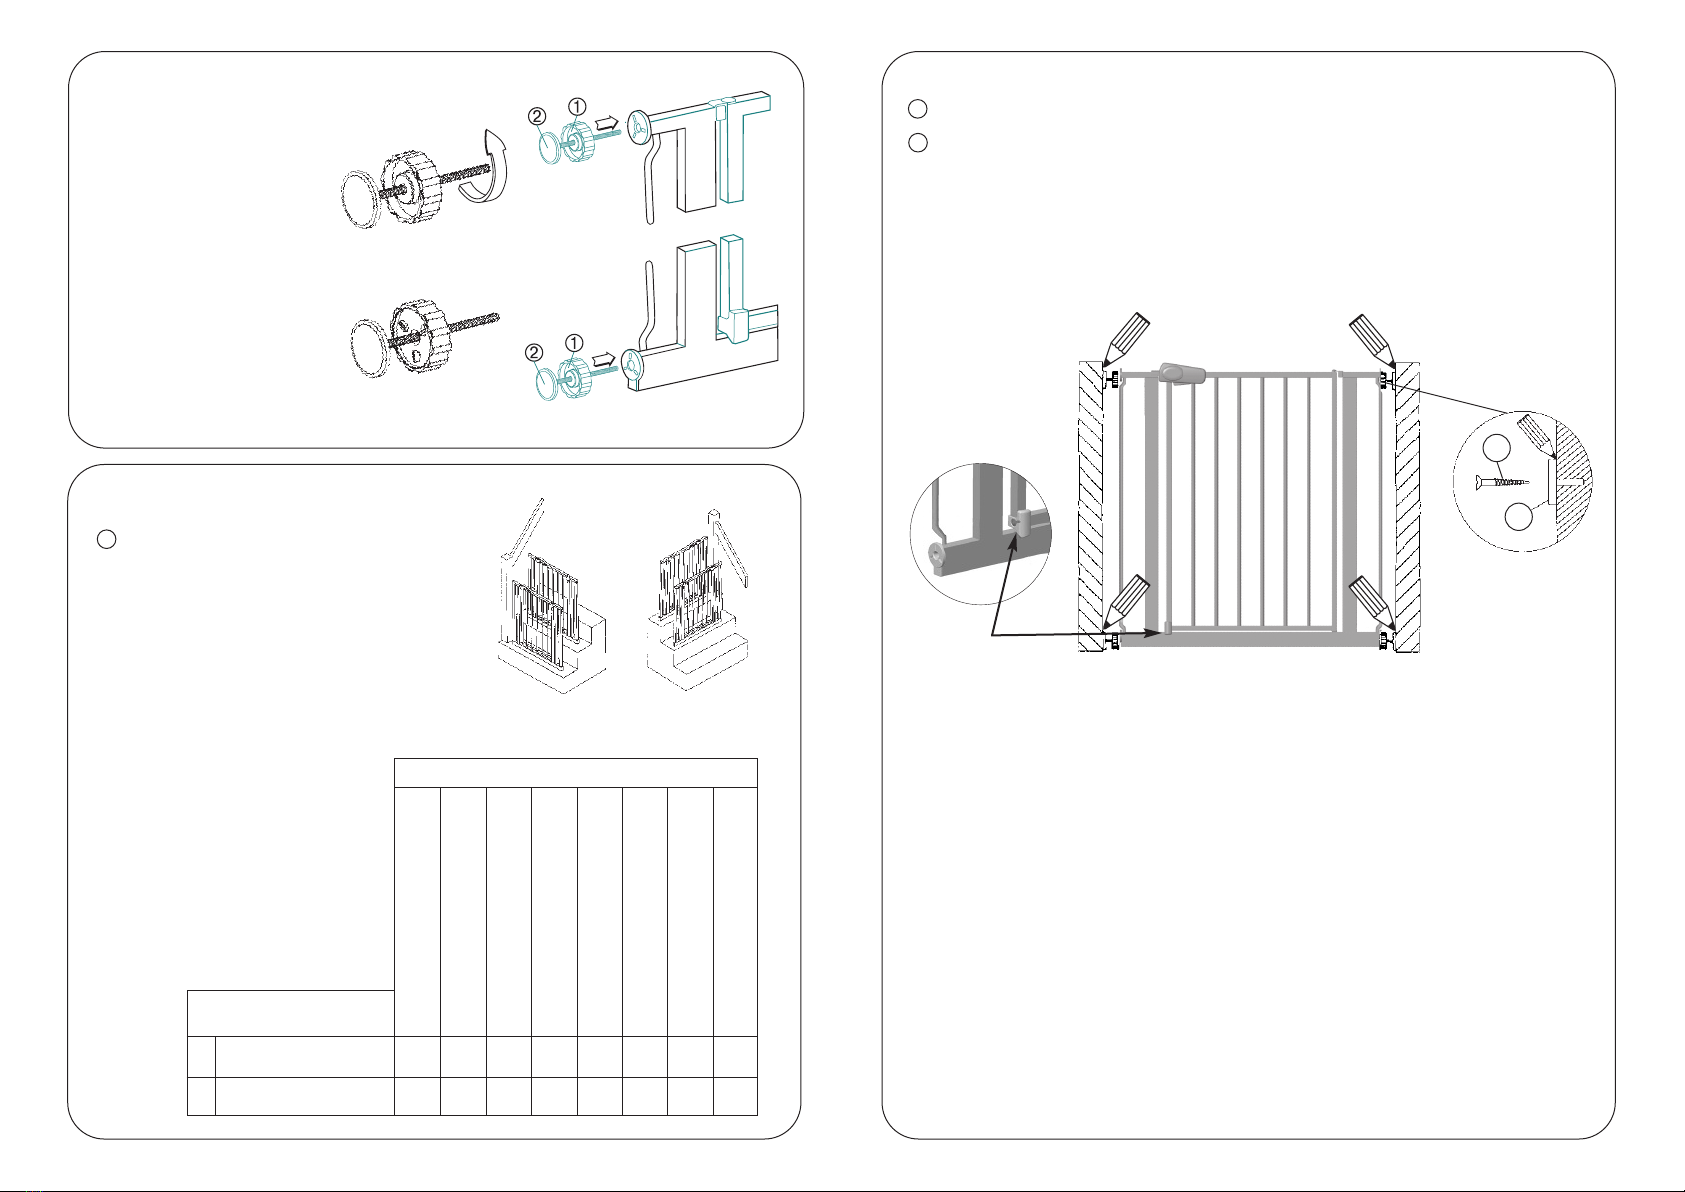
manuals.online logo
Brands
  1. Home
  2. •
  3. Brands
  4. •
  5. Lovencare
  6. •
  7. Indoor Furnishing
  8. •
  9. Lovencare Easyfit User manual

Lovencare Easyfit User manual

Customer Care Line: (02) 9774 4655
'.2&*,1,
297 Canterbury oad, evesby, NSW 2212
Tel: (02) 9774 4655 Fax: (02) 9774 4633
Email: "&'$'.&*'%-Website: ///$'.&*'%-
E Using the gate
'*-+"& ,! ,&+-*,!,","+",,'**,$1&"++-*
(&"& ,!,
Push the slider on the top of the handle forward and hold it there while squeezing the
lever underneath. elease the slider. This lifts and secures the locking latch into
the open position. The gate door can now be opened.
$'+"& ,!,
Manually close the gate door and push the slider on the top of the handle forward. The
locking latch will drop and lock over the gate frame.
Do not slam or swing the gate door shut – manually push it closed.
Always make sure the gate is shut and locked fully before leaving unattended.
%'."& ,!,
This gate is fitted with tamper proof handwheels. The top two handwheels can only be
slackened off whilst the gate door is in the open position and the pressure released by
pulling the side bars away from the wall cups.
Check the gate periodically to ensure that the wall surface, wall cups, spindles,
handwheels and locking devices are all functioning correctly. Additional and replacement
parts should only be obtained by contacting the Love’n Care Service Department via the
Helpline.
To clean, wipe the gate with a damp cloth.
F Maintenance
Gate extension are available in 3 sizes: 6.4 cms
12.9 cms and 32.4 cms.
Extensions can be used to extend the gate up to a
maximum of 148 cms.
‘Y’ Spindles are available for fitting gate to rounded
newel posts.
Extensions and ‘Y’ spindles can be obtained from
your stockist or the Love’n Care website.
Caution: Do not extend to more than 148 cms.
G Extensions
A Contents
SPINDLE x 4
WALL CUP x 4
HANDWHEEL x 4
SC EW x 4
EASYFIT GATE
5
ADHESIVE
PAD x 4
4
12
3
The Love’n Care
Eas fit Gate
Fitting Instructions
IMPO TANT! EAD AND FOLLOW
THESE INST UCTIONS CA EFULLY
AND KEEP FO FUTU E EFE ENCE
: Incorrect installation can be dangerous.
: Do not use the safety barrier if any components are damaged or missing.
: The safety barrier must not be fitted across windows
This Safety Barrier conforms to EN1930:2011 when fitted as instructed.
This Safety Barrier is designed for children up to the age of 24 months.
Be aware of hazards with childern using or climbing over the safety barrier.
This safety barrier is for domestic use only.
Manual Closing S stem
&.(+.+/*'(,-  #! #!



B Assembl
Screw the handwheels (1)
fully onto the spindles (2).
Make sure that they are the
correct way round as shown
in the diagram.
Insert one spindle assembly
into each corner socket of
the gate.
C Location



! ,+!'-$('+","'&+'
,!,",'(&+/1*'%,!+,"*+.
!
µ





% !!# #"
%"! %%#!
% !!# #"
%"!$%#!

()   ! " 

() !" %!"

%
!# """ 


() ##!"  

() #$  
















               
µ


Top of stairs
Bottom of stairs
For wider openings, gate
e tensions are available.
Fi ing surfaces must be
suitable for the purpose
and structurally sound.
Note: Fitting to some
surfaces may require the
separate purchase of
appropriate fi ing aids
(eg. wall plugs)
D Installation
!
!
3
5
At bottom of stairs
position on front of
lowest stair possible
At top of stairs do
not position below
top level
",,"& ,!,Do not remove the gate door securing tie until the gate has been fitted.
1 Position the gate in the centre of the gap, ensuring that it is upright.
2 Adjust the left and right handwheels evenly until the gate is fixed in position with the
wall cups (3) held in place.
3 Mark the positions of the 4 wall cups and remove the gate.
4 Follow the correct fixing method as detailed in the chart opposite, stick or screw
the wall cups to their marked positions using the adhesive pads (4) or screws
provided (5) together with the appropriate wall plugs or fixing aids.
+-*"& /$$-(+,'/$$((*+-*'*/!*("&,"+$#"&
'*$"+,*+*/+%-+,-+
5 eposition the gate making sure that the (+,/&,!'-,+"*+&,!
"0"& +-**)-$. Locate the spindles into the wall cups. Turn the bottom
handwheels until they both just touch the gate frame. Then tighten until secure.
6 Turn the top handwheels until they touch the gate frame. Tighten both handwheels an
equal number of turns until the arrow on the locking latch lines up with the vertical
upright.
7 Check that the doorstop is fitted so that the gate door only opens away from the
stairs. If it does not, either turn the gate around or unscrew and fit the door stop on
the opposite side of the tube upright and retighten the screw.
8 emove the securing tie from the gate door. The gate is now ready for use.
,'(&"& "*,"'&+
The gate can be set up with the gate door opening in either direction as required.
This can be achieved by turning the gate around but if this is not suitable the direction
of the door can be reversed by unscrewing and removing the door stop at the bottom
of the gate door and refitting it on the other side.




Other Lovencare Indoor Furnishing manuals

Lovencare SENATOR JIT300 User manual

Lovencare

Lovencare SENATOR JIT300 User manual

Lovencare DLX EURO CHANGER CEC 1100 User manual

Lovencare

Lovencare DLX EURO CHANGER CEC 1100 User manual

Lovencare HK801 User manual

Lovencare

Lovencare HK801 User manual

Lovencare BP 881 User manual

Lovencare

Lovencare BP 881 User manual

Lovencare HK 210 User manual

Lovencare

Lovencare HK 210 User manual

Lovencare HK802 User manual

Lovencare

Lovencare HK802 User manual

Lovencare HK805 User manual

Lovencare

Lovencare HK805 User manual

Lovencare BP 882 User manual

Lovencare

Lovencare BP 882 User manual

Lovencare Charnwood DORDEAUX ASH User manual

Lovencare

Lovencare Charnwood DORDEAUX ASH User manual

Lovencare Charnwood AU-LUCCA LUC2125 User manual

Lovencare

Lovencare Charnwood AU-LUCCA LUC2125 User manual

Lovencare HK803 User manual

Lovencare

Lovencare HK803 User manual

Lovencare MIAMI CHANGER HK 110 User manual

Lovencare

Lovencare MIAMI CHANGER HK 110 User manual

Lovencare LUSH GLIDER CHAIR HK809 User manual

Lovencare

Lovencare LUSH GLIDER CHAIR HK809 User manual

Lovencare HK800 User manual

Lovencare

Lovencare HK800 User manual

Popular Indoor Furnishing manuals by other brands

Regency LWMS3015 Assembly instructions

Regency

Regency LWMS3015 Assembly instructions

Furniture of America CM7751C Assembly instructions

Furniture of America

Furniture of America CM7751C Assembly instructions

Safavieh Furniture Estella CNS5731 manual

Safavieh Furniture

Safavieh Furniture Estella CNS5731 manual

PLACES OF STYLE Ovalfuss Assembly instruction

PLACES OF STYLE

PLACES OF STYLE Ovalfuss Assembly instruction

Trasman 1138 Bo1 Assembly manual

Trasman

Trasman 1138 Bo1 Assembly manual

Costway JV10856 manual

Costway

Costway JV10856 manual

moss DESIGN Caisson Credenza Assembly instructions

moss DESIGN

moss DESIGN Caisson Credenza Assembly instructions

Aquaglide FULL DECK 15.0 owner's manual

Aquaglide

Aquaglide FULL DECK 15.0 owner's manual

AREBOS AR-HE-SW30 user manual

AREBOS

AREBOS AR-HE-SW30 user manual

Till-Hilft Fulda 87005.330 Assembly instructions

Till-Hilft

Till-Hilft Fulda 87005.330 Assembly instructions

Twoey Outside 2010 quick start guide

Twoey Outside

Twoey Outside 2010 quick start guide

Hettich Easys 200 operating instructions

Hettich

Hettich Easys 200 operating instructions

The bedboss RELAX 404 Series owner's manual

The bedboss

The bedboss RELAX 404 Series owner's manual

Oeseder Möbelindustrie Bern 991 720 Assembly instructions

Oeseder Möbelindustrie

Oeseder Möbelindustrie Bern 991 720 Assembly instructions

Costway HW68469 user manual

Costway

Costway HW68469 user manual

Next ALIX A27743 Assembly instructions

Next

Next ALIX A27743 Assembly instructions

BROSA Hans Assembly guide

BROSA

BROSA Hans Assembly guide

Prodigg MINIKA PBA015T-FUR installation manual

Prodigg

Prodigg MINIKA PBA015T-FUR installation manual

manuals.online logo
manuals.online logoBrands
  • About & Mission
  • Contact us
  • Privacy Policy
  • Terms and Conditions

Copyright 2025 Manuals.Online. All Rights Reserved.