Lowrance Sirius User manual

Sirius Weather & Audio
Operation Manual

Copyright © 2013 Navico
All Right Reserved.
No part of this manual may be copied, reproduced, republished, transmitted or
distributed for any purpose, without prior written consent of Navico.
Lowrance® and Navico® are registered trademarks of Navico, Inc.
Sirius and XM are trademarks of Sirius XM Radio Inc.
Navico may nd it necessary to change or end our policies, regulations
and special offers at any time. We reserve the right to do so without no-
tice. All features and specications subject to change without notice.
For user manuals and the most current information on this product, its
operation and accessories, visit our web site:
www.lowrance.com

1
Contents
To turn on/off SIRIUS audio:..........................................................3
To view SIRIUS status: ........................................................................... 4
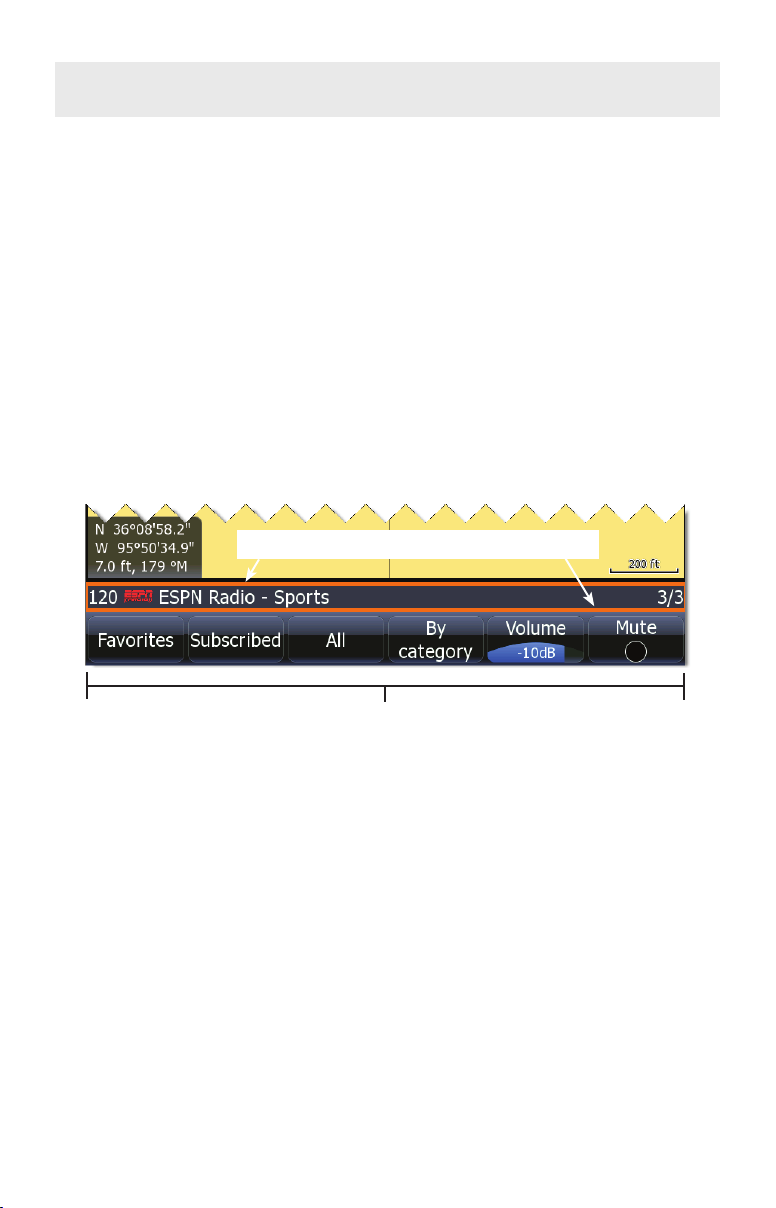
Media Bar Controls........................................................................4
Channels .......................................................................................5
Listening to SIRIUS audio .............................................................5
Favorites........................................................................................6
Subscribed Channels ....................................................................6
All Channels ..................................................................................7
By Category...................................................................................7
To view channels by category:.......................................................7
Lock Channel.................................................................................7
To Turn on/off Lock Channel:.........................................................7
Change Lock Code........................................................................8
Changing Lock code to default setting (0000)...............................8
Volume...........................................................................................8
Mute...............................................................................................8
Displaying Weather on Chart page:...............................................9
View.............................................................................................10
Current Conditions.......................................................................11
Alarms .........................................................................................11
Lightning distance and Storm distance........................................12
Icons............................................................................................12
Marine Zone ................................................................................13
Adjust...........................................................................................14
Animate .......................................................................................15
Transparency...............................................................................16

2
Manual Conventions
When you are instructed to press a button in this manual, the button will be shown
in all caps and bold text like — MENU, EXIT, ENTER, etc. If you are instructed
to select an item from a menu, the item to be selected will be listed in bold like —
Brightness, Key beeps, etc.
For example: Press MENU, select Language and press ENTER.
Softkeys
The instructions in this manual show how to adjust SIRIUS audio and weather
features/settings using display unit menus. If you have an HDS unit with softkeys,
you can get the same results using the softkeys.
Active Status
Controls what menu will appear when MENU is pressed. The media bar must be
active for menu-driven adjustments to be made to SIRIUS audio; likewise, the page
screen must be active for page screen menus to be accessible. When the media bar
or page screen are active, they will have an orange border.
To switch active status between the media bar and page screen, press and hold
PAGES for two seconds.
Operation
Softkeys
Orange border shows media bar is active

3
SIRIUS Audio
Turns on/off SIRIUS Audio. With Audio turned on
a scrolling media bar will appear at the bottom of
the display.
The media bar controls volume, channels and
access to the Sirius Audio menu.
To turn on/off SIRIUS audio:
1. Press MENU twice
2. Select Page and press ENTER.
3. Highlight Sirius audio and press ENTER.
Audio
NOTE: To enable SIRIUS audio, the SIRIUS module must be
connected to an HDS unit via an ethernet cable.
Subscription Status
Signal strength
1/3 (weak)
2/3 (good)
3/3 (preferred)
Subscription
Status ESN (electronic
serial number)
There are three (subscription) service
levels: Inland, Mariner and Voyager
(www.sirius.com/marineweather)

4
SIRIUS Status
Displays status of SIRIUS antenna, weather/audio
signal and subscription information.
To view SIRIUS status:
1. Press MENU twice.
2. Highlight Network and press ENTER.
3. Select Sirius status and press ENTER.
Media Bar Controls
Pages
With the media bar on screen, you can make it active by
holding down the Pages key for two seconds; the media
bar has an orange border when it is active
Zoom In/Zoom Out Zoom in decreases volume; Zoom out increases volume
Keypad Up/Down
Pressing the keypad up/down switches through Favorite
channels; pressing the keypad left/right switches though
all subscribed channels
Menu Pressing the Menu key will open SIRIUS Audio menu
when the media bar is active
NOTE: Media Bar controls work only when the Media Bar is active
SIRIUS channel Signal strength
Media bar
Artist
Now playing
When media bar is active it
will have an orange border

5
SIRIUS Audio Menu
Controls SIRIUS audio features. With the media bar active, you can access the
Audio Menu by pressing MENU.
Channels
Allows you to view all available channels and access all
subscribed channels by category or favorites. That makes it
easier to access desired channels.
To access the Channels menu, select Channels from the
SIRIUS Audio menu and press ENTER.
Listening to SIRIUS audio
You can select an audio channel to listen to from any of the Channel screens —
Favorites, Subscribed, All or By Category.
To listen:
1. Use the keypad to select Favorites,
Subscribed, All, or By Category from the
Channels menu and press ENTER.
2. Highlight a desired audio channel and
press ENTER.
SIRIUS Audio Menu
Channels menu
NOTE: You will not be able to select channels from the Favorites
screen until channels have been added to the Favorites list.

6
Favorites
Used to access/listen to channels added to the favorites list. The favorites list groups
your most desired channels in one place.
To access the Favorites, select Favorites from the Channels menu and press
ENTER.
Adding/removing Favorite channels:
1. Select All from the Channels menu and press ENTER.
2. Use the keypad to select a desired
channel.
3. Highlight the desired channel and
press the keypad left/right; or use the
MENU key to make the selection.
4. Repeat Steps 2 and 3 to remove a
channel from the Favorites list.
Subscribed Channels
List of channels included in your SIRIUS
subscription. Allows you to access only
channels you can use.
To access Subscribed Channels, highlight
Subscribed on the Channels menu and press
ENTER.
Favorites screen
Channels added to Favorites

7
All Channels
Accesses list of all SIRIUS channels available. The All Channels list allows you
to see all available channels, both subscribed and unsubscribed. You also can add
channels to favorites.
To access the All Channels list, select All on the Channels menu and press
ENTER.
By Category
Groups SIRIUS channels by category, allowing you to see all available channels
from a desired genre.
To view channels by category:
1. Highlight By Category on the
Channels menu and press
ENTER.
2. Press the keypad left/right to
toggle through SIRIUS audio
categories.
Lock Channel
A parental control that prevents selected channels from being broadcast unless an
unlock code is entered.
To Turn on/off Lock Channel:
1. Select Lock Channel from the SIRIUS Audio menu and press
ENTER. A dialog box will appear.
2. Use the keypad to input the desired code and press ENTER.
NOTE: You must start listening to a locked channel within 5 minutes
of entering the lock code; otherwise, you will have to re-enter the lock
code to access the channel.

8
Change Lock Code
Used to lock individual channels so they can not be accessed without entering a
code.
To change the lock code:
1. Select Change Lock code from the Sirius
Audio menu and press ENTER.
2. Use the keypad to input the desired code
and press ENTER.
Changing Lock code to default setting (0000)
1. Make sure the media bar is active and all menus are closed.
2. Press ZIN, ZOUT, ZIN, ZOUT, ZIN, ENTER.
Volume
To adjust SIRIUS Audio volume, highlight Volume on the Sirius Audio menu and
press the keypad left/right.
Mute
Silences SIRIUS Audio. To mute audio, select Mute on the SIRIUS audio menu and
press ENTER. Repeat this step to turn off mute.
NOTE: You must have a Sirius weather and audio (optional)
subscription to use the associated features in your unit.

9
Overlay
Used to display weather or radar data on the Chart
page.
Displaying Weather on Chart page:
1. From the Chart page press the
MENU key. The Chart menu will
appear.
2. Select Overlay and press ENTER.
3. Select Weather and press ENTER. The Weather options menu will
appear.
Precipitation Color Guide
Green Rain
Yellow
Orange
Red
Rain with increasing intensity from yellow to red
Purple Rain/Snow mix
Blue Snow
When moving the cursor over the colors, precipitation info will be
shown in the lower left corner of the screen
Weather
NOTE: The Overlay menu will only be visible when a radar is attached
or when a SIRIUS module is/has been connected to your unit via ethernet.
Weather data and Sirius Media bar shown on the chart page.
Precipitation
info at cursor
position

10
Weather options menu
Controls the way weather data is displayed and how you
will be alerted if severe weather approaches.
To access the Weather options menu, select Weather
options from the Chart menu and press ENTER.
View
Turns on/off Precipitation, SST (Sea Surface Temp) colored, SST text, Forecast
wave colored and Forecast wind barb graphic weather displays. To access the View
menu, select View from the Weather options menu and press ENTER.
View Menu Features
Precipitation rain (green, yellow, orange or red — depending on
severity); rain/snow mix (purple) and snow (blue)
SST Colored sea surface temp range (dark blue to dark red)
SST Text displays sea surface temp as text
Forecast
Wave Colored
wave height range shown (dark blue to dark red); arrows
show wind direction; wave period shown in seconds (5s
= 5 seconds)
Forecast
Wind Barbs
shows direction the wind is coming from (from barb to
circle)
Current conditions at
cursor position
Precipitation
SST Text
Wind
Barbs
Forecast Wave Colored
Map Scale
Wave
period in
seconds

11
Current Conditions
When Precipitation and SST Colored are displayed, the current conditions at the
cursor position will be displayed in dialog box in the lower left corner of the screen.
Forecast Wave Colored shows forecasted wave heights at the cursor position.
To turn on/off View options select the desired graphic display from the View menu
and press ENTER.
Alarms
Enables/disables Lightning, Storm, Marine Zone and
Watch boxes weather alarms. Alarms help you stay aware
of nearby weather conditions without having to keep your
eyes trained on the unit. You can also set alarm distance
thresholds for Lightning and Storm alarms.
To access the Alarms menu, select Alarms from the
Weather options menu and press ENTER.
SST Colored: current SST at cursor
position is 81 degrees Fahrenheit.
Forecast Wave Colored: wave height
forecast at cursor position is 10 feet.
NOTE: It is not uncommon for clouds to block satellites that
provide SST data, causing gaps in SST coverage.

12
Weather Alarms
Lightning Triggered when lightning strikes within a selected distance
Storm Triggered when a storm moves within a selected distance
Marine
Zone
Sounds an alarm when a severe weather alert is issued within
the selected marine zone
Watch
Boxes
Sounds an alarm if your vessel is inside a watch box or moves
into a watch box
To turn on an alarm, highlight the desired alarm on the Alarms menu and press
ENTER.
Lightning distance and Storm distance
Alarm thresholds that trigger an alarm when
lightning or a storm moves within a selected
distance.
To set alarm distances:
1. Highlight Lightning distance or Storm distance on the Alarms menu
and press ENTER.
2. Use the keypad to input the desired distance.
3. Press ENTER.
Icons
Turns on/off City forecasts, Lightning, Surface observations, Storm tracks, Storm
attributes and Watch boxes weather icons. Center the cursor over any weather icon
— except lightning — and press Enter to open the icon information screen.
Chart screen with City forecasts, Surface observations and Storm attributes
icons displayed
City
Forecast
Surface observations
Storm
attributes

13
Icon information
City forecasts displays forecast information for selected city
Lightning shows where lightning strikes have occurred
Surface
observations
displays information about surface information like
wind speed, temperature, precipitation, etc.
Storm tracks shows info on severity and past , present and
future path of a storm
Storm attributes changes icons based on conditions — regular cell ,
hail , tornado , etc.
Watch boxes shown in center of the watch box ; displays weather
watch information
To access the Icons menu, select Icons from the Weather options menu and press
ENTER.
Marine Zone
Allows you to select a marine zone and then read the forecast
for the selected zone.
To access the Marine Zone menu highlight Marine Zone on
Weather options menu and press ENTER.
NOTE: Once a marine zone is accepted, it will be your default zone
until you change it. After accepting a zone, you no longer will have to
select the zone before reading its forecast.
Tropical storm IDA shown on a Simrad NSE series unit.

14
To select a marine zone:
1. Select Choose from the marine zone menu and press ENTER.
2. Press the ZOOM OUT key until the region containing the desired
marine zone is shown on the screen.
3. Use the keypad to select the desired region.
Press the ZOOM IN key to view marine
zones within the selected region.
4. Use the keypad to select the desired marine zone and press
MENU.
5. Select Accept or Read and press ENTER.
To view accepted marine zone forecast:
1. From the Marine Zone menu, highlight
Read (marine zone name) and press
ENTER.
2. Use the keypad to scroll through the
forecast and press EXIT.
Adjust
Used to select a range for the SST Colored and Wave Height color settings. To
access the Adjust menu, select Adjust from the Weather options menu and press
ENTER.
SST Range consists of cool and warm thresholds. The SST on screen colors
automatically adjust to the range you select using dark blue
for the selected cool threshold and dark red for the warm
threshold. Temps between the cool and warm thresholds will
vary in color.
Adjust menu
Selected marine forecast zone Press Zoom in key to view marine
zones within a selected region

15
Wave Height uses minimum and maximum thresholds. Forecast Wave Color will
automatically adjust to the thresholds you select. The minimum wave height will be
shown in dark blue with wave heights at the maximum threshold shown in dark red.
To adjust SST or Wave Height:
1. Select SST or Wave Height from the Adjust menu and press
ENTER.
2. Highlight the desired eld (Cool/
Warm or Minimum/ Maximum) and
press ENTER.
3. Use the keypad to input the desired
SST range (Cool/Warm) or Wave
Height range (Minimum/Maximum)
values.
4. Select Save and press ENTER.
Animate
Replays the track and development of a storm from a
selected time period. That allows you to observe how a
storm is developing and where it may be headed next.
After selecting a time period to animate, you can have
the storm animation move at manual, low, medium and
high speeds.
To select Time period or Speed:
1. Highlight Animate on the Weather
Options menu and press ENTER.
2. Select Time period or Speed and
press ENTER.
3. Choose the desired time period or
speed and press ENTER.
Animate time readout;
scenario shows storm
location 30 minutes ago

16
Transparency
Controls the transparency of the weather overlay, allowing you to view important
navigation information like the shoreline, while a storm is passing through.
Transparency does not affect weather icons.
To make adjustments, highlight Transparency on the Weather Options menu and
press the keypad left/right.
SIRIUS Subscription Levels
Weather Content Marine
Inland
Marine
Coastal
Marine
Offshore
Weather Radar w/ Precip type P* P P
City Forecast P P P
Storm Attributes (speed and direction) P* P P
Lightning P* P P
Weather Warnings and Watchboxes P P P
Weather Observations and Buoys P P
TropicalStormTrackswithWindelds P P P
Marine Zone Forecasts P P
High Resolution Sea Surface Temps P P
Forecast Wind and Waves 0-3 hour 0-48 hour
SIRIUS Channel Art P P P
Roadside Fuel Prices P P P
SIRIUS audio can be added to Marine Inland and Marine Coastal weather
data subscriptions. Audio is included in Marine Offshore subscriptions.
* “ * Viewable within 80-mile radius of vessel in Vessel Mode, but can be
viewed within 80-mile radius of the cursor position in Browse Mode. The
viewing is restricted to approximately 10nm seaward from shorelines.
Visit www.sirius.com/marineweather for subscription details.
Transparency set to minimum. Transparency set to 10.

Contact information
Customer Service:
800-628-4487
(8 a.m. to 5 p.m. Central Standard Time, M-F)
(Canada)
855-361-1564
(8 a.m. to 5 p.m. Eastern Standard Time, M-F)
Ordering Accessories
http://store.navico.com/
Our Website:
www.lowrance.com

Visit our website:
www.lowrance.com
© Copyright 2013
All Rights Reserved
Navico Holding AS
*988-10446-001*
This manual suits for next models
1
Table of contents
Other Lowrance Radio manuals

Lowrance
Lowrance LVR-250 User manual

Lowrance
Lowrance Link-5 User manual

Lowrance
Lowrance Link-6 User manual

Lowrance
Lowrance LVR-850 Installation and operating instructions

Lowrance
Lowrance LVR-880 EU User manual

Lowrance
Lowrance Link-6S User manual

Lowrance
Lowrance LVR-880 EU User manual

Lowrance
Lowrance Link-2 User manual

Lowrance
Lowrance LVR-850 User manual

Lowrance
Lowrance Link-9 User manual