LUNA OPTICS LN-G3-M50 User manual

1
LN-G3-M50
GEN-3 QHD DIGITAL TECHNOLOGY
DAY & NIGHT MONOCULAR 6-36x50
INSTRUCTION MANUAL
SOFTWARE VERSION M8 V1.17A
IMPORTANT: Please read this manual in its entirety prior
to using this device!

2
DIGITAL NIGHT VISION TECHNOLOGY:
1. Your night vision viewer operates with batteries. Unlike a daylight
binocular, where you see the image due to light traveling through the
glass and the prisms, the digital night vision device works by projecting
the image onto an OLED display screen. While the Image Sensor and the
OLED display are the crucial components of your viewer, the optical parts
of the unit are also very important, as they gather the light into the
Image Sensor and then bring the projected image from the OLED screen
to your eye. Since the image is projected on the display screen, just like
any TV, it has certain limited resolution, so your digital night viewer
cannot provide the same crystal-clear image, as you see through your
daylight binoculars.
2. Another important point –your digital night vision viewer has the
option of full-color and numerous monochrome images –why? Because,
while full-color image is an excellent choice during daylight, it sometimes
washes out the details in the dark and will not be as effective as
monochrome image during nighttime conditions.
3. Your digital viewer is safe to operate during daylight and nighttime
hours. IT IS NOT SAFE FOR YOUR EYES TO LOOK DIRECTLY AT THE SUN
THROUGH THIS PRODUCT! Please note that during daylight you will have
to reduce the brightness level of the unit to prevent the image from
becoming totally washed out. You should also utilize Color Enhancing
Filter, supplied with the unit for daylight operation in order to view more
vibrant colors. (Filter is embedded into the front lens cover)
4. For more details on how to operate your viewer, please read this
manual completely to ensure proper operation.
YOUR PACKAGE INCLUDES THE FOLLOWING:
1. LN-G3-M50 Monocular
2. 16GB or 32GB Micro SD-card (installed into the SD-card slot)
3. Color Enhancing Filter (installed onto the front lens –daylight use
only –remove in the dark!)
4. Carry case & Wrist Strap (strap is installed on the monocular)
5. USB Cable, HDMI cable & Micro-SD Card USB Flash Drive Adapter
6. 2xCR123A batteries (optional –NON-RECHARGEABLE!)

3
Please identify all the parts of the device PRIOR to operation!
2
9
5
1
8
6
3
4
7
10
11
11-c
11-b
11-a

4
GLOSSARY:
1 –Objective Lens Focusing Wheel 8 –Folding Eyecup
2 –IMAGE Button 9 –Menu Super Controller
3 –CAMERA Button 10 –Power / IR Indicator Lights
4 –POWER & IR Button 11 –Connection Area:
5 –Ocular Focusing Wheel 11-a) Micro-SD Card Slot
6 –Battery Compartment Cover 11-b) Micro-USB Connector
7 –Infrared Illuminator Lens & Barrel 11-c) Micro-HDMI Output
INSTALLING THE BATTERIES:
Your device operates on two 3V Lithium type batteries, known as CR123A
type commonly available in Electronics/Camera/Convenience stores.
NOTE: it is possible to use rechargeable batteries (CR123R) but please
make sure each battery peak voltage is equal to or less than 4.2V.
Furthermore, rechargeable batteries are not recommended due to
significantly shorter operating time!
WARNING: batteries supplied with the unit are not
rechargeable –do not charge or recharge these batteries!
To install the batteries, unscrew the battery compartment cover (6), and
install two CR123A batteries into compartment inserting the positive (+)
end first. Once the batteries are inside, replace the cover by rotating it all
the way to the end until the stop (do not use force or over-tighten!).
DAYLIGHT COLOR ENHANCING FILTER:
Your monocular is equipped with a unique daytime
color enhancing filter, which provides vibrant and
accurate colors rendition during daytime use (digital
image sensors are known to distort colors and provide
an unnatural color image). The filter is embedded in the
protective lens cover, and we strongly recommend
keeping it on during daytime use. During nighttime you will need to remove
the lens cover/filter by grasping the extended rubber knob and gently pulling
the cover off. Take care not to accidentally remove the filter from the rubber
cover. To replace the cover, align it with the lens barrel and gently push onto
the rubber parts along the edges only (never press directly onto the red filter).

5
TURNING THE UNIT ON AND OFF:
Your night vision unit has push-buttons. To turn the unit ON, press the POWER
Button (4) and hold it for 3 seconds. The LED Power Indicator (10) located on the
back of the unit will briefly light up in green color and then the image can be seen
through the eyecup (8). Even if the image is not yet sharp, the unit is operating.
To turn the unit OFF, press and hold the POWER Button for 3 seconds. The image
will disappear if you turn the unit off correctly. We suggest always replacing the
daytime color filter / protective lens cover after the unit is turned off and no
longer in use.
IMPORTANT: When turning the unit ON or switching between various modes
(Video, Photo etc.) or when operating the unit with Wi-Fi stream activated, it is
normal to see some image flickering in the display. This is normal and does not
affect the unit. If the flickering does not disappear once the affecting functions are
no longer active, please re-start the unit. If conditions persist, please contact us at:
info@lunaoptics.com for assistance.
ON-SCREEN DISPLAY ICONS:
Video Recording Counter Video Resolution
Camera Mode
IR Power Level Time (Date) Power source
(May be different
on newer models) Image Magnification

6
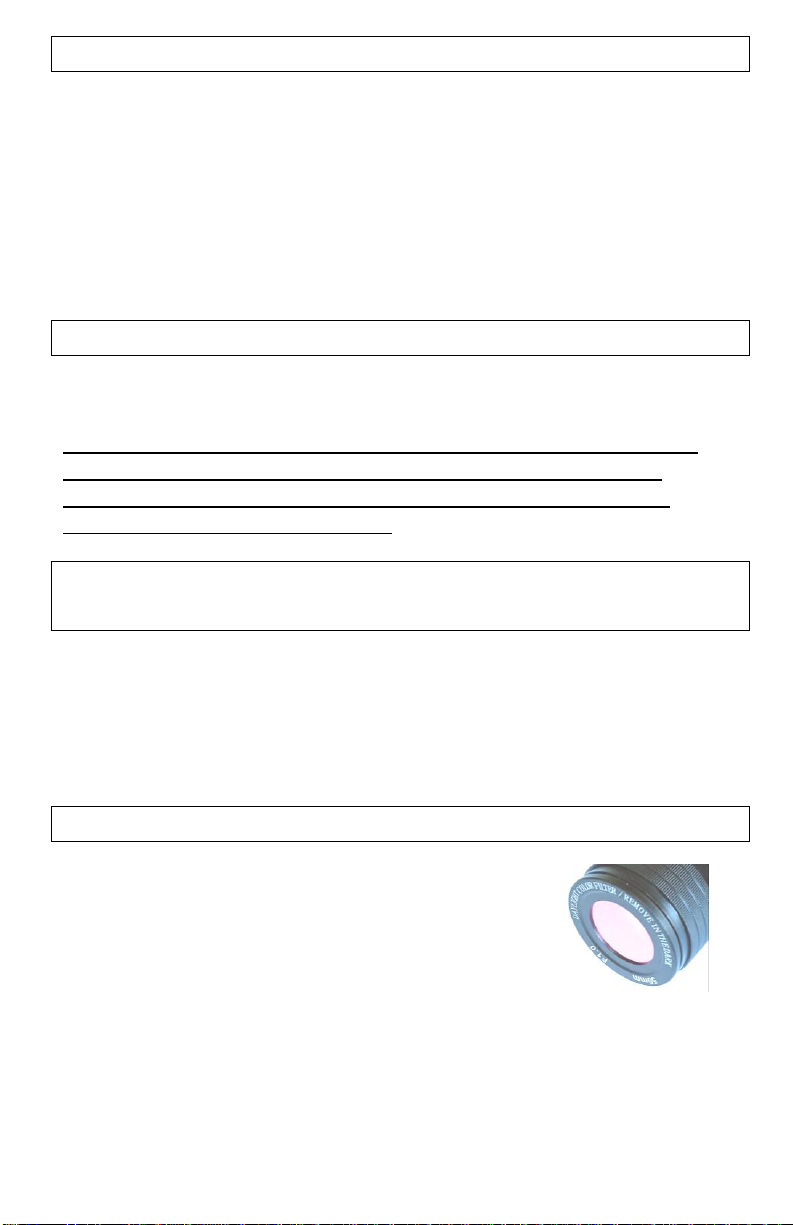
OPERATING FROM A 5V/2A POWER BANK: BEST POWER OPTION
Your digital viewer can also operate from the commonly available 5V USB Power
Bank chargers. Please make sure the output of the Power Bank is at least 2A, as
less powerful output may fail to power the unit especially when the IR illuminator
is activated or during video recording / Wi-Fi connection. To connect the Power
Bank, open the Connection Area (11) rubber cover by gently pulling it outward and
then swing it counter-clockwise to the right and locate the Micro-USB connector
(11-b). Connect the small end of the USB cable (included) to the connector and
then connect the large end of the cable into Power Bank output. You may need to
activate the power bank first, prior to turning the viewer on. There is no need to
remove batteries when using the power bank.
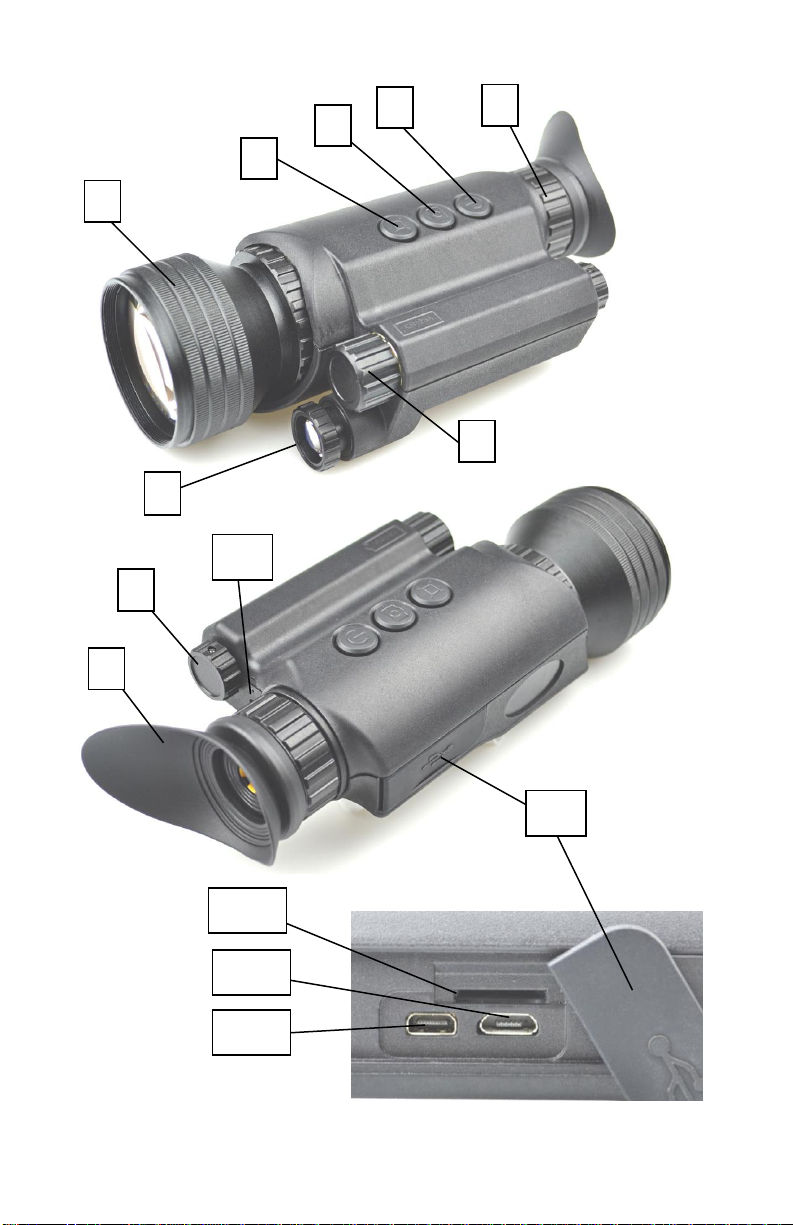
FOCUSING THE UNIT:
To obtain the sharp image, you must first rotate the Ocular (Eyepiece) Focusing
Ring (5) in either direction, until you notice in which position you can see the on-
screen display icons well. After that, rotate the Objective Lens Focusing Wheel (1)
focusing on the object you are trying to view until the image is at its best. You may
have to repeat (fine-tune) the process again, until the image is sharp and clear.
Once the clear image is obtained, you will no longer need to adjust the eyepiece,
just rotate the front objective lens to adjust the distance to the object you are
viewing.
SUPER CONTROLLER / MENU FUNCTIONS:
Your monocular features a unique and user-
friendly adjustment called Super Controller
(9). It incorporates various operating
functions and makes navigating and adjusting
menu functions fast, easy and natural without
having to take your eyes off the eyepiece in
the field. It is especially useful when using in
dark conditions where button location may
be particularly difficult. The Super Controller
activates the Main Menu by pressing onto it
for approx. 2 sec.
Once activated, all Menu navigation is done the following way:
-Scrolling through the menu contents: rotate the Super Controller in
either direction (each click scrolls the menu by one step)
-Selecting and confirming function: short press onto the Super Controller
-Return from selected function to Main Menu: Long-Press onto Super
Controller (2 sec)
-Exiting the Main Menu: Long-Press onto the Super Controller (2 sec)

7
MAIN MENU consists of the following selections:
VIEW MODE:
-DAYTIME COLOR: this setting presents image in natural full color, best
suited for daytime viewing and recording.
-B&W MONOCHROME: this setting presents the image in monochrome
black and white color (preferred for virtually all nighttime settings)
-NV GREEN PHOSPHOR: this setting presents image in traditional night
vision green color (good for certain nighttime field settings)
-NV WHITE PHOSPHOR: this setting presents image in traditional night
vision turquoise hue color (good for nighttime urban settings)
-AMBER: this setting presents image in soft Amber color (good for highly
detailed image during variety of low-light conditions and for car
headlights glare)
SEE PAGE-11 FOR MORE INFORMATION ON IMAGE COLOR SELECTION
WI-FI:
-OFF: Wi-Fi is turned OFF (default setting)
-ON: Wi-Fi is turned ON (SEE PAGE-14 FOR MORE INFORMATION)
PLAYBACK:
-Selecting this mode will allow you to review and play back the images and
videos directly on your monocular. During playback it is possible to delete
unwanted files by short-pressing the Camera button (3), then rotate the
Super Controller (9) to confirm delete and short-press the Super
Controller to erase the image or video. To exit this mode press and hold
the Controller for 2 seconds.
SETTINGS:
Opens the Settings Chapters as follows below:
ELECTRONIC IMAGE STABILIZER (EIS):
-OFF: Electronic Image Stabilizer is turned off (default setting)
-ON: Electronic Image Stabilizer is turned on (SEE PAGE-14 FOR MORE
INFORMATION)
RESOLUTION:
-QHD @30FPS
-3MHD / 30FPS:
-FHD 1080p / 60FPS:
-FHD 1080P / 30FPS:
-HD 720P / 30FPS:
CAPTURE MODE:
-Instant: select if you want no delay in capturing still image. Image will be
captured as soon as the camera button is pressed. (Default mode)
-Delay 3S: device will count down 3-2-1 and then image is captured.
-Delay 5S: device will count down 5 seconds and then image is captured.
-Delay 10S: device will countdown 10 seconds and then image is captured.

8
FACTORY RESET:
-Cancel: Exit to main menu
-OK: Returns binocular to factory settings
FORMAT CARD:
-Cancel: Exit to main menu
-Format Card: Formats micro-SD card (ALL FILES WILL BE ERASED!)
LCD BRIGHTNESS:
-Allows user to select brightness of the OLED display level from 1 to 6.
(NOTE: Also see page-9 for Image Button shortcut)
DATE/TIME:
-Select when setting or updating date and time (see PAGE-11 for more
information)
VERSION:
-Displays current software version installed in your device. (In case of any
technical questions or malfunction, our customer service may ask for the
software version)
LANGUAGE:
-Select to change language.
ELECTRONIC IMAGE MAGNIFICATION ZOOM:
Your unit is also equipped with electronic zoom function, which allows you to
change image magnification from 6x to 36x. To increase the image magnification,
rotate the Menu / Super Controller (8) to the right (clockwise) and look into the
eyepieces –you will see the image magnification increase with each rotation click
by approximately 3x. See below the magnification chart according to each
rotation:
6x –9x –12x –15x –18x –21x –24x –27x –30x –33x –36x
You can observe the current magnification level on the bottom of the image
display once you start rotating the Super Controller. To decrease the image
magnification, rotate the Super Controller to the left (counterclockwise) and image
magnification will decrease. Factory default setting is 6x
NOTE: During any image magnification adjustments, please avoid pressing onto
the Super Controller, as this may activate the device main menu.
SHORTCUTS (MULTIPLE BUTTON FUNCTIONS):
The three top buttons can be used to skip the main menu navigation and provide
quick shortcuts to the most popular functions:
POWER & IR BUTTON (4):
a) Initial press for 3 seconds –turns the power ON
b) When power is ON, a single short press activates
the 1st power level of IR illuminator. There are 3 IR

9
power levels –each consecutive short-press increases the power by one
level. The 4th short press turns the IR illuminator OFF.
c) When power is ON, pressing for 3 seconds shuts the power OFF.
CAMERA BUTTON (3)
a) Short press activates still image capture.
b) Long-press activates/deactivates Video recording.
c) It is possible to capture still image during video
recording by pressing the Camera button
momentarily.
IMAGE BUTTON (2)
a) Regulates OLED display brightness. Each short press
increases the display brightness by one level. There
are 6 brightness levels. Once the highest brightness
level is reached the next press will reset the
brightness to level 1. (Default setting is level 2).
SETTING UP DATE AND TIME:
As your viewer has the capability to take images and record video, time and date is
automatically stamped onto each image and video recording. To set the correct
date and time, please follow this procedure:
Turn the unit ON. After image appears, press onto
the Super Controller (9) and hold it for
approximately 2 seconds to activate the menu. Scroll
until Date/Time function by rotating the Super
Controller and select it by momentarily pressing
onto it. To adjust the numbers, rotate the Super
Controller in either direction. To switch between
numbers, press onto Super Controller momentarily.
After Date is set, adjust the time. Time is in 24hr
format, so 13:00 is 1pm; 17:30 is 5:30pm and so on. As with the date, changing
hours and minutes is done by rotating the Super Controller and moving between
hours and minutes is done by pressing onto it. Once the time is adjusted you may
choose to change the date format to MM/DD/YYYY or YYYY/MM/DD according to
your preference. Once you are finished setting the date and time, you can exit the
menu by pressing Super Controller (9) for approximately 2-3 seconds. Once set,
the time will be displayed on the bottom of the OLED image display.
IMPORTANT: in order to preserve the set date/time do not remove the dead
batteries from the unit until you are ready to replace them with the new set, then
replace the old batteries with new set as quickly as possible and the date/time will
be preserved.

10
USING INFRARED ILLUMINATOR:
Your digital viewer is equipped with a built-in powerful Infrared illuminator light
(7). This light operates in a spectrum, which is normally invisible to a human eye,
however with the help of the Image Sensor, located inside the unit, you will see a
beam of light when looking though the ocular lens. Since the Image Sensor does
not actively amplify the available light, you will need to utilize the IR illuminator
often in nighttime conditions.
WARNING: Your IR illuminator is a Class-3R
laser product. DO NOT LOOK DIRECTLY INTO IR
ILLUMINATOR LENS WHILE THE ILLUMINATOR
IS ON!
To turn the Infrared illuminator ON, press the Infrared illuminator button (4)
momentarily –the blue IR)icon on the bottom of the display will appear on the
lower left corner of the display, indicating the IR illuminator is operating. The
illuminator intensity can be further increased by pressing the IR button (4) second
and third time (momentarily). The blue icon will change to IR))and IR))). After
the 3rd and most powerful level, the next momentary press on the IR button will
turn the IR off completely. The blue IR icon will disappear from the display when
the IR illuminator is properly turned off.
IMPORTANT: whenever operating IR illuminator please note that batteries
working time will be significantly diminished, especially when IR is on the 2nd and
3rd power levels. This is due to the high-power consumption of the IR diode.
Whenever the conditions allow, consider using IR on the 1st (lowest) power level
and only utilize 2nd and 3rd power levels when absolutely necessary.
When using the infrared illuminator, it is important to remember that like a
flashlight, it is brightest when used in short distances. As the distance increases,
the intensity of the infrared light fades away. The illuminator lens can be focused
by rotating the front lens barrel (7). This allows for the IR beam to be widened
(shorter effective distance) or narrowed (longer effective distance).
IMAGE COLOR OPTIONS:
IMAGE COLOR CAN BE QUICKLY CHANGED BY MOMENTARY PRESS ONTO
MENU CONTROLLER
-Daytime Color (default mode) displays images in full color. This is the
preferred mode for daytime use as well as when enough artificial light is
present (inside a well-lit room). If used during nighttime the overall
sensitivity of the image sensor will be significantly reduced and, as you

11
must remove the daytime color filter during nighttime (once the filter is
removed, the image colors will no longer have true reproduction).
-B&W Monochrome displays images in monochrome black and white. This
mode is particularly useful when it might be important to read the street
signs or automobile plates or similar situations where highest contrast
between light and dark colors is necessary. This mode is the most
preferred for virtually any nighttime activity.
-NV Green Phosphor allows you to experience image as seen with
traditional “intensifier tube” night vision devices. This mode is best
utilized at nighttime in clear field/rural settings.
-NV White Phosphor allows you to experience image as seen with
traditional white phosphor “intensifier tube” night vision devices. This
turquoise-like hue is best utilized at nighttime in city/urban settings.
-Amber, this unique and state-of-the-art color mode may be used in a
variety of nighttime conditions when the highest detail of the object is
required. It provides excellent sharpness and contrast similar to B&W
mode. This color mode is also very useful for dark and rainy days, as well
as for dusk and dawn conditions and for conditions where
direct/projection light is present, for example automobile headlights, as it
helps to mitigate the light glare.
IMPORTANT: PLEASE READ!
Due to the inherited limitations of any digital image sensor, video refresh rate will
be significantly slower during nighttime, resulting in visible image lag/delay when
using your monocular in the dark. It is important to take the following steps to
minimize this effect and ensure the best possible image and video recording
quality:
-During nighttime and in any dark condition, when you cannot see many
details, activate built-in IR illuminator –it will provide extra light needed
for the image sensor to “speed up” its refresh rate and image delay will
be minimized.
-During nighttime you need to remove the daylight color enhancing filter –
it will block most of the Infrared light from the built-in IR illuminator
resulting in a very dark image.
-Always try to utilize a quality tripod for any video recording done at
nighttime. This will ensure steady placement and will minimize image
delay when filming a moving object.
ELECTRONIC IMAGE STABILIZER (EIS)
Your monocular is equipped with an Electronic Image Stabilizer (EIS)”, which helps
compensate for some shake during viewing and video recording. To activate, enter
Main Menu, then enter Settings –highlight EIS icon and turn it on. Once active, a
white Hand icon will appear on the left bottom corner of the image display, and it
will turn blue when image stabilization is active.

12
IMPORTANT: when EIS is activated image Zoom will no longer be possible and
system will be fixed on 6x optical magnification. If you must utilize Zoom, you will
need to turn EIS off.
TAKING PICTURES AND RECORDING VIDEOS:
WE STRONGLY RECOMMEND MOUNTING YOUR DEVICE ONTO A STEADY
TRIPOD WHEN RECORDING VIDEO OR TAKING STILL IMAGES –
PARTICULARLY WHEN WATCHING DISTANT OBJECTS AND/OR UTILIZING
ZOOM FUNCTION
Your digital viewer has the ability to take High-Resolution pictures and record HD
videos onto the external Micro-SD card. 16GB or 32GB card is included with your
unit and it is already installed into the SD-card slot. The Micro-SD card can be
upgraded up to 128GB, which is especially useful if you plan to record a lot of
videos See RE-FORMATTING 64 & 128GB CARDS TO FAT32 FORMAT on page-15
for important instructions.
Your monocular has a multi-use CAMERA button (3). It can be used to record video
and capture still images. Single short press on the Camera button activates still
image capture. Long press activates video recording (video recording counter
starts). During video recording any single short press captures still image (photo
icon briefly appears next to the video recording count).
To take a still image, focus the unit onto the object you are viewing and with a
steady hand gently press the CAMERA button (3) once. The display will
momentarily freeze the image and it is then automatically stored onto the SD card.
All still images are taken at 5360x3008 resolution (16.1MP)
To record a video, focus the unit onto the object, then press and hold CAMERA
button (3) for several seconds. The system will start recording. To stop video
recording, press and hold the CAMERA button for 2-3 seconds. During recording it
is still necessary to re-adjust the focus if you wish to record different objects,
located at different distances. There are 5 different video recording options:
1. QHD (Quad-HD resolution) at 30FPS: When highest video resolution and
crystal-clear image is necessary both: daytime or nighttime. Provides
brilliant image details, very close to 4K, without sacrificing the nighttime
sensitivity. Best choice for viewing video files on 4K TVs.
2. 3MHD / 30FPS: Very close in quality to QHD but allows for more video
files to be stored on memory card. Excellent choice for those who plan to
watch the video recording on 4K TV or monitors but wish to save more
space on memory card.
3. FHD 1080p / 60FPS: best mode for recording moving objects (animals,
birds, sports etc.) as well as when tripod mounting is not possible. Choose
this resolution for both: nighttime and daytime action recording.
4. FULL-HD 1080P / 30FPS: Blue-Ray quality recording. Best for recording in
daylight with color filter on and when mounted on tripod.

13
5. HD 720P / 30FPS: best choice for smaller size video recording files. Allows
for more video files to store on a memory card and still provides excellent
image when viewed on 720p or higher resolution HDTV.
IMPORTANT: once your micro-SD card reaches its capacity, video recording and
still image taking will no longer be possible and “SD Card” will be displayed,
indicating it is time to either replace the card or empty your current card. This
feature acts as a safeguard to prevent accidental over-writing your existing video
and photo files.
IMPORTANT: If you see “Memory Error” message displayed, your micro-SD card
is either bad, or, if you have a 64GB or 128GB card, it is not operating in FAT32
format. Please refer to page-15 for re-formatting instructions.
DATA VIEWING AND DATA TRANSFER OPTIONS:
It is possible to view the images and videos directly on the unit’s micro-display. To
do so, while the unit is operating access the main menu by pressing the Super
Controller for 2-3 seconds and choose “Playback”. As always, scrolling between
functions is done by rotating the Super Controller and function selection is done by
short pressing the Super Controller. To exit the Playback Mode simply press Super
Controller for 2-3 seconds.
You can connect the unit directly to the computer via USB connection by utilizing
the micro-USB connector (11-b). To do so, connect the micro-USB part to the unit,
then connect the standard USB part to the computer. Device does not need to be
powered. It will power up once connected. Connection will start automatically
once the software download is finished (also done automatically). Once download
is done, you will be able to open and transfer all of your SD-card files onto your
computer.
Alternatively, you can remove the micro-SD card from the monocular and use it in
the included USB flash drive adapter to transfer data to your computer. Carefully
open the Connection Area (11) rubber cover and locate the Micro-SD Card Slot
(11-a). Gently push onto the micro-SD card and it will pop out. If your computer
has a direct micro-SD slot, you can insert the card directly to the slot bypassing the
above options. It is also possible to utilize the full-size SD card adapter (not
included with monocular). To replace the micro-SD card gently push it into the slot
(11-a) until it clicks and stays in place.
CONNECTING TO EXTERNAL VIDEO SOURCE:
You can connect your device to the HD source, such as HDTV or monitor via the
micro-HDMI cable (included with your device). Carefully open the Connection Area
(11) rubber cover and locate the Micro-HDMI output (11-c) Connect the small end
of the cable to the micro-HDMI Output and then connect the large end of the
cable to the HDMI input on your TV or monitor.

14
IMPORTANT: Please note that when the device is connected via HDMI to any
video monitor or HDTV, it will be impossible to connect via Wi-Fi to the App during
active video recording. If you wish to connect to the Wi-Fi App, you will need to
discontinue video recording.
1. WI-FI LINK AND OPERATION
INSTRUCTIONS:
2. Download “ROADCAM” App on your Android
phone/tablet or on iPhone/iPad. For Android users if you have a problem
finding the app in Google Play Store, please scan
the QR code below.
3. Enter Main Menu via Super Controller (9) and scroll
to Wi-Fi selection. Turn the Wi-Fi ON. Now look
through the eyepiece and observe the Wi-Fi signal
name (typically M5 or M7 or M8) and Password
(typically 12345678).
4. Find the device Wi-Fi signal on your phone (same as shown on the unit’s
display) and select it.
5. Enter password (second line of the unit’s OLED display) –NOTE: only
numbers after “:” are needed to be entered – typical default password is
12345678.
6. Once connected make sure your phone is allowed to stay connected to
this Wi-Fi signal even though there is no internet available. This will
prevent automatic disconnect from your phone.
7. Now open the app and it will display the device name below the orange
cam symbol –simply touch the cam symbol and app will connect to the
device.
8. Follow on screen menu on your smart device to utilize the available
features of the app. NOTE: during Wi-Fi streaming the ZOOM function is
disabled and cannot be utilized!
9. During Wi-Fi streaming a single press onto the Super Controller activates
either Video or Photo capture, depending on the selected mode. Repeat
press deactivates video.
10. If the App shuts down during normal use, please re-start it, or re-install it
on your mobile device if it happens more than twice.
RE-FORMATTING 64GB & 128GB MICRO-SD CARDS TO FAT32
FORMAT:
Any micro-SD card above 32GB needs to be re-formatted from EXFAT format to
FAT32 format, which is the format of the night vision monocular (and many other

15
consumer electronics). Please note that FAT32 is the most widely used format and
is also considered the most reliable format.
In order to re-format the card you must run it through a 3rd party provider. We
suggest using Disk Partition. While nearly all of the providers would want you to
buy their upgraded versions, you can just download their basic free version and it
would be sufficient to re-format the card. Disk Partition seems to be the most
simple and hassle-free provider we could find:
https://www.disk-partition.com/download.html
•Download the “Standard Free” version and follow all the download
instructions.
•Once downloaded, open the program and insert the micro-SD card into
the computer.
•Highlight the correct disc by single-click and then choose on the bottom
left side of the menu to “Format Partition” (alternatively right-click on the
highlighted disc and choose the same function). A pop-up window will
appear. You can label your partition (such as “Luna Optics Monocular” or
any other name you desire (it’s optional) and then make sure to select
“FAT32” as the File System. Then click “OK”.
•Once the format is finished, click on “Apply” located in the most upper
left corner. You must select “Apply” otherwise the formatting is not
finished.
•You card is now formatted, but before you can use your 64/128GB card in
our digital night vision product you must also format the card inside the
product. To do so, insert the card into its slot (11-c), turn your monocular
on and through the menu find and select “Format”, then select “OK”.
Once the card is formatted inside the night vision device it is now ready to
use.
TROUBLESHOOTING:
1. Unit does not turn on:
a) Check if the batteries are inserted correctly.
b) Make sure you press and hold the POWER button for 3 seconds.
2. The display is working, but you cannot see the image:
You may be turning the unit on in a very dark area without utilizing
the IR illuminator. Please also remove the front lens cover.
3. Unable to obtain sharp and clear image:
a) Repeat the process of rotating the ocular and objective lens several
times until you get a good feel of it.
b) You may be viewing an object that it too close –the minimum
focusing distance is approximately 80cm or 2.6ft
4. During image magnification adjustment color suddenly changes or Main Menu
activates:

16
You have accidentally pressed onto the Super Controller either
momentarily (color change) or for more than 1sec (Menu
activation). Press onto it again for approximately 2 seconds and
Menu will disappear.
5. I’m trying to turn the IR illuminator on and instead the unit shuts down:
You are holding the Power/IR button for more than 1 sec. In order
to turn the IR illuminator on, you must press the button only
momentarily.
WARNING! NEVER ATTEMPT THE FOLLOWING:
•NEVER try to disassemble the unit by yourself or by anyone
who is not our authorized technician. Doing so may result
in injury and will void any warranty claims.
•NEVER submerge the unit into water or use it during heavy
rain.
•NEVER look directly at the sun through this device.
•NEVER look directly at the IR illuminator lens while the
illuminator is active.
TECHNICAL SPECIFICATIONS:
Image Sensor Resolution / Sensitivity: ____________ QHD 2560x1440 / 0.002lux
Image Display: _____________________________ 0.38” HD AMOLED-Q 1280x720
Still Image resolution ____________________________5360x3008 (16.1MP) JPEG
Video resolution (signal) ________________________________QHD 1440p AVI
Video Recording options _____________________ 1440p / 1296p / 1080p / 720p
Image Magnification ____________________________________________6x-36x
Objective Lens _____________________________________________F1.0/50mm
Focusing Distance_______________________________________ 80cm (2.6ft) - ∞
Viewing Distance (daylight, 6x) ___________________________ 1000m (1090yds)
Viewing Distance (IR complete darkness) _____________________ 400m (436yds)
Field Of View______________________________________________________ 9°
Memory ____________________________________ Micro SD card (up to 128GB)
Wi-Fi ____________________________________________________ Android/iOS
Battery Power_____________________________________2 x 3V Lithium (CR123)
External Power ________________________________________ 5V/2A micro-USB
Operating Time (2xCR123A batteries, IR off, no video/Wi-Fi) ___________3-3.5hrs
External outputs _________________________________ micro-HDMI / micro-USB
Dimensions________________________170mm x 80mm x 63mm (6.7”x3.1”x2.5”)
Weight___________________________________________________ 510g (17 Oz)
Warranty________________________________________________________2yrs
LUNA OPTICS, INC. 300 Hawthorn Dr., Fate, TX 75087 (USA)
E-mail: info@lunaoptics.com Web: www.lunaoptics.com © 2023
Other manuals for LN-G3-M50
1
Table of contents
Other LUNA OPTICS Monocular manuals