Luna TG-L800S User manual

User Manual
LUNA (TG-L800S)
TG-L800S

2
Contents
Before Using
Read this rst..............................................3
Copyrights Information..........................4
Getting Started LUNA
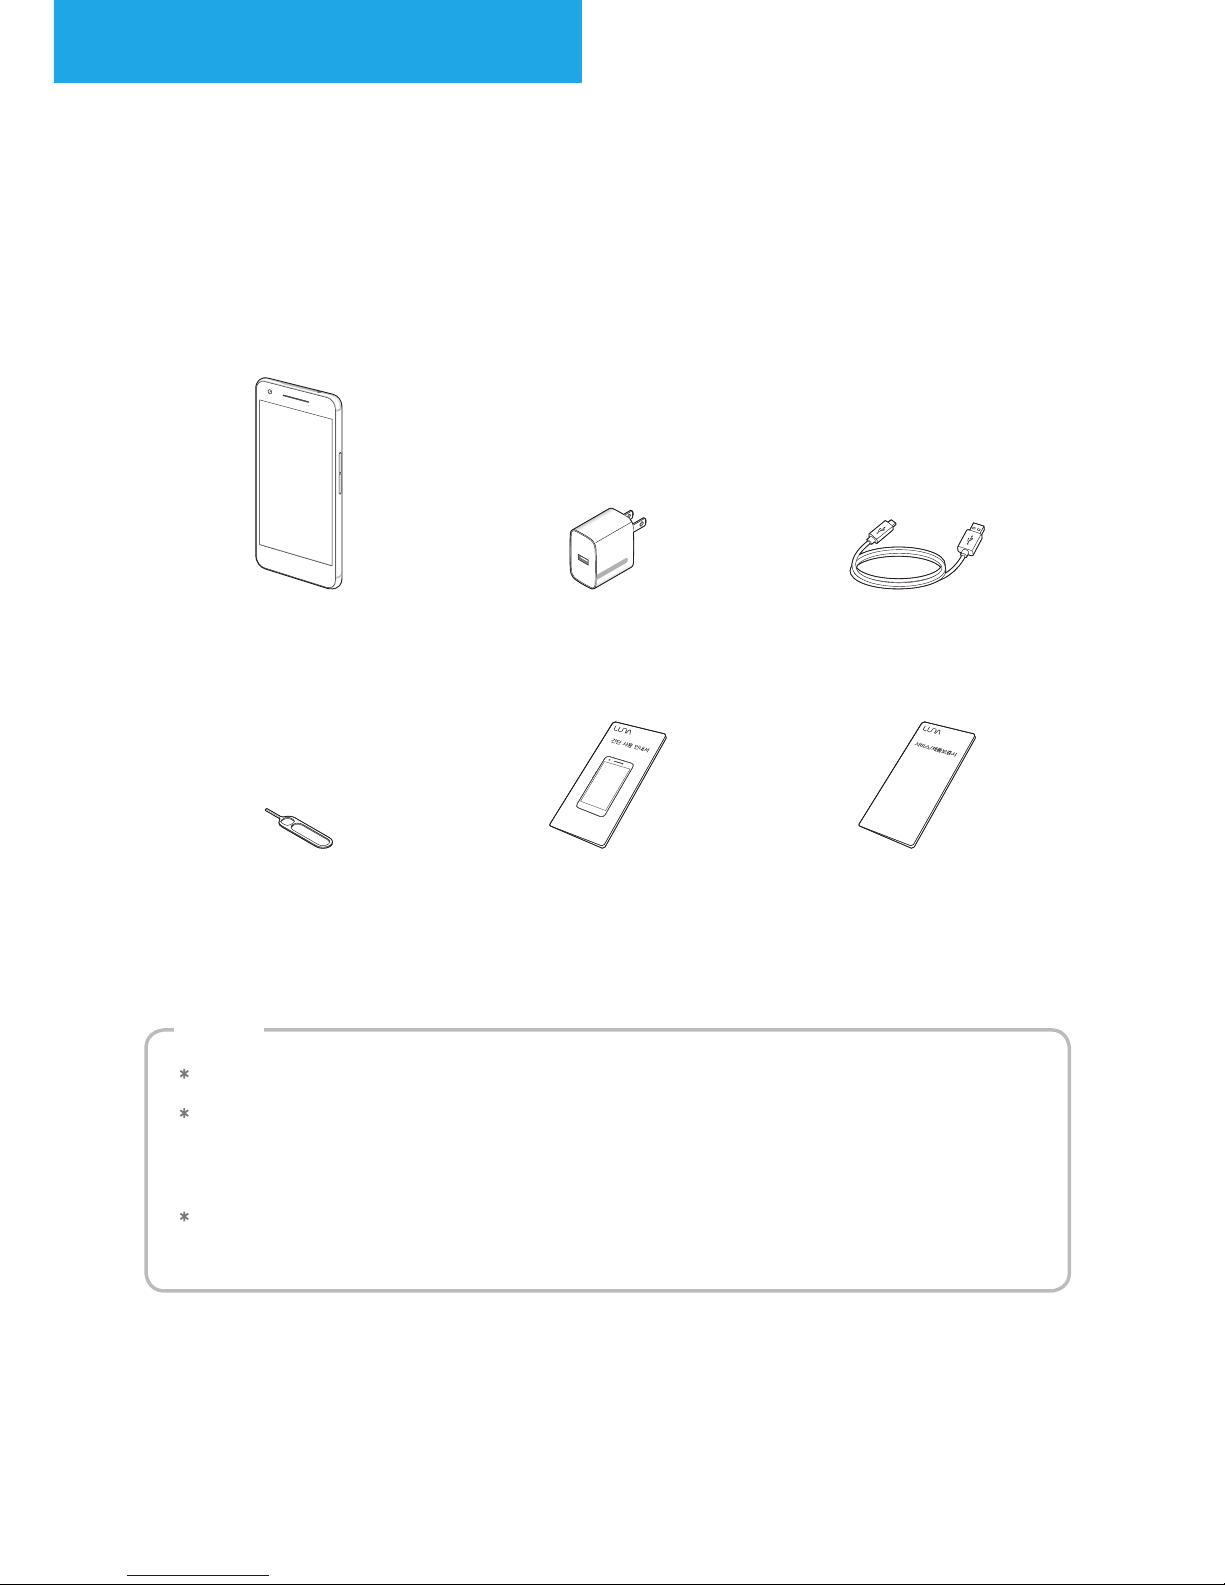
What’s in the Box.......................................5
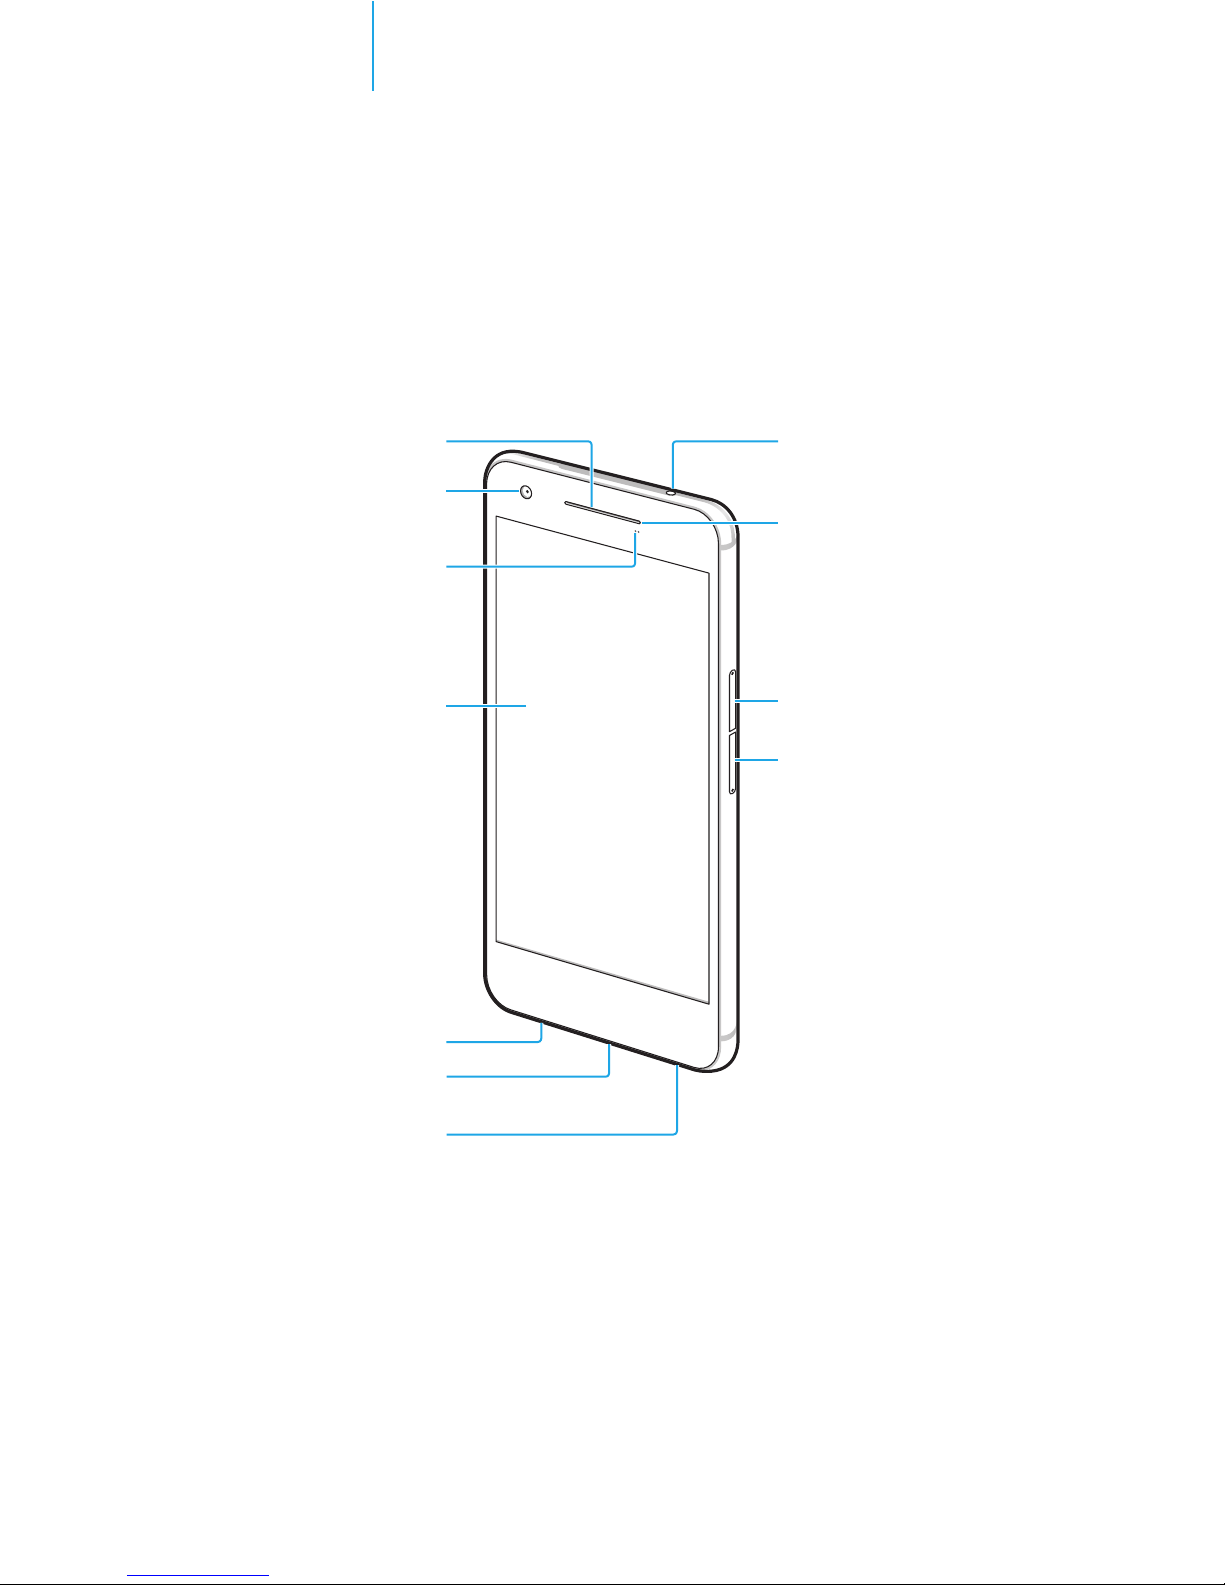
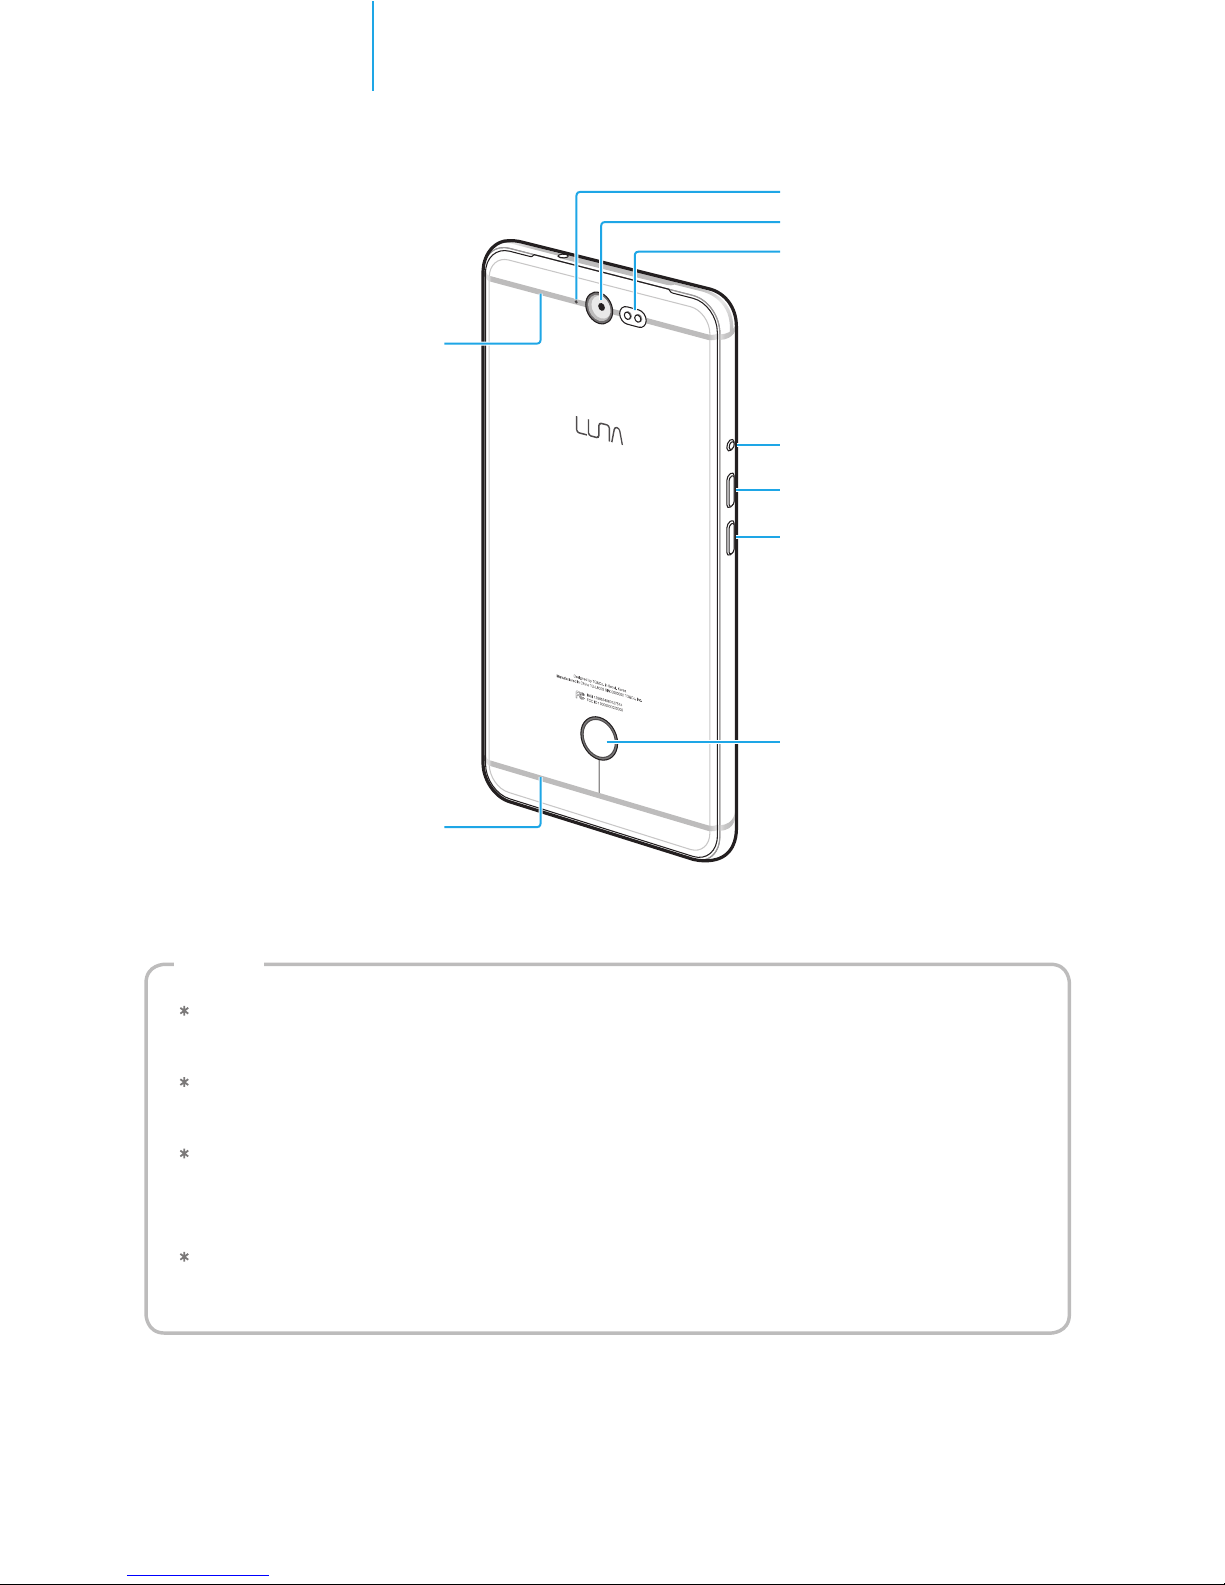
LUNA Overview .........................................6
Installing the micro SIM Card................9
Installing the micro SD Card................11
Charging the Battery .............................12
Power On/Off ...........................................15
Getting to Know Your LUNA
Touch Screen ............................................17
Home Screen........................................... 22
Lock Screen .............................................. 49
Typing Characters...................................51
Running and Stopping Apps .............. 54
Screen Capture ....................................... 54
Managing your Smartphone and
Data ............................................................ 55
Connecting the Wireless Display ...... 58
Data Sharing............................................ 59
Using Apps
Installing and Deleting Apps.............. 60
Phone......................................................... 61
Contacts .................................................... 66
Messaging................................................ 69
Browser..................................................... 72
Camera ...................................................... 73
Gallery........................................................ 81
Music .......................................................... 82
Video Player ............................................. 85
Email ........................................................... 87
Alarm/Clock.............................................. 91
Calendar.................................................... 93
FM Radio.................................................... 94
Note ............................................................ 95
Calculator.................................................. 95
File Manager ............................................ 96
Voice Note................................................. 97
Safebox...................................................... 98
Backup Tool.............................................. 99
Weather..................................................... 99
Downloads ............................................... 99
Torch ........................................................... 99
Google Apps ..........................................100
Settings
About Settings ......................................102
Wireless & Networks Settings .........103
System Settings .................................... 110
Personal Settings ................................. 115
Device Settings ..................................... 119
Appendix
User Troubleshooting Guide (Check
Before Requesting Service) ..............122
Specications.........................................126
Customer Service................................. 127
Important Safety Information......... 127
FCC Compliance Statement .............. 131

3
Before Using
Read this rst
Please read this User Manual before using the smartphone to ensure that you are using it safely
and correctly.
≐This User Manual may be changed without notice.
≐Depending on the smartphone model, software version, or mobile network service, some
contents of this User Manual may differ from the actual product.
≐The basic apps that came with your smartphone are subject to change. Support for these
apps may be discontinued without notice at the will of the app developer or mobile service
provider.
≐TG&Co. assumes no responsibility for apps that you purchase from an app market, such as
the Play Store, and install. Please contact your app provider regarding any questions, defects,
and damages caused by defects related to a purchased app.
≐TG&Co. assumes no responsibility for damages resulting from a use of the product that is not
approved by TG&Co., or failure to follow the precautions and instructions of the User Manual.
≐Our company does not guarantee any product that has been damaged due to the use of apps
that are not approved by TG&Co., or the use of illegal apps.
≐TG&Co. assumes no responsibility for device malfunctions and data damages resulting from
the modication of the operating system or the installation of unapproved apps.
≐If you upload or download a large size video le, install apps, and use location-based services
using your cellular network, you may be charged overage fees depending on your data
network plan. If you are sending or receiving large amounts of data, it is recommended to
use Wi-Fi.
≐This wireless device cannot be used for services related to the safety of human life as it has
the possibility of radio wave interference.

4
Before Using Copyrights Information
Copyrights Information
≐Copyright © 2016 TG&Co.
≐This manual is protected under international copyright laws. No part of this manual may be
reproduced, distributed, translated, or transmitted in any form or by any means without the
prior written permission of TG&Co.
≐Android, Google, Gmail, YouTube, Play Store, Play Book, Play Movies & TV, Play Games, Voice
Search, Maps, Hangouts, Chrome, Photos, Drive, etc. are registered trademarks of Google
Inc.
≐Bluetooth is a registered trademark of Bluetooth SIG, Inc.
≐Wi-Fi®, Wi-Fi Protected Setup™, Wi-Fi CERTIFIED Passpoint™, Wi-Fi Direct™, Wi-Fi CERTIFIED™,
and Wi-Fi logo are registered trademarks of Wi-Fi Alliance.
≐All other trademarks and copyrights are the property of their respective owners.

5
Getting Started LUNA
What’s in the Box
The following items are included.
LUNA phone Charger USB cable for charging and
connecting with a PC
micro SIM and micro SD
tray eject pin Quick guide Warranty card
↝If any of the above are missing, please contact the customer center.
↝Use devices that have been supplied or approved by TG&Co. If you use a device
supplied by another provider that is not approved, your smartphone may malfunction
or not work.
↝The appearance and specications of the phone and accessories may be changed
without notice.
NOTES

6
Getting Started LUNA LUNA Overview
LUNA Overview
micro SD card tray
micro SIM card tray
LED indicator
Front camera
Touch screen
Speaker
Front microphone
USB connector for
charging and connecting
Stereo earphone jack
Illumination and
proximity sensors
Receiver

7
Getting Started LUNA LUNA Overview
Power button
Flash
Rear camera
Rear microphone
NFC antenna
Volume up button
Volume down button
Antenna line
Antenna line
↝Some touch screen protection lms may reduce the touch sensitivity or cause a
malfunction.
↝If water is on the touch screen or the phone is in a humid place, the touch screen may
not work properly.
↝During calling or data communication, if you touch the antenna line with your ngers
or attach a metal label to it, it may decrease call quality and increase the drain on the
battery.
↝If you wish to use a case to protect your smartphone, use a case that has been
supplied or approved by TG&Co.
NOTES

8
Getting Started LUNA LUNA Overview
BUTTONS
Button Description
Power
≐Press and hold more than 1 second to turn the
smartphone on or off.
≐Press to turn on or lock the screen.
≐Press and hold more than 8 seconds to reboot the
smartphone.
Volume up
≐Press to increase the volume.
Volume down
≐Press to lower the volume.
≐Press the Volume down button and the Power button
simultaneously to capture the current screen.

9
Getting Started LUNA Installing the micro SIM Card
Installing the micro SIM Card
To use your smartphone, you must install the micro SIM (Subscriber Identity Module) card
supplied by your mobile provider.
1
Insert the micro SIM and micro SD tray eject pin into the micro SIM card tray eject hole and
push the pin until the tray ejects slightly from the slot.
2
Using your thumb and index nger, pull the tray out of the slot completely.
3
Place the micro SIM card on the tray with the metal contact points facing downwards.
4
Insert the tray in which the micro SIM card is installed into the slot completely.

10
Getting Started LUNA Installing the micro SIM Card
↝Be careful not to damage the contact points of the micro SIM card by bending and
scratching.
↝Do not lose or hand over your smartphone, as the micro SIM card contains your
personal information. If someone makes calls or uses data communication on your
phone, you will be charged a fee. TG&Co. is not liable for damages that result from
losing or transferring your smartphone.
↝Make sure your smartphone’s power is turned off when you install or remove the
micro SIM card. If you install or remove it with the power is on, it may damage the
micro SIM card and your smartphone.
CAUTIONS
↝For information regarding functions and support services of the micro SIM card,
please contact your mobile service provider.
↝The micro SIM card has a lock function preventing its use by others. If you enter an
incorrect password (PIN) three times while the micro SIM card is in lock mode, the
micro SIM card will lock and be unavailable for use. In this case, you must enter the
PUK code to unlock the micro SIM card. The PUK code is provided with the micro SIM
card. If you have forgotten the PUK code, please contact your dealer or the network
service provider that issued the micro SIM card. (Note: if you enter an incorrect PUK
code 10 times, you will be permanently unable to use the micro SIM card.)
↝When you turn your smartphone on for the rst time, it takes about 1 minute until it is
ready for use, as it needs to read the information from the micro SIM card.
NOTES

11
Getting Started LUNA Installing the micro SD Card
Installing the micro SD Card
To use the extended memory in addition to the system memory, you can use the micro SD
(Secure Digital) card as an external memory card.
1
Insert the micro SIM and micro SD tray eject pin into the micro SD card tray eject hole and
push the pin until the tray ejects slightly from the slot.
2
Using your thumb and index nger, pull the tray out of the slot completely.
3
Place the micro SD card on the tray with the metal contact points facing downwards.
4
Insert the tray in which the micro SD card is installed into the slot completely.

12
Getting Started LUNA Charging the Battery
Charging the Battery
Read before charging the battery
≐Make sure to only use a charger that has been supplied or authorized by our company.
Unauthorized chargers may cause the smartphone to malfunction or the smartphone
battery to explode. These damages will not be covered under the warranty.
≐If you connect the charger to your smartphone incorrectly, it may cause damage to your
smartphone. This damage will not be covered under the warranty.
≐You can charge your smartphone by connecting to your PC. Please note that the charging
time from your PC may be longer than when using the charger. In addition, if you connect to
a USB port that does not maintain a constant output voltage, your smartphone may not be
charged.
≐You can use your smartphone while charging, but this may mean that it takes longer to fully
charge the battery.
≐Always use your smartphone after charging it suciently, so that the power is not turned off
when you transfer data, install apps, and update the software.
≐If your charger or USB cable is damaged, do not use them. Contact our customer center and
purchase a new product, if necessary.
≐During charging, the smartphone and charger may become warm. This is not a malfunction
and does not affect the performance of the smartphone.
The following are some tips that can help you to increase your battery life:
≐When you are not using your smartphone, keep the screen locked.
≐Set the auto sleep time to a short time.
≐Do not set the screen brightness to bright. Keep the screen brightness level moderate.
≐Turn on power saving features.
≐Turn off unused apps that are running in the background.
≐Turn off Wi-Fi, Bluetooth, or GPS, which consume signicant battery power, when they are
not in use.
≐Turn off auto synchronization features for your apps.

13
Getting Started LUNA Charging the Battery
↝If you are out of the service area or in an area with a weak signal for an extended
period of time, the increased battery consumption required to make a signal
connection may make your battery life shorter.
↝As some basic functions run in the background even when the screen is off, the
battery may be drained even when the smartphone is not in use.
NOTES
Battery charging
Before using your smartphone for the rst time, you are recommended to charge the battery
with the power adapter and USB cable provided in the gift box.
Insert the small end of the USB cable into the USB connector at the bottom, insert the other end
of the USB cable into the charger, and plug the charger into an electrical outlet to start charging
the battery. The LED light will turn green once the battery is fully charged.

14
Getting Started LUNA Charging the Battery
↝If you turn your smartphone power on while charging your smartphone, it may not be
100% fully charged.
↝If you charge your smartphone using the USB port of your PC or car charger, the
charging time may be longer depending on your PC or car charger’s specication.
↝After you have nishing charging your smartphone, disconnect the USB data
communication cable from your smartphone and unplug the charger from the wall
outlet to avoid power consumption.
NOTES

15
Getting Started LUNA Power On/Off
Power On/Off
Power on
Press and hold the Power button for more than 1 second to turn on your smartphone.
When you turn on your smartphone for the rst time, please follow the onscreen instructions
to personalize your smartphone. Some features might require internet access in order to
synchronize your online account and location-based services. You can also enable or disable
them in settings later on.
↝To use certain Google apps (Play Store, Gmail, etc.), you must register for a Google
account. Once you have created your Google account, you can use all Google apps
by syncing them, and recover erased or corrupted data from your Google account.
You can create several Google accounts and synchronize each Google account
separately.
↝To register your Google account, the smartphone should be connected to the
Internet using the data network or Wi-Fi.
NOTES

16
Getting Started LUNA Power On/Off
Power off
Press and hold the Power button for more than 1 second and tap Power off in the menu.
Button Description
Power off
Turn off your smartphone.
Restart
Turn your smartphone off and on again.
Airplane mode
Turn Airplane mode on/off. Airplane mode disables the
wireless features such as Wi-Fi, Bluetooth, and the voice and
data network.
Screen shot
Capture the current screen.
Silent mode
Change to silent mode.
Vibration mode
Change to vibration mode.
Sound mode
Change to sound mode.
If you smartphone is not responding or not working, press and hold the Power button
for more than 8 seconds to reboot.
NOTE

17
Getting to Know Your LUNA
Touch Screen
You can do anything on your LUNA by touching the screen and pressing the buttons. Different
ways of touching the touch screen result in different operations. Use your smartphone after
learning some basic touch skills.
Tap
Tap the screen with your nger. To run an app, select a menu item or button, and enter a
character, tap an app shortcut, menu item, button, keyboard, etc.

18
Getting to Know Your LUNA Touch Screen
Long-press
Tap and hold the screen with your nger for more than 1 second. By making a long press on the
screen, you can access available options.
Double-tap
Double-tap on the screen to zoom in or zoom out when using certain apps such as Gallery,
Maps, Photo, etc.

19
Getting to Know Your LUNA Touch Screen
Drag
Tap and hold the screen and move to a target position with your nger without breaking
contact. You can move a shortcut or movable item to the position of your choice.

20
Getting to Know Your LUNA Touch Screen
Swipe
Quickly touch and move your nger across the touchscreen (left/right/up/down) without
breaking contact. You can see the previous or next screen of the Home or Apps screen by
swiping from right to left, or from left to right. Also, you can see the up or down page of the
contact list or web page by swiping from up to down, or from down to up.
Table of contents