manuals.online logo
Brands
  1. Home
  2. •
  3. Brands
  4. •
  5. Lutron Electronics
  6. •
  7. Power Supply
  8. •
  9. Lutron Electronics QSPS-P4-1-35V User manual

Lutron Electronics QSPS-P4-1-35V User manual

3
1
2
QSPS-P4-1-35V
Input
100 V~50/60 Hz 1.5 A
Output
35 V- 143 mA
Lutron Electronics Co., Inc.
7200 Suter Road
Coopersburg, PA 18036-1299, U.S.A.
02/2020
P/N 045650 Rev. B
QS Link Plug-In Power Supply
Installation Guide – Please read before installing
English
Important Notes
1. All wiring and circuit protection must be in accordance with national and local electrical codes.
2. Ambient operating temperature: 0 °C to 40 °C (32 °F to 104 °F), 0 to 90% humidity, non-condensing.
3. This product is intended for indoor use only.
Mount the Power Supply (optional)
• The power supply can be mounted using the mounting tabs and fasteners of appropriate type for the mounting
surface. Hand tighten only. DO NOT use a power tool to tighten the fasteners.
• It is recommended to mount power supplies in a location that will remain accessible, where it will not interfere with
window treatments or other moving devices.
Rules for QS Link Wiring
• +35 V-must NEVER be connected between devices that supply PDUs (Power Draw Units).*
• Use a Lutron-specic wire for the QS link.
• The maximum total distance of the QS link is 600m (1969ft) (when using GRX-CBL-46L).
• Only use the cable noted above for the QS link wiring. Using other cable may cause malfunction.
Maximum devices powered by one
QSPS-1-35V
Shades Controls
1 shade or
drapery drive
Up to
1 PDU*
None Up to
8 PDUs*
* For more information, refer to the QS Link Power Draw Unit Specication Submittal (P/N 369405) at www.lutron.com
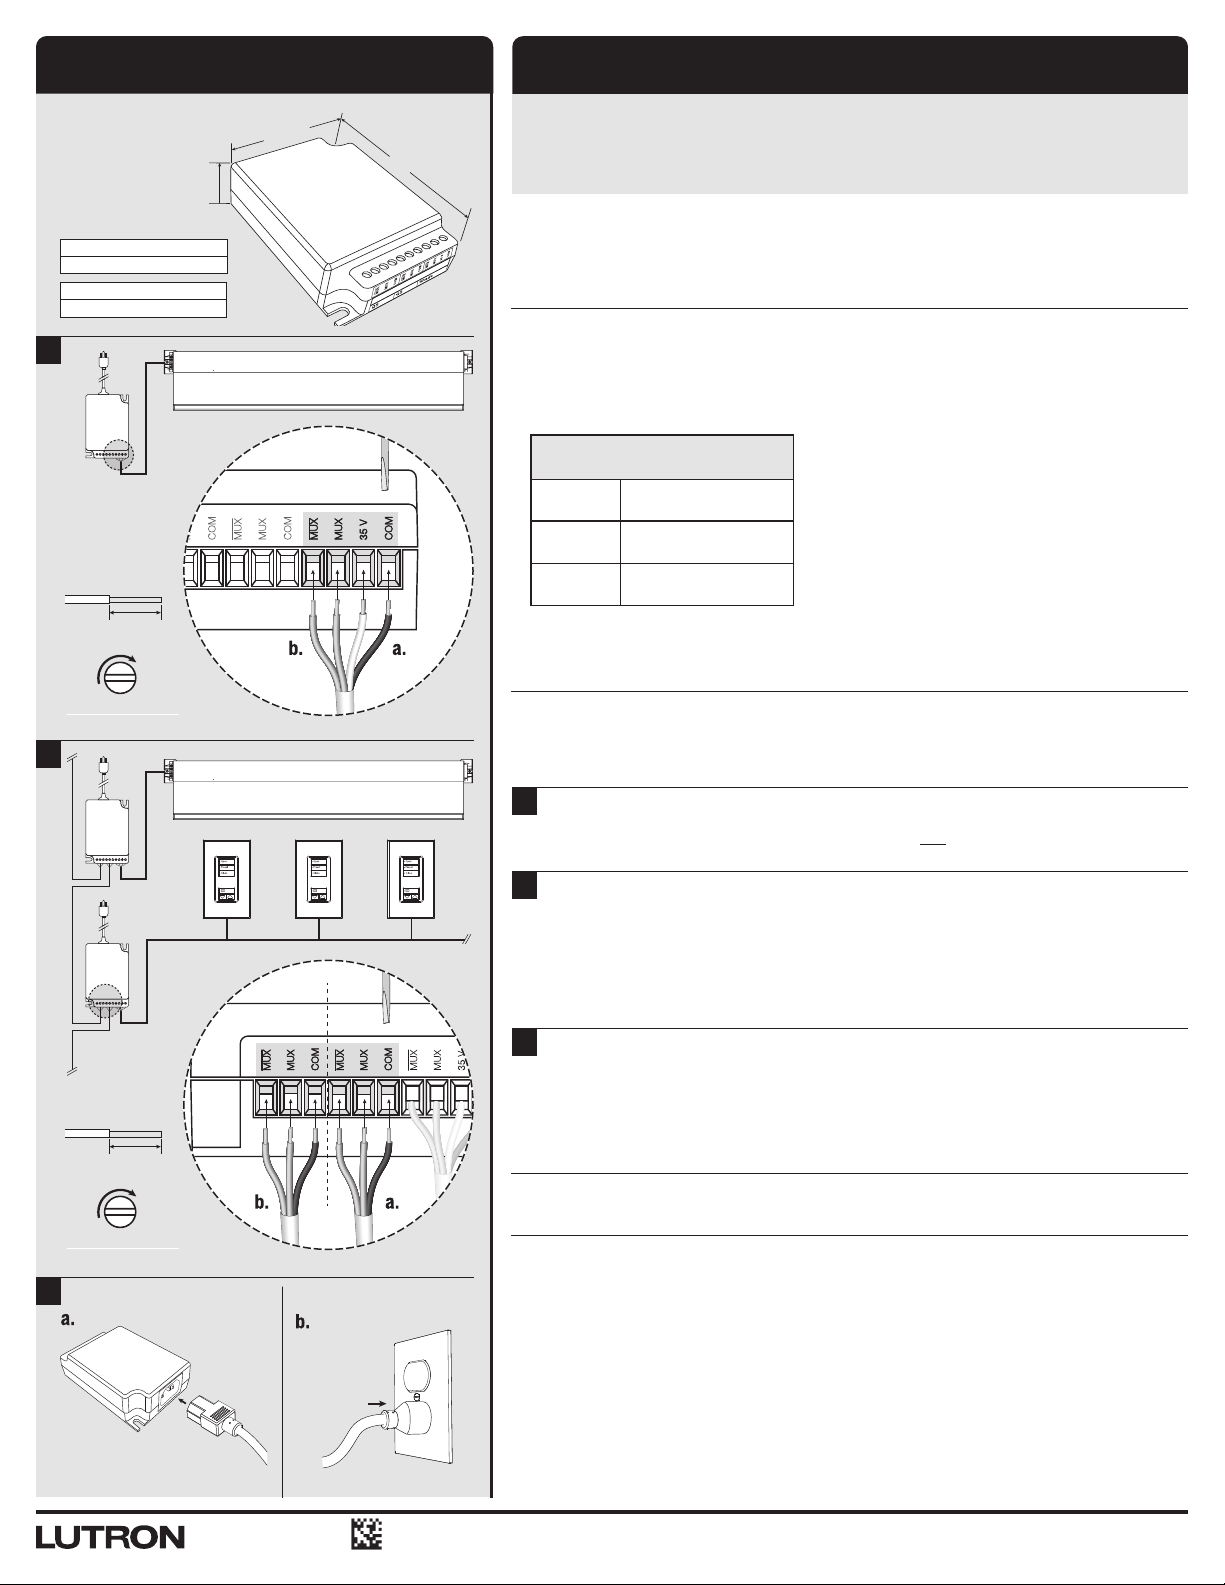
Connect the Power Supply
• Strip 6 mm (0.25 in) of insulation from each conductor.
• Tighten each terminal screw securely to 0.5 N•m (5 in-lb), and ensure there is no insulation inside the
terminal block.
1 Connect the drive for the window treatment or connected PDUs
a.Connect the power and common wires to the corresponding 35 V and COM terminals.
b.Connect the communication wires to the corresponding MUX and MUX terminals.
2 Daisy Chain Power Supply Communication Lines (optional)
Multiple power supplies (and their connected devices) may be daisy-chained along the wired communications
link as shown.
a. Connect the incoming communications link wires to the corresponding terminals on one side of the communications link
pass-through.
b.Connect the outgoing communications link wires to the corresponding terminals on the other side of the
communications link pass-through.
3 Connect the AC Cord
Use the 3-prong power cord supplied. This device must utilize earth ground to ensure proper operation.
a.Connect the AC power cord to the power supply.
b.Plug the power cord into a standard 3-prong receptacle.
Worldwide Headquarters
Lutron Electronics Co., Inc.
7200 Suter Road
Coopersburg, PA 18036-1299 USA
USA, Canada, Caribbean:
1.844.LUTRON1 (588-7661)
Mexico: +1.888.235.2910
Central & South America:
+1.610.282.6701
www.lutron.com/support
[email protected]
United Kingdom
In EEA imported by:
Lutron EA Ltd
125 Finsbury Pavement
4th Floor, London, EC2A 1NQ UK
TEL: +44.(0)20.7702.0657
FAX: +44.(0)20.7480.6899
Tech Support: +44.(0)20.7680.4481
FREEPHONE: 0800.282.107
Asian Headquarters
Lutron GL Ltd.
390 Havelock Road
#07-04 King’s Centre
Singapore, 169662
TEL: +65.6220.4666
FAX: +65.6220.4333
[email protected]
Japan
Free Dial: 0120.083.417
www.lutron.com/japan
Customer Assistance
www.lutron.jp/le/limited_warranty.pdf
Warranty
Lutron is a trademark or registered trademark of Lutron Electronics Co., Inc. in the US and/or other countries.
32 mm
(1.25)
70 mm
(2.75)
103 mm
(4.00)
6 mm
(0.25)
0.5 N•m
(5 in-lb)
6 mm
(0.25)
0.5 N•m
(5 in-lb)
入力 
100 V~50/60 Hz 1.5 A
出力
35 V- 143 mA
QS リンクプラグイン電源アダプター
取付説明書 – 取付前に必ずお読みください
日本語
 重要事項
1. すべての配線や回路保護については、電気関係法令に従ってください。
2. 動作周囲温度:0 - 40 °C、湿 度 0 - 90%、結露がないこと。
3. 本製品は屋内使用専用です。
電源アダプターの取付(オプション)
• 本製品は、取付タブと適切なネジを使って壁面に取り付けることができます。壁面に取り付ける
場合は、手を使って締め付けてください。ネジを締め付ける際に、電動工具は使用しないでくださ
い。
• 電源アダプターは電動シェードやその他の機器に干渉しない、手の届く場所に取り付けることを
推奨します。
QSリンク配線の注意事項
• PDU(給電単位)*を供給する機器間には、+35 V-を絶対に接続しないでください。
• QSリンクには、ルートロン製専用電線を使用してください。
• QSリンクの最大延長距離は600 m(GRX-CBL-46L使用時)です。
• QSリンクの配線には、上記弊社製ケーブルのみ使用可能です。それ以外のケーブルを使用する
と、誤動作の原因となります。
1台のQSPS-1-35V
で給電可能な最大数
シェード コントロール機器
シェード ま た は ロ ー ル
スクリーン 1 台 最大1PDU*
なし 最大8PDU*
*   詳細については、www.lutron.comの『 QSリンクの給電単位(PDU)』仕様書(P/N 369405) をご覧ください。
電源アダプターの接続
• QSリンク信号線の各配線の被覆を6 mm剥きます。
• 端子台内にケーブル被覆を噛みこんでいないことを確認し、各端子ネジを0.5 N•mでしっかりと締
めます。
 1  ウィンドウシェードのモーターや子機類を接続する
a. 電源線とコモン線を35 V端子とCOM端子にそれぞれ接続します。
b.対応するMUX端子とMUX端子に通信線を接続します。
 2
 電源線・信号線の一筆書き配線(オプション)
複数の電源アダプター(およびそれらに接続されている機器)は、図に示すように有線通信リ
ンクとともに一筆書き配線が可能です。
a. 入力側QSリンク線を、入力側端子に接続します。
b.出力側QSリンク線を、送り側端子に接続します。
 3 ACコードの接続
付属の3極電源コードをご使用ください。適正動作を確実にするため、本機器はアースに接続
する必要があります。
a. 電源アダプターにAC電源コードを接続します。
b. 標準の3極レセプタクル(コンセント)に電源コードを差し込みます。
ワ ー ルド ワイド 本 社
Lutron Electronics Co., Inc.
7200 Suter Road
Coopersburg, PA 18036-1299 USA
米国、カナダ、カリブ諸国:
1.844.LUTRON1 (588-7661)
メキシコ: +1.888.235.2910
中米/南米:
+1.610.282.6701
www.lutron.com/support
[email protected]
英国
Lutron EA Ltd
125 Finsbury Pavement
4th Floor, London, EC2A 1NQ UK
TEL:+44.(0)20.7702.0657
FAX:+44.(0)20.7480.6899
技術サポート: 
+44.(0)20.7680.4481
フリーダイヤル: 0800.282.107
アジア本社
Lutron GL Ltd.
390 Havelock Road
#07-04 King’s Centre
Singapore, 169662
TEL: +65.6220.4666
FAX: +65.6220.4333
[email protected]
日本
フリーダイヤル: 0120.083.417
www.lutron.com/japan
カスタマーサポート
保証
Lutronは、米国または/およびその他諸国で登録されているLutron Electronics Co., Inc.の商標または登録商標です。
QSPS-P4-1-35V
32 mm
70 mm
103 mm
Lutron Electronics Co., Inc.
7200 Suter Road
Coopersburg, PA 18036-1299, U.S.A.
02/2020
P/N 045650 Rev. B
www.lutron.jp/le/limited_warranty.pdf
6 mm
0.5 N•m
6 mm
0.5 N•m
3
1
2

Other Lutron Electronics Power Supply manuals

Lutron Electronics Sivoia QED SVQ-10-PNL-230 User manual

Lutron Electronics

Lutron Electronics Sivoia QED SVQ-10-PNL-230 User manual

Lutron Electronics QSPS-P1-1-50 User manual

Lutron Electronics

Lutron Electronics QSPS-P1-1-50 User manual

Lutron Electronics QSPS-P1-10-60 User manual

Lutron Electronics

Lutron Electronics QSPS-P1-10-60 User manual

Lutron Electronics QSPS-P2-10-60 User manual

Lutron Electronics

Lutron Electronics QSPS-P2-10-60 User manual

Lutron Electronics T120-15DC-9-BL User manual

Lutron Electronics

Lutron Electronics T120-15DC-9-BL User manual

Popular Power Supply manuals by other brands

Sonelco P3270 manual

Sonelco

Sonelco P3270 manual

Skyrc SK100157 instruction manual

Skyrc

Skyrc SK100157 instruction manual

ferrum HYPSOS user manual

ferrum

ferrum HYPSOS user manual

BRIDGEWERKS Mag 15 quick guide

BRIDGEWERKS

BRIDGEWERKS Mag 15 quick guide

Mission Critical NEWMAR Sentinel Installation & operation manual

Mission Critical

Mission Critical NEWMAR Sentinel Installation & operation manual

Kramer VA-102P512 user manual

Kramer

Kramer VA-102P512 user manual

Renogy Smart Shunt 300 quick guide

Renogy

Renogy Smart Shunt 300 quick guide

Genie GPR816/12R quick start guide

Genie

Genie GPR816/12R quick start guide

Coolmax V-600 user manual

Coolmax

Coolmax V-600 user manual

Bicker DC300WS user manual

Bicker

Bicker DC300WS user manual

Elettrotest TPS/M/D user manual

Elettrotest

Elettrotest TPS/M/D user manual

Antec CP-1000 user manual

Antec

Antec CP-1000 user manual

Jetter JetMove 3000 user manual

Jetter

Jetter JetMove 3000 user manual

VigorPool LAKE 300 user manual

VigorPool

VigorPool LAKE 300 user manual

Nova Electronics X-PAK 904 Installation sheet

Nova Electronics

Nova Electronics X-PAK 904 Installation sheet

Siemens SITOP power 20 operating instructions

Siemens

Siemens SITOP power 20 operating instructions

Matsusada Precision ECU Series instruction manual

Matsusada Precision

Matsusada Precision ECU Series instruction manual

PeakTech 6181 Operation manual

PeakTech

PeakTech 6181 Operation manual

manuals.online logo
manuals.online logoBrands
  • About & Mission
  • Contact us
  • Privacy Policy
  • Terms and Conditions

Copyright 2025 Manuals.Online. All Rights Reserved.