LuxaFlex Duette Parts list manual

Installation •Operation •Care
LUXAFLEX®DUETTE® Shades
with Hard-Wired Motorisation

CONTENTSCONTENTS
Getting Started:
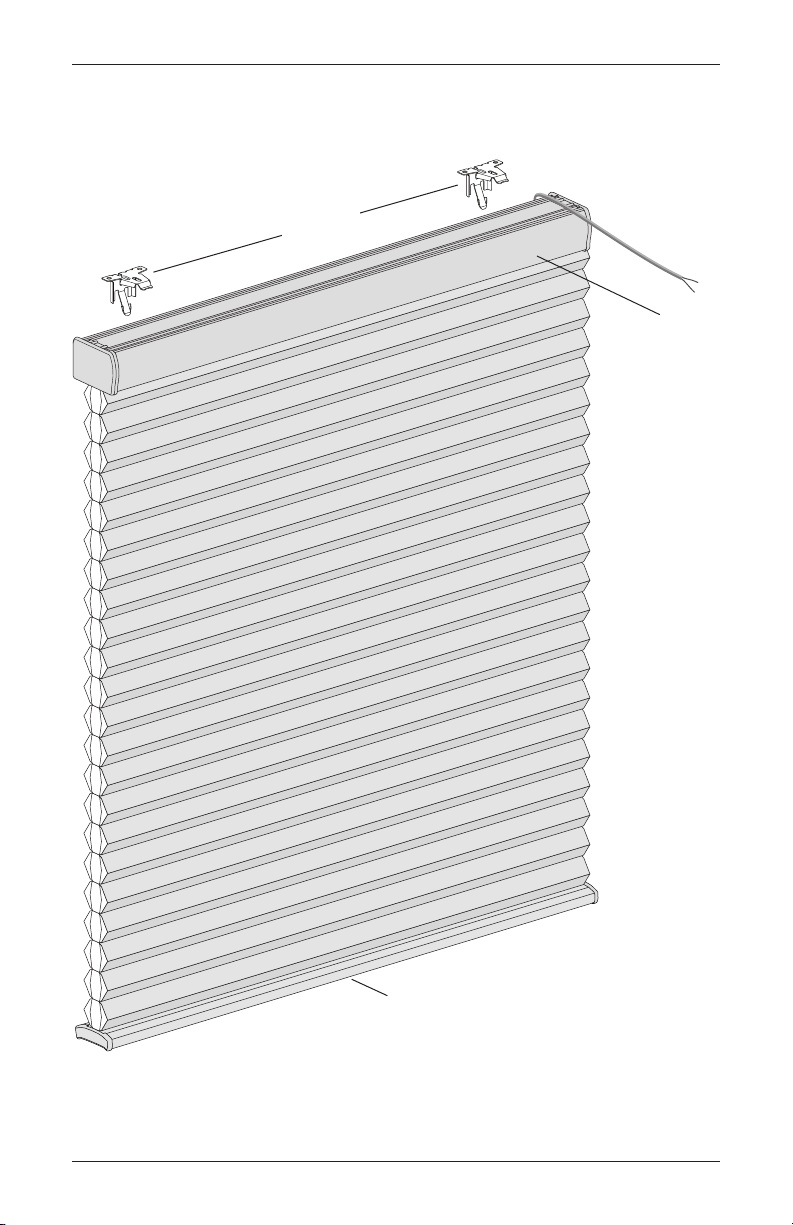
Product View .................................................................... 1
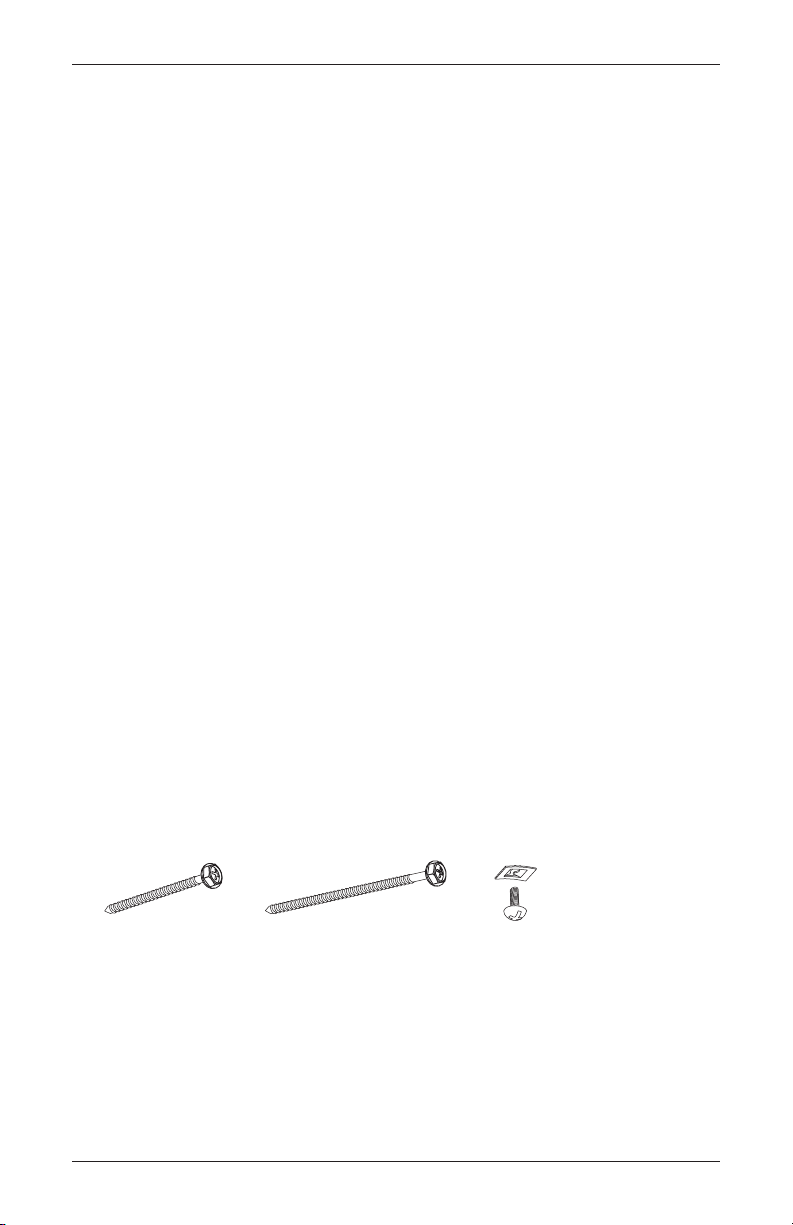
Tools and Fasteners Needed ............................................. 2
Installation:
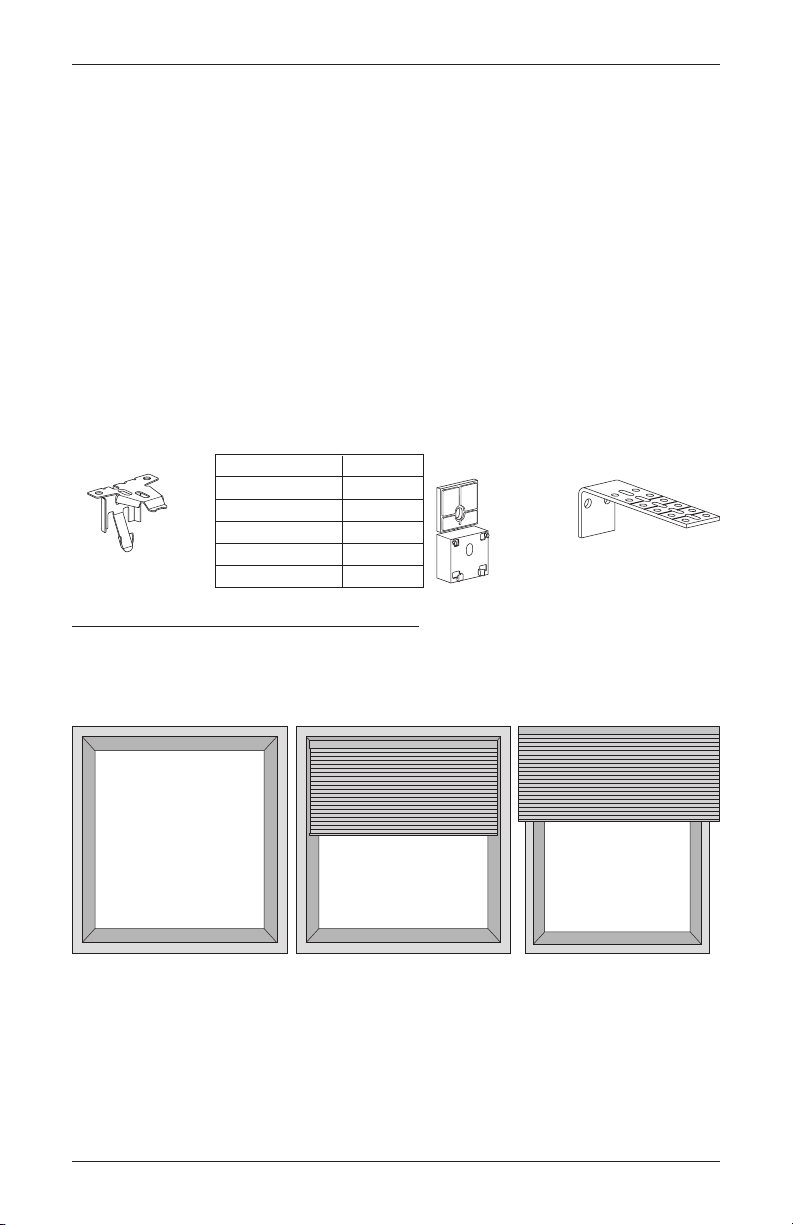
Installation Overview ......................................................... 3
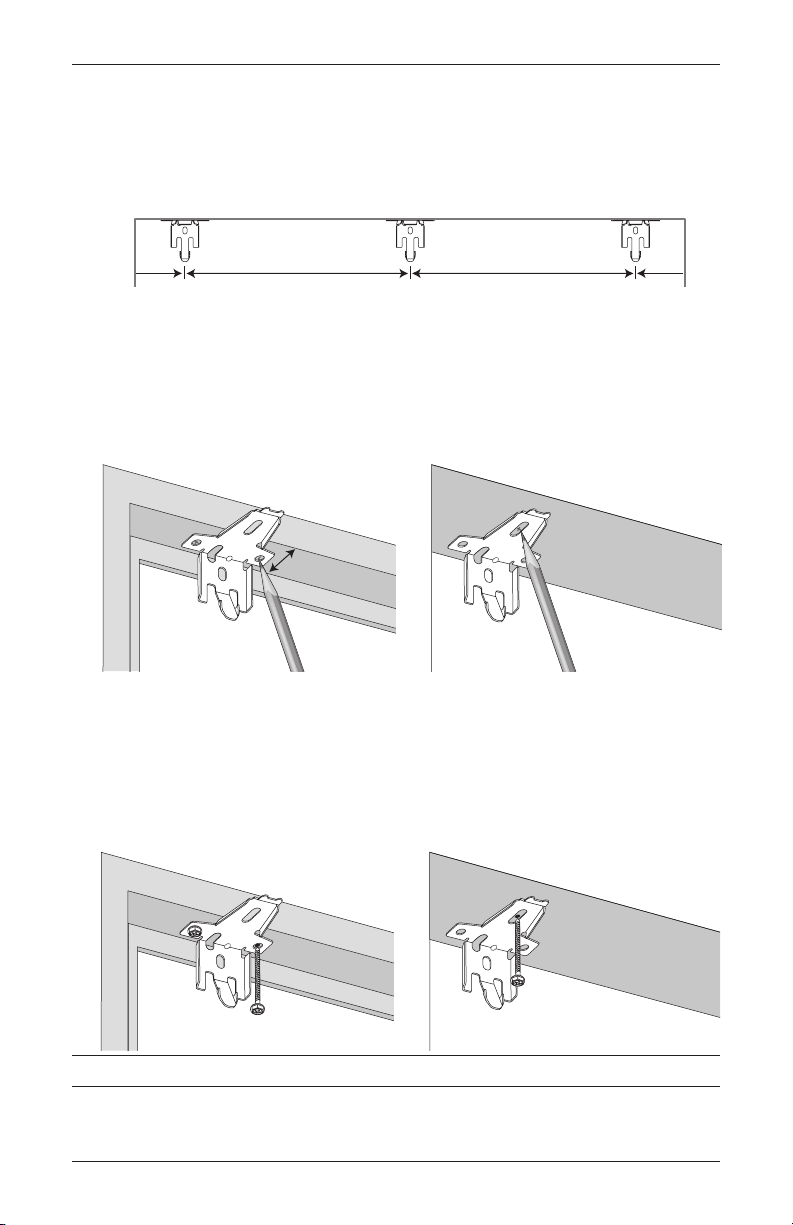
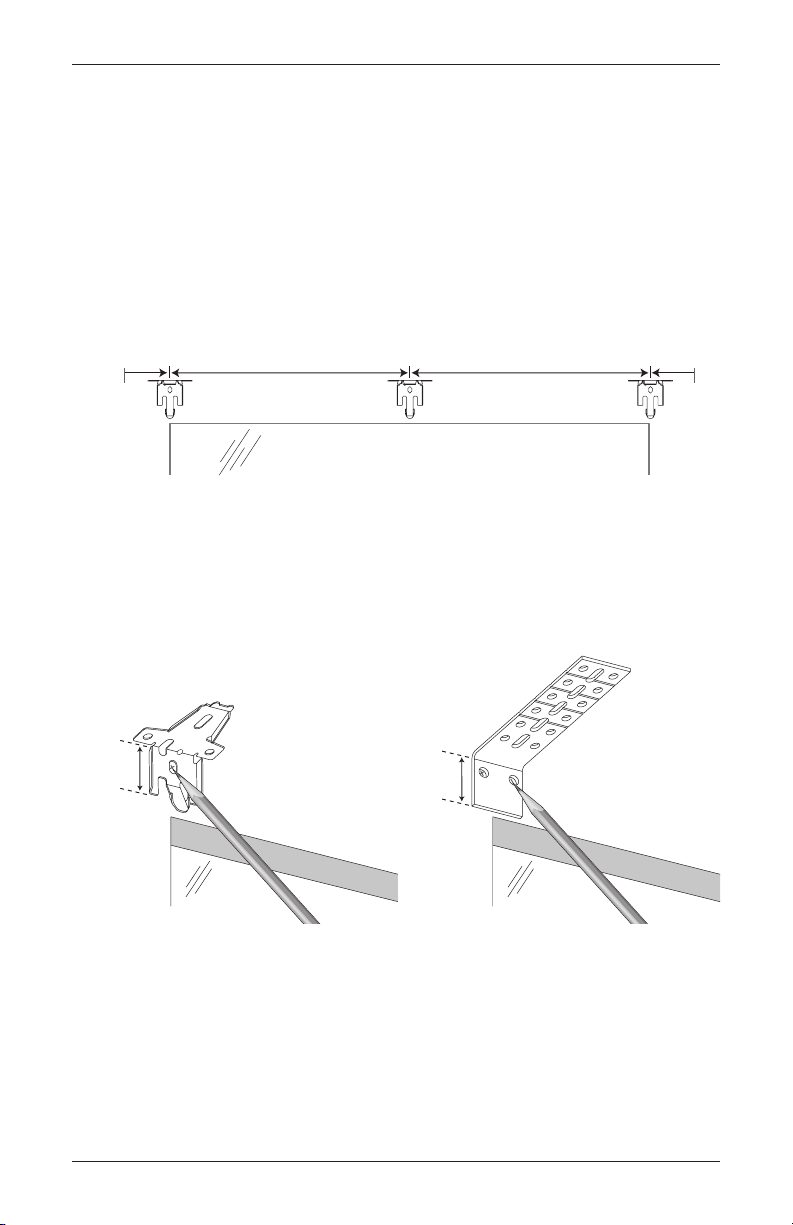
Mount the Installation Brackets — Reveal Mount................ 4
Mount the Installation Brackets — Face Mount................... 5
Install the Shade ............................................................... 7
Operation:
Operate the Shade ............................................................ 9
References ....................................................................... 9
Troubleshooting .............................................................. 10
Care:
Removing the Shade ....................................................... 12
Cleaning Procedures ....................................................... 12
© Copyright 2013 Hunter Douglas Limited [ABN 98 009 675 709]
® Registered Trade Marks of Hunter Douglas Limited •18.013.021 •05/2013
PLEASE READ THESE INSTRUCTIONS ALL THE WAY THROUGH BEFORE COMMENCING INSTALLATION.
INSPECT ALL PARTS FOR DAMAGE OR MISSING COMPONENTS.
INSTALLATION WORK AND ELECTRICAL WIRING MUST BE DONE BY QUALIFIED PERSON (S) IN ACCORDANCE
WITH ALL APPLICABLE CODES AND STANDARDS.
IMPORTANT
WARNING -Never install this product with power connected. DISCONNECT FROM POWER SUPPLY before
installing or adding accessories to this device.
WARNING - Prior to installation inspect all parts for damage or missing components.
WARNING - To Reduce the Risk Of Fire, Electric Shock, Or Injury To Persons, Installation Work And Electrical
Wiring Must Be Done By Qualified Person(s) In Accordance With All Applicable Codes And Standards.
WARNING -
• Thisapplianceisnotintendedforusebypersons(includingchildren)withreducedphysical,sensoryor
mental capabilities, or lack of experience and knowledge, unless they have been given supervision or
instruction concerning use of the appliance by a person responsible for their safety.
• Youngchildrenshouldbesupervisedtoensurethattheydonotplaywiththeappliance

GETTING STARTED
1
GETTING STARTED
1
Product View
Installation
Brackets
Bottom Rail
Headrail
Wires from
Motor

GETTING STARTED
2
LUXAFLEX®DUETTE®Shades with hard-wired motorisation are recommended for professional
installation only. In most cases, planning and wiring should be completed before the shades are
installed.
Motorised shades ship with the motor installed inside the headrail. All other components
required for operation are ordered separately. Consult a home automation professional if
integrating with a home automationsystem.
Please thoroughly review this instruction booklet and the enclosed packing list before beginning
the installation. Check the packaging to be sure you have all the components needed to install
the shades. Keep the packaging until the shades perform to your satisfaction. Do not remove
theprotective plastic cover on the headrail until after each shade is installed.
Tools and Fasteners Needed
■Flat blade and Phillips screwdriver
■Level
■Measuring tape and pencil
■Power drill, 3mm drill bit, and 6mm hex driver
■Wire stripper
In addition, you will need fasteners designed to work with the specific mounting surface(s).
■#6 Hex Head Screws (Provided). Two 38mm screws are provided per installation
bracket.
■#6 Longer Hex Head Screws (Not Provided). If using spacer blocks, use #6 screws
long enough for a secure attachment. Add 13mm length for each spacer block.
■Screws and Speed Nuts (Provided). Extension brackets are supplied with screws and
speed nuts.
■Drywall Anchors (Not Provided). Use drywall anchors when mounting into drywall.
Speed Nut
and Screw
(Provided with
Extension Brackets)
#6 x 38mm
Hex Head Screw
(Provided)
Longer #6 Hex Head Screw
for Use with Spacer Blocks
(Not Provided)

INSTALLATION
3
Installation Overview
To install a shade, you will need to perform the following three steps:
STEP 1: Install the Brackets
STEP 2: Install the Shade
STEP 3: Connect the Power Source
STEP 1 — Install the Brackets
■Each shade will include the correct installation brackets for the fabric pleat size.
■The number of installation brackets supplied with each shade varies with shade width, as
shown in the table below.
■Shade orders may also include spacer blocks or extension brackets, if they were specified
for added clearance.
Mounting Types and Window Terminology
If the installation brackets are mounted correctly, the rest of the shade installation process
follows very easily. To prepare for this important first step, review the mounting types and basic
window terminology illustrated below.
IMPORTANT: Always check local electrical codes before completing any wiring.
■Refer to the appropriate page below based on the mounting type chosen for the shades:
➤Reveal Mount — Page 4
➤Face Mount — Page 5
Face Mount
Shade mounts outside
window opening.
Reveal Mount
Shade fits within
window opening.
Collectively, the sill and
jambs are called the
“window casement.”
Molding
Head Jamb
Sill
Jamb Jamb
Installation Brackets For Added Clearance
Shade Width (mm) Brackets
2
3
4
5
6
Extension
Bracket
13mm Spacer
Block
3mm Shim
(Break Off)
610 – 915
916 – 1830
1831 – 2745
2746 – 3556
3357 – 4400
10mm and 20mm
Cell Size

INSTALLATION
4
Mount the Installation Brackets —Reveal Mount
■Measure and mark the locations of the two end brackets 50mm from each jamb.
➤Space any additional brackets evenly between the two end brackets. (See the chart on
page 3 for bracket requirements.) Mount into wood whenever possible.
■Center the brackets on yourmarks, then mark the screw hole locations.
➤The minimum casement depth for installation brackets is 10mm. Mark both of the
winged screwholes with shallow mounting depths.
➤The minimum casement depth for a fully recessed mount is 60mm for 10mm and
20mmcell sizes. Mark the center screw hole when depth permits.
IMPORTANT: The front edges of the brackets must be level and aligned to each other.
■Drill the screw holes using a 3mm drill bit.
CAUTION: Use drywall anchors when mounting into drywall.
■Use a level to check that the mounting surface is level. Shim the brackets if necessary.
■Attach the installation brackets using the screws provided.
Proceed to “Install the Shade” on page7.
50mm Space Evenly JambJamb Space Evenly 50mm
10mm Minimum
Use Wing Holes
with Limited Depth
Use Center Hole
When Depth Permits

INSTALLATION
5
Mount the Installation Brackets — Face Mount
■Center the shade over the window opening at the desired height. Use a pencil to lightly
mark each end of the headrail on the mounting surface.
➤Alternatively, measure the width of the headrail and use that width to mark the headrail
end points over the window opening.
■Mark 50mm from each headrail end mark.
➤Space any additional brackets evenly between the two end brackets. (See the chart on
page 3 for bracket requirements.) Mount into wood whenever possible.
■Center the installation brackets on your marks and mark where to drill the screw holes.
➤A minimum flat vertical surface of 30mm isrequired.
➤The top of the installation brackets (or extension brackets) should be at the desired
height. The brackets should be level andaligned.
CAUTION: The rear of the brackets must be flush against a flat mounting surface. Do not
mount brackets oncurved molding.
■Drill the screw holes using a 3mm drill bit.
CAUTION: Use drywall anchors when mounting into drywall.
50mm Space Evenly
Window Opening
Space Evenly 50mm
30mm 30mm
Extension
Bracket

INSTALLATION
6
■Attach the installation or extension brackets using the screws provided.
IMPORTANT: The tops of the
installation brackets or extension
brackets must be level and the
front edges of the brackets must
be aligned.
■If using spacer blocks, first attach each installation bracket to a 10mm spacer block.
➤Insert the legs of the installation bracket into the tabs on the
spacer block.
➤Then rotate the installation bracket back to snap it in place.
➤You may stack additional spacer blocks or 3mm shims onto the
back of the first spacer block, if needed.
IMPORTANT: Do not add more than 40mm of clearance using spacer blocks.
■Attach the spacer block/installation bracket assemblies using mounting screws long
enough for asecure installation. (Add 13mm length for each spacer block.)
IMPORTANT: The tops of the installation brackets must be level and the front edges of
the brackets must be aligned.
■If using extension brackets, attach an installation bracket to the underside of each extension
bracket using thespeed nuts and screws provided.
Proceed to “Install the Shade” on page7.
Tab
Tab
Spacer
Blocks
Longer Screw
Extension
Bracket
Speed Nut
Screw

INSTALLATION
7
Install the Shade
The Hard-wired Motorised lifting system must be wired to a motor control device to operate. The
motor control device can be the Platinum Wired Wall Switch or a 3rd party motor controller. If
a 3rd party motor controller is selected, the Platinum Remote Control and Wireless Wall Switch
cannot be used to operate the shade.
Connect DUETTE Hard-wired Motorised Shades with a
Platinum Wired Wall Switch
The Platinum Wired Wall Switch is used to provide control over hard-wired motorised shades.
Simple UP/DOWN control of the blind using
the front switch.
Infrared control using the Platinum Remote
Control by pointing at the IR receiver eye.
The IR receiver eye is also used when
programming an RF channel from the
Platinum remote control or Platinum
Wireless Wall Switch.
RF Module (included) allows RF Control
from the Platinum Remote control or
Platinum Wireless Wall Switch.
Dry contact harness for relay/switch control
from Automation systems.
Communications port for advanced
automation via RS232.

INSTALLATION
8
Switch Connections
■Connect the Wires
1. Insert small screwdriver.
2. Pull back on screwdriver to open the wire terminal
Connection.
3. Insert wire into the circular wire terminal connector.
4. Remove screwdriver to lock the wire.
■Wiring Diagrams
Small power supply 34.077.000
can be used for one motor/switch.
Large power supply 34.064.000 can be used for up to 4
motors/switches.
■Automation
The Platinum wall switch has both dry contact inputs
and outputs to allow access to advanced control
systems, as well as mechanical switches or relays.
A communications port is also available for automation
systems utilising RS232 serial control.
To DUETTE Shade
To DUETTE
Shade
To DUETTE
Shade

INSTALLATION
9
Connect the Wires
WARNING! Do not plug the power supply into the outlet until you have completed
all the electrical connections. Any live power can giveyou an electric shock.
■Connect the wires from the shade to the power wires.
NOTE: The motor wire must be long enough to reach
the power, but not so long that it could become entangled
with the shade's moving parts. Trim excess wire.
IMPORTANT: Always check local electrical codes
before completing any wiring.
CAUTION: Be sure the wires do not become pinched by
the brackets or headrail during installation. Damage or
overheating of components could result.
Mount the Headrail
■Fit the front channel on top of the
headrail onto the front lip of the
installation brackets.
■Push the headrail up and back until
it snaps into place.
■Check to ensure the headrail is securely in the brackets.
➤Check that the bottom of the headrail is snapped into the base of each bracket.
➤Check that the front lip of each bracket is in the front channel of the headrail.
➤If any brackets are not installed correctly, release the shade and reinstall. See
“Removing the Shade (If Necessary)” on page12.
Headrail
Snap
in Place
Bracket
Good Bad
Power Wire

OPERATION
10
Level the Bottom Rail (If Necessary)
■Lift the bottom rail to locate the pockets on the underside of the rail.
■Gently pull down on the bottom rail to fully insert the 3mm Allen wrench key into the pocket.
The key is fully inserted when the ring on the key abuts to the pocket.
➤Lift up the bottom rail slightly before turning the Allen wrench key.
•Turn the key 3mm clockwise to raise that side of
the bottom rail
•Turn the key 3mm counter-clockwise to lower it
➤One quarter turn of the key equals approximately 6mm.
IMPORTANT: The Allen wrench key must be fully inserted to avoid stripping the
mechanism. Do not pull down on the bottom rail while turning the key.
■Adjust the end pockets first. Then adjust any additional pockets as necessary to
maintain equal tension across the bottom rail.
Pocket
Underside of Bottom Rail Allen Wrench Key
Lower
Raise

OPERATION
11
Operate the Shade
■Lower and raise the shade using the control device(s) for your particular installation.
References
Platinum Technology Remote Operation
For information regarding operation and programming of the Platinum Technology remote
control, refer to your Platinum Technology Remote Control Guide.
Platinum Technology Hard-Wired Wall Switch Operation
For information regarding operation and programming of the Platinum Technology Wall Switch,
refer to your Platinum Technology Wall Switch Guide for Hard‑WiredSystems.

OPERATION
12
Problem The shade will not fit into the installation brackets.
Solution Check that the headrail is completely inserted into the installation brackets. See
“Install the Shade” on page 7.
Check that the installation brackets are level and aligned. Adjust and/or shim if
necessary.
Check the heads of the mounting screws are flush against the installation
brackets. Tighten if necessary.
Check that the shade fabric is not caught between the installation bracket and
the headrail.
Problem The motor does not operate.
Solution Check that the DC power supply is securely plugged into the wall outlet and that
the outlet has power.
Check that the batteries in the control device are fresh and installed correctly.
Check that the control device is programmed correctly. Refer to the
documentation that came with the control device.
Check that all wire connections are secure and properly connected.
With power off, reverse the polarity of the motor wires and try operating the
shadeagain.
Check that wiring run guideline lengths have not been exceeded.
Problem The shade operates opposite of the button pressed on the wall switch. (The
shade goes up when you press the Down▼ button, or goes down when you
press the Up
▲
button.)
Solution With power off, reverse the polarity of the motor wires.
Troubleshooting
If your shade is not operating correctly;
■First, refer to the table below for specific solutions for your shade.
■Next, review any guides that came with your motor control devices.
■If questions remain, please contact your fabricator motorization specialist.

OPERATION
13
Problem The motor seems to be running with difficulty, or sounds like it is straining.
Solution Check that inside-mounted shades are not installed too tightly into the window
opening. Make sure there is clearance between the ends of the shade and the
window casement.
Check that the shade fabric is not caught between the installation bracket and
the headrail.
Check that the installation brackets are level and aligned. Adjust and/or shim if
necessary.
Problem The shade raises or lowers unevenly, or the bottom rail is not level.
Solution Check that the installation brackets are level and aligned. Adjust and/or shim if
necessary.
Level the bottom rail, if necessary. See “Level the Bottom Rail (If Necessary)” on
page 8.
Check if the window may be out of square by measuring the diagonals. The
measurements should be equal. If not, shim the headrail or adjust the bottom
rail to obtain the best possible result.
Problem Adjacent shades do not stackevenly.
Solution It is considered normal if the stack-up on both shades is within 8mm of each
other. If one shade stacks up tighter than another, lower and raise both shades
several times.
Check that the shade fabric is not catching on any brackets or components.
Check that the fabric stacks evenly. If uneven, see “Level the Bottom Rail (If
Necessary)” on page 8.
Problem The shade does not raise or lower completely.
Solution Press the Up
▲
or Down▼ button again. If the shade then raises or lowers
completely, an intermediate stop has been set. Refer to the documentation that
came with the control device or motor control to remove the stop, if desired.
Check that the shade fabric is not catching on any brackets or window
components.

CARE
14
Removing the Shade (If Necessary)
■Lower the shade
approximately100mm.
■While holding the headrail, push
back on the bottom tab of the
installation bracket to release the
bottom edge of the headrail.
■After releasing the bottom edge, roll
the back of the headrail down and
out from thebracket.
Cleaning Procedures
LUXAFLEX®DUETTE®Shades are made of anti-static, dust-resistant fabric which repels dirt and
dust. For most honeycomb fabrics, the following cleaning options are available.
Dusting
■Regular light dusting with a feather duster is all the cleaning that is needed in most
circumstances.
Vacuuming
■For deeper cleaning, vacuum gently with a brush attachment.
CAUTION: Do not vacuum Architella Elan and Architella Elan Blockout .
Compressed Air/Hair Dryer (Cool Setting)
■Use compressed air or a hair-dryer on a cool setting to blow dust and dirt off shades.
Spot-Cleaning
■Prepare a solution of warm water and a mild detergent.
■Dampen a clean cloth in the solution and wring it out.
■Dab the spot with the dampened cloth until it is gone. Do not rub the fabric.
■Allow the shade to dry in the completely lowered position.
CAUTION: Do not spot-clean Batiste, Architella Elan or the fabric-covered valance.
Headrail
Bracket

CARE
15
Bathtub Cleaning/Water Immersion
■Immerse the shade in a basin or bathtub filled with warm water and a mild detergent. Never
immerse the headrail into the solution.
■Rinse with clean water.
■Before removing from the rinse water, fully raise the shade and tilt it to allow excess water
to drain off.
■Dry the shade completely in the lowered position.
CAUTION: Do not immerse fabric-covered valance, Batiste, Architella Elan, Daybreak,
Dusk, Architella Panache, Architella Aurora, Sunterra, Vintage and all blockout fabrics
in all fabric ranges.
Ultrasonic Cleaning
■Some honeycomb fabrics can be ultrasonically cleaned by a professional.
■Specify that a mild detergent solution be used.
■Never immerse the headrail into the solution.
■Dry the shade completely in the lowered position.
CAUTION: Do not ultrasonically clean fabric-covered valances. Do not ultrasonically clean
Batiste and all blockout fabrics.
Injection/Extraction Cleaning (LUXALFEX® Onsite Blind Cleaning)
Note: Only avaliable in limited regions.
This type of professional cleaning injects a cleaning solution into the fabric and extracts the dirty
solution in the same motion.
■Use only the dry method of injection/extraction for blockout fabrics.
■If using injection/extraction for Batiste specify that no chemicals are used (wateronly).

Notes

Notes

Other manuals for Duette
4
Table of contents
Other LuxaFlex Indoor Furnishing manuals

LuxaFlex
LuxaFlex Silhouette Series User manual

LuxaFlex
LuxaFlex Modern Roman User manual

LuxaFlex
LuxaFlex Roman Shades User manual

LuxaFlex
LuxaFlex PolySatin User manual

LuxaFlex
LuxaFlex PowerView User manual

LuxaFlex
LuxaFlex Roller Blinds XL User manual

LuxaFlex
LuxaFlex Facette Series User guide

LuxaFlex
LuxaFlex Duette User manual

LuxaFlex
LuxaFlex PowerView Guide

LuxaFlex
LuxaFlex Duette Parts list manual