LYSON BULK INK FEED SYSTEM User manual

INSTALLATION INSTRUCTIONS AND USER GUIDE
Thank you for purchasing a Lyson bulk ink feed system. You have just taken the first step to enjoying
the cost saving and superior performance benefits of using Lyson bulk ink. Lyson bulk ink feed
systems are simple to install, easy to use and will provide you with many hours of trouble free and
lower cost printing. However, the successful use of the system is dependent on how accurately you
follow this guide during installation. Please read these instructions and familiarize yourself with the
system components before you start the installation. During installation, it is wise to avoid touching
the chips fitted to the cartridges. Please also remember that you are now about to start working with
bulk ink instead of sealed cartridges. During installation, protect the area around your printer in case
of ink spillage and wear the disposable gloves included with the kit. Have a roll of paper towel handy.
Remember, accidents can happen!
SYSTEM COMPONENTS
1. Bulk ink feed system.
2. Puncture tool.
3. Alcohol wipes (2).
4. Air filters (6).
5. Disposable gloves(2).
6. Suction syringes with end adapters (6).
7. Instruction CD.
8. Filling funnels (not shown – only supplied with certain
Systems).
STEP 1
Before starting the installation, print a good nozzle check print using the existing inks installed on your
printer. Write the date on the print and keep it. No warranty claim regarding the bulk ink feed system
will be accepted unless it is supported by a good nozzle check print produced before the system was
installed. The utility for producing a nozzle check print can be found under the ‘Maintenance’ or
‘Utilities’ tab of the Epson print driver software supplied with your printer. A good nozzle check print
should like this:-
LYSON BULK INK FEED SYSTEM
FOR THE EPSON PHOTO
1270/12
80/1290/2000P

STEP 2
If you are using the same Lyson ink in cartridges as you purchased with the bulk ink feed system then
proceed to step 3. If you are currently using a different ink type, including Epson original ink, then it is
a good idea to flush out your printer before installing the system. Otherwise, you will waste a lot of
time and ink purging through one ink type to another. Lyson supplies cleaning cartridges for the
purpose of flushing the printer and these can be obtained from your local Lyson supplier. If you are in
doubt about the need to flush your printer, then contact your local supplier or e-mail us at
[email protected]. Lyson will not be held responsible for problems caused by the
incompatibility of different ink types.
To flush your printer with cleaning cartridges, use the normal cartridge change procedure to remove
the existing cartridges from the machine. Install the cleaning cartridges and print full color images
onto scrap paper until the printed output is entirely clear. This will take between 5 to 10 prints.
Remove the cleaning cartridges from the printer and dispose of them. Cleaning cartridges are
intended for once only use.
STEP 3
Lay out the bulk ink feed system on a flat surface near to
your printer. Put some paper towel underneath the
cartridges and reservoirs. Visually inspect the tubing to
make sure it is not kinked or has been damaged during
transit. Look underneath the ink reservoirs to make sure
that all the tubes are connected to a reservoir.
Familiarize yourself with the two holes and the rubber
bungs on the top of each reservoir. The larger hole is the
ink filling hole and the smaller hole is the air hole. Remove
all the bungs from the ink filling holes but keep the bungs
inserted into the air vent holes.
Fill the reservoirs with ink. Use the funnels (use a
separate, clean funnel for each ink) provided with the
system unless your system came with ink bottles that have
spout type lids. Be careful to ensure that you fill each
reservoir with the correct color ink. Fill the reservoirs to
about ½” from the top. If you used filling funnels then rinse
the funnels clean with water, dry and keep safe for use
later when you need to refill a reservoir. After you have
filled all the reservoirs, insert the rubber bungs back in the
ink filling holes and remove the bungs from all the air vent
holes.

STEP 4
Turn over the cartridges (labels down). Take the puncture
tool and gently pierce a hole in the center of the clear film
over the ink exit on the black cartridge. Keep the puncture
tool safe as it will be needed when you fill the other colors.
Take one of the suction syringes and make sure that it has
an end adapter firmly fitted to the tip. This picture shows a
syringe with the end adapter fitted.
STEP 5
Take a suction syringe and gently push the end adapter
(with no needle attached) through the pierced film at the ink
exit hole and into the cartridge about ¼” or as far as it will
go. The picture below shows what the syringe and adapter
look like when inserted into the cartridge. Pull up slowly on
the syringe plunger and you should see black ink travel
along the tube from the reservoir and into the cartridge. If
you feel that there is a lot of resistance then angle the
syringe very slightly to one side. If ink has not entered the
bottom of the syringe by the time the syringe plunger has
reached the limit of it’s travel, then remove the syringe and
adapter from the cartridge, push down the plunger, re-insert
the syringe and adapter into the cartridge, and pull up on the
plunger again. You may need to extract two or three
syringe’s full of air before the cartridge is full. As soon as ink
enters the bottom of the syringe, stop pulling and remove the
syringe and adapter from the cartridge. Any ink in the
syringe can be squirted back into the corresponding ink
reservoir through the filling hole. Rinse out the syringe and
adapter with water and keep safe in case it is needed again.

STEP 6
Fill the 5 ink color cartridge with ink by repeating steps 4 and 5 with each of the ink exit holes in order.
Use a new syringe and adapter for each ink. The ink channels on the color cartridge are smaller than
with the black cartridge so you should only need to remove just over one syringe full of air before
each channel is full. When the color cartridge is upside down and facing you like in the picture above,
the ink colors reading from left to right are yellow, light magenta, magenta, light cyan, and cyan.
When you have filled all the cartridges and inserted all the
air filters into the air holes, place the reservoirs at the right
hand end of your printer, as in this picture. This is how the
reservoirs should be when you are printing – with air filters
in all the air holes and the bungs in the ink filling holes.
STEP 7
Press the change cartridge button on your printer. This will
make the print head move to the far left of your printer. Pull
the printer’s power lead from the wall outlet (do not turn off
the printer first with the normal on/off button. Don’t worry,
this will not damage your machine). The print head should
be now be free to move easily by hand. Lift the cartridge
lids and remove the existing cartridges.
STEP 8
Drape the tubing across the top of the printer and place the
cartridges into the print head (see photo) as you would a
normal set of cartridges. Close the cartridge lids taking
care that the tubing comes over the top of the lids.

STEP 9
Locate the tube support bracket about 7” from the inside
right edge of the top cover (see picture). Before using the
self adhesive tape to attach the bracket, wipe the area
where the bracket will go with one of the alcohol swabs to
remove any grease or dirt.
STEP 10
Locate the tubing clip on the right of the printer as shown in
the photo. Again, wipe the area where the clip will go with
an alcohol swab before using the self adhesive tape on the
clip.
Your printer should now look like this. Note that the tubing
has to go through the tubing support bracket at an angle in
line with the tubing clip on the right. If the tubing is not at
the correct angle, you can twist it gently by hand in the clip
on the bracket.
STEP 11
Move the print head by hand fully to the right of the
machine and back again to make sure that the tubing is not
catching on anything. The areas to look out for are the
corner on the left of the machine (see arrow in photo), and
that the tubing doesn’t touch on the base on the printer
(see arrow in photo below). Also make sure that the tubing
between the cartridges and the support bracket is long
enough to allow full movement of the print head across the
entire width of the machine. If you need to adjust the
tubing, the tubing clips can be opened by squeezing the
tab at the front of each clip.

When you are satisfied that the tubing is located correctly
and not catching anywhere, plug the power back into the
outlet. The print head will move to the left and then back to
the right a few times. When it has finished moving, perform
a nozzle check print to double check that the tubing is not
catching.
STEP 12
The installation is now complete and your printer should
look like this photo. Perform nozzle check prints and
cleaning cycles until you get a good nozzle check. It will
take about four to five cleaning cycles to get a good nozzle
check print. You are now ready to start printing! You can at
this point fill the reservoirs again if you wish as in step 3.
USER GUIDE
The use of a Lyson bulk ink feed system is very simple as long as you remember six important
points:-
1. Before switching your printer on to start printing, make sure that all the reservoirs have air
filters in each of the air holes, and that the ink filling holes have the rubber bungs inserted.
2. Top up the reservoirs regularly with ink, and try and keep all the ink levels at the same height
with each other. Be aware that certain colors will be used more quickly than others depending
on what type of printing you do. For instance, the black ink will be used quicker than the other
colors if you print a lot of text. Or, if you print mainly photos, then the cyan and magenta will
run down first. Never let the ink levels drop below one third full and don’t fill higher than ½“
from the top.
3. The ink level monitor on your computer will still work and show the ink levels dropping in the
cartridges. Don’t worry as this is normal. When an ink color shows low or empty, simply stop
printing, switch of your printer, wait 10 seconds and then switch your printer back on. This will
reset the ink level to full on your computer. You may also get the occasional warning on your
computer screen to tell you that you are not using Epson original inks. Just confirm that you
are happy to continue and the warning will go away.
4. When you have finished printing, always turn your printer off.
5. Always stand the reservoirs on the same surface as the printer (level with the bottom of the
printer). Do not lift up the reservoirs – this will not help ink flow and could cause the
reservoirs to siphon all the ink out into the printer.

6. Always try and use your printer at least once every few days, even if you only print one small
color print. This will keep the ink fresh in the printer’s print heads and reduce the chance of
clogging or drying out of the inks. If you can’t use your printer every day or so (if you go away),
then a good tip is to buy a simple plug in timer like you would use to switch a lamp or
Christmas tree light on and off. Connect your printer’s power lead through the timer, leave the
power on/off button on the printer depressed or in the ‘on’ position, and set the timer to come
on for 30 minutes or so each day. This will turn the printer on each day and it will perform a
little head clean and keep the ink fresh in the print head jets. Although this uses a little ink each
time, it will be far less than performing multiple cleaning cycles when you return.
Apart from these six points, you should use your printer just as you would with normal cartridges, As
long as you follow these simple guidelines, you will enjoy trouble free and cost saving printing.
TROUBLE SHOOTING GUIDE
Problem Things to do/check
Consistent banding present in prints. 1. Check that the reservoirs all have air filters in the
air holes.
2. Check that the ink levels in the reservoirs have not
fallen below one third full. Refill as necessary.
3. Check to make sure that no tubes are kinked or
damaged.
4. Perform a nozzle check print to see if any jets are
missing or clogged. If so, then perform head
cleaning cycles and nozzle check prints until you
get a good print.
5. If head cleaning doesn’t cure the problem then
remove the cartridges from the printer and re-prime
the cartridges using a suction syringe with an end
adapter fitted, as in this picture.
6. With cartridges upside down, insert the end
adapter into the ink exit hole about ¼” as in the
picture below.

7. Pull up on the syringe plunger until you get a good
flow of ink entering the bottom of the syringe (you
may get some air bubbles at first). Remove the
syringe and adapter from the cartridge and squirt
any ink in the syringe back into the relevant
reservoir through the ink filling hole. Rinse out the
syringe and end adapter with water until it is clean.
Re-prime the other cartridges by using the same
method. Make sure you thoroughly clean out the
syringe and end adapter with water between
colors. Re-install the cartridges and perform head
cleanings and nozzle checks until you get a good
print.
Ink blobs dropping on prints. 1. Check that all the reservoirs have air filters
installed in the air holes.
2. Check that the ink levels in the reservoirs have not
been filled higher then ½” from top of the
reservoirs.
An ink reservoir is accidentally
allowed to run dry. 1. Refill the reservoir with new ink.
2. Remove the relevant cartridge from the printer and
re-prime the cartridge using a suction syringe and
end adapter as in section one of this trouble
shooting guide.
Prints appear to be the wrong color. 1. Perform a nozzle check print to make sure all the
jets are firing correctly. If jets are missing then
perform head cleaning cycles and nozzle check
prints until a good print is obtained.
2. Check to see if you are using the correct printer
profile. Some Lyson inks require that an ICC color
profile is used during printing to correct color shifts.
Many free profiles along with user guides are
available for down load at www.lyson.com or
www.ink2image.com.
3. Check to make sure that you have filled the
reservoirs with the correct color ink.

You need to leave your printer
unused for a period longer than four
weeks (two weeks in regions of high
temperature and/or low humidity), or
you want to remove the bulk ink feed
system from your printer for an
extended time.
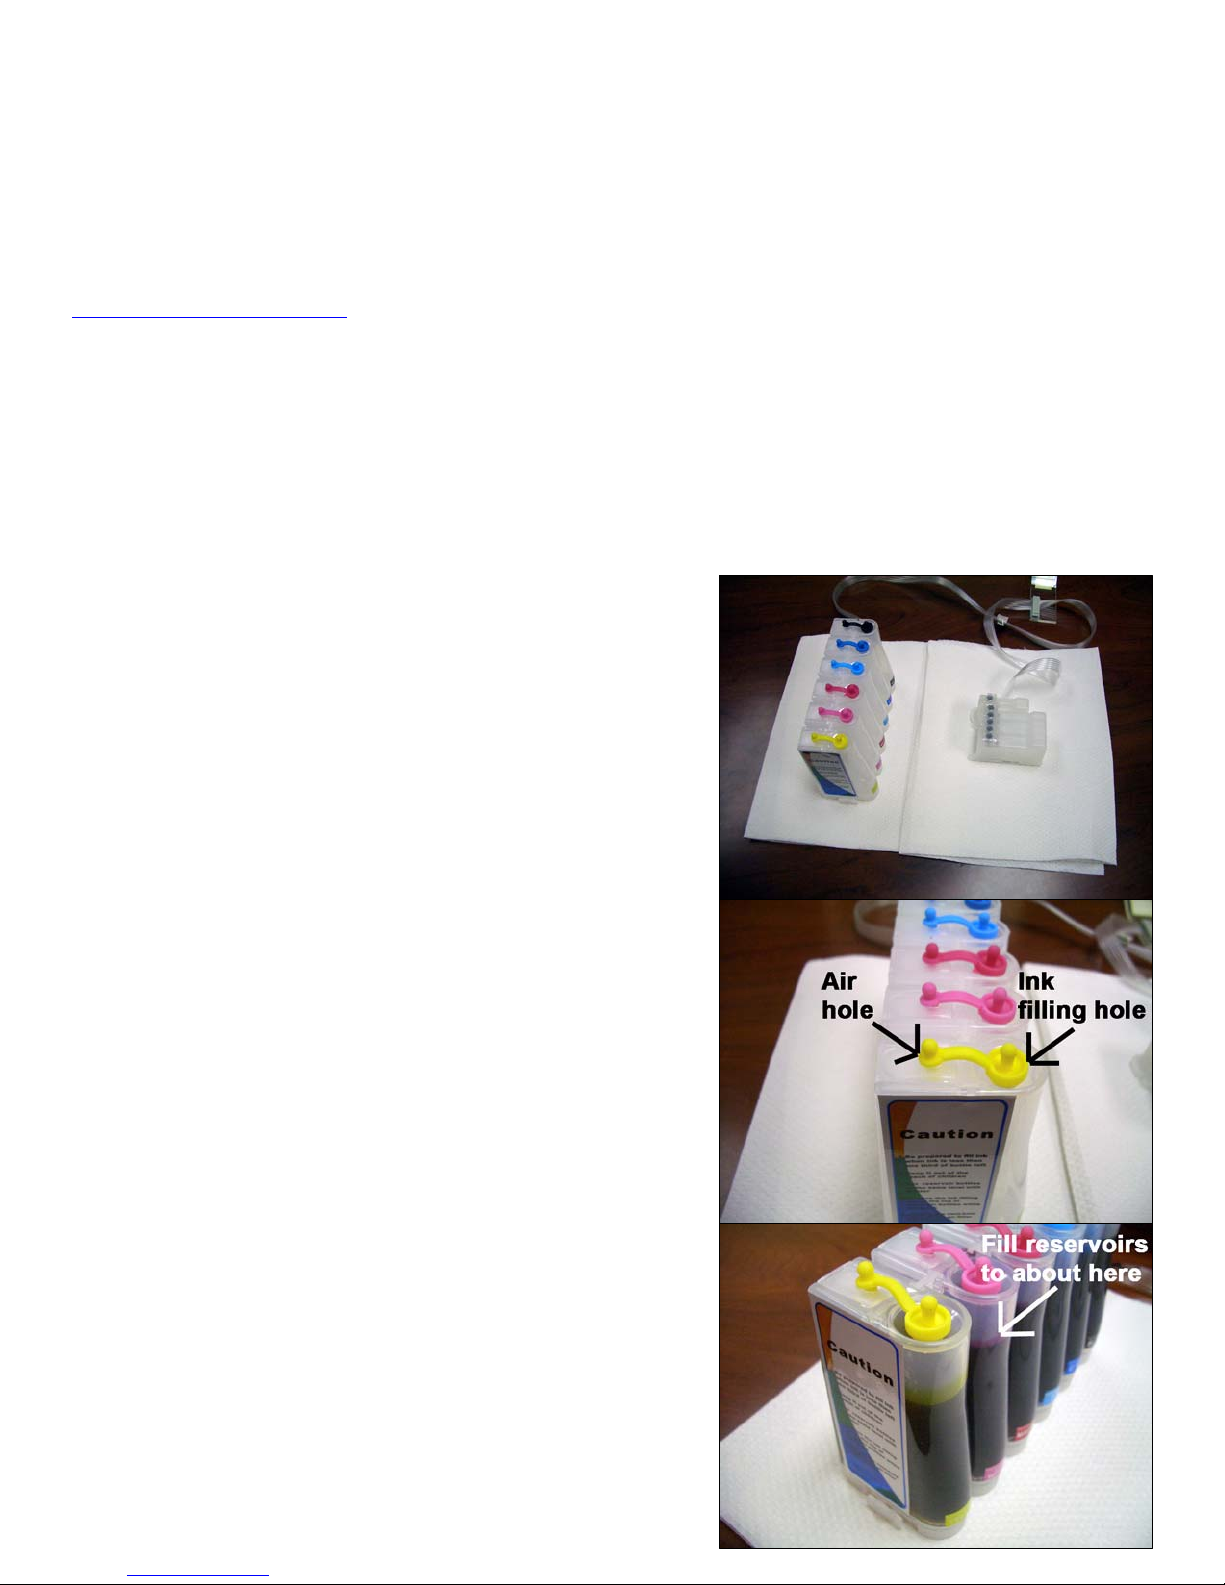
1. Remove all the air filters from the tops of the
reservoirs and insert the rubber bungs into the air
holes to seal the reservoirs.
2. Remove the cartridges from the printer and place
them in a plastic bag with the ink exit holes
upwards.
3. Open the tube clips by squeezing the small tab at
the front of each clip. The entire system can now
be removed from the printer for storage
4. Flush the printer with Lyson cleaning cartridges
available from your local Lyson supplier.
5. To re-install your system, follow the installation
guide from the beginning again except that the tube
support bracket and clips will already be attached
to your printer.
If you require technical assistance or support with your Lyson bulk ink feed system, please initially
contact the store or dealer where the system was purchased. All Lyson dealers are well trained in the
operation of the system and can help with most problems. Alternatively, contact Lyson technical
30 DAY GUARANTEE TO REPLACE DEFECTIVE PARTS
Lyson guarantee all parts are defect-free for a period of 30 days from the date that you receive your
new Lyson Bulk ink feed system. If you have received a defective part, please initially contact the
retailer or dealer from where the system was purchased.
DISCLAIMER
As Lyson bulk feeds are self installed by the user, Lyson is not responsible for any damages to your
printer, whether they are or are not related to the Lyson Bulk ink feed system. Please contact the
store or dealer where the printer was purchased, or the printer manufacturer for any problems or
questions related to the printer and its operation.
If the Customer chooses to use ink in the system from another manufacturer other than Lyson, and is
not satisfied with the ink, or it clogs the printer or the bulk feed system, it will be the Customers
responsibility to pay for the parts to repair the system and restore it to normal usage. We can only
guarantee that the Lyson Bulk ink system will deliver Lyson ink just as well as a normal ink cartridge.
We will not accept returns of used systems, or systems filled with third party ink that the customer
later decides does not meet their specific needs.
Table of contents
Other LYSON Printer Accessories manuals
Popular Printer Accessories manuals by other brands

Pitney Bowes
Pitney Bowes SendPro Desktop SendKit Installation instruction

Epson
Epson T033120 Product information sheet

Toshiba
Toshiba SmartLink e-STUDIO16 Operator's manual

Epson
Epson T545500 Material safety data sheet

VASTEX
VASTEX E-200 series Assembly and operation instructions

TonerRefillKits
TonerRefillKits ReChargX RX139 instructions