INTELLIGENTES ODER MANUELLES BETRIEBSSYSTEM
Um vom Betriebssystem MANUELL in SMART zu wechseln, oder
umgekehrt, schalten Sie die Lampe aus. Ist die Lampe ausgeschaltet,
drücken Sie den Schalter ca. 4 Sekunden lang. Nach der anfänglichen
Einschaltung des Hauptlichts schaltet sich die Lampe für 1 Sekunde
aus und die Diode im Schalter ändert ihre Farbe je nach dem Betrieb-
ssystem:
• BETRIEBSYSTEM SMART – blau
• BETRIEBSYSTEM MANUELL– grün
Im Betriebssystem SMART kontrolliert die Lampe nach ihrer Einschal-
tung den Bedarf der weiteren Arbeit mithilfe des Bewegungssensors.
Wird binnen 120 Sekunden keine Vibration festgestellt, gilt es für das
Gerät, dass das Fahrrad nicht benutzt wird und die Lampe schaltet sich
aus. Wir die Lampe im SMART-System mit dem Schalter ausgeschal-
tet, wird der Stand-by-Modus aktiviert: STAND-BY (für 1 Stunde). In
dieser Zeit blinkt die blaue Kontrolllampe am Schalter alle zwei Se-
kunden und die Lampe wartet auf das Fernsignal von der Fernbedie-
nung (die Fernbedienung ist als Zubehör zugänglich ABF0166P). Nach
dieser Zeit, wenn die Fernbedienung kein Signal sendet, schaltet sich
die Lampe vom Stand-by-Modus aus.
Mit einer dazugehörenden Fernbedienung können die Parameter, der
Lichtstrahl und das Betriebssystem der Lampe gewechselt werden,
zeitweise kann auch der HIGH-Modus während des Betriebs in einem
anderen Lichtmodus aktiviert werden. Im MANUELLEN Betrieb-
ssystem werden alle Lampeneinstellungen von Hand eingeführt und
sie kann mit der Fernbedienung nicht ausgeschaltet werden (im Set
nicht vorhanden).
LADEPROZESS
Um die Lampe zu laden, schließen Sie die beigefügte USB - USB-C -
Leitung an die Energiequelle DC 5V/1A an. Den USB-C-Anschluss am
Ende der Leitung stecken Sie in die Steckdose der Lampe unter der
Silikonabschirmung. Der aktive Ladeprozess wird mit der Pulsation
der roten Diode am Schalter des Gerätes signalisiert. Nach der erfolg-
ten vollständigen Ladung des Akkus wird dieser Zustand durch den
Farbenwechsel an der Diode des Schalters je nach dem vorprogram-
mierten Betriebssystem signalisiert. Für das SMART SYSTEM wech-
selt die Farbe in blau, für das MANUELLE SYSTEM - in grün.
KONTROLLE DES AKKUSTANDS
Wenn die Lampe eingeschaltet ist, drücken Sie den Schalter und lassen
Sie ihn sofort los. Das Gerät prüft den Akkustand in Bezug auf die zu-
gängliche Kapazität und wird diese mit Hilfe der Dioden am Schalter je
nach dem gespeicherten Betriebssystem folgenderweise signalisieren:
Im BETRIEBSSYSTEM SMART
• Erleuchtung der blauen Diode: 100% - 30%
• Blaue Diode blinkt: 29% - 10%
• Blaue und rote Diode blinken: weniger als 10%
Im MANUELLEN BETRIEBSSYSTEM
• Erleuchtung der grünen Diode: 100% - 30%
• Grüne Diode blinkt: 29% - 10%
• Grüne und rote Diode blinken: weniger als 10%
SIGNALISIERUNG DER ENTLADUNG
Das Gerät ist mit einem System zur Signalisierung der Entladung aus-
gestattet. Stellt die Elektronik während des Betriebs der Lampe fest,
dass das Akku unter 10% entladen ist, blinkt das Hauptlicht 4 Mal alle
30 Sekunden, bis das Akku abgeschaltet wird, was nach Spannun-
gsrückgang auf 2,8 V erfolgt. Diese Schwelle ist für den Schutz der Li-
-Ion-Zelle vor übermäßigen Entladung einstellt.
HINWEIS!
Die Lampe kann während der Ladung im LOW-Betrieb und in den
Blinkmodi benutzt werden. Jetzt sind keine anderen Funktionen mö-
glich.
VORSICHT!
Prüfen Sie, ob Sie Originalteile für die Mactronic®-Taschenlampe be-
nutzen. Anwendung von Ersatzteilen anderer Produzenten kann die
Qualität und die Parameter des Produktes beeinträchtigen. Die in die-
sem Produkt eingesetzten aufladbaren Akkus sind recycelbar. Gemäß
der WEEE-Richtlinie der EU dürfen Zellen nicht in den Abfalltonnen,
sondern in geeigneten Behältern für Batterien entsorgt werden.
Prüfen Sie bei Ihrem Entsorgungsunternehmen, wie die Produkte wie-
derverwertet oder anderweitig verarbeitet werden.
ALLGEMEINE INFORMATIONEN
Modifikationen und Reparaturen:
Sämtliche Modifikationen und Versuche des Nutzers Reparaturen auf
eigene Faust vorzunehmen, denen Firma Mactronic® nicht zugestim-
mt hat, haben eine automatische Ungültigkeit des Garantiescheins zur
Folge.
Garantie der Mactronic®:
Mactronic® gewährt eine Dreijahresgarantie für das Produkt. Die Ga-
rantie kann auf bis zu 5 Jahre verlängert werden (um die Garantie zu
verlängern, müssen Sie Ihren Kauf mit diesem Formular registrieren:
https://mactronic.pl/en/content/15-warranty. Die Garantie umfasst
jegliche Werksfehler des Materials und/oder der Herstellung. Die Ga-
rantie gilt nicht im Fall von Fehlern, die aus der gewöhnlichen Nutzung
resultieren, Rost und Fehlern, die wegen unberechtigter Modifikatio-
nen, unerlaubter Aufbewahrung entstanden sind, Beschädigungen in-
folge Herunterfallens, unsachgemäßer Behandlung des Produkts,
Korrosion als Konsequenz des Batteriebzw. Akkulecks, oder auch Fe-
hlern wegen eines bestimmungswidrigen Gebrauchs.
BEDIENUNG UND BATTERIEGEBRAUCH
Um die Gefahr von Bränden, Stromschlägen oder Verletzungen zu ver-
ringern, beachten Sie die ausführliche Gebrauchsanweisung der
Taschenlampe.
• Achten Sie immer auf die Polarität der Batterie.
• Entfernen Sie die Batterien aus der Taschenlampe, wenn Sie sie über
einen längeren Zeitraum aufbewahren.
• Laden Sie keine Alkalibatterien auf.
• Entsorgen Sie die Batterien nicht im Feuer.
• Lassen Sie die Batterien außerhalb der Reichweite von Kindern liegen.
• Öffnen Sie den Akku nicht.
• Halten Sie die Lampen von UV-Strahlung, Feuchtigkeit und Feuchti
keit und chemischen Produkten fern.
/PL
SPECYFIKACJA
Źródło światła Cree XP-L2
Lumeny 1000 lm
Kandele 8500 cd
CZASY I TRYBY
Migający DAY FLASHING 200 lm 12 h
Migający NIGHT FLASHING 600 lm 10 h
HIGH 1000 lm 1 h 30 min
MEDIUM 400 lm 3 h
LOW 200 lm 6 h
Zasilanie główne Li-Ion 3,7V 2600 mAh
Czas ładowania 4h (USB-C, 1A)
Wymiary 98,5 x 31 x 31 mm
Waga 145 g
Wodoodporność IPX6
Wstrząsoodporność 1,2 m
Zasięg światła 155 m
Last Setting Memory Yes
Sensor ruchu Tryb z sensorem ruchu
(Sensor w trybie: Wł./Wył.)
Dziękujemy Państwu za wybór produktu firmy Mactronic®. Odpowied-
nia obsługa oraz konserwacja zapewnia wysoką trwałość i niezawod-
ność. Prosimy o zapoznanie się z poniższą instrukcją i zachowanie jej
na przyszłość, gdyż zawiera ona istotne informacje dotyczące bez-
piecznej obsługi oraz użytkowania.
UWAGA!
Wykorzystanie latarki do celów niezgodnych z jej przeznaczeniem nie
jest zalecane. Producent jednoznacznie wycofuje gwarancje w przy-
padku jej użycia niezgodnie z zalecanym przeznaczeniem.
OBSŁUGA LATARKI
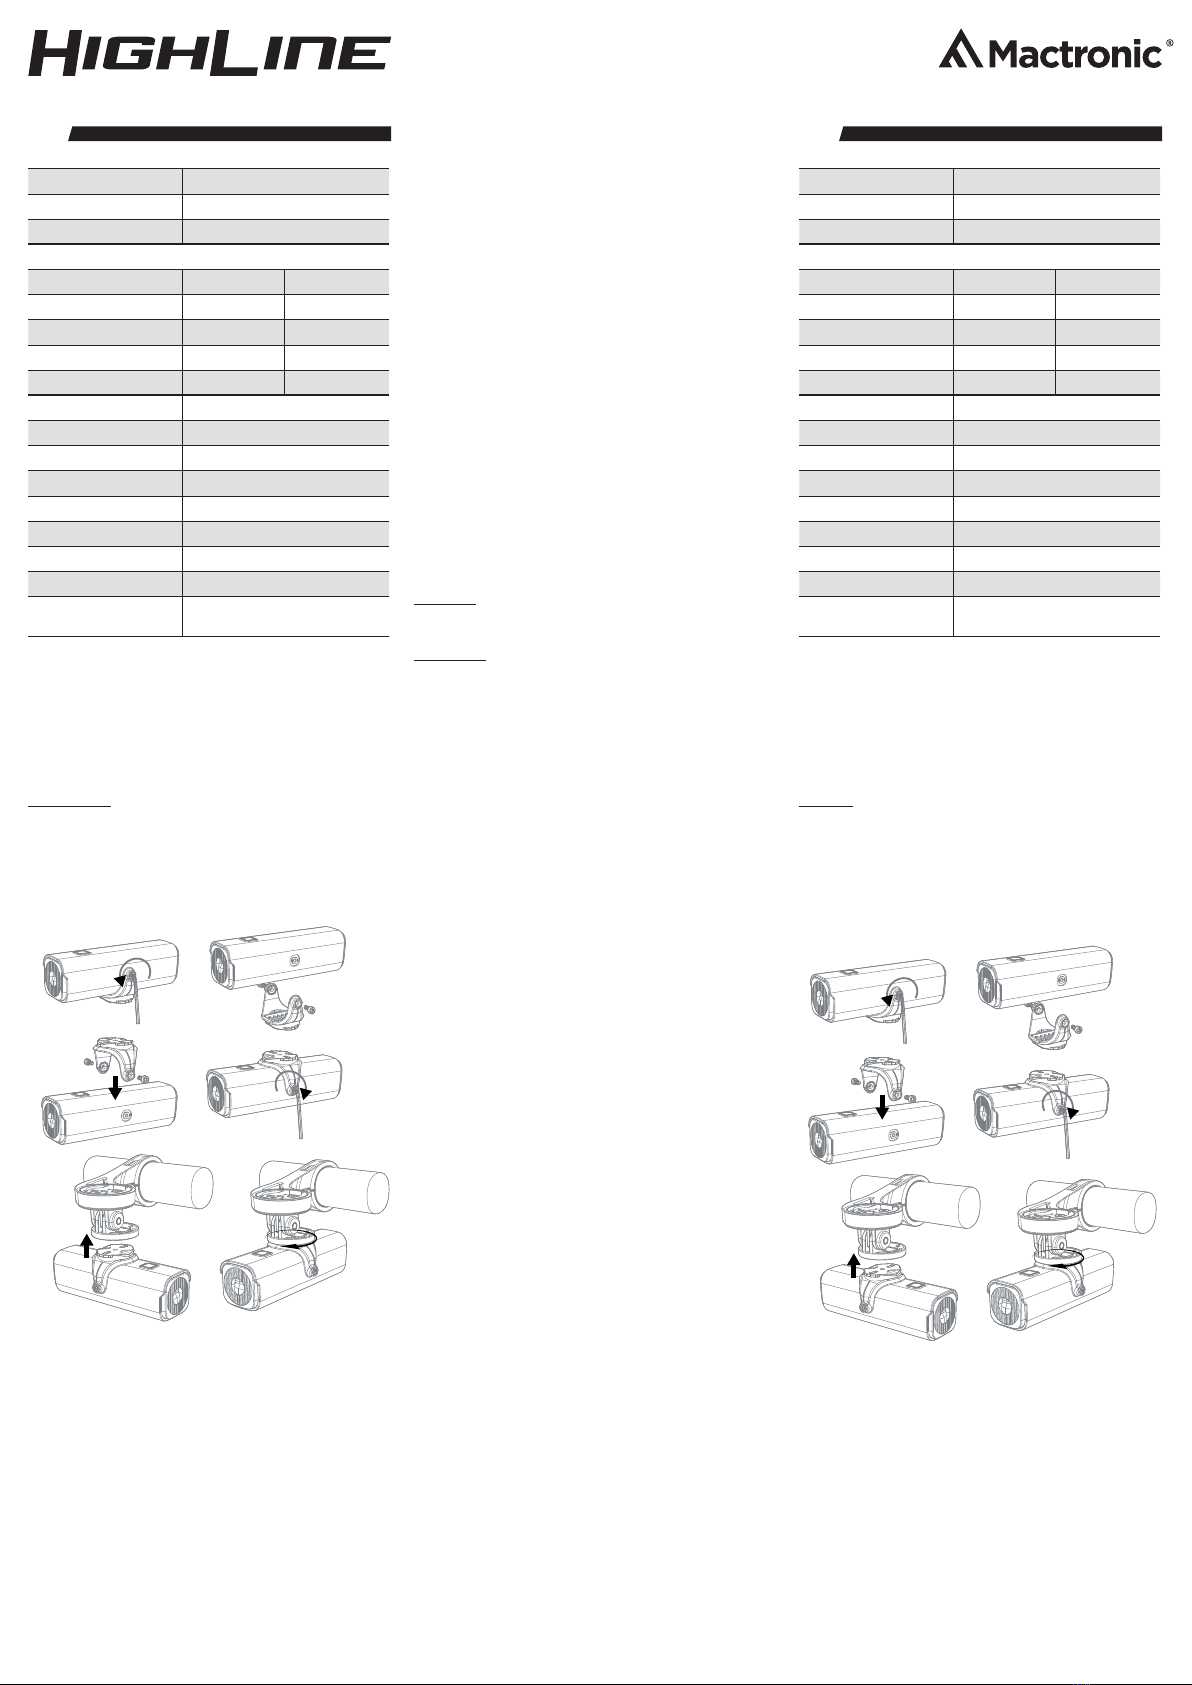
MONTAŻ
Aby zainstalować lampę Highline na montażu do kierownicy, wprowadź
ją do gniazda uchwytu obróconą o 90˚ i przekręć aż do wyczuwalnego
zblokowania się elementów. W celu wypięcia urządzenia z uchwytu ob-
róć lampkę o 90˚ względem uchwytu i zdejmij ją. Jako dodatkowe ak-
cesorium dostępny jest uchwyt z ramieniem (ABF0166M), umożliwiają-
cy wspólny montaż lampy oraz nawigacji rowerowej lub licznika
(Garmin, XOSS, IGPSport, Magene, Meilan, Cycplus).
Zapoznaj się z graficzną instrukcją montażu.
OBSŁUGA:
Aby włączy bądź wyłączyć latarkę naciśnij i przytrzymaj włącznik znaj-
dujący się w górnej części obudowy przez ok. 0,5 sek. Latarka urucho-
mi się w ostatnim zapamiętanym trybie pracy i ustawieniu światła.
ZMIANA TRYBU PRACY STAŁY/MIGAJĄCY
W celu zmiany tryb pracy ze stałego na migający lub na odwrót, z miga-
jącego na stały, naciśnij szybko włącznik 2 razy (podczas pracy lampki).
Aby poruszać się pomiędzy ustawieniami światła dla wybranego trybu
naciskaj przycisk. Latarka będzie zmieniała ustawienia światła po każ-
dorazowym naciśnięciu przycisku, odpowiednio dla trybów pracy:
• Dla trybu stałego: LOW -> MEDIUM -> HIGH
• Dla trybu migającego: DAY FLASHING (4 błyski, następnie 2 błyski -
600 lm) -> NIGHT FLASHING (pulsacja ~ 200 lm).
UWAGA!
Lampka posiada czujnik temperatury, zabezpieczający ją przed prze-
grzaniem. Gdy czujnik wykryje temperaturę > 65˚C, urządzenie przełą-
czy się samoczynnie z ustawienia: HIGH, do ustawienia MEDIUM, obni-
żając emisję światła, celem oszczędzania energii oraz obniżenia
temperatury . Z tego powodu czas pracy podany dla trybu HIGH jest li-
czony jako czas łączny, dostępny dla tego trybu.
INTELIGENTNY LUB MANUALNY SYSTEM PRACY:
Aby zmienić system pracy lampki z MANUALNEGO na SMART, lub od-
wrotnie, wyłącz lampkę. Gdy lampka jest wyłączona - przytrzymaj
włącznik ok. 4 sekundy. Lampka, po początkowym włączeniu światła
głównego, zgaśnie na 1 sekundę a kolor diody umiejscowiony we
włączniku urządzenia zmieni się, według oznaczenia systemu pracy:
• SYSTEM PRACY SMART – kolor niebieski
• SYSTEM PRACY MANUALNY – kolor zielony
W systemie pracy SMART lampka, po włączeniu się, kontroluje za pomo-
cą czujnika ruchu potrzebę dalszej pracy. Jeśli przez 120 sekund nie
wykryje wibracji, urządzenie uzna że rower nie jest używany i lampka
wyłączy się. Jeżeli lampka w SYS. SMART zostanie wyłączona przyci-
skiem, zostanie aktywowany tryb czuwania: STAND-BY (na okres trwają-
cy 1 h). Przez ten czas kontrolka we włączniku będzie migać na niebie-
sko, co dwie sekundy, a lampka będzie czekać na sygnał radiowy pilota
(pilot dostępny oddzielenie - ABF0166P). Po tym czasie, jeśli pilot nie
nada żadnego sygnału, lampka wyłączy się z trybu czuwania.
Posiadając dedykowany pilot, możemy w łatwy sposób zmieniać para-
metry, strumień świetlny jak i system pracy lampki a także chwilowo
aktywować tryb HIGH w momencie pracy w innym trybie światła. W sys-
temie pracy MANUALNYM wszystkie ustawienia lampki wprowadza się
ręcznie jak i nie da się jej włączyć pilotem (nie załączono w zestawie).
ŁADOWANIE
Aby naładować lampkę, podłącz załączony przewód USB – USB-C do
źródła zasilania DC 5V/1A. Drugi koniec przewodu zaopatrzony we wtyk
USB-C, wetknij w gniazdo lampki ukryte pod silikonową osłoną. Aktyw-
ny proces ładowania zostanie zasygnalizowany pulsacją czerwonej
diody umiejscowionej w włączniku urządzenia. Po pełnym naładowa-
niu akumulatora latarka sygnalizuje ten stan poprzez zmianę koloru
diody włącznika zależnie do zaprogramowanego systemu pracy. Dla
SYSTEMU SMART kolor zmieni się na niebieski, a dla SYSTEMU MANU-
ALNEGO na kolor zielony.
KONTROLA STANU AKUMULATORA
Gdy latarka jest wyłączona naciśnij przycisk włącznikowy i szybko go
zwolnij. Urządzenie skontroluje stan akumulatora w zakresie dostęp-
nej pojemności i zasygnalizuje go za pomocą diod umieszczonych we
włączniku, w następujący sposób w zależności od zapamiętanego sys-
temu pracy:
W systemie Pracy SMART:
• Zapalenie się niebieskiej diody: 100% - 30%
• Miga niebieska dioda: 29% - 10%
• Miga dioda niebieska i czerwona: mniej niż 10%
W systemie Pracy MANUALNEJ:
• Zapalenie się zielonej diody: 100% - 30%
• Miga zielona dioda: 29% - 10%
• Miga dioda zielona i czerwona: mniej niż 10%
SYGNALIZACJA ROZŁADOWANIA
Urządzenie posiada system sygnalizacji rozładowania. Gdy elektronika
podczas pracy lampki wykryje rozładowanie akumulatora poniżej 10 %
główne światło będzie migać 4 razy co 30 sekund, aż do odcięcia aku-
mulatora, co nastąpi po spadku napięcia zasilania do 2,8V. Próg ten jest
ustawiony dla ochrony ogniwa Li-Ion przed nadmiernym rozładowa-
niem.
UWAGA!
Latarkę można używać podczas ładowania w trybie LOW i trybach mi-
gających. Nie działają wtedy żadne dodatkowe funkcje.
OSTRZEŻENIE
Upewnij się, że używasz oryginalnych części zaprojektowanych do la-
tarki Mactronic®. Stosowanie części zamiennych wyprodukowanych
przez innych producentów może wpłynąć na jakość i parametry pro-
duktu. Ładowalne akumulatory używane w tym produkcie mogą podle-
gać ponownej przeróbce. Zgodnie z regulacją unijną WEEE nie wolno
wyrzucać ogniw do śmieci lecz do specjalnych pojemników na baterie.
Sprawdź w miejscowym zarządzie firmy wywożącej śmieci o sposobie
i rodzaju ponownej przeróbki lub o innych dyspozycjach.
INFORMACJE OGÓLNE
Modyfikacje i naprawy:
Wszelkie modyfikacje i podejmowane przez użytkownika próby nieau-
toryzowanych napraw, na które firma Mactronic® nie wyraziła pisem-
nej zgody, powodują automatyczne unieważnienie gwarancji.
Gwarancja firmy Mactronic®:
Firma Mactronic® udziela 3-letniej gwarancji na produkty. Istnieje
możliwość wydłużenia gwarancji do 5 lat (wymagane zarejestrowanie
zakupu poprzez formularz - https://mactronic.pl/pl/przedluz-gwaran-
cje). Gwarancja ta obejmuje wszelkie wady fabryczne materiału i/lub
wykonania. Gwarancja nie obejmuje wad będących wynikiem normal-
nego użytkowania, wystąpienia rdzy, wad powstałych wskutek nie-
uprawnionych modyfikacji, niewłaściwego przechowywania, uszko-
dzeń powstałych w wyniku upadków, niewłaściwego obchodzenia się
z produktem, korozji spowodowanej przez wyciek z baterii lub akumu-
latorów bądź wad powstałych w wyniku użytkowania latarki w sposób
niezgodny z jej przeznaczeniem.
OBSŁUGA i UŻYCIE BATERII
Dla zredukowania ryzyka wywołania pożaru, porażenia prądem lub
doznania obrażeń ciała, należy zapoznać się ze szczegółową instrukcją
użytkowania latarki.
• Bezwzględnie przestrzegaj biegunowości baterii.
• Wyjmuj baterie z latarki w przypadku długotrwałego przechowywania.
• Nie ładuj baterii alkalicznych.
• Nie wrzucaj baterii do ognia.
• Pozostawiaj baterie poza zasięgiem dzieci.
• Nie otwieraj baterii.
• Przechowuj lampki z dala od promieniowania UV, wilgoci
oraz produktów chemicznych.
Made in PRC for Mactronic®Group Sp. z o.o.
ul. Stargardzka 4, 54-156 Wrocław
©2022 Mactronic®mactronic.pl
ISO 9001: 2015