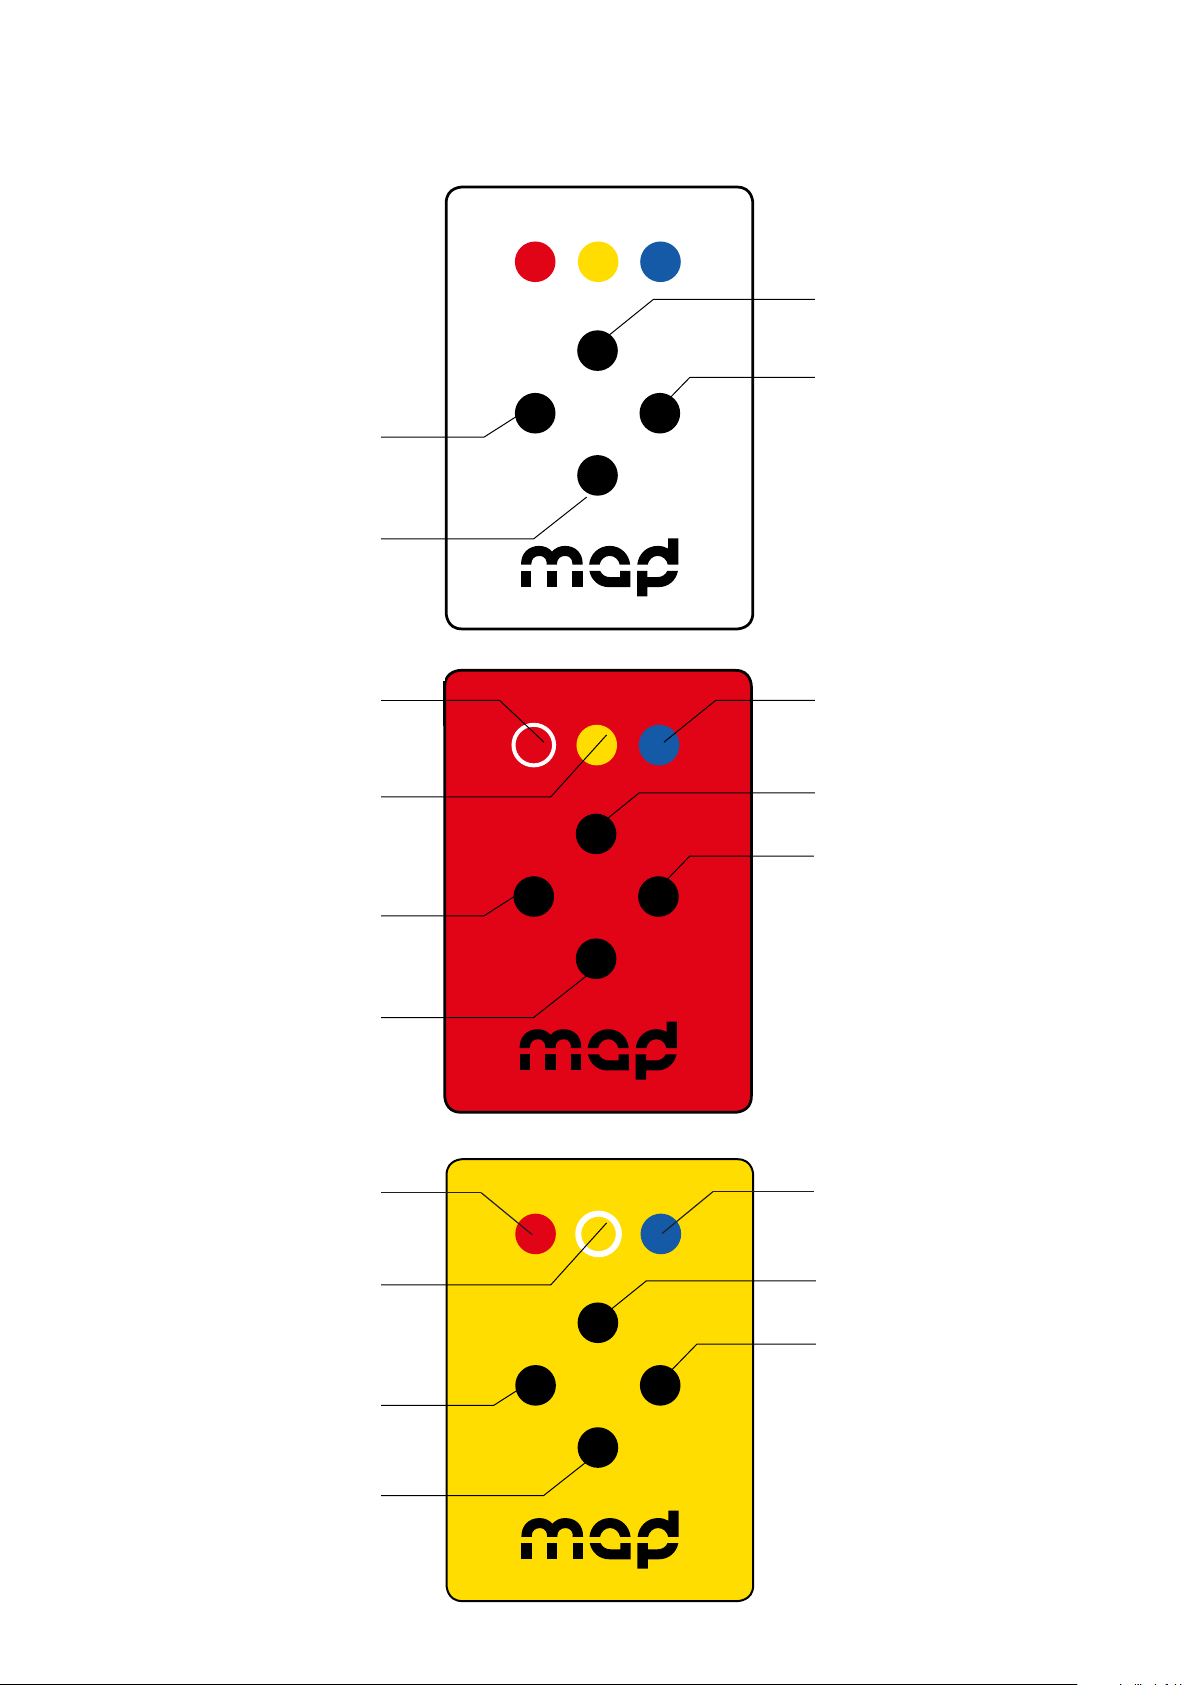
MadMapper miniMAD User manual

1
mini
The hardware companion of MadMapper
User guide

2
mini
miniMAD is a all-in-one dedicated device for video mapping and LED mapping
based on the Raspberry Pi platform.
It is easy to use, small and versatile for your future video mapping projects.
miniMAD will either be congured with miniMAD Video to play a video-mapping,
or with miniMAD Light to play recorded DMX sequences.
WARNING :
miniMAD Video and miniMAD Light cannot be installed at the same time on the
same miniMAD.
www.madmapper.com
Designed and developed by garageCube and
1024 architecture

3
miniMAD VIDEO
FEATURES 4
Surfaces
Media
Projector
Export
Network synchronization
CONTROLS 7
Buttons
Keyboard
Network synchronization
miniMAD LIGHT
FEATURES 10
Record
Export
Audio
CONTROLS 12
Buttons
Keyboard
Micromodul8
INFORMATION
SPECIFICATIONS 14
Technical Specications
In the box
Activate and update

4
miniMAD VIDEO FEATURES
SURFACES
miniMAD supports 3 types of surfaces:
- Quad (including mask and mesh warping)
- Triangle
- Mask
Other surface types (Circle, Line, 3D surface) and
FX are not supported yet.
MEDIA
miniMAD Video supports a single media at a time
on every surfaces.
Every image les supported by MadMapper will be
exported to miniMAD.
During the export process, movie les will be
transcoded and their resolution adapted to maxi-
mize smoothness, depending on the selected
projector’s resolution and various settings found in
the Advanced panel.
PROJECTOR
The device supports a single projector connected
to the HDMI port.
The maximum supported resolution is 1080p
(1920×1080).
In case the selected resolution is not supported
by the actual connected projector, the device will
use the projector’s default resolution and display a
notication.

5
EXPORT
In MadMapper, click File > Export Video Mapping to miniMAD.
FFmpeg Tools is required to export MadMapper project to miniMAD, so please download FFmpeg Tools
Installer using the provided link.
Eject the SD-card from the miniMAD and insert it in your computer.
If necessary, update miniMAD as advised before exporting.
Then, select the projector you want to export to miniMAD, adjust the output resolution, the audio output,
the playback options, optionally unselect and reorder your medias.
FEATURES
miniMAD VIDEO

6
EXPORT
In the case your mapping consists in a single fullscreen-quad with no color correction applied - typically
when displaying on a TV-screen, a video-wall, a straight video-projection or perspective-corrected by
the projector itself - MadMapper will propose you to switch the Fullscreen maximum quality mode on, so
your media will be exported using the best possible resolution (up to 1080p30).
Note that when this mode is on, mapping and color correction controls are disabled on the miniMAD.
Finally, click the “Export” button to start the export.
The process may take some time depending on the number of movie les and their duration.
MadMapper will avoid transcoding movie les that are already optimized on the SD-card.
SYNCHRONIZATION
Connect the miniMADs on the same ethernet network to synchronize media-playback automatically.
Movie synchronization happens on every miniMADs playing a movie with the exact same frame count
and framerate, even though their le names are dierent.
Every media-related action made on any miniMAD happens instantly and automatically to every
miniMADs:
- media change
- pause
- restart
- playback mode
- audio mode
- image display-time
Note that media change works properly if every miniMADs contain a le with the same name, even
though its content is dierent.
Create a MadMapper project using the video-wall template, import your pictures and videos,
and export the dierent projectors to as many synchronized miniMADs.
The setup couldn’t be easier: Just connect all your miniMAD with an ethernet cable to a network switch,
and wait until they automatically synchronize.
Note that you can also connect two miniMADs directly using an ethernet cable.
Ethernet cables
FEATURES
miniMAD VIDEO

7
6
BUTTONS
Left
previous media
Right
next media
Up
change playback mode
Down
pause media
long press : restart movie
Left
move control point
Right
move control point
Up
move control point
Down
move control point
Red(toggle ON/OFF)
Mapping control mode
Yellow
previous control point / surface /
all surfaces
Blue
next control point / surface / all surfaces
Right
Contrast +
Up
Brightness +
Down
Brightness -
Yellow (toggle ON/OFF)
Image control mode
Left
Contrast -
VIDEO PLAYBACK
/ CONTROLS
MEDIA MODE
MAPPING MODE
IMAGE MODE
CONTROLS
Up
change playback mode
Right
next media
Blue
next control point/surface/all surfaces
Up
move control point
Right
move control point
Up
Brightness +
Right
Contrast +
Left
previous media
Down
pause media
Long press: restart movie
Red(toggle ON/OFF)
Mapping control mode
Yellow
previous control point/surface/
all surfaces
Left
move control point
Down
move control point
Yellow(toggle ON/OFF)
Image control mode
Left
Contrast -
Down
Brightness -
miniMAD VIDEO
BUTTONS
Blue
next surface
Red
previous surface
Blue + Yellow
display info
Blue + Yellow
display info

8
CONTROLS
KEYBOARD
As an alternative to the miniMAD’s buttons, you can use any USB keyboard as a remote.
Using a wireless USB keyboard may be particularly interesting when the device is not easily accessible.
Attach the keyboard to one of the four USB ports prior to powering it on and follow the following
keyboard map to control all functions:
Backspace
restart media
Numbers
direct access to the
10 rst media
H
display help
D
display info
Q
shutdown
A
change audio output
P
change playback mode
Enter
next surface
Up
control image
display time
Right
next media
Down
control image
display time
C
activate cropping control
I
activate
image control
M
activate
mapping
control
Left
previous
media
Space
pause media
playback
Tab
next control point
miniMAD VIDEO

9
CONTROLS
MICROMODUL8
- Blue buttons: direct access to the 16 rst medias
- First master knob: master luminosity
- Second master knob: master audio-level
OSC
- /pause: pauses the playback
- /play: starts the playback after a pause
- /replay: restarts the current media
- /previous_media: previous media
- /next_media: next media
- /set_playback_mode/{playback mode index}: set the playback mode (cf media playback mode list in
MadMapper’s export window), example: /set_playback_mode/1 will set “Repeat media list” playback
mode
- /set_media_by_name/{media name}: set the current media by name, example: /set_media_by_name/
machine-1.mov will play movie called machine-1 (on miniMAD movies have the .mov extension, images
the .png extension)
- /set_media_by_index/{media index}: set the current media by index, example: /set_media_by_index/2
will play the third media in the playlist
- /set_media_by_index + integer OSC value: set the current media by index using a variable
- /set_image_time + integer OSC value: change the image display time in seconds
- /set_master_luminosity + oat OSC value: master luminosity for the targeted miniMAD
- /set_master_luminosity/all + oat OSC value: master luminosity for all connected miniMADs
Note that all indices start at 0.
The miniMAD declares itself as “miniMAD OSC”, using the Bonjour protocol.
NETWORK SYNCHRONIZATION
When connected to a network, all the miniMADs share the same media controls (media change, pause,
restart, playback mode, audio mode, image display time) which means that every change that’s made on
any miniMAD is instantly reected on all of them.
DISCLAIMER
miniMAD network synchronization can induce a frame delay between the dierent miniMADs.
Therefore miniMAD is not the best solution for setups using edge-to-edge screens, side-by-side or soft-
edge projections, using content that would highlight this delay.
For such a setup, we advice you to use directly MadMapper on a computer with several video-outputs.
miniMAD VIDEO

10
miniMAD LIGHT FEATURES
RECORD
In MadMapper, once your xtures
are setup, open Tools --> MadLight
Recorder.
Click “Record” to start recording the
DMX output. Click “Record” again to stop
the recording.
When recorded, adjust the in & out
frames by using the dedicated Loop
controls.
Then, check and reorder the sequences
you want to export to the miniMAD
and press Play to get a preview within
MadMapper.

11
miniMAD LIGHT FEATURES
EXPORT
In the MadLight Recorder dialog, check
the sequences you want to export then
click Export to miniMAD to open the
export dialog.
By default, miniMAD will use the same
DMX interface as MadMapper, but you can
select a dierent one using miniMAD DMX
Output.
In the case you’re using ArtNet or SACN
you can either select automatic network
conguration (using DHCP) or manual
network conguration and input the IP-
address and mask the miniMAD will use
on the network.
Insert the miniMAD SD-card in the SD-
card reader.
Once the SD-card is ready, click Export to
export selected sequences to the SD-
card.
Once exported, the SD-card should be
automatically ejected so you can directly
stick it in your miniMAD.

12
miniMAD LIGHT CONTROLS
Right
next sequence
Left
previous sequence
Up
change playback mode
Numbers
direct access to the
10 rst sequences
Backspace
restart sequence
Esc
toggle blackout
KEYBOARD
Space
pause sequence
Left
previou sequence
Right
next sequence
Down
decrease luminosity
Up
increase
luminosity
Yellow + Up/Down
control Luminosity
Yellow +Red
toggle Blackout
BUTTONS

13
miniMAD LIGHT CONTROLS
MICROMODUL8
- Blue buttons: direct access to the 16 rst sequences
- First master knob: master luminosity
OSC
- /pause: pauses the playback
- /play: starts the playback after a pause
- /replay: restarts the current sequence
- /previous_sequence: previous sequence
- /next_sequence: next sequence
- /set_playback_mode/{playback mode index}: set the playback mode (cf media playback mode list
in MadMapper’s export window), example: /set_playback_mode/1 to set the Repeat sequence list
playback mode
- /set_sequence_by_name/{sequence name}: set the current sequence by name, example: /set_
sequence_by_name/light_sequence_3 to play the sequence called light_sequence_3
- /set_sequence_by_index/{sequence index}: set the current sequence by index, example: /set_
sequence_by_index/2 to play the third sequence
- /set_sequence_by_index + integer OSC value: set the current sequence by index
- /set_master_luminosity + oat OSC value: set the master luminosity
Note that all indices start at 0.
The miniMAD declares itself as “miniMAD OSC” using the Bonjour discovery protocol.

14
INFORMATION
TECHNICAL SPECIFICATIONS
• Raspberry Pi 2 Model B
• 7 buttons control panel
• HDMI output up to 1080p60 (1920×1080 at 60Hz)
• 16 GB MicroSD-card + adapter
• 2 Amps power supply
• Size 9x10x3 cm
IN THE BOX
• 1 x 16 GB microSD-card class 10 installed with miniMAD software and an
SD-card adapter
• 1 x power supply 100-240V including EU, AUS, UK and US plug
• Size 9x10x3 cm
DISCLAIMER
miniMAD network synchronization can induce a one-frame delay between
the dierent miniMADs.
Therefore miniMAD is not the best solution for setups using edge-to-edge
screens, side-by-side or soft-edge projections, using content that would
highlight this delay.
For such a setup, we advice you to use MadMapper software on a
computer with several video-outputs.
For better synchronization, we also advice you prefer 720p over 1080p
projector resolution

15
INFORMATION
UPDATE YOUR miniMAD SD-CARD
First, you need to download the latest image of the miniMAD system (8 and 16GB versions are available)
and the Etcher ashing tool.
Note that you don’t need to decompress the downloaded zipped images.
All those les are available to download on MadMapper Yourspace page.
On both platforms:
1. Insert your miniMAD SD-card in your computer’s card-reader.
2. Launch Etcher application. ( https://www.balena.io/etcher/ )
3. Select the downloaded .zip disk-image le as source.
4. Select the SD-card drive as target.
5. Click “Flash!” to start the operation.
The ashing operation can take up to 20-30 minutes.
All those les are available to download on MadMapper Yourspace page.
ACTIVATE YOUR miniMAD SD-CARD
After you ashed your miniMAD SD-card with the latest system image, you will need to activate it in
order to export.
The procedure only takes a few seconds:
1. Insert the SD-card in the miniMAD
2. Connect the miniMAD to any HDMI display
3. Plug the power cord to turn the miniMAD on
4. Follow the procedure displayed on the screen
Note that the miniMAD red light is blinking when the activation process is required.
Other manuals for miniMAD
2
Table of contents
Popular Video Card manuals by other brands

Gigabyte
Gigabyte AMD Radeon HD6870 user manual

Matrox
Matrox PJ-4OLP user guide

Gainward
Gainward GTX 560 Ti 448 CORES 1280MB “Limited... datasheet

Gigabyte
Gigabyte GV-N570SO-13I user manual

ATI Technologies
ATI Technologies All-in-Wonder X800 PCI Express Installation and setup user's guide

MSI
MSI N620GT series user guide