MAG-LEV audio ML1 User manual

Levitating turntabLe | ML1
IMPORTANT:
Read the entire user manual before proceeding to unpack.
For assistance, contact our Customer Service Department at 0038641771907 or at

Thank you for purchasing this MAG-LEV Audio
product.
Read through this user manual before unpack-
ing, setting up and using this product to en-
sure its correct use. Also, keep this manual,
along with the warranty, for future reference.
Make sure that the operating voltage of the
product is correct for the country you live in.
WARNING: to prevent re or shock hazard, do not expose this apparatus to rain or moisture.
Caution:
Do not expose this apparatus to drips or splashes.
To avoid electric shock, do not open the cabinet.
Refer servicing to qualied personnel only.
Do not expose this apparatus to excessive heat such as sunshine, re or the like.
Do not subject this apparatus to strong impact.
For PLUGGABLE EQUIPMENT, the socket-outlet shall be installed near the equipment and shall
be easily accessible.
In case of emergency, disconnect the power cord plug of this apparatus quickly.
Do not place any objects lled with liquids, such as vases, on this apparatus.
To prevent re, do not place any naked ame sources (such as lighted candles) on this apparatus.
Do not install this apparatus in a conned space such as a bookcase or similar unit.
Install this apparatus only in the place where ventilation is good.
Do not plug the apparatus in damaged outlets.
Do not expose any parts of this apparatus to any magnets.
For customers in the USA/Canada
CAUTION / RISK OF
ELECTRIC SHOCK
/ DO NOT OPEN
Caution: To prevent electric shock, do not remove
the cover. There are no user-serviceable parts inside.
Internal adjustments are for qualied professionals
only. Refer all servicing to qualied service person-
nel.
The exclamation point symbol within an
equilateral triangle is intended to alert the
user to the presence of important operating
and maintenance (servicing) instructions in
the literature accompanying the product.
The lightning ash with arrowhead symbol,
within an equilateral triangle, is intended to
alert the user to presence of uninsulated
“dangerous voltage” within the product’s
enclosure that may be of sufcient magni-
tude to constitute a risk of shock to per-
sons.
1. INTRODUCTION
2. SAFETY PRECAUTIONS
1. INTRODUCTION 03
2. SAFETY PRECAUTIONS 03
3. NOTES ON USE
3.1. Turntable body
3.2. Cartridge
3.3. Platter
3.4. Counterweight
3.5. Tonearm
06
4. PACKAGE CONTENTS 07
5. PART NAMES AND FUNCTIONS
5.1. Overall diagram
5.2. Tonearm
08
6. PREPARING THE SURFACE / SPACE 10
7. UNPACKING 13
8. SETTING UP THE TURNTABLE 17
9. SETTING UP THE TONEARM
9.1. Setting up the vertical tracking angle
9.2. Setting up the anti-skating weight
20
10. PLAYING A RECORD
10.1. Playing a record
10.2. Semi - Automatic stopping of playing a record
10.3. Manual stopping of playing a record
10.4. Turning, changing or removing the vinyl record
10.5. Levitation Mode / Levitating the levitating
platter
10.6. Dust cover *
10.7. UPS (Uninterruptible Power Supply)
26
11. CARE
11.1. Turntable body
11.2. Platter
11.3. Stylus tip
11.4. Placemat
33
12. REPLACING A CARTRIDGE 34
13. RESET 36
14. HARD RESET 38
15. TRANSPORTING AND SHIPPING THE TURNTABLE 39
16. SPECIFICATIONS
16.1. Dimensions
16.2. Turntable specications
16.3. Tonearm specications
16.4. Cartridge specications
41
17. TROUBLESHOOTING 42
Index
03

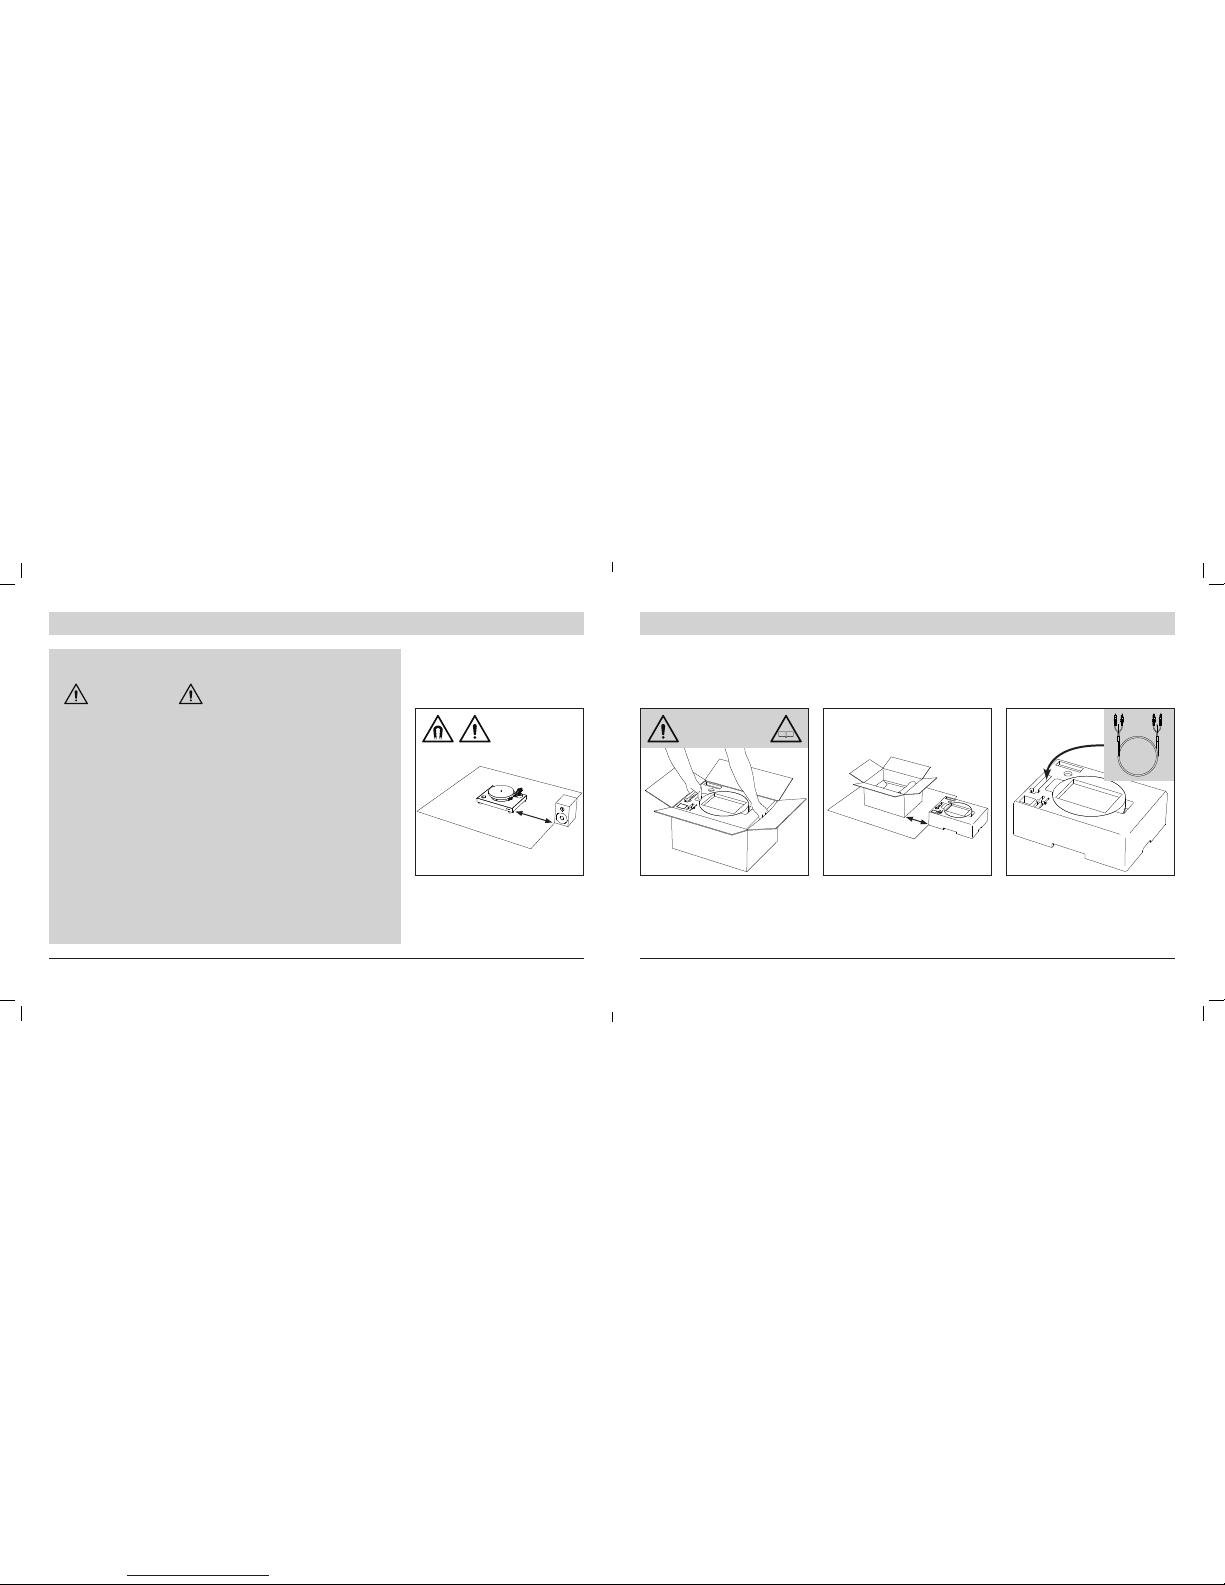
2.1. Important Safety Instructions
WARNING:
CAUTION:
1. Read these instructions.
2. Keep these instructions.
3. Heed all warnings.
4. Follow all instructions.
5. Do not use this apparatus near water.
6. Clean only with a dry cloth.
7. Do not block any of the ventilation openings.
Install in accordance with the manufacturer’s
instructions.
8. Do not install near any heat sources such as
radiators, heat registers, stoves, or other ap-
paratus (including ampliers) that produce
heat.
9. Do not defeat the safety purpose of the po-
larized or grounding plug. A polarized plug
has two blades with one wider than the oth-
er. A grounding plug has two blades and a
third grounding prong. The wide blade or the
third prong is provided for your safety. If the
provided plug does not t into your outlet,
consult an electrician for replacement of the
obsolete outlet.
10.Protect the power cord from being walked on
or pinched particularly at plugs, convenience
receptacles, and the point where they exit
from the apparatus.
11.Only use attachments/accessories specied
by the manufacturer.
12.Use only with a cart, stand, tripod, bracket
or table specied by the manufacturer,
or sold with the apparatus. When a cart
is used, use caution when moving the
cart/apparatus combination to avoid injury
from tip-over.
13.Unplug this apparatus during lightning
storms or when unused for long periods of
time, or when not in use.
14.Refer all servicing to qualied service per-
sonnel. Servicing is required when the ap-
paratus has been damaged in any way, such
as power-supply cord or plug is damaged,
liquid has been spilled or objects have fallen
into the apparatus, the apparatus has been
exposed to rain or moisture, does not oper-
ate normally, or has been dropped.
15.Children are not allowed to handle the ap-
paratus unattended.
16.Children are not allowed to use the appara-
tus, to avoid risk of damage to hands, ngers
and other body parts due to strong magnets
in the product.
17.Do not insert any parts of the body between
the turntable body and the levitating platter
when the apparatus is turned on.
18.People with heart pacemakers are not al-
lowed to handle the apparatus or operate the
platter. They should also keep a distance of
at least 1m or 3.3 feet from the apparatus or
the platter, to avoid magnets in the appara-
tus and platter from interfering with the heart
pacemaker.
19.When handling the platter, do not place it
near or on any metal parts in the vicinity,
to avoid the magnets sticking to any metal
parts. This could result in damage to your-
self, magnets or the platter.
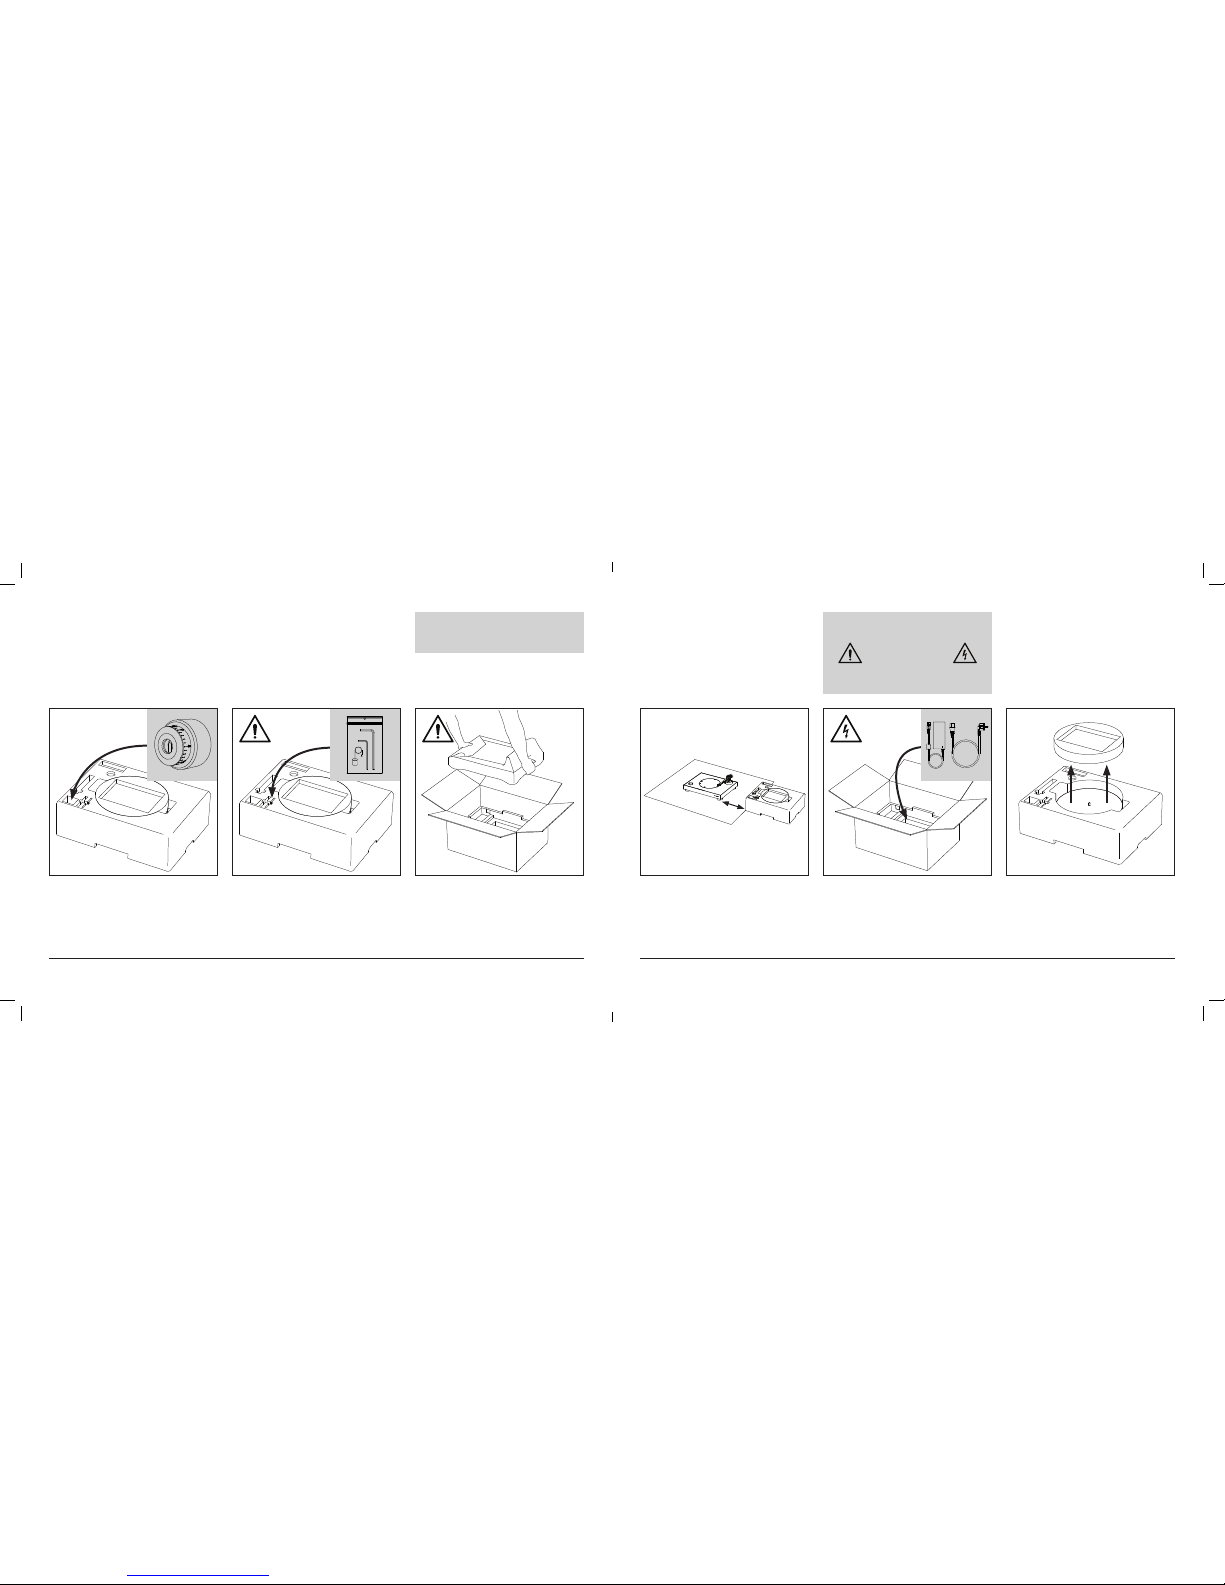
20.When handling the platter do not come clos-
er than 4 cm to the body of the turntable
or the height of the platter feet. If com-
ing closer than the previous mentioned
distance the force of magnets becomes
to strong to handle.
The risk of physical injury when han-
dling the product, due to strong force
of magnets
IMPACTS AND HITS
Large magnets have a strong attractive force.
Improper handling can damage your
ngers or skin that gets caught between
the magnets and metals. This can lead
to damage of body parts and other
monetary damage.
Large magnets can cause body part breakage.
Heart pacemakers
Magnets can inuence the heart pace-
maker and heart debrillator:
• heart pacemaker can switch to a test
mode, which causes improper function-
ing
• heart debrillator can stop working
• do not come closer than 1m (3 feet)
to the apparatus
• warn others, who are wearing such
devices, not to come closer than 1m
(3 feet) to the apparatus
Risk of body injuries
When connecting this product to a
public commuted telephone network,
use only the telecommunication cable
(RJ-11) 26 AWG or larger to reduce the
risk of re. For Australian users, the ca-
ble must be approved by the Australian
Communications and Media Authority.
If the levitating platter falls down from
platter feet or from a levitating position
onto a turntable body, it sticks to the
surface, due to strong magnets. When
removing the platter after it has fallen,
be sure to be in a stable position and
carefully pull it away from the turntable
body, strongly gripping the platter.
Risk of overturning
In the event of an impact of the platter
with a table or a direct impact to a oat-
ing platter, the platter can fall from the
platter feet or from a levitating position
onto the cover of the turntable, which
can damage the feet, or the surface of
the cover or the platter itself may be
damaged. There is also risk of damage
to body parts.
Metal parts
Neodium magnets are fragile. When
crashing among each other, magnets
can break and get damaged. Sharp de-
bris can y a few meters away and can
harm the eyes if in contact.
Avoid magnets crashing together
make sure to take necessary precau-
tions when handling magnets under
dangerous circumstances.
Magnetic eld
Magnets create a long-distance, strong
magnetic eld. Such eld can harm
TVs, laptops, hard drives, bank cards,
storage units, mechanical watches,
hearing aids and speakers.
Make sure to keep magnets away from
devices and objects, which can be af-
fected with a strong magnetic eld.
Inuence on people
Based on current knowledge, magnetic
elds from permanent magnets do not
have a measurable positive or negative
effect on people. It is not likely that per-
manent magnets present a health risk.
However it is not possible to be com-
pletely sure.
• for your safety, avoid constant con-
tact with the magnets
• make sure to keep strong magnets at
least 1m (3 feet) away from your body
05

Do not set and use the product in locations that
are considerably hot or humid, dirty, or subject
to extreme vibrations.
The product should be positioned on a at, level
surface.
When taking out or handling the platter, grip
the platter with both hands and always keep it
away from any metal or magnetic objects, cell
phones, tvs or any other electronic equipment.
Do not place it anywhere on the turntable, but
on platter feet in raised state.
Do not touch the platter when in use.
Do not scratch the reecting mirrors on the bot-
tom of the platter.
Do not place any other objects on the platter
besides the vinyl records and place mats.
This product’s packaging materials
are recyclable and can be reused.
Please dispose of any materials in
accordance with the local recycling
regulations.
When discarding the unit, comply
with local rules or regulations. Mag-
nets should never be thrown away
or incinerated but disposed of in ac-
cordance with the local regulations
concerning magnets disposal.
Make sure that you have all the included items
listed below before using this product. Do so af-
ter you have unpacked the product following the
instructions on page 11.
If some items are missing or damaged, con-
tact our Customer Service Department at
0038641771907 or customersupport@magle-
vaudio.com. If you have purchased the product
from a local distributor or dealer, please contact
them to resolve any issues.
User manual
Power adapter
Turntable body
Power cord
Platter
RCA Audio cable
Platter mat
Inbus key 2x
Counterweight Anti-skating weight
When packing the apparatus into the box, always
remove the tonearm weight by unscrewing it.
When packing the apparatus into the box, always
secure the tonearm with the provided attachment
to stabilize it during transport.
Always adjust the tonearm with great care and
Attach the provided protector to the cartridge
when the product is not in use.
Do not touch the stylus of the cartridge with
3. NOTES ON USE
4. PACKAGE CONTENTS
3.1. Turntable body (page 08)
3.3. Platter (page 08)
A note about recycling
3.4. Counterweight (page 09)
3.5. Tonearm (page 09)
3.2. Cartridge (page 09)
your nger.
Do not allow the stylus to bump against the plat-
ter, mat, or edge of the record.
Always adjust the cartridge while platter is rest-
ing on raised platter feet, with the apparatus in
off mode.
follow the instructions for adjusting the tonearm.
Always use the tools provided for tonearm ad-
justments.
07

5. PART NAMES AND FUNCTIONS
5.1. Overall diagram
5.2. Tonearm
1.a892155 1167
6 9128
1.b 14313 10412414 11 1310
1
9
8
3
7
2
5
1.a Counterweight
Balances the tonearm and adjusts to
provide the proper tracking force
1.b Downforce scale
Adjusts the downforce of the tonearm
2 Tonearm lift
Moves the tonearm vertically to and
from the face of the record
3 Tonearm lift lever / cueing lever
Operates the tonearm lift
4 Tonearm rest
5 Tonearm tube
6 Headshell
7 Cartridge
8 Anti-skating weight with wire
While the record is playing, a force acts on
the stylus tip to pull it inward. This force
can be counteracted by setting the same
values for anti-skate and the tracking
force.
1 Turntable body
Aluminum frame, plastic housing
2 Control Button
OFF/33.3 RPM/45 RPM/Levitation
3 Platter feet
4 LED light ring
5 Turntable feet
6 Tonearm
For details, refer to “Tonearm” on page 09
13 DC inlet
Insert a power cable here
14 Reset button
Under the turntable (page 38)
7 Levitating platter
9a Bottom channel for platter feet
9b Reective mirrors in the channel
8 Platter mat
9 Spindle
10 Sensors
Reading the speed of rotation
11 Analog RCA outlet
12 Grounding connector
9 Anti-skating weight support hoop
10 Anti-skating weight adjustment scale
11 Removable transport lock
12 Finger lift
13 Tonearm base
14 Tonearm base adjustment screw
15 Tonearm lift sensors
38 mm
37 mm
09

6. PREPARING THE SURFACE / SPACE 7. UNPACKING
Take out the RCA cables and remove the ties.Remove the top half of the Styrofoam box. Grip
on the sides with both hands and lift vertically
out of the cardboard box. Place it on a solid
and at surface.
50 cm
/ 20“
Place it at least 30 cm from the package.
1. 2. 3.
Read the entire user manual before unpacking
the apparatus.
Always follow instructions when unpacking the
apparatus.
Make sure you set up the surface you wish to
put the apparatus on in a level position and
make sure the surface is at before unpacking.
The product should always be placed
on a surface with enough area to t
the product feet fully on the surface.
Optimum recommendation (width x depth):
480 mm x 450 mm / 19“ x 17,7“.
READ THE
ENTIRE USER
MANUAL!
MAKE SURE TO USE
THE CORRECT
TOOLS TO
MAKE SURE THE
SURFACE IS LEVEL.
1. Make sure you set up the surface you
wish to put the apparatus on is level
and make sure the surface is at.
2. The product should always be placed
on a surface with enough area to t
the product feet fully on the surface.
3. Make sure the table, cabinet or sur-
face has no metal parts that interact
with magnets. Be certain to check
on, next to and under the surface to
make sure there are no metal parts in
the vicinity that would cause interfer-
ence with the turntable. (we suggest
wooden surfaces)
4. Any metal or magnetic parts should
be at least 50cm or 20“ away from the
turntable.
5. Make sure the speakers, preamps,
ampliers and other electronic equip-
ment is positioned at least 50cm or
20“ away from the turntable.
6. To avoid effects of vibrations and
acoustic pressure, do not mount the
product next to such items as speak-
ers.
7. The product may pick up radio static
if placed next to a radio. Therefore,
try to keep the product away from
radios.
8. If the product is near equipment (cell
phone, etc.) that emits strong radio
waves, noise may occur.
30 cm
/ 12“
11

Take out the box with the tonearm weight. Take out the small bag with tools and
anti-skating weight.
Take out the body of the turntable with both
hands and place it at least 30cm (1 foot) away
from the platter (top part of the Styrofoam box).
4. 5.
REMOVE THE PROTECTIVE
FOAM SHEET/BAG.
6.
Place it at least 30 cm from the package. Take out the box in the middle with the power
adapter inside. (brown box)
Take out the power cord.
Remove the circular Styrofoam part from the
middle.
7. 8. 9.
MAKE SURE IT IS
THE RIGHT POWER
CORD FOR YOUR
COUNTRY!
30 cm
/ 12“
13

LEAVE THE PLATTER INSIDE THE
TOP PART OF THE STYROFOAM
BOX, UNTIL YOU HAVE SET UP
THE TURNTABLE AND YOU ONLY
HAVE LEFT TO PLACE THE PLAT-
TER ON THE TURNTABLE FEET
(PAGE 18).
When taking out or handling the platter, grip
with both hands and always keep it away from
any metal or magnetic object, cellphones, tvs
or any other electronic equipment. (minimum
50cm or 20“ distance)
11.
BEFORE SETTING UP THE PLATTER ON
RAISED PLATTER FEET READ PAGE 18.
12.10.
After purchase, we suggest that you save all
packaging materials for possible future stor-
age, moving, or shipping.
Warranty and returns are valid if sent back in
the original packaging and packed properly.
Follow the instructions in case of repacking
(page 39).
Before connecting the power adapter,
make sure the power adapter is suitable
for the voltage in your country.
Plug in the power cord directly to
the outlet.
Do not use extensions or dividers.
1. 2. 3.
Place the turntable body (2) on the
pre-prepared surface.
THIS PRODUCT REQUIRES SOME ASSEMBLY BEFORE USING IT FOR
THE FIRST TIME. DO NOT CONNECT THE POWER CABLE UNTIL
ASSEMBLY IS COMPLETE.
8. SETTING UP THE TURNTABLE
WARNING WARNING
REMOVE THE PROTECTIVE
FOAM SHEET/BAG.
Follow the instructions on the next page to
connect the turntable properly.
Schematic visualisation on page 16.
MAKE SURE THE
OUTLET YOU WISH
TO PLUG THE
APPARATUS IN, IS
IN GOOD
CONDITION.
50 cm
/ 20“
15

4.
When the turntable is plugged into the
electric power grid for the rst time, the platter
feet will rise out of the turntable body into set
up position.
When the light in the control button stops
blinking, the turntable body set up is nished.
5. 6.
Lift the levitating platter vertically out of the
upper half of the Styrofoam box.
BE SURE TO LEAVE THE APPARATUS
PLUGGED IN FOR A MINIMUM OF 60
MINUTES BEFORE FIRST USE, FOR THE
APPARATUS TO WORK AS INTENDED.
Power adapter with power cord
AC input: AC100-240 V / 50-60 Hz / 2.0 A
DC output: 12V / 0.5 A
Operating temperature at normal playing
condition (room temp. 25°C) is
approximately 35°C.
2. step
Connect the power
adapter and power cord.
1. step
Plug the power cable into
the DC inlet.
3. step
Plug the power plug into
the outlet.
Connectable equipment
(Amplier, etc.)
To outlet
IT IS EXTREMELY IMPORTANT TO FOLLOW THE STEPS ON HOW TO
CONNECT THE TURNTABLE. IF THE STEPS ARE NOT FOLLOWED, IT
CAN CAUSE DAMAGE TO THE TURNTABLE.
17

7. 8. 9. 9.
REMOVE THE CIRCULAR STYROFOAM
PART FROM THE UPPER HALF OF THE
STYROFOAM BOX.
REMOVE THE PLASTIC BAG FROM THE
LEVITATING PLATTER.
HAVE A STRONG GRIP ON THE
PLATTER, DUE TO THE STRONG
FORCE AND PULL OF THE MAGNETS
IN THE TURNTABLE BODY AND THE
LEVITATING PLATTER.
Hold the levitating platter with both hands and
grip rmly.
Firmly gripping the platter, start lowering the
platter on the platter feet, slowly and vertically.
Place the channel on the bottom of the platter
onto all four platter feet, carefully and patiently.
Make sure that the platter feet are fully in the
channel and you feel no force of the magnets,
then let go of the platter.
You can help make sure all 4 feet are in the
channel by rotating the platter around its axis.
If all 4 platter feet are not in the channel, you
won`t be able to turn the platter with ease and
you will feel a force of the magnets pulling the
platter toward the body.
If the platter is not properly set up, the
platter will fall down due to strong magnets!
In this case there is risk of bodily injuries
and damages to the turntable.
BE CAREFUL EXECUTING THIS
STEP. THERE IS RISK OF BODILY
INJURY.
WARNING WARNING
WARNING
WARNING
MAKE SURE YOU
PLACE IT ON ALL
4 PLATTER FEET.
19

9. SETTING UP THE TONEARM
In order for the cartridge to pick up sound cor-
rectly from the record’s grooves, the tonearm’s
balance and tracking force must be adjusted
to t the specications of the cartridge’s. If the
tonearm’s balance and tracking force are not
properly adjusted, the record or the cartridges
stylus may become damaged.
Do not drag the cartridge’s stylus across the
record or mat when adjusting the tonearm’s bal-
ance or tracking force. Doing so may damage
the stylus.
Adjust the downforce prior to installing the anti-
skating weight.
1. 2. 3. 4.
With the tracking force gauge ring facing for-
ward attach the counterweight to the back of
the tonearm, and slowly turn it counterclock-
wise (to the left)
Remove the cartridge’s protector, by pulling
straight forward. Applying a downward force
may cause the stylus to come off the body.
Only low volume is output if the stylus has
come off, or is about to come off, so refer to
“Replacing the stylus” (page 34) to reattach the
stylus correctly.
Make sure the cueing lever is in downward
position.
Move the tonearm out of the tonearm rest.
WHILE HOLDING THE HEADSHELL,
REMOVE THE CABLE TIE USED TO
SECURE THE TONEARM AT THE TIME
OF DELIVERY.
You have to set the counterweight on
your own as it is necessary for it to be
packed separately, to ensure the safety
of the product.
5.
Turn the counterweight until the tonearm is
parallel to the platter.
For other cartridges follow the
instructions of cartridge
manufacturers.
21

7. 8.
Let go of the downforce scale and rotate the
counterweight between 15-16 (for Ortofon
OM10).
Return the tonearm to the tonearm rest.
VTA and SRA are already set for the mounted Ortofon OM10. If you wish to change the cartridge or have bought the turntable without
one, please read the following instructions.
Refer to the image below if you need to
readjust the setting for Ortofon OM10. If
you are installing another cartridge, refer
to manuals from manufacturers of the
cartridges you wish to use.
9.1. Setting up the vertical tracking angle - Vertical tracking angle (VTA and SRA)
The goal is to bring the diamond tip, in relation
to the grooves of record surface, to the same
position as the original cutter head’s diamond
tip. To optimise this we need to set up the
cartridge’s diamond tip in the grooves at a
specic angle.
To adjust the height of the tonearm, use the
large inbus key, unscrew the two screws at the
back of the tonearm base and adjust the height
accordingly. Make sure to have the turntable in
a levitating position to achieve the correct result.
Refer to manuals from manufacturers of the car-
tridge you wish to use.
1:1
5.
While supporting the counterweight so that it
does not move, turn the tracking force gauge
ring so that its “0” position lines up with the
centerline on the back of the tonearm (the
tracking force is not adjusted simply by
turning the tracking force gauge ring).
1.a
1.b
1.a Counterweight
Balances the tonearm and adjusts to
provide the proper tracking force.
1.b Downforce scale
Adjusts the downforce of the tonearm.
23

9.2. Setting up the anti-skating weight (page 09, part 10)
You have to set the anti-skating weight on your
own as it is necessary for it to be packed sepa-
rately, to ensure the safety of the product.
The anti-skating force must be adjusted accord-
ing to the mass of the cartridge as follows:
Pro-Ject 9cc
For Ortofon OM10, use the 2nd groove.
Downforce Groove in the stub (10)
10 - 14mN 1st from bearing rings
15 - 19mN 2st ˝˝˝
20mN and bigger 3st ˝˝˝
123
Hang the loop of the thread of the anti-skating
weight (8) in the groove of the anti-skating stub
(10) corresponding to the downforce applied to
your cartridge and feed the thread through the
loop of the wire support (9).
As you can see there are two different angles
serving the same purpose. VTA and SRA. These
angles are affected by the height of the tonearm
and tracking force. The height of the tonearm
raises the actual pivot point of the cantilever
(SRA). The higher the tonearm on the armboard,
the bigger the SRA and VTA. Changing the
tracking force changes VTA due to cantilever
suspension. With a lighter tracking force, the
cantilever is pushed up less and VTA and SRA
are bigger. In reality different cartridges have
variations in design and SRA can be around 85-
95 deg while VTA is 18-25 deg.
Refer to the image below if you need to
readjust the setting for Ortofon OM10. If
you are installing another cartridge, refer
to manuals from manufacturers of the
cartridge you wish to use.
25

10. USING THE TURNTABLE
1. 2. 3. 4. 5.
Place the vinyl record onto the platter so that
the center hole aligns with the spindle.
Clean the vinyl record with a brush for vinyl
records with a gentle motion following the
grooves in the record. Finish with a diagonal
motion towards the edge of the record. Only
clean the vinyl records on the platter, when the
platter is resting on the platter feet.
Remove the cartridge’s protector, by pulling
straight forward. Applying a downward force
may cause the stylus to come off the body.
Only low volume is output if the stylus has
come off, or is about to come off, so refer to
“Replacing the stylus” on page 34 to reattach
the stylus correctly.
Turn the control button clockwise from OFF
mode (9 o’clock) , to 33 (33.3 rpm – 12 o’clock)
or 45 (45 rpm – 3 o’clock), depending on the
speed the record is supposed to be played at.
This turntable only plays 33.3 rpm and 45 rpm
records.
Lift the tonearm from the tonearm rest, and
move it toward the vinyl record.
Place the cartridge of above the track on the
vinyl record you wish to listen to. Make sure
you place the stylus above the vinyl record, to
not damage it.
ONLY PLACE, CLEAN, SWITCH
AND TURN THE VINYL RECORDS
WHEN THE LEVITATING PLATTER
IS RESTING ON PLATTER FEET.
WARNING
If using small 45rpm vinyl records with
a large center hole, place the 45rpm
adapter on the spindle, before placing
the record.
12
Make sure the cueing lever is in
downward position (page 21).
10.1. Playing a record
27

10.2. Semi - Automatic stopping of
playing a record
1. 2.6. 4. 5.3.
30 seconds after the tonearm reaches the end
of the record, the tonearm will lift itself and the
levitating platter will slowly stop rotating.
After the tonearm has lifted, move the tonearm
back into the tonearm rest.
When the levitating platter reaches the correct
speed and stabilizes, the light in control button
will stop blinking and the tonearm will lower
itself and place the stylus on the record.
The platter feet will automatically rise and hold
the levitating platter.
Move the control button anti-clockwise to OFF
mode.
Make sure to place it completely inside the
tonearm rest and not only above it.
29

10.3. Manual stopping of playing a
record
1. 1.
When you wish to manually stop the playing of
a record, lift the cueing lever.
Lower the cueing lever.
3.2.
Make sure to place it completely inside the
tonearm rest and not only above it.
Move the tonearm back into the tonearm rest.
4.
The platter feet will automatically rise and hold
the levitating platter.
5.
Move the control button anti-clockwise to OFF
mode.
31

10.4. Turning, changing or
removing the vinyl record
10.5. Levitation Mode / Levitating
the levitating platter
10.6. Dust cover 10.7. UPS (Uninterruptible Power
Supply)
ONLY TURN, CHANGE OR REMOVE
THE VINYL RECORD WHEN THE
PLATTER FEET ARE RAISED AND
THE LEVITATING PLATTER IS NOT
LEVITATING, AND THE TONEARM
IS IN THE TONEARM REST.
WARNING
Remove the vinyl record by gently pressing on
the spindle, while at the same time lifting the
edges of the record vertically. This is especially
important when removing a vinyl record that
ts tightly on the spindle. Some records may
mount and dismount harder than others.
After turning or changing the record repeat
the process for playing a record if you wish to
continue listening to the record.
Make sure the turntable is set up propperly.
Turn the control button counter-clockwise
to – mode (6 o’clock).
The platter feet will retract and the levitating
platter will begin to levitate.
To stop the levitation mode, turn the control
button clockwise to OFF mode (9 o’clock).
The platter feet will rise and hold the levitating
platter in place.
This applies to owners of the MAG-LEV
Audio dust cover or any other dust cover.
Only use the dust cover when the turntable is
in OFF mode.
Do not use a dust cover that rests on or touch-
es the turntable body.
Do not use a dust cover with no openings for
ventilation.
Do not put any items on the dust cover.
Do not push or pull on the dust cover, for it may
damage the dust cover or the apparatus.
This apparatus uses capacitors, which are
installed inside of the turntable body, for the
use of regulating constant electrical current to
the turntable body and to store enough power
to bring the turntable to a safe stop in case of
a power outage. In case there is a power out-
age or the cable is accidentally unplugged, the
levitating platter will slowly stop turning, the
tonearm will lift up and the platter feet will rise
and hold the levitating platter. This will bring the
apparatus to a safe stop, avoiding damage to
the apparatus or any other possessions in the
vicinity.
When the turntable body is dirty or dusty, make
sure the turntable is in off mode, then discon-
nect the power cable plug, remove the turnta-
ble platter. Make sure to move the platter 50cm
(20“) away from the turntable, any metal, mag-
netic or electronic devices. Lower the turntable
feet (page 38), then wipe off the dirt and dust
with a soft, dry cloth.
Do not use benzenes, thinners, etc.
When storing the product for a long time, follow
Make sure to clean the levitating platter when
it is removed from the platter feet. If dirty, clean
the mirrors on the bottom of the levitating plat-
ter for optimal efciency and sensors to work
properly.
If dirt and grime are stuck to the stylus tip, clean
it with a commercially sold brush.
We recommend using a stylus cleaner (sold
separately) if the stylus tip is considerably dirty.
Clean the stylus tip by moving the brush from
the rear to the front of the stylus tip.
Be sure to only use the place mat provided or a
placemat from the MAG-LEV Audio list of rec-
ommended placemats that work well with ML 1
turntable (refer to website for the list).
If the turntable mat gets dirty, it can easily
scratch the record,so remove the mat periodi-
cally and wipe off any dust.
11. CARE
11.1. Turntable body
11.2. Platter
11.3. Stylus tip
11.4. Platter mat
the transportation of the apparatus and repack-
ing procedure. (page 39)
33

12. REPLACING A CARTRIDGE
Make sure you are only using cartridges sug-
gested by MAG-LEV Audio with the turntable.
You can nd a list of recommended and
allowed cartridges at this
website www.maglevaudio.com.
Be aware that cartridges not on the list might
not work with the turntable and may damage
your record or parts of the apparatus.
Refer to the user manual for the cartridge that
you will be using if you are replacing the car-
tridge (Ortofon OM10) included with this prod-
uct with another, commercially sold cartridge.
After you replace the old cartridge with a new
one, you must readjust the overhang and the
tonearm’s balance and tracking force.
REPLACING THE STYLUS
Please check the instructions from the
manufacturer of the cartridge, to see how
to replace the stylus.
1. 2. 3. 4.
Remove the lead wires. Be careful not to
damage the lead wires.
Using a commercially sold, non-metallic
slotted screwdriver, remove the installation
screws, and then remove the cartridge from the
headshell.
Refer to the user manual for the new
cartridge for mounting instructions.
Using a commercially sold, non-metallic slot-
ted screwdriver, tighten the screws in both
places, and then adjust the overhang. After the
adjustments are complete, tighten the screws
securely.
The overhang is already set for the mount-
ed Ortofon OM10. If you wish to change
the cartridge or have bought the turntable
without one, please read the instructions
from the catridge manufacturer.
The position of the cartridge must be accu-
rately determined (adjusting the overhang)
when mounting a cartridge or headshell
other than the one provided.
Adjust the tonearm balance and tracking force.
Refer to “Tonearm balance and tracking force
(page 20) to perform the readjustments.”
1.a
1.b
35

13. RESET
1. 2. 3. 4. 5.
Make sure the control button is in OFF mode,
platter feet are raised and the levitating platter
is resting solidly on the platter feet.
Hold the levitating platter rmly with both
hands and remove it by lifting it vertically.
Make sure to place the removed levitating plat-
ter at least 50cm (20“) away from the turntable
body and away from any metal, magnetic or
electronic objects, to avoid damage to the ap-
paratus or other possessions.
Find the smaller inbus key provided or a small
pin for the next step.
With one hand or a help of a friend, lift the
turntable body from the left side and press the
reset button on the bottom of the turntable
body one time.
Lower the turntable body back on the surface.
The platter feet will begin to retract and move
into the turntable body.
Start using the turntable again.
Bottom view
WARNING
Remove the RCA cables from the
turntable body.
1:1
14
RESET
50 cm
/ 20“
37

RESET
14. HARD RESET 15. TRANSPORTING AND SHIPPING THE TURNTABLE
REPEAT THE
STEPS 1 - 5 FROM
PREVIOUS CHAPTER
(13. RESET, PAGE 36 - 37).
REPEAT THE STEP 14.
HARD RESET
(PAGE 38)
Bottom view
2x
Press the reset button on the bottom of the
turntable body two times, quite fast (inside the
span of 1 second).
Turn the control button to the levitation mode
swiftly.
Using the product’s original packing materials,
wrap the turntable in the reverse order from
when you unwrapped it.
• Remove the power adapter from the turnta-
ble body. Carefully pull the plastic casing on
the connector to unplug it correctly and not
damage the connector.
• Remove the power cord from the outlet in
the wall.
• Unscrew the tonearm counterweight.
• Remove the anti-skating weight.
• Place the cartridge protector back onto the
cartridge.
• Use a provided cable tie to secure the to-
nearm to the tonearm rest.
• When the LED ring on the turntable body
stops blinking, it is safe to begin packing
the turntable.
NOT FOLLOWING THESE STEPS,
IT IS LIKELY THAT THE WARRANTY
WILL BECOME VOID.
WARNING
39
Other manuals for ML1
1
Table of contents
Other MAG-LEV audio Turntable manuals