3 07/06/18
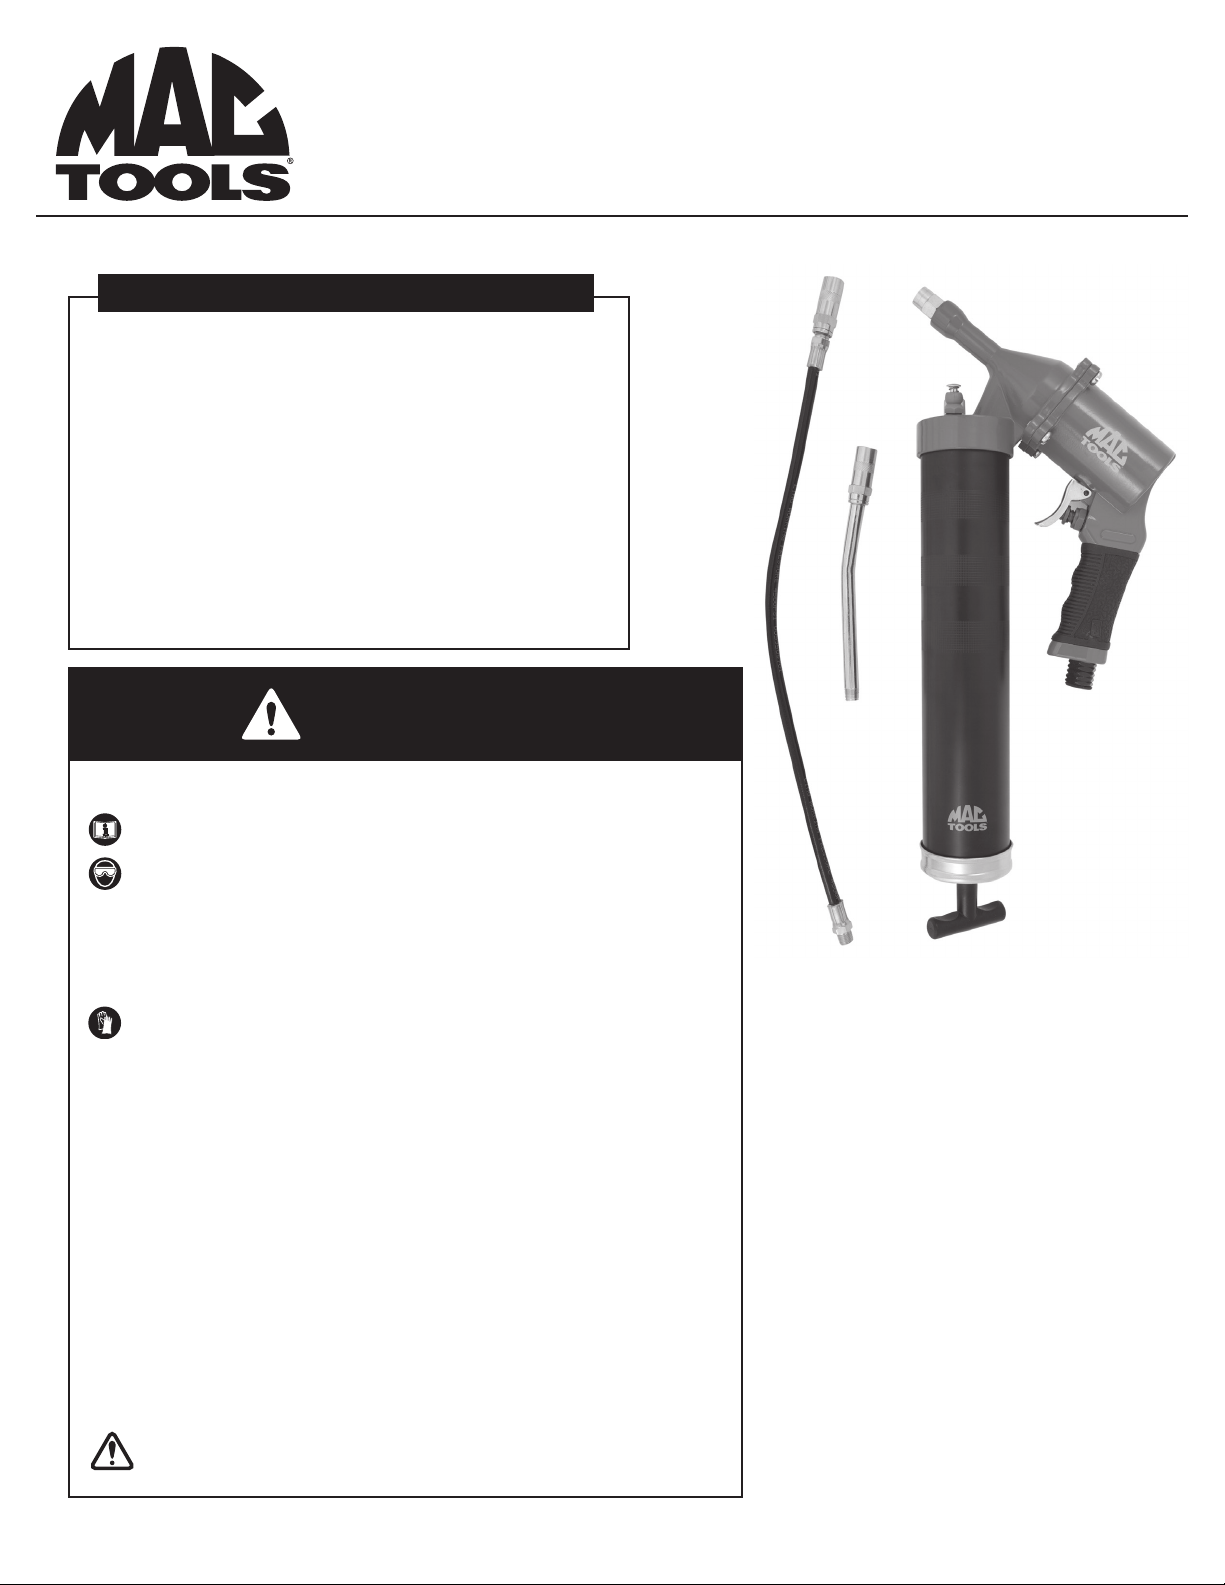
Model GG63HD Continuous Shot Air Grease Gun
FEATURES AND FUNCTIONS
• Continuous grease feed with one trigger pull
• Heavy duty cast aluminum body for durability and long life
• 3 way loading - bulk, 14 oz. cartridge, filler pump
• Locking plunger for force priming the gun
• Bleeder valve for purging unwanted air
• Working pressure: 40 psig - 100 psig
• Includes 18" high press grease hose, and 6" bent metal spout
PROPER GREASE GUN USE
This Air Powered Continuous Shot Air Grease Gun was developed for
the specific purpose of dispensing grease by using pneumatic power.
The maximum rating listed in the specifications, should not
be exceeded.
This tool should only be used for its designed purpose and according
to the instructions in this manual.
GENERAL CAUTIONARY NOTES
Do not allow bystanders, children or other on-lookers in the work
area as they can cause distractions, which may lead to mistakes and
accidents.
Carefully inspect the equipment for damaged, loose or missing
parts. If the unit is worn or damaged, do not use it and contact an
authorized service center for evaluation or repair.
The Continuous Shot Air Grease Gun must be primed after each refill
or grease cartridge change. You should also check the priming of the
gun before each use.
For best performance and to extend product life, add a few drops of
air tool oil through the air fitting at the bottom of the handle if gun
begins to cycle slowly or erratically.
CAUTION!
Air pockets in the cartridge will cause the gun to lose prime.
PRIMING THE CONTINUOUS
SHOT AIR GREASE GUN
With the gun loaded with grease and the gun hooked to an air supply,
activate the trigger until grease flows from the hose or pipe. To relieve
air pockets, operate the air vent valve #8 while depressing the trigger.
If grease does not flow after 10-15 seconds of operation, remove the
hose or pipe and activate the trigger until grease flows from the hose/
pipe outlet. Make sure the bearing, fitting and lubrication line are
clear and free flowing before operating the gun. If the bearing, fitting
or lubrication line is blocked, the gun can stall.
REMOVING AN EMPTY GREASE CARTRIDGE
Make sure that the Grease Gun is disconnected from the air
supply prior to adding or removing the Grease Cartridge.
1. Pull the T-handle until the rod is fully extended. Hook the rod into
the rod notch in the end cap.
2. Unscrew the grease tube from the gun.
3. Carefully center the grease rod and eject the empty cartridge from
the grease barrel.
INSTRUCTIONS FOR CARTRIDGE LOADING
Make sure that the Grease Gun is disconnected from the air
supply prior to adding or removing the Grease Cartridge.
1. Pull the T-handle until the rod is fully extended, lock the rod into
the cap notch and remove the barrel assembly from the gun.
2. Turn T handle 1/2 turn to lock the follower rod to the follower.
3. Remove the plastic cap from the grease cartridge and insert the
cartridge into the barrel assembly.
4. Remove the pull-tab from the grease cartridge.
5. Screw the barrel assembly on to the gun assembly.
6. Release the rod by centering the rod.
7. Push the rod by hand until the follower is inserted into the grease
cartridge. Then turn the T-handle 1/2 turn to unlock the follower
rod from the follower.
8. Prime the gun and remove any air pockets per the instructions on
priming the gun.
SUCTION FILLING
1. Remove the barrel assembly from the gun.
2. Insert the open end of the barrel assembly into the grease bucket.
3. Pull the T-handle until it is fully to the rear and engage it in the
rod notch, making sure to keep the open end of the barrel well
within the grease.
4. When the barrel assembly is full of grease, screw it back on to the
gun assembly.
5. Release the rod by centering the rod.
6. Prime the gun and remove any air pockets per the instructions on
priming the gun.
USING A FILLER PUMP
1. Attach the bulk load fitting to the bulk container.
2. Operate the filler pump.
3. When the T-handle and rod are fully extended (about 8-1/2"), the
barrel is full.
4. Remove the gun from the bulk load container.
5. Release the rod by centering the rod.
6. Prime the gun and remove any air pockets per the instructions on
priming the gun.