Magene Left Crank Power Meter User manual

Dual-protocol Crank
Power Meter

Contents
Quick Start Guide 1
Unpacking the Box
Connect and Activate the Power Meter
Connect the Power Meter Device
Calibrating the Power Meter
Peripheral Pairing and Functions
Replace the Battery
Product Specifications
Q&A
Upgrading the Power Meter‘s Firmware
Warnings and Daily Check
Warranty Card
1
2
3
4
4
4
6
7
8
8
10

Thank you for purchasing Magene Dual-Sided Crank Power Meter
(Hereinafter referred to as Magene Power Meter).
Please be sure to follow the 3.0 operation steps to activate the power meter before use.
For information regarding crank installation and adjustment not covered in this guide,
please refer to your bicycle dealer’s instruction manual.
E-mail:[email protected]
Phone:(+86)400-662-8297
Website:www.magene.cn
If you have any questions about the power meter module, please contact us.
Take Magene Power Meter and its parts out of the box and keep the original packaging
for future storing and transporting.


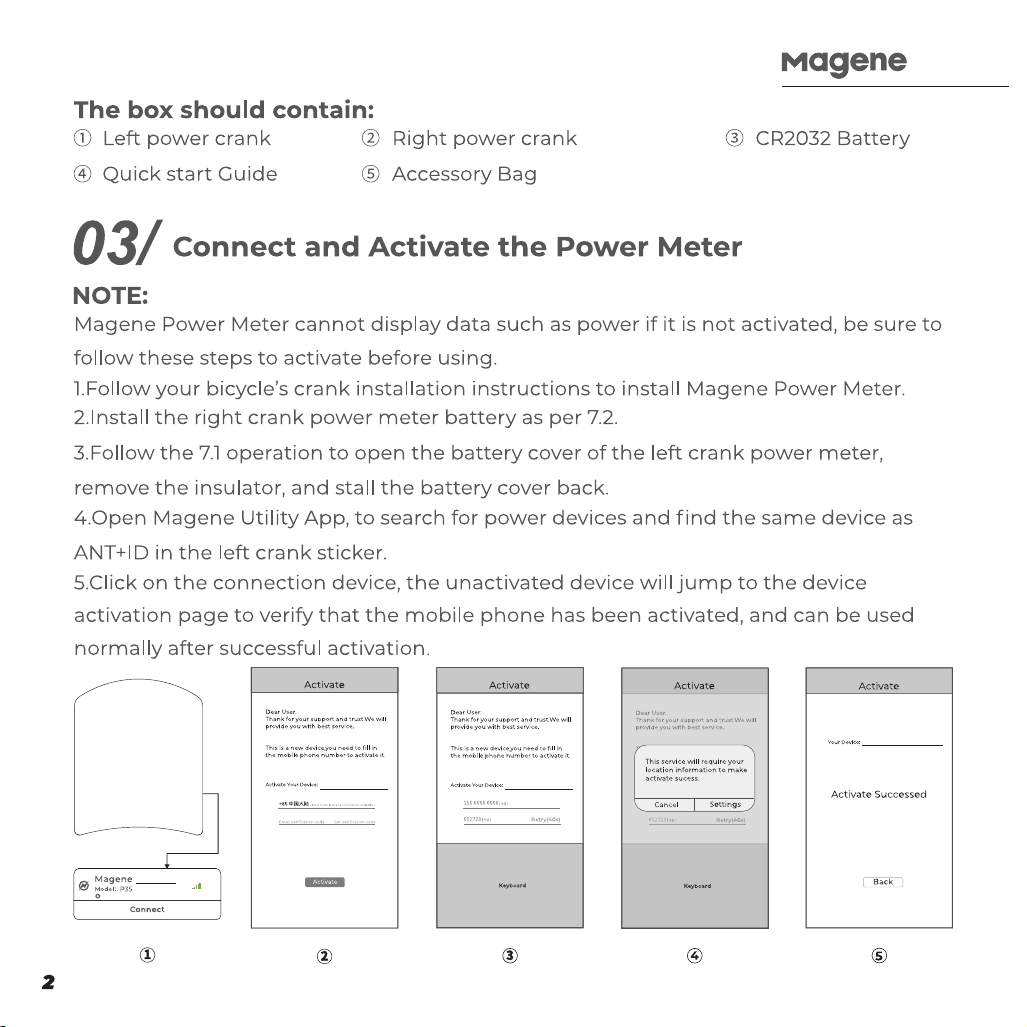
If step 4 cannot search for the power meter, please sit around the Magene
Power Meter 1min and rotate the crank for a few weeks, at which time Bluetooth
enters the broadcast state and can be connected.
If activation fails, click return, enter the device search list, and reactivate.
Magene Power Meter can be connected to power device after activation.
Magene Power Meter is a Bluetooth and ANT+ dual-protocol power meter
that is compatible with ANT+ and Bluetooth devices that support the standardized
power meter protocol. Using this protocol the power meter’s measured data can be
viewed and recorded.
Typically,most bike computers can search for and add power meter equipment
in the settings through the settings>sensors>new>sensor>power meter.
When searching for the Magene Power Meter,step on the pedal connected to
the power meter crank so that the power meter can detect the torque therefore
waking up the power meter from Sleep mode,start the Bluetooth or ANT+ signal
broadcast and wait for a device to connect.
If there are multiple power meters in the current environment,you need to identify
your power meter by ANT+ ID. For ANT+ ID,please refer to step 3.4 for the
identification method.

Zero offset calibration will calibrate the power meter to 0 power when at rest.
When calibrating, please turn the left crank in the vertical ground down state and
use ANT+ Device or MAGENE UTILITY for calibration.
Magene Power Meter wirelessly transmits ride information to a bike computer or
receiver that support ANT+ or Bluetooth.
Magene Power Meter logs the following information as you ride.
Power Cadence Remaining Battery Capacity
This product transmits the following information wirelessly to cycle computers or
receivers that support ANT+ or Bluetooth LE connections.
When you discover the power meter is unable to make connections to any device
the battery may be exhausted. Try replacing the battery at this time.
7.1.1 Rotate the battery cover counter-clock-wise to the unlocked position to open
the battery compartment.
7.1.2 Remove the depleted CR2032 battery nothing the orientation. Install the new
in the same orientation with the positive pole inside the battery cover.

7.1.3 Reinstall the battery cover by pressing tight and rotating clockwise until the
cover Reaches the locked position.
7.2.1 Use a 1.6mm hexagonal screwdriver to unscrew the battery cover bolt
counterclockwise,remove the battery cover.Remove the depleted CR2032 battery
nothing the orientation. Install the new battery in.
7.2.2 Install the battery cover in the position where it is removed and tighten the
two bolts alternately.

1.Please ensure the battery cover of left power meter is lined up in the correct
orientation before pressing and turning, failure to do so may cause damage.
2.Please remove the battery cover of the right power module before dismounting
the chainwheel.
3.When installing the battery cover of the right power meter module,please align the
screw with the hole and then screw it in. Do not use a screwdriver to push the bolt.
4.Please keep used batteries in a safe place, or dispose of them
in specially designated battery recycling depositories.
Right Crank Power Meter
5.Do not attempt to disassemble the batteries.
Left Crank Power Meter
Power Accutacy
Weight
Power Supply
Working Life
Wireless Interface
Water Proofing
Power Range
Cadence Range
External Cadence
Sensor Magnets
Operating
Temperature
Reuqires Zero-point
Calibration
1.5%
12g 13g
CR2032 Battery
350H
ANT+
Bluetooth BLE4.2
IPX7 Splash Resistance
0-3000W
20~240rpm
None
Yes
-10~50

Please refer to the following if you have any questions in the process of using Magene Power Meter.
1.Check to see if activation has been performed
2.Check whether the bike computer or software has been connected
3.If the connection cannot be made, please replace the battery
Do zero offset calibration by your bike computer or Magene Utility
Keep the Magene Power Meter steady than make sure that the left crank is
pointing straight at the ground. Try again.
Magene Power Meter
1.Reinstall the left crank power meter battery
2.Power data display is not supported by bike computer or software
3.ANT+ device malfunctioned or Bluetooth was not enabled
1.Use the Magene Utility to check if the right side is connected. After static setting
the crank 1 min,don’t touch it. Rotate the crank to see if the connection state is
restored. if not, check the battery power (or replace the battery).

2.If the problem occurs after the upgrade fails, check that the ID of the right crank (see
the ANT+ID number on the sticker on the crank) appears in the device list, if so, click the
connection, upgrade the device, and re-check the connection status after the upgrade.
If none of the above is applicable or the problem is not solved, please consult online
customer service or dealers.
Do not spray the power meter module with high pressure water when cleaning the
bicycle.
Please tighten the crank and pedal bolts exactly according to the instructions.
Otherwise, it may cause damage to the crank or pedal.
Do not put the battery into fire or heat, otherwise it may cause a fire or explode.
The power meter module is a splash-proof design.Do not soak the power meter
module in water.
Do not subject the crank and power meter module to severe impact, as this may
cause the power meter module to detach or malfunction.

In temperatures below –(minus) 10℃, the CR2032 battery life will decay rapidly.
Use neutral detergent when washing cranks. Use of alkaline or acidic detergents
or thinners may shorten the life of the sensor case.
The power meter module users the 2.4G wireless communication band.The 2.4G
signal environment surrounding the object or the surrounding area may cause
interference to communications.
If the signal connection is found to be unstable, try again in an open area.
Strong electromagnetic waves generated by surrounding.
Do not try to remove the waterproof glue around the power meter module!
This will compromise the waterproof performance of the power meter module.
Natural wear and aging and normal use caused by performance deterioration is not
covered by the warranty.
Please check the items listed below before riding. In case of any abnormality,it is
recommended to seek professional technicians for maintenance and debugging.
Are there any cracks in the crank arms?
Are the fastening sections fixed securely?
Are the bearing sections fixed securely?
Are there any abnormal noises?
Is there sufficient charge remaining in the battery?

meter.
Thank you for purchasing Magene Dual-Sided Crank Power Meter crank-arm power
Please carefully read the Warranty Clause.
This product has passed the strict quality inspection. Failure caused by product quality
problem under normal use, we will give free warranty within the warranty period.
Within 7 days from the date of purchase(including), the quality of the product itself is
unconditionally returned.
The warranty period of Magene Power Meter is 18 months, Please use the original
packaging for repairing, otherwise manufacturer does not undertake any related
responsibility.
The following situations are not covered by warranty:
Beyond the warranty period.
No valid warranty certificate.
Damage caused by improper use and maintenance.
The product code on the warranty card does not match the product.
Unauthorized maintenance, modification, use of parts other than the product.
Damage caused by irresistible factors.
Damage caused by not using or installing the product in accordance with the
instructions.
Alter warranty card without authorization.
Other failures and damages caused by non-product design, manufacturing,
quality, etc
Wear and dirt caused by normal operation, such as scratch, bump, etc
After the warranty expires , we continue to provide maintenance service for which
will be charged related service fee.

Dual-protocol Crank
Power Meter
신속사용�지침

목�록
빠른�설치�안내 14
박스�개봉
제품�활성화�및�연결
파워�미터�연결
파워�미터�조정
주변�기기들과의�페어링�및�기능
배터리�교체
제품�사양
Q&A
펌웨어�업그레이드
주의�사항�및�사용�전�확인�내용
보증�카드
14
15
16
16
16
17
19
19
21
21
21

우선 Magene 듀얼�파워미터를�구매해�주셔서�감사�드립니다.
파워미터를�사용하기�전�반드시 3.0 단계와�같이�제품�활성화를�진행해�주셔야�합니다.
크랭크의�설치�그리고�적절한�조절�방법은�각�크랭크의�제조사�권장�내용에�따라�진행해�주시면�됩니다.
설치에�어려움이�있으시다면�가까운�자전거�매장이나�해당�제품의�관련�업체에�문의�후�내용�확인을
부탁�드립니다.
연락처 :
만약�파워�미터에�관한�내용이�궁금하시다면�아래�연락처를�통해�문의�부탁�드립니다.
추후 AS 접수나�기타�제품�개별�이동�시�필요할�수�있기에�포장�박스와�구성품은�보관을�부탁�드립니다.
파워미터가�설치된
왼쪽�크랭크�암
홈�디스크
파워미터가�설치된
왼쪽�크랭크�암
seo@cometbicycle.com
031-795-8357
www.cometbicycle.com
14

제품�구성:
파워미터가�설치된�왼쪽�크랭크�암
주의:
액세서리
파워미터가�설치된�오른쪽�크랭크�암
빠른�설치�안내서
만약�파워미터가�활성화�되지�않았다면�제품의�사용�데이터들이�전송되지�않습니다.
귀하�설비�활성화:
연결
재취득(40s)
예시
데이터�키보드
설비�활성화 설비�활성화
활성화�완료
존경하신�사용자님:
Magene 테크놀로지를�신임하여�주어서�감사하며,
고객님들에게�양질�서비스�제공을�기대합니다.
이�작업은�가까운�오프라인�체험점과�지역�활동
정보�등을�제공하는�전국�지역행�서비스를
제공하는데�도움을�줄�것입니다.
취소 설정
리턴
제품�사용�전�활성화를�위해�아래의�단계를�진행해�주십시오.
1.제조사별�크랭크�설치�안내에�따라�파워미터가�장착된�크랭크�세트를�자전거에�장착�합니다.
2.7.2의�내용과�같이�오른쪽�크랭크�암�파워미터�모듈에�배터리를�장착�합니다.
3.7.1 내용과�같이�왼쪽�크랭크�암의�배터리를�커버를�분리�한�후�배터리를�장착하고�커버를�잘�체결�합니다.
4.Magene 유틸리티�어플리케이션을�열고,가지고�계신�제품의 ANT+ID와�동일한�제품을�검색�후�연결�합니다.
ID는�왼쪽�크랭크�암에�표기되어�있습니다.
5.연결�메뉴를�클릭�후, 활성화�되지�않은�제품의�경우�활성화�단계로�이동하게�됩니다.
CR2032 배터리

파워�미터�연결
파워�미터�조정
주변�기기들과의�페어링�및�기능
주의 :만약 4번의�과정�중�가지고�있는�파워미터�제품이�검색되지�않는다면,크랭크를�회�전시켜�제품의
전원을�활성화�시킨�후�다시�검색을�해보시길�바랍니다.이때�페달에�발을 올리고�힘을�주어�크랭크를�회전
시켜야�합니다.
만약�활성화�과정이�실패하면, Return 버튼을�누른�후�제품�검색�메뉴에서�해당�제품을�다시�선택�후�한번�더
활성화�과정을�진행해�보시길�바랍니다.
Magene 듀얼�파워미터는�활성화�이후�다른�기기들과�연결이�가능�합니다.
본�제품은 ANT+와�블루투스를�사용하는�기타�장비들과�호환�됩니다.
대부분의�사이클링컴퓨터�제품들은�검색을�통해�파워미터와�연결이�가능�합니다.
일반적으로,대부분의�자전거�컴퓨터들은 ( 속도계,가민�등 ) 셋팅�메뉴에서�설정이�가능합니다.
셋팅‒ 센서 ‒ 새로운�센서 ‒ 파워미터
주의: Magene 듀얼�파워�미터를�검색하려면�페달에�발을�올려�힘을�줘야�합니다. 페달에�전해지는�토크를
감지하면�배터리�절약을�위한�슬립�모드가�해제되고 ANT+와�블루투스 신호를�전송하기�시작�합니다.
만약�주변에�여러�개의�파워�미터가�있는�환경�이라면�반드시 ANT+ ID를�확인하여�제품�을�연결�하여야�합니다.
제로�켈리브레이션은�파워�미터의�기본값을 “0”으로�맞추게�됩니다. 보정을�할�때는�반드�시�왼쪽�크랭크
Magene 듀얼�파워�미터는 ANT+ 혹은�블루투스를�사용할�수�있는�사이클링�컴퓨터�혹은�그�외의�장비들에
아래�내용들을�무선으로�전송합니다.
암이 6시�방향을�향해야�하며, ANT+ 장비�혹은 Magene어플리케이션을�사용하십시오.
16

페달링�파워
만약�파워미터가�어느�장치와도�연결되지�않는다면,배터리가�수명을�다�하였을�수�있습니다.
배터리�교체�후�연결해�보십시오.
7.1.1 시계�반대�방향으로�커버를�회전�시켜�자물쇠가�열려�있는�모양에�맞추고�배터리�커버를�엽니다.
7.1.2 방전된 CR2032 배터리를�제거�후�새�배터리를�장착�합니다.배터리�장착�시 + 표기가�되어�있는�면이
배터리�커버�쪽을�향하게�장착해�주시면�됩니다.이후�커버를�누르면서�자물쇠가�걸려�있는�이미지까지
시계�방향으로�회전시켜�장착�합니다.
7.1 왼쪽�크랭크�암�배터리�교체
회전속도 배터리�잔량

1.6mm 육각�렌치를�이용하여�배터리�커버의�나사를�분리�합니다.기존에�사용하던 CR 2032배터리를�제거
후�새�배터리를�장착�합니다.이후�고정�나사를�이용하여�커버를�잘�고정�합니다.
1.왼쪽�크랭크�암�배터리�커버를�닫기�전, 정해진�곳에�올바르게�위치해�있는지�확인하십시�오.
올바르지�않은�위치에서�장착을�시도할�경우�제품이�손상될�수�있습니다.
2.오른쪽�크랭크�암의�체인링을�분리할�경우�파워�미터의�배터리�커버를�먼저�분리�하여야�합니다.
3.오른쪽�크랭크�암의�배터리�커버를�장착할�경우�과도한�힘으로�눌러�체결하지�않도록�하며,나사산과
나사의�정렬이�올바른�상태에서�체결�되여야�합니다.만약�올바르지�않은�위치에서�각�부품이�체결�될
경우�제품이�손상될�수�있습니다.
4.사용이�완료된�배터리는�지정된�배터리�폐기�장소에만�폐기�하여야�합니다.
5.배터리�분해�혹은�개조는�불가�합니다.
7.2 오른쪽�크랭크�암�배터리�교체
주의:

제품�사양
왼쪽�크랭크�공률모듈
공률�정확도
제품중량
전기공급모식
지속이용시간
무선연결구
방수등급 IPX7흩뿌림�방지
필요�없음
공률범위
발딛기빈도�범위
카덴스�외부설치
자석센서
사용환경
제로�점검�필요
오른쪽�크랭크�공률모듈
Magene 듀얼�파워�미터�사용자들이�자주�문의�했던�내용들이�아래와�같이�있었습니다.
사용�중�궁금하신�내용이�있을�경우�확인을�부탁�드립니다.
1.5%
12g 13g
CR2032단추�전지
350H
0-3000W
20~240RPM
필요
ANT+
블�루�투�스 BLE4.2
-10~50
This manual suits for next models
1
Table of contents
Other Magene Bicycle Accessories manuals
Popular Bicycle Accessories manuals by other brands

Hardline
Hardline NSP-HL-18-20 installation instructions

FastTt
FastTt Carbon Aero Bar installation guide

Qstarz
Qstarz SR-Q2100 Quick installation guide

Lekker
Lekker Adjustable handlebar stem installation manual

Rose electronics
Rose electronics ALL2GETHER HIGH PERFORMANCE XXL owner's manual

Bosch
Bosch Performance Line user manual