manuals.online logo
Brands
  1. Home
  2. •
  3. Brands
  4. •
  5. Magnetic Racing
  6. •
  7. Toy
  8. •
  9. Magnetic Racing 013 Administrator Guide

Magnetic Racing 013 Administrator Guide

How to assemble the Race Headquarters
We will begin by building the inner walls and then add then work our
way upwards. We leave the stairs and hand rails until last as these
are the most delicate parts. We recommend super glue as this is
quick and makes a strong model.
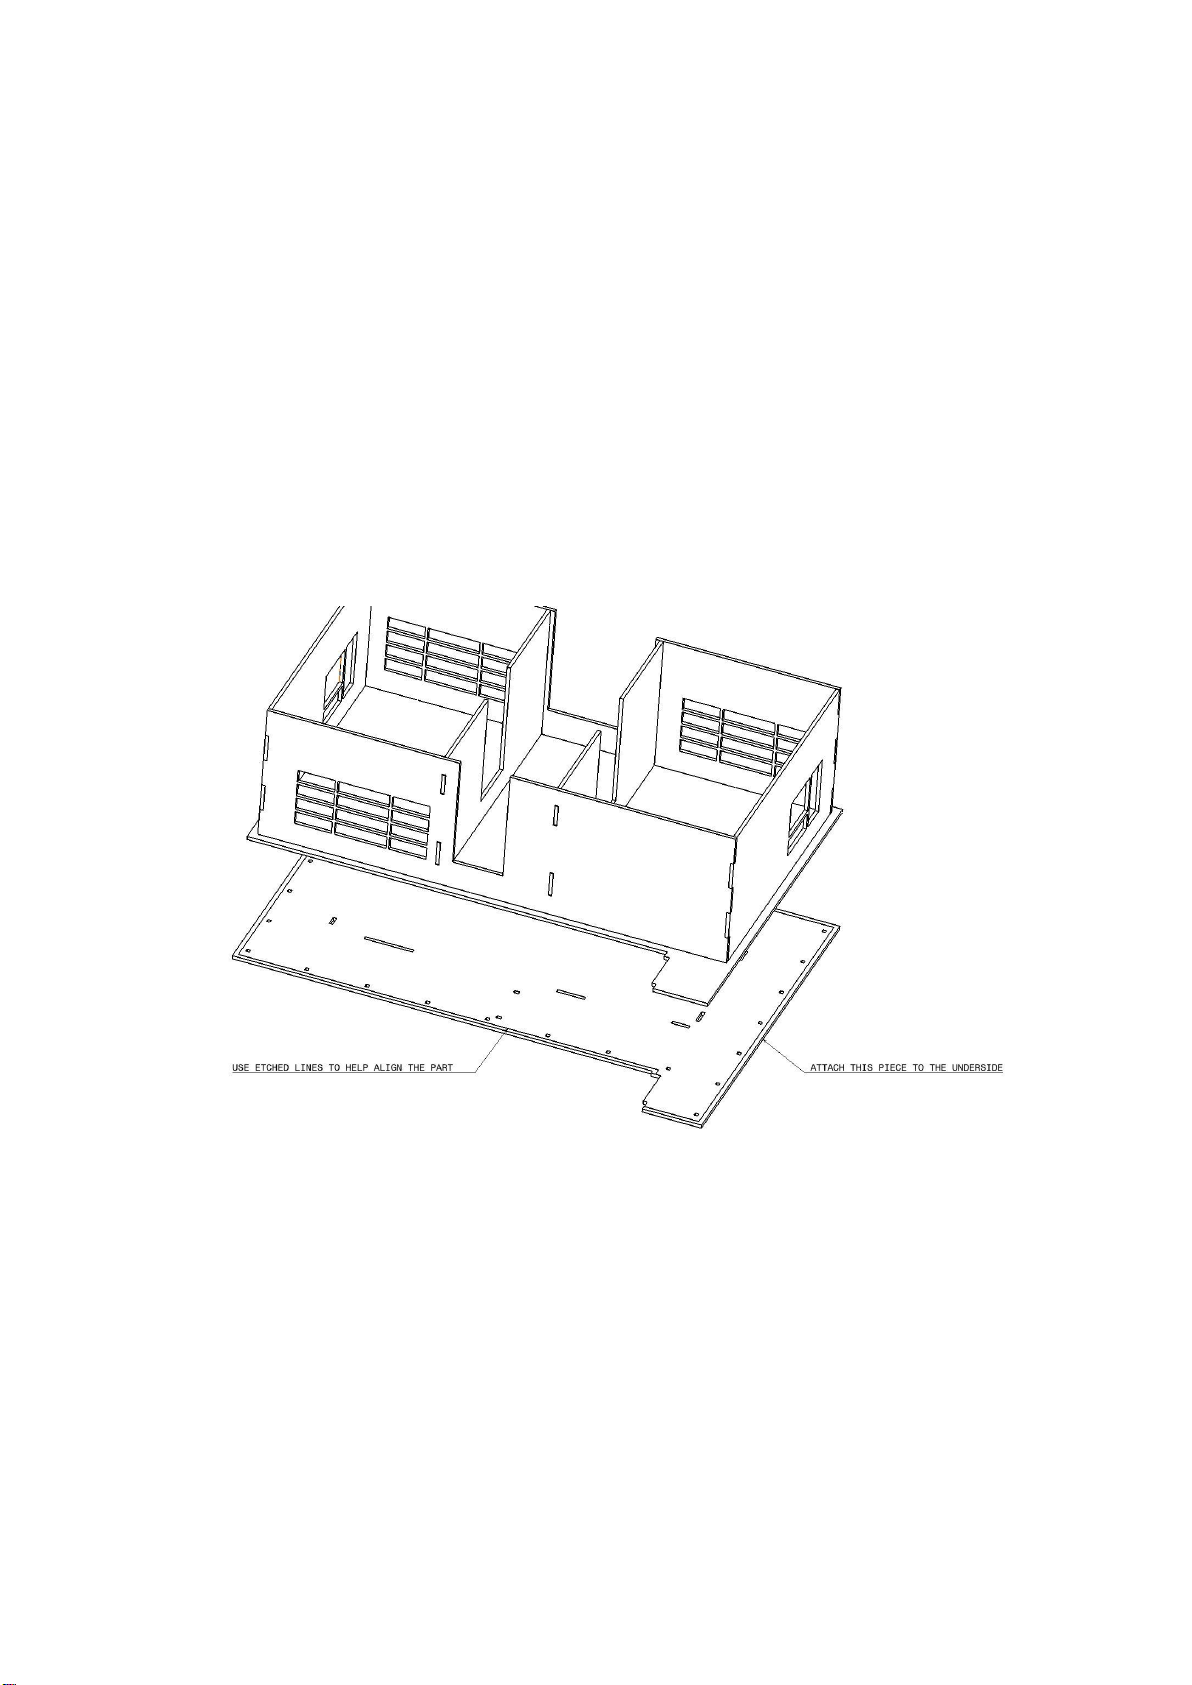
To begin locate the lower floor. This has "MAGNETIC RACING"
etched on it. Place this on the workbench with the text facing
upwards. Now locate the two inner walls. These are identical to each
other. Apply some small drops of super glue on the lower edge and
push them into the slots. Use another square part of the kit to get
them perfectly vertical. Hold each in place until the glue holds them.
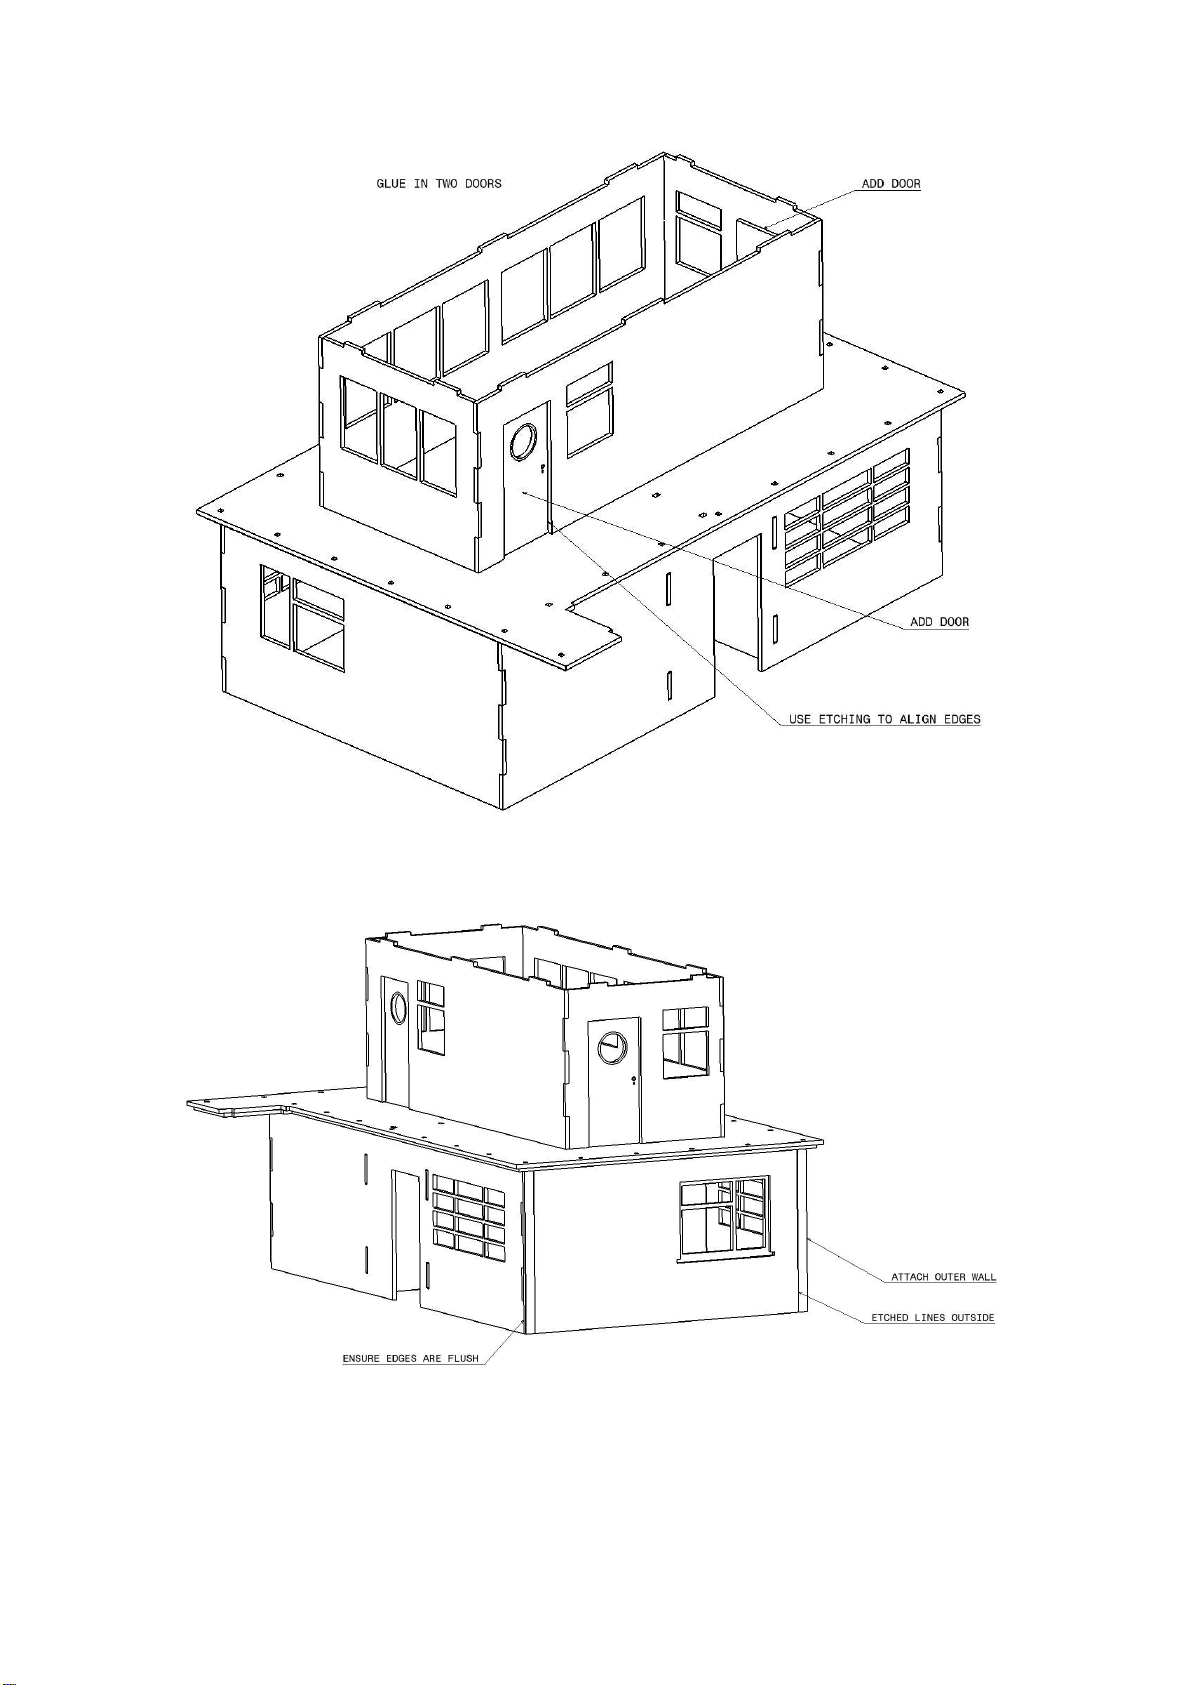
Next we add on the front inner wall. This can be recognized as it has
a large double width door and two windows with small windows. It is
important especially with large pieces in the to do a trial fit without
glue. The parts are generally very accurate, but depending on how
they are assembled may need a little gentle sanding to make them
easy to assemble. Once you are happy, apply small drops of super
glue on the mating faces and press the part home. Make sure it is
fully pressed down into the lower piece and against the wall edges.
Next we add on the rear inner wall. This has a single window and a
single width door. Note the window is on the left in the image below.
We have offset the slots, so it should be impossible to assemble this
incorrectly. Once again do a dry assembly first, remove the wall,
apply glue and reassemble. As before press the part down and up
against the centre walls until it dries.
Add on the two end walls. Make sure the windows are positioned as
shown. They should only fit one way. Apply glue and press the
corners together until the glue dries.
We now glue on the next floor to the underside. Before gluing, double
check that all the holes are free of laser cut debris. Pay particular
attention to the small square holes around the edge. If you don't do
this they may be difficult to remove once you have glued on the part.
There are etched lines on this part which align perfectly to the edges
of the other floor. When applying glue do this around the edges
inside the etched lines and also in the centre. do not go near the slots
as we do not want glue to seep into them. Press the model together
on a flat surface. If you want to work a little slower you can switch to
wood glue here and press the model together with a weight on the
top of the until the glue goes off. This can give you extra time to slide
the faces around a little to get them aligned more accurately.Pay
particular attention to the stair landing which sticks off the rear edge.
The better you get this, the easier the stairs will be to attach later.
Turn the model over and orientate it a shown in the image below.
Glue on the front wall. Once again use another square edged part of
the kit to ensure it is glued upright.
Next glue on an end wall. Note the position of the door. Apply glue
and push the part down into the floor. Hold the corner together as the
glue dries
Add the second end wall in a similar manner. *IMPORTANT* This
part has a narrower width lug at one end. Make sure that this is
placed to the left end as shown in the image below.
Follow this with the rear wall as shown.
Now glue in in two doors. All the single doors in the kit are the same
so choose any two. There is etching on the doors to help as a guide
to get them correctly placed in the door aperture. Apply glue
sparingly as you do not want it to squeeze out so it shows on the
door face. Double check that the porthole window is at the top of the
door!
We now begin to add the outer walls. Start with the ends. Apply glue
and press it home. Note that the etched lines are on the outside of
the model and the edges are flush with the inner walls at each end.
In a similar manner add on the other end wall. Once again check the
ends are flush and the etched detail is on the outside.
Now add the back outer wall. This forms a neat corner with the end
walls.
Now on goes the front outer wall. Pay attention here to get the double
door gaps nicely even. the kit is very accurate so this should be
straightforward. The end also align to form a neat corner. If you have
the model a little poorly built, give priority to the centre door gaps as
the ends will be covered later with corner edging.
We next turn our attention to the upper floor. Begin with the end
walls. These have no etched detail on them. Align the corners and
check the door gaps are neatly aligned.
Add the other end wall in a similar manner.
Now on goes the front wall.
Follow this with the rear wall.
Turn the model around and make sure it is on a flat surface. Add the
front plinth. This is the one without holes. Check it fits easily before
applying glue and then press home. Make sure it lies flat on the build
surface so is square to the wall. We add the plinth before adding the
doors as this gives us a nice location for the bottom edge of the door.
It is a good idea here to place a sheet of paper on the build surface
as it is possible to glue the whole model down by accident. With
paper it is much easier to remove it without damaging your bench.
allow this to dry thoroughly before proceeding.
Add on the double door with the etched detail outermost. We insert
the door from below the model and locate it using the etched lines.
By attaching the plinth first we are able to push the door down and
against it to position it correctly. Apply glue sparingly as we do not
want it to seep onto the front of the doors. make sure you add glue
on the lower edge of the door as this reinforces the plinth.
Now add on the two door pillars. There are some similar looking parts
in the kit, but the parts you want are 7mm wide x 64.5mm tall. Glue
these either side of the door. There are no etched marks to help you,
but align the inner edges with the door aperture.Apply a little glue on
the lower edge and ensure it pushes down on the plinth. By doing
this you reinforce the plinth so it is less likely to snap off in use.
Next add on the top door canopy. Once more apply glue on the top of
the door pillars and along the rear edge. Ensure it is positioned
horizontally as it dries.
Turn the model around and add on the rear plinth. Note the position
of the holes. We have sized the lugs so it should only fit on one way.
Once again place some thin paper under the model when you glue it
on. This way you can rip off the paper easily and scrape off any
residue after drying instead of gluing it to your bench! It is important
here to get everything square so take your time here. By doing this it
makes it much easier to assemble the rear stairs at a later stage.
Make sure this is thoroughly dry before proceeding as it is easy to
twist the part off the model by accident.
Attach a single door using the plinth and the etched lines to the inside
of the wall. A little glue on the lower edge of the door further
reinforces the plinth.
We now glue on the second floor roof. Note this is the last time we
have access to the inside of the second floor, so if you are detailing
the inside or adding window glass (not supplied) do it now. It is in
theory possible to have this roof removable, but this makes the model
rather fragile. This can be done by not applying glue here and also
not gluing the stair sides to the lower roof (see later). Note this part
has no etched detail and the stair landing is to the rear of the model
as shown below. Once more it should be impossible to fit this the
wrong way around. As this is a large part do a trial fit first without glue
to see if it pushes home easily.
Next comes the upper roof. Check the part for debris, particularly in
the small square holes. Push out any scrap wood with a craft knife.As
the part has etched lines on the underside, assembly is best
accomplished by inverting the model. Place the separate part on the
bench and lower the main model onto it. Try this dry first so you know
how it fits and then apply glue inside the etched lines around the
edge and in the centre. Avoid applying glue near any of the slots. Pay
particular attention to the landing which protrudes from the rear of the
building. Get this aligned perfectly as this helps later when we
assemble the stairs.
Turn the model the correct way up and add on the upper inner wall.
This is the one with the door and it has lugs on the lower edge. Glue
it in place and ensure it is upright. use another square part in the kit
as a right angle. Let this fully dry before continuing.
We now add on the front and rear inner wall. Both parts are identical.

Popular Toy manuals by other brands

Hasbro Power Rangers Beast Morphers quick start guide

Hasbro

Hasbro Power Rangers Beast Morphers quick start guide

STAX 30817 Building Instruction

STAX

STAX 30817 Building Instruction

MadLab MR. WHISKERS manual

MadLab

MadLab MR. WHISKERS manual

THE WORLD MODELS Rambler EP instruction manual

THE WORLD MODELS

THE WORLD MODELS Rambler EP instruction manual

BLOTZ B10-MW-113 manual

BLOTZ

BLOTZ B10-MW-113 manual

ROBBE Air Beaver Instruction and user's manual

ROBBE

ROBBE Air Beaver Instruction and user's manual

marklin 36241 instruction manual

marklin

marklin 36241 instruction manual

bruder 03180 quick start guide

bruder

bruder 03180 quick start guide

Carson Specter Two Brushless instruction manual

Carson

Carson Specter Two Brushless instruction manual

Mega Construx POKEMON FVK78 manual

Mega Construx

Mega Construx POKEMON FVK78 manual

Smoby 7600360730 manual

Smoby

Smoby 7600360730 manual

Hasbro Blastin' Action Battle Station 3860 instruction manual

Hasbro

Hasbro Blastin' Action Battle Station 3860 instruction manual

Rich Trend Enterprise HIDE AND SEEK TOY operating instructions

Rich Trend Enterprise

Rich Trend Enterprise HIDE AND SEEK TOY operating instructions

Faller 180630 manual

Faller

Faller 180630 manual

FMS Ranger FMS111P instruction manual

FMS

FMS Ranger FMS111P instruction manual

AeroWorks 100cc Edge 540 ARF-QB Assembly manual

AeroWorks

AeroWorks 100cc Edge 540 ARF-QB Assembly manual

REVELL Sea Venom Faw.22 manual

REVELL

REVELL Sea Venom Faw.22 manual

Seagull Models SPARROW HAWK 62 CC Assembly manual

Seagull Models

Seagull Models SPARROW HAWK 62 CC Assembly manual

manuals.online logo
manuals.online logoBrands
  • About & Mission
  • Contact us
  • Privacy Policy
  • Terms and Conditions

Copyright 2025 Manuals.Online. All Rights Reserved.