MAGNIMA AirPoint Ring User manual

USER MANUAL
FCC ID: 2AXZF-APR1050
WWW.MAGNIMA.COM
© Copyright Magnima
AirPoint® Ring

CONTENTS
2
4
5
6
8
9
10
11
12
12
13
13
14
15
15
16
Introduction
Controls
PairingtheAirPoint®Ring
WearingtheAirPoint®Ring
UsingAirPoint®Ringonasurface
UsingAirPoint®Ringasanairmouse
Air Slide
Optimize AirPoint® Ring Using AirPoint App
Lefthandmode
Presentationmode
AirMouse sensitivity adjustment
Updating AirPoint® Ring firmware
Kill Mode
Troubleshooting
Cleaning
Charging
Specifications
Warranty
EN
1
17
USER MANUAL
18

INTRODUCTION
AirPoint®Ringisafingerwearablecomputermousethatcanbeusedtowirelesslycontrolacomputeror
mobiledevice.TheAirPoint®Ringsupportsboth2Dand3Dmotion,anditcanbeusedasanairmouseor
surfacemouse.TheincludedAirPoint®chargercanbeusedtochargeandstoretheAirPoint®Ringwhenitis
notbeingused.
Package contents
Supported devices
TheAirPoint®Ringcanbeusedwiththefollowingoperatingsystems:
macOS® 10.10 or later
Windows® 8 or later
2
• AirPoint® Ring
• AirPoint® charger
• Charging cable (USB-C)
• Finger size adapters: small, medium, and large
• Quick start guide
• AirPoint® Manual

TheAirPoint®Ringcanalsobeusedwiththefollowingmobileoperatingsystemswithlimitedfunctionality
(nosoftware):
Android™ 5.0 or later
Chrome OS™ all
Safety considerations
Thisproductcontainssmallpartsthatcouldbeachokinghazard.Keepitandallpartsoutofthereachof
children.
Donotattemptrepairsonthisproductyourself.
Prolongedcomputeruseisassociatedwithseveralmedicalconditions,including,butnotlimitedto,muscle
sorenessandfatigue,repetitivestressinjury,visionproblems,headacheandobesity.Keepingyourhead
straightwithacomputerscreenateyelevel,takingregularbreaks,andlimitingcomputeruseandexercise
willhelpreducemanyoftheseproblems.Seekprofessionalmedicalhelpifanyoftheseconditionsoccur.
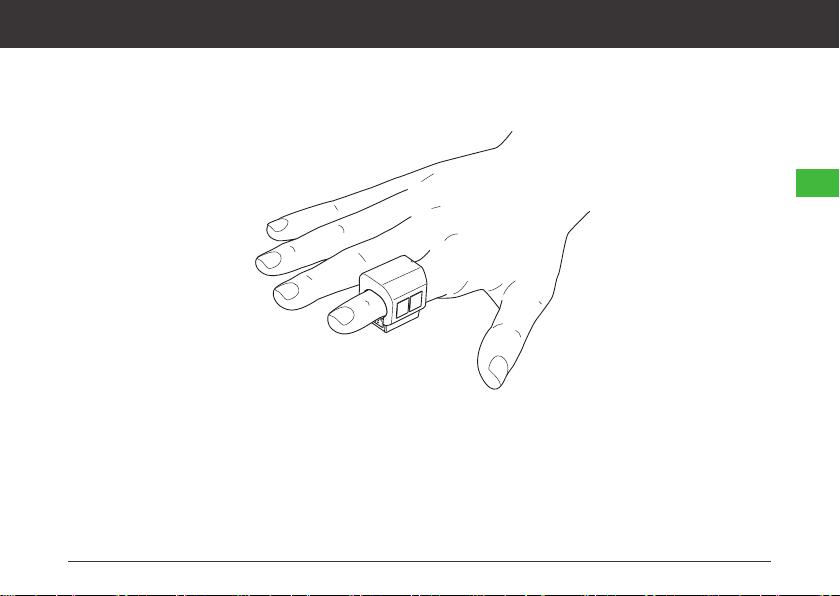
Do not disassemble or remodel the product.
EN
3
USER MANUAL

CONTROLS
Controls
Finger button
On / Off switch
Touchpad
Touchpad
Magnetic connector
LED indicator
4

PAIRING THE AIRPOINT RING
1SlidetheAirPoint®RingpowerswitchtoOn.
ThegreenLEDwillglow.
2OpenthelistofavailableBluetoothdevicesonyourdevice.
3FindAirPointinthelistandconnect.
ThegreenLEDwillstopglowingwhentheAirPoint®Ringpairswithyourdevice.
ThegreenLEDwillglowwhentheAirPoint®Ringisdisconnectedfromadevice.
EN
5
USER MANUAL

WEARING THE AIRPOINT RING
Thethreesizingadapterscanbeusedtoadjustthesizetofityourfinger.Tousetheadapter,slideitinto
theinsideoftheRingandmakesureit’slockedproperly.
6

WeartheAirPoint®Ringonyourindexfinger.
USER MANUAL
EN
7
USER MANUAL

USING AIRPOINT RING ON A SURFACE
Move the cursor Slide your index nger across the surface.
Le Click Tap the lower touchpad with your thumb or press the nger buon.
Right click Tap the upper touchpad with your thumb.
Drag Press and hold the lower touchpad with your thumb or press and hold the
nger buon over the item you want to drag and move the AirPoint® Ring.
Scroll Press and hold the lower touchpad with your thumb or press and hold the
nger buon over the scroll bar and move the AirPoint® Ring up or down.
8

USING AIRPOINT RING AS AN AIR MOUSE
Acvate or deacvate
air mouse mode Tap the upper or lower touchpad with your middle nger.
Le click Tap the lower touchpad with your thumb or press the nger buon.
Right click Tap the upper touchpad with your thumb.
TheAirPoint®Ringwillautomaticallyentersleepmodeafter60secondsofinactivity.MovetheAirPoint®Ring
towakeit.
ThespeedofthecursormovementcanbeadjustedfromthesystemsettingsofthePC:
macOS® System Preferences > Mouse > set the tracking speed by sliding
Windows® Sengs > Devices > Mouse sengs > Addional mouse opons > Pointer
opons > set the pointer speed by sliding
USER MANUAL
EN
9
USER MANUAL

AIR SLIDE
In presentations, to navigate to next slide, deactivate air mouse mode and tilt the thumb in clockwise direction
as shown in figure. Likewise, to move to previous slide, tilt the thumb in counter-clockwise direction as shown
in figure.
In macOS, the direction of slide change will be opposite by default.
To change the slide direction: System Preferences->Mouse->Uncheck the Scroll Direction
10

11
macOS® 10.10 or later
Windows® 10 or later
The AirPoint® application can be used with the following operating systems:
USER MANUAL
OPTIMIZE AIRPOINT RING USING AIRPOINT APPLICATION
The Windows and macOS AirPoint® application can be downloaded from www.magnima.com/product/airpoint-ring
Install the application to explore more of AirPoint® Ring.
The additional features of AirPoint® Ring namely 'Left hand mode', 'Presentation mode' and 'Air mouse sensitivity
adjustment' can be activated through 'AirPoint®' desktop application. There will also be indication on the app for a
firmware or software update.

EN
12
LEFT HAND MODE
To activate/deactivate Left Hand mode, single click on the left hand mode icon on the app as shown
in the image below.
NOTE: When AirPoint® Ring is in left hand mode, it is designed to be worn on the left hand index finger
PRESENTATION MODE
To activate/deactivate Presentation mode, single click on the presentation mode icon as shown in the image
below.
Go to next slide dĂƉƚŚĞlowerƚŽƵĐŚƉĂĚǁŝƚŚLJŽƵƌƚŚƵŵďŽƌƉƌĞƐƐƚŚĞĮŶŐĞƌďƵƩŽŶ
Go to previous slide Tap the upper touchpad with your thumb.

USER MANUAL
13
AIR MOUSE SENSITIVITY ADJUSTMENT
To adjust the Air Mouse sensitivity, use the slider in the app as shown in the image below and set the
range by sliding.
UPDATING THE AIRPOINT RING FIRMWARE
TheAirPoint®Ring firmwarecanbeupdatedusingtheAirPoint®application.WhentheAirPoint®Ring
firmwareisbeingupdated,theLEDwill firstglowyellowandgreentogetherandthenyellowandred
together.TheLEDwillglowgreenwhenthe firmwareupdateiscompleteandtheAirPoint®Ringisreadyto
use.

KILL MODE
Kill mode is a quick way to prevent unwanted movement by disabling the AirPoint® Ring.
To activate or deactivate kill mode, simultaneously press for three seconds the finger button and the upper
touchpad of the air mouse mode activation pads.
The LED will blink twice indicating kill mode activation/deactivation.
14

TROUBLESHOOTING
Pleasevisitmagnima.comfordetailedtroubleshootingsteps.
Youcancontactcustomersupportat1-800-694-4815orc[email protected]om.
EN
15
CLEANING
UseadryclothorapplyasmallamountofcleanertotheclothtocleantheAirPoint®Ring.TheAirPoint®Ring
isnotwaterproof,anditshouldnotbecleanedwithwaterorsprayeddirectlywithcleaner.
No cursor movement with the device after prolonged usage in Mac system
1. Make sure the AirPoint® Ring is turned ON
2. Verify that AirPoint® Ring is in a ‘connected’ state in the Bluetooth list of the host device
3. If the device is in ‘connected’ state and no pointer movement then remove the device from the
Bluetooth device list and connect again.
USER MANUAL

CHARGING
TochargetheAirPoint®Ring,docktheringtotheAirPoint®charger.TheLEDwillchangetoyellowwhenthe
powerislowandredwhenthepowerisextremelylow.
TochargetheAirPoint®charger,connecttheAirPoint®chargertoapowersupplyusingaUSB-Ccable.The
LEDsontheAirPoint®chargerwilllightuponebyonetoindicatethechargingprogress.
EN
16

SPECIFICATIONS
Dimensions AirPoint® Ring: 36mm x 32mm x 39mm
AirPoint® charger: 65mm x 66mm x 68mm
Weight
AirPoint® Ring: < 50 grams
AirPoint® charger: 150 grams
Package: 360 grams
Baery life 8-10 hours aer fully charged
Baery capacity AirPoint® Ring: 65 mAh
AirPoint® charger: 750 mAh
Sensors
● 3D Accelerometer
● Gyroscope
● LED Opcal Sensor
● Tacle Switches
● Capacive Touchpad
Wireless connecon Bluetooth 5.0
Wireless operang range 100 (40m) average
17
USER MANUAL

WARRANTY
1-yearlimitedhardwarewarranty.
FCC compliance statement
Thisdevicecomplieswithpart15oftheFCCRules.Operationissubjecttothefollowingtwoconditions:(1)
Thisdevicemaynotcauseharmfulinterference,and(2)thisdevicemustacceptanyinterferencereceived,
includinginterferencethatmaycauseundesiredoperation.
Thisequipmenthasbeentestedandmeetsapplicablelimitsforradiofrequency(RF)exposure.This
transmittermustnotbeco-locatedoroperatinginconjunctionwithanyotherantennaortransmitter.
CAUTION:Thegranteeisnotresponsibleforanychangesormodificationsnotexpresslyapprovedby
thepartyresponsibleforcompliance.Suchmodificationscouldvoidtheuser’sauthoritytooperatethe
equipment.
NOTE:ThisequipmenthasbeentestedandfoundtocomplywiththelimitsforaClassBdigitaldevice,
pursuanttopart15oftheFCCRules.Theselimitsaredesignedtoprovidereasonableprotectionagainst
harmfulinterferenceinaresidentialinstallation.Thisequipmentgenerates,uses,andcanradiateradio
frequencyenergy,andifnotinstalledandusedinaccordancewiththeinstructions,maycauseharmful
interferencetoradiocommunications.However,thereisnoguaranteethatinterferencewillnotoccurina
particularinstallation.Ifthisequipmentdoescauseharmfulinterferencetoradioortelevisionreception,
EN
18

whichcanbedeterminedbyturningtheequipmentoffandon,theuserisencouragedtotrytocorrectthe
interferencebyoneormoreofthefollowingmeasures:
•Reorientorrelocatethereceivingantenna.
•Increasetheseparationbetweentheequipmentandreceiver.
•Connecttheequipmentintoanoutletonacircuitdifferentfromthattowhichthereceiveris
connected.
•Consultthedealeroranexperiencedradio/TVtechnicianforhelp.
Patent information
PatentNo.US9798387B2
DateofPatent:Oct.24,2017
Disclaimer
Everyefforthasbeenmadesothattheinstructionsandinformationinthisguideareaccurateandcomplete.
Liabilitycannotbegivenforanyomissionsorerrors.
Do Not Disassemble Or Remodel The Product.
Magnimareservestherighttomakeanychangeswithoutnoticetothisoranyotherproductofthecompany.
19
USER MANUAL
PatentNo.US10782781B2
DateofPatent:Sep.22,2020
Table of contents
Popular Educational Equipment manuals by other brands

Kyoto Kagaku
Kyoto Kagaku Strap-on Venipuncture Trainer 2 instruction manual

Global Specialties
Global Specialties PB-505A user manual

JP
JP LEAP T304 user guide

Prestan
Prestan AED UltraTrainer instructions

Pretorian
Pretorian OPTIMAX TRACKBALL instructions

Next Level Racing
Next Level Racing FLIGHT SIMULATOR BOEING MILITARY EDITION instruction manual