manuals.online logo
Brands
  1. Home
  2. •
  3. Brands
  4. •
  5. Mail Boss
  6. •
  7. Outdoor Furnishing
  8. •
  9. Mail Boss Mail Manager User manual

Mail Boss Mail Manager User manual

Congratulations on the purchase of your Mail Boss®Mail Manager®locking security mailbox.
The Mail Boss Mail Manager is designed with your security and convenience in mind. This mailbox is
constructed of tough, vandal resistant, heavy gauge galvanized steel and comes with patented security
features to keep your mail safe. The Mail Manager mailbox is designed with a large internal volume so that
more than several days of mail can be securely stored inside. This product can be installed on a matching in
ground steel post or simply attached to most pre-existing mailbox stands. If this mailbox was purchased
without a post and you desire to install this mailbox on a matching steel post, you may purchase one as well
as other accessories at www.mailboss.com.
On this insert you will find a list of hardware parts included as well as detailed instructions. Installation
is quite simple and requires only a 13mm socket & ratchet, 13mm wrench or crescent wrench (note: If
mounting onto an existing wood stand you will need a portable drill to drill four pilot holes). Installation will be
most easily accomplished if you take the time to carefully sort the hardware and familiarize yourself with the
function of each piece.
If you require assistance with assembly, part replacement, or any other matter, contact the toll-free
Epoch Design Service Center from anywhere in the Continental United States, Monday through Friday,
9AM - 5PM Pacific Standard Time at 1-800-589-7990. You may also email your request or comments to
[email protected] and a service representative will respond.
You will also find helpful hints and tips on our website: www.mailboss.com.
MAIL
BOSS
Accessory items and parts available: www.mailboss.com
Parts and Hardware List
23/4" stainless machine bolts
(#2 Phillips Head)
Attach Mail Boss to the Fast-Trak
mounting plate
41 1/2" long lag screws
(13mm head)
Connect mailbox to a wooden
mailbox platform
Mail Manager mailbox
Locking security mailbox
1
Security key
Used to lock and unlock
your Mail Boss
3
1/4" pilot hole drill bit
For drilling pilot hole into
existing wooden mailbox
platform
1
®
Mail Manager
Mail Manager
Floor liner
Used to receive mail
smoothly and protect
mailbox floor
1
Spreader Bars
Allows Mounting Of Two, Three
Or Four Mailboxes On One Post
Available In All Colors
Flag
Lock Dust Cover
Protects lock mechanism
HASP Lock
Standard padlock compatible
In Ground Post
Available In All Colors
Surface Mount
Post & Base Plate
Available In All Colors
Newspaper Holder
Available In All Colors
12 Disc High-Security Lock
Additional Keys and/or Lock
Thank you.
18-June-2018
1/2
Have a question?... Need a part ASAP?...1-800-589-7990
Copyright © 2018 Epoch Design™ All rights reserved
LOCKING SECURITY MAILBOXES
MAIL BOSS®
Fits almost any post or platform!
It is advised to contact the local post office or mail carrier before installing the mailbox to ensure
its correct placement at the street. Generally, mailboxes are installed at a height of 41”- 45” from the
road surface to the point of mail entry for a locking mailbox, and are set back 6“- 8” from the front face
of the curb or road edge to the mailbox door. Please note that it is not the responsibility of mail carriers
to open mailboxes that are locked, accept keys for this purpose or lock mailboxes after delivery.
We have provided 4 Lag screws that can be used to mount this mailbox
onto wood. There are many ways to do this depending on your specific needs.
You may want to look at examples in your neighborhood or on the internet to
give you ideas on what is best for you.
14”
floor liner
We strongly recommend you WRITE DOWN YOUR KEY NUMBER and keep it in a safe place.
Without a key number we will not be able to provide replacement keys, you will have to purchase a new lock and keys set.
For security purposes, we reserve the right to deny key replacement without proof of purchase. Additional keys can be purchased at mailboss.com
CARE AND MAINTENANCE: Your new Mail Boss mailbox is designed to withstand the elements, to help preserve the UV and weather coating
apply a clear or light colored car wax to the exterior of the box 2-3 times per year. If your mailbox finish is damaged exposing the
metal, we recommend prompt application of a matching protective paint such as Rust-Oleum to prevent rusting. To preserve your
lock we recommend the application of “Tri-Flow” lubricant to the interior of the lock twice a year. If you live in an area where dust,
debris or salt spray is prevalent, you may consider purchasing a lock dust cover from mailboss.com for added protection.
! IMPORTANT !
Using a pen/pencil mark the holes you
will be drilling into the wood using the
bottom of the mailbox as your template.
Secure the mailbox to the top of
the post using the machine screws
provided with the post. Secure bolts
with a 13mm socket or wrench.
1
1
Use a 1/4" drill bit to pre-drill the holes
into the wood post or gang plank.
2
Place liner on floor inside of mailbox.
2
Place liner on floor inside of mailbox.
4
Secure the mailbox to the wooden platform using the lag bolts provided.
3
WOOD POST / WOOD GANG PLANK METAL POST
18-June-2018
2/2

Other Mail Boss Outdoor Furnishing manuals

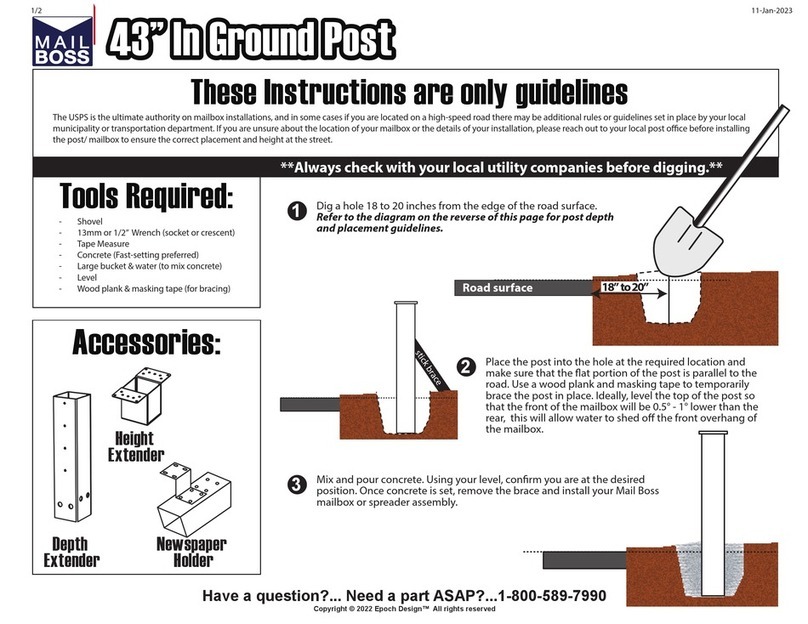
Mail Boss 43" In Ground Post User manual

Mail Boss

Mail Boss 43" In Ground Post User manual

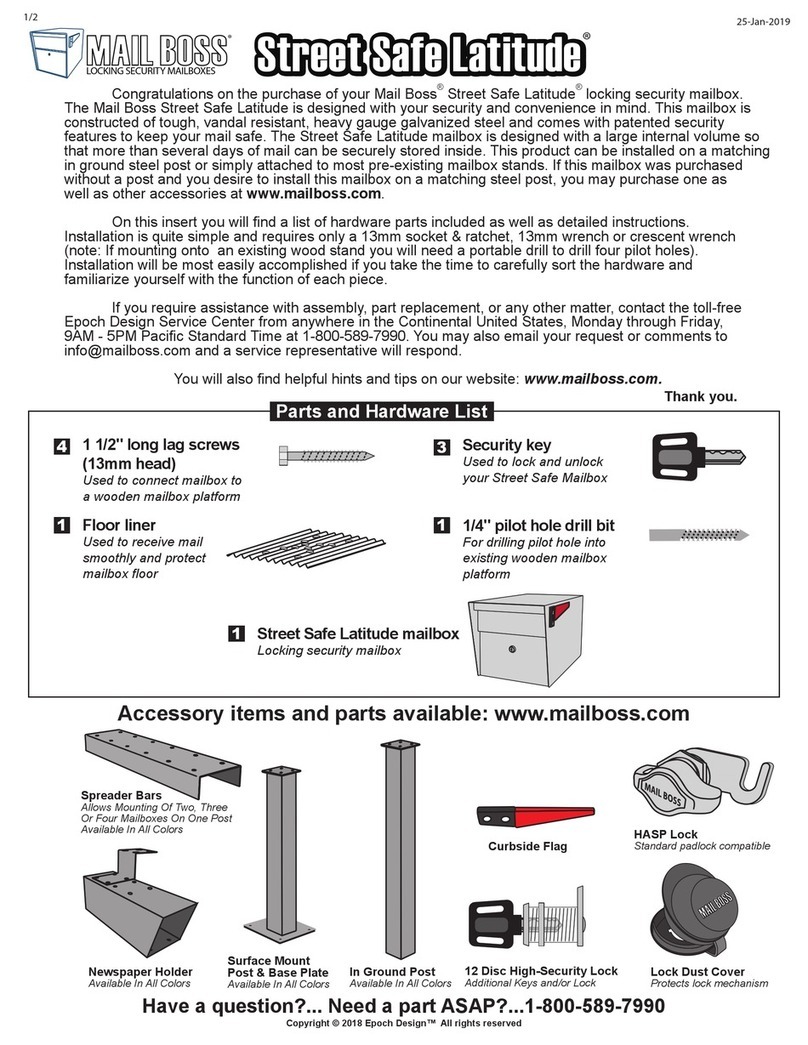
Mail Boss Street Safe Latitude User manual

Mail Boss

Mail Boss Street Safe Latitude User manual

Popular Outdoor Furnishing manuals by other brands

OCC Outdoors Products OCC-942SM-DV10 Mounting instructions

OCC Outdoors Products

OCC Outdoors Products OCC-942SM-DV10 Mounting instructions

Architectural Mailboxes 7540 Assembly instructions

Architectural Mailboxes

Architectural Mailboxes 7540 Assembly instructions

Hanover TRAD5PCSLSW4FP-TAN manual

Hanover

Hanover TRAD5PCSLSW4FP-TAN manual

YOTRIO LORENA Assembly instruction

YOTRIO

YOTRIO LORENA Assembly instruction

Outsunny 84C-247 Assembly & instruction manual

Outsunny

Outsunny 84C-247 Assembly & instruction manual

Hay PALISSADE PARK DINING BENCH instruction manual

Hay

Hay PALISSADE PARK DINING BENCH instruction manual

Broyhill PEMBROKE H21GS193VB Assembly instruction

Broyhill

Broyhill PEMBROKE H21GS193VB Assembly instruction

RioOutdoors 4S-QH installation instructions

RioOutdoors

RioOutdoors 4S-QH installation instructions

Net World Sports Single Boot wiper Assembly instructions

Net World Sports

Net World Sports Single Boot wiper Assembly instructions

HAPPATIO HPO-ZPTY-H owner's manual

HAPPATIO

HAPPATIO HPO-ZPTY-H owner's manual

Oxford Garden CHADWICK CH60 Assembly instructions

Oxford Garden

Oxford Garden CHADWICK CH60 Assembly instructions

YitaHome FTPLCG-0222 Assembly instructions

YitaHome

YitaHome FTPLCG-0222 Assembly instructions

neighbor Teak Low Chair and Ottoman Assembly guide

neighbor

neighbor Teak Low Chair and Ottoman Assembly guide

Costway HW65874 user manual

Costway

Costway HW65874 user manual

stilum unio 57 1029 401 Mounting instructions

stilum

stilum unio 57 1029 401 Mounting instructions

Forever Redwood THE TRADITIONAL WOODEN GARDEN PERGOLA Assembly instructions

Forever Redwood

Forever Redwood THE TRADITIONAL WOODEN GARDEN PERGOLA Assembly instructions

Dragon Wholesaling Family EVO installation instructions

Dragon Wholesaling

Dragon Wholesaling Family EVO installation instructions

X-METAL CARPORT Assembly instructions

X-METAL

X-METAL CARPORT Assembly instructions

manuals.online logo
manuals.online logoBrands
  • About & Mission
  • Contact us
  • Privacy Policy
  • Terms and Conditions

Copyright 2025 Manuals.Online. All Rights Reserved.