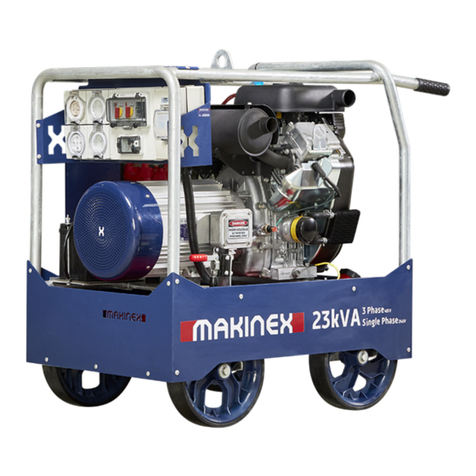
MAKINEX GEN-16P-US-208 User manual

Page 1of 26
OPERATOR’S MANUAL
Makinex 16kW 3-Phase Generator
Model: GEN-16P-US-208/GEN-16P-US-240/GEN-16P-US-480
Rev 1117

Page 2of 26
Table of Contents
DISCLAIMER.....................................................................................................................................................3
ABOUT THIS MANUAL......................................................................................................................................4
KEY TERMS .......................................................................................................................................................... 4
PRODUCT INFORMATION ................................................................................................................................5
PROPOSITION 65 WARNINGS ............................................................................................................................. 5
SAFETY INFORMATION .......................................................................................................................................5
GENERAL SAFETY PRECAUTIONS..................................................................................................................... 5
ELECTRICITY RELATED SAFETY PRECAUTIONS................................................................................................. 7
EARTHING OF GENERATOR.................................................................................................................................8
SAFETY DECAL ................................................................................................................................................... 10
PRODUCT SPECIFICATIONS ............................................................................................................................11
GEN-16P-USA WITH 2X50A, 2X30A, 2X20A OUTLET WITH GFCI PROTECTION................................................. 11
FEATURES.......................................................................................................................................................... 11
OVERALL MACHINE DIMENSIONS..................................................................................................................... 12
ALTERNATOR SPECIFICATIONS .........................................................................................................................12
OPERATION ...................................................................................................................................................14
BEFORE USE ...................................................................................................................................................... 14
ADDING FUEL.................................................................................................................................................... 15
OPERATING GENERATOR ...............................................................................................................................16
CONNECTING ELECTRICAL DEVICES .................................................................................................................. 16
SHUTTING DOWN THE GENERATOR ................................................................................................................. 16
MAINTENANCE ..............................................................................................................................................17
GENERAL RECOMMENDATIONS: ...................................................................................................................... 17
CHECK YOUR GENERATOR ............................................................................................................................ 17
STORAGE .......................................................................................................................................................18
LIMITED WARRANTY......................................................................................................................................19
NORMAL WEAR ................................................................................................................................................19
INSTALLATION, USE, AND MAINTENANCE........................................................................................................20
OTHER EXCLUSIONS.......................................................................................................................................... 20
CONTACT INFORMATION...............................................................................................................................22
APPENDIX A- RISK ASSESSMENT ....................................................................................................................... 23
APPENDIX B- WIRING DIAGRAMS ..................................................................................................................... 24

Page 3of 26
INTRODUCTION
Thank you for purchasing a MAKINEX product.
This manual provides information and procedures to safely operate and maintain
the GEN-16P Generator. For your own safety and protection from injury, carefully
read, understand, and observe the safety instructions described in this manual.
Keep this manual or a copy of it with the machine. If you lose this manual or need
an additional copy, please contact MAKINEX. This machine is designed and built
with user safety in mind; however, it can present hazards if improperly operated
and serviced. Please follow the operating instructions carefully. If there are any
questions regarding operating or servicing of this machine, please contact
MAKINEX.
All rights, especially copying and distribution rights are reserved.
Copyright 2017 by MAKINEX
No part of this publication may be reproduced in any form or by any means,
electronic or mechanical, including photocopying, without express written
permission from MAKINEX
Any type of reproduction or distribution not authorised MAKINEX represents an
infringement of valid copyrights and will be prosecuted. We expressly reserve the
right to make technical modifications, even without due notice, which aim at
improving our machines or their safety standards.
DISCLAIMER
MAKINEX and its affiliates take no responsibility for any damage, injury or
death resulting from the incorrect or unsafe use of this product. Use of this
product should be undertaken by competent persons only. It is the operator’s
responsibility to ensure that the following safety procedures are followed. If you
are unsure, do not operate this product.
Record the model and serial numbers as well as date and place of purchase for
future reference. Have this information available when ordering parts and when
making technical or warranty inquiries

Page 4of 26
ABOUT THIS MANUAL
This manual uses the following symbols to help differentiate between different kinds
of information. The safety symbol is used with a key word to alert you to potential
hazards in operating and owning power equipment. Follow all safety messages to
avoid or reduce the risk of serious injury or death.
KEY TERMS
READ
CAREFULLY
READ CAREFULLY –refers to important
information that should be paid careful attention.
CAUTION
CAUTION - indicates a potential hazardous situation
which, if not avoided, may result in minor or moderate
injury
WARNING
WARNING –indicates a potentially hazardous
situation which, if not avoided, could result in death or
serious injury
DANGER
DANGER –indicates a imminently hazardous
situation which, if not avoided, will result in death or
serious injury
PROHIBITED
PROHIBITED –identifies actions that should never
be carried out by anyone interacting with the machine.
MAKINEX SUPPORT
1-855-Makinex (855-625-4639)
MODEL NO.
GEN-16P-US-208 / GEN-16P-US-240 / GEN-
16P-US-480
SERIAL NO.
DATE OF PURCHASE
PURCHASE LOCATION

Page 5of 26
PRODUCT INFORMATION
PROPOSITION 65 WARNINGS
WARNING
THIS PRODUCT CONTAINS LEAD, A CHEMICAL
KNOWN TO THE STATE OF CALIFORNIA TO
CAUSE BIRTH DEFECTS OR OTHER
REPRODUCTIVE HARM.
WARNING
THIS PRODUCT CONTAINS ONE OR MORE
CHEMICALS KNOWN TO THE STATE OF
CALIFORNIA TO CAUSE CANCER, BIRTH
DEFECTS OR OTHER REPRODUCTIVE HARM.
WARNING
EXHAUST GASES FROM THIS PRODUCT
CONTAIN CHEMICALSKNWON TO THE STATE OF
CALIFONIA TO CAUSE CANCER, BIRTH DEFECTS
OR OTHER REPRODUCTIVE HARM.
WASH HANDS AFTER HANDLING THIS
PRODUCT
SAFETY INFORMATION
WARNING
Read this manual thoroughly before operating your
generator. Failure to follow instructions could result in
serious injury or death
WARNING
MAKINEX GEN-16P-USA Generator designed for
professional operators only, instruct operators in care
and use of the machine before use!
GENERAL SAFETY PRECAUTIONS
•ALWAYS use in a well-ventilated area.
•ALWAYS ensure the applied load does not exceed the generators rating.
Overloading the generator is dangerous and could cause serious damage.
•ALWAYS disconnect the generator when carrying out any maintenance.
•ALWAYS ensure the generator reaches operating speed before connecting
a load.
•ALWAYS start the engine BEFORE connecting any appliances to the output
receptacles.

Page 6of 26
•ALWAYS test the GFCI’s before use.
•ALWAYS check the generator for damage before use.
•ALWAYS keep well clear of all moving parts on the generator at all times.
•NEVER allow children or animals near the generator.
•NEVER connect to a commercial or mains power supply, or any other
electrical source.
•NEVER allow the generator to run out of fuel when a load is connected.
•NEVER alter or tamper with the internal wiring of the generator.
•NEVER climb or stand on the generator as dents may cause overheating of
the acoustic lining.
•NEVER touch any part of the engine, alternator, or exhaust when the
generator is in use as these get hot and could burn.
DANGER
RISK OF EXPLOSION OR FIRE
•Fuel and its vapours are extremely flammable and explosive
•Fire or explosion can cause severe burns or death
•ALWAYS switch the engine OFF when refuelling.
•ALWAYS refuel away from any source of heat.
•ALWAYS refuel in a well-ventilated area.
•NEVER overfill fill the tank, fill to the level specified.
•NEVER smoke whilst refuelling and avoid smoking or using a naked flame
near the generator.
•NEVER start the engine if there is a fuel spill. Any spillage must be wiped
clean and the generator allowed to dry before attempting to start the engine.
DANGER
RISK TO BREATHING
•Running engine gives off Carbon Monoxide, an odourless,
colourless, poisonous gas.
•Breathing Carbon Monoxide can cause nausea, fainting or
death.
•Some chemicals or detergents may be harmful if inhaled or
ingested, causing severe nausea, fainting, or poisoning.
WARNING: EXHAUST FUMES CAN BE FATAL
•ALWAYS ensure that there is adequate ventilation when using the generator.
•ALWAYS position the generator so that the exhaust is pointing away from
people or animals.

Page 7of 26
•NEVER use the generator indoors or in an enclosed area. (i.e. in warehouse,
tunnel, well or a hold).
ELECTRICITY RELATED SAFETY PRECAUTIONS
WARNING
RISK OF ELECTRICAL SHOCK
•Risk of electrocution.
•ALWAYS test the GFCI’s before use.
•ALWAYS store the generator undercover when not in use and away from
damp or wet conditions.
•NEVER use the generator outdoor when it is raining or snowing or in wet or
damp conditions.
•NEVER use water or any other liquids to clean the unit while it is running.
DANGER
RISK OF HOT SURFACES
•Contact with hot surfaces, such as engine’s
exhaust components, could result in serious burns.
•During operation, touch only the control surfaces of generator. Keep children
away from the generator at all times. They may not be able to recognise the
hazards of this product.
WARNING
POSITIONING THE GENERATOR FOR USE
•ALWAYS leave at least a 3-foot gap between the generator and any
surrounding building or structure.
•ALWAYS ensure the generator is on a solid, flat surface.
•ALWAYS ensure the surrounding area is free from any material that could
burn or be damaged by heat.
•NEVER move or tilt the generator whilst it is switched on.
•NEVER cover or enclose the generator whilst it is in use.
•Be aware of the weight of the generator, do not attempt to lift or move the
generator without the assistance of other persons or suitable lifting
equipment.

Page 8of 26
EARTHING OF GENERATOR
Earthing of generators helps protect the user from electric shock or electrocution
which may be caused due to malfunction or breakdown. This threat to the user is
prevented by creating a path of least resistance for the electrical current to travel to
the ground which inherently absorbs the over-current or short circuit.
WARNING
FAILURE TO PROPERLY CONNECT THE EQUIPMENT TO THE
EARTHING CONDUCTOR WILL RESULT IN A RISK OF
ELECTROCUTION. CONSULT WITH A QUALIFIED ELECTRICIAN
INCASE OF DOUBT WITH THE EARTHING OF THE UNIT.
To connect the generator to an appropriate
earth source, a hex nut and an earth terminal
should be used. A #8 earth wire must be used
to establish the earth path for the electrical
current. Connect the terminal of one end of
the earth wire to the frame in-between a
spring washer and two hex nuts then tighten
the nuts securely. The other end of the wire should be bolted securely onto an
appropriate ground source.
Portable generators are inherently more dangerous than fixed generators as they are
not permanently earthed. Therefore, appropriate measures must be taken to properly
set up the earthing of the generators. The National Electric Code (NEC) contains
several methods that can be used to establish a suitable earthing source for the
portable generator unit. Some examples of these methods are summarised in the
following points.
•A suitable earthing source can be a metal underground water pipe in direct
contact with the earth at a minimum depth of 10 feet.
•If a pipe is unavailable, an 8-foot length pipe or rod can also be used as a
suitable earthing source.
•Pipes used as an earthing source must be 3/4 inch trade size or larger with a
non-corrosive outer surface.
•Steel or iron rods must be at least 5/8 diameter, and at least 1/2 inch diameter
for non-ferrous rods. Ensure that the non-ferrous material used is earthing
suitable.
•Rod or pipe should be driven 8 feet deep into the ground. If a rock bottom is
met within 4 feet, the rod or pipe can be buried in a trench.

Page 9of 26
•All electrical tools and appliances powered by the generator, must be properly
earthed by either a third wire or “double insulated”.
Recommendations:
1. Use electrical devices with 3-prong power cords
2. Use extension cords with a 3-hole receptacle and a 3-prong plug on opposite
ends to maintain earth protection from the generator to the appliance.
We strongly recommend that all applicable federal, state, and local regulations
relating to grounding/earthing specifications be checked and followed.
THIS INSTALLATION MUST BE CARRIED OUT BY A LICENSED ELECTRICIAN
AND ALL LOCAL CODES MUST BE FOLLOWED

Page 10 of 26
SAFETY DECAL
*May vary by model

Page 11 of 26
PRODUCT SPECIFICATIONS
GEN-16P-USA WITH 2X50A, 2X30A, 2X20A OUTLET WITH GFCI PROTECTION
(may vary by model)
GENERATOR:
MAX OUTPUT
16kW
FREQUENCY
60Hz
VOLTAGE
120/208V, OR 120/240V OR 120/480V
CONTINUOUS OUTPUT
14,800W OR 15,200W (480V model)
SOCKETS
2X50A, 1X30A, 2X20A outlets with GFCI protection,
OR 1x30A, 2x20A outlets with GFCI protection (480V)
WEIGHT
155 kg (344 lbs)
NOISE LEVEL (7M)
NO LOAD - 72dB
50% LOAD - 76dB
100% LOAD - 78dB
RATED POWER FACTOR
0.8
ENGINE:
TYPE
TWIN CYLINDER AIR COOLED PETROL
MODEL
HONDA GX690
STARTING SYSTEM
KEY START
DISPLACEMENT
688CC
FUEL ECONOMY
3.5 L(0.92 gallon)/h @ 50% LOAD
FUEL TANK
34 L (9 gallon)
FEATURES
FEATURES
Durable Galvanised frame
Multi cushion isolators for vibration reduction
Compact design for easy storage and transport

Page 12 of 26
OVERALL MACHINE DIMENSIONS
ALTERNATOR SPECIFICATIONS
120/208V

Page 13 of 26
120/240V
240/480V

Page 14 of 26
OPERATION
BEFORE USE
1. Oil Level Check (New machines will be pre-oiled from MAKINEX)
Check the engine oil level with the engine stopped and in a level
position.
1 Start the engine and let it idle for 1 or 2 minutes. Stop the engine
and wait for 2 or 3 minutes.
2. Remove the oil level dipstick and wipe it clean.
3. Fully insert the oil level dipstick, then remove it to check the oil
level.
4. If the oil level is low, remove the oil filler cap, and fill with the
recommended oil to the upper limit mark on the oil level dipstick.
5. Reinstall the oil level dipstick and oil filler cap.

Page 15 of 26
ADDING FUEL
WARNING
FAILURE TO USE FUEL AS RECOMMENDED IN THIS
MANUAL WILL VOID WARRANTY
-DO NOT use unapproved gasoline such as E85 (85% ethanol/15% gasoline).
-DO NOT mix oil with gasoline.
-DO NOT modify engine to run on alternate fuels.
WARNING
Fuel and fuel vapour are extremely flammable and
explosive. Fire or explosion from misuse of fuel can cause
severe burns and even death.
WHEN ADDING FUEL TO GENERATOR, OBSERVE THE FOLLOWING STEPS:
2.0 Always ensure that fuel tanks are filled outdoors.
2.1 Turn generator OFF and let it cool for at least two minutes before removing fuel
cap.
2.2 Loosen fuel cap slowly to release pressure.
2.2 Slowly add unleaded gasoline to fuel tank. DO NOT fill fuel above baffle. This
allows appropriate space for fuel expansion.
2.3 Wait for spilled fuel to evaporate before starting the engine.
2.5 Keep fuel away from sparks, open flames, pilot lights, heat and other ignition
sources.
2.6 DO NOT light a cigarette or smoke near open fuel tank or container.

Page 16 of 26
OPERATING GENERATOR
STARTING THE ENGINE
1. Remove all connections from the AC sockets.
2. If the fuel tank is equipped with a valve, be sure the fuel valve is in the OPEN or
ON position before attempting to start the engine.
3. To start a cold engine, pull the choke knob out to
the CLOSED
position. To restart a warm engine, leave the
choke knob in the OPEN position.
4. Turn the engine switch to the START position, and
hold it there until the engine starts.
5. When the engine starts, release the engine switch,
allowing it to return to the ON position.
6. Once the engine has warmed up, set the choke
lever to the OPEN position.
CONNECTING ELECTRICAL DEVICES
The generator can supply 120V AC through 2 x 20amp sockets or 120V AC through
2 x 30amp sockets and 208V AC through the 50A sockets.
1. Connect the appliance to the generator starting with the device that draws the
most current.
2. Set the circuit breaker to ‘ON’.
SHUTTING DOWN THE GENERATOR
1. Disconnect all appliances connected to the generator.
2. Turn the ignition key to the OFF position.
3. Set the fuel supply valve to OFF if the fuel tank equipped with.
NOTE: To stop the generator in an emergency simply turn the ignition key to the off
position.

Page 17 of 26
MAINTENANCE
GENERAL RECOMMENDATIONS:
Regular maintenance will improve the performance and extend the life of the
GENERATOR.
The generator’s warranty does not cover items that have been subjected to operator
abuse or negligence. To receive full value from the warranty, the operator must
maintain the generator as instructed in this manual and in the engine manual,
including proper storage.
NOTE: An hour meter is installed on the
machine to help with tracking operation
hours.
Refer to Honda GX690 user manual (provided at sale) for engine related
maintenance.
Should you have questions about replacing components on your generator, please
contact dealer for assistance.
CHECK YOUR GENERATOR
It is considered good practise to inspect a generator before and after use, looking at:
•Condition of tyres
•Function of brake
•Condition of electrical components
•Earthing bolts are tight
•All 4 generator mounting bolts are tight
•Fuel lines are not damaged
•Oil and fuel levels
•Battery is well secured and terminals are fastened tightly

Page 18 of 26
STORAGE
Long term storage instructions (fuel in tank)
Gasoline fuel can become stale when stored over 30 days. Stale fuel causes acid
and gum deposits to form in the fuel system or crucial carburettor parts. To keep fuel
fresh, add a fuel stabiliser liquid additive to fuel. The fuel stabiliser is available at
most auto parts stores.
Draining gasoline is unnecessary if the fuel stabiliser is used according to the
instructions that come with it. Run engine for a minimum of two minutes, after
stabiliser is added to fuel, to allow it to circulate throughout the engine. The engine
and fuel can be stored up to 24 months.
WARNING
Fuel and fuel vapour are extremely flammable and
explosive. Fire or explosion from misuse of fuel can
cause severe burns and even death.
To protect against rust formation during storage, oil the cylinder bore:
1. Remove spark plugs and pour approx. 15ml (1/2oz) of clean engine oil into
the cylinder.
2. Install spark plug and briefly turn key starter for 1-2 seconds to distribute oil.
DO NOT start engine at this time.
WARNING
Unintentional sparking can cause fire or electrical shock.
Failure to observe this warning can cause severe
property damage, severe burns and even death.
Disconnect spark plug wire from spark plug and cover tip
of spark plug wire with insulating tape and place wire
where it cannot come in contact with spark plug or
generator frame.
WARNING
Certain storage covers can be flammable or can melt in
high temperatures. DO NOT place storage cover over
generator until it has completely cooled.

Page 19 of 26
LIMITED WARRANTY
In order to take advantage of the MAKINEX limited warranty, you must have
maintenance performed according to the schedule (contained in relevant owner’s
manual supplied with this product), by an authorised MAKINEX dealer or MAKINEX
service technician. You are free to have your MAKINEX product serviced by any
suitably qualified mechanic or electrician (depending on the mechanical or electrical
requirement) and this will not affect your statutory warranties, however, failure by the
owner to have the recommended servicing carried out by an authorised MAKINEX
dealer/service technician means that you cannot take advantage of the MAKINEX
limited warranty.
In order to ensure your safety, we strongly recommend that you only use an
authorised MAKINEX dealer for servicing. Only authorised MAKINEX dealers have
access to all the special tools, technical information, parts and training required to
maintain your MAKINEX product in peak operating condition.
MAKINEX warrants each new Generator to be free from defects in material and
workmanship under normal domestic and industrial use and service for the period
specified below, conditional to the limitations and exclusions printed on this page.
This warranty applies only to new MAKINEX generator distributed by us and by our
authorised MAKINEX dealers.
WARRANTY: (Ex-factory/ Reseller premise)
MAKINEX warrants to the original purchaser:
oFrame and all Electrical components will be free of defects in material
and workmanship for a period of one (1) year from the original date of
purchase.
oHonda GX Engine is subject to (3) years warranty. Please see
www.hondapowerequipment.com for details.
o3 years warranty on RFL alternators
o1 year warranty for electrical components
o6 months warranty for battery
WARRANTY EXCLUSIONS
This warranty does not cover the following repairs and equipment:
NORMAL WEAR
Generator needs periodic parts and service to perform well. This warranty does not
cover repair when normal use has exhausted the life of a part or the equipment as a
whole.

Page 20 of 26
INSTALLATION, USE, AND MAINTENANCE
This warranty will not apply to parts and/or labour if this generator is deemed to have
been misused, neglected, involved in an accident, abused, loaded beyond the
generator’s limits, modified and installed improperly. Normal maintenance such as
spark plugs, air filters, adjustments, fuel system cleaning and obstruction due to
build-up is not covered by this warranty.
OTHER EXCLUSIONS
This warranty excludes:
- Cosmetic defects such as paint, decals, etc.
- Accessory parts such as starting batteries, and storage covers.
- Failures due to acts of God and other force majeure events beyond the
manufacturer’s control.
- Problems cause by parts that are not original MAKINEX parts.
Responsibility of the consumer under this Limited Warranty:
- Strict adherence to the maintenance checks and schedule with proof of
scheduled maintenance service required by an authorised agent or qualified
mechanic.
- Maintenance services are not covered under warranty.
- It is the consumer’s responsibility to deliver the machine in question to our
service premises or to the premises of our appointed agent at the consumer’s
expense for replacement or repair as applicable.
This manual suits for next models
2
Table of contents
Other MAKINEX Inverter manuals
