Makita WUT02U User manual

WUT02
EN Wireless Unit Adaptor INSTRUCTION MANUAL 4
FR Adaptateur Sans Fil MANUEL D’INSTRUCTIONS 10
DE Funk-Netzadapter BETRIEBSANLEITUNG 16
IT Adattatore per unità senza li ISTRUZIONI PER L’USO 22
NL Draadloos-eenheidadapter GEBRUIKSAANWIJZING 29
ES Adaptador de Transmisión
Inalámbrica
MANUAL DE
INSTRUCCIONES 36
PT
Adaptador para Unidade de
Comunicação sem Fio (Wireless)
MANUAL DE INSTRUÇÕES 43
DA Trådløs enhedsadapter BRUGSANVISNING 49
EL Προσαρμογέας ασύρματης
μονάδας ΕΓΧΕΙΡΙΔΙΟ ΟΔΗΓΙΩΝ 55
TR Kablosuz Ünitesi Adaptörü KULLANMA KILAVUZU 62
ZHCN 蓝牙适配器 使用说明书 67

1
2
3
4
9
8
10
7
11
5
6
Fig.1
2
1
3
4
5
3
2
2
Fig.2
2
1
3
Fig.3
Fig.4
2

23
1
Fig.5
1
Fig.6
1
2
Fig.7
2
1
3
Fig.8
123
!
3
2
1
Fig.9
3

4ENGLISH
ENGLISH (Original instructions)
SPECIFICATIONS
Model: WUT02
Dimensions (L x W x H) 154 mm x 71 mm x 57 mm
Net weight 0.41 kg
• Duetoourcontinuingprogramofresearchanddevelopment,thespecicationshereinaresubjecttochange
without notice.
• Specicationsmaydifferfromcountrytocountry.
Symbols
Thefollowingsshowthesymbolsusedfortheequip-
ment.Besurethatyouunderstandtheirmeaningbefore
use.
Take particular care and attention.
Read the instruction manual.
DOUBLE INSULATION
Do not expose to moisture.
OnlyforEUcountries
Donotdisposeofelectricequipment
together with household waste material! In
observanceoftheEuropeanDirective,on
WasteElectricandElectronicEquipment
and its implementation in accordance with
nationallaw,electricequipmentthathave
reachedtheendoftheirlifemustbecol-
lectedseparatelyandreturnedtoanenvi-
ronmentallycompatiblerecyclingfacility.
SAFETY WARNINGS
NOTE: The wireless unit adaptor is hereinafter
referred to as “adaptor” in this instruction manual.
WARNING: Be sure to thoroughly read and
understand this instruction manual as well as the
instruction manuals of the vacuum cleaner, tool,
and wireless unit to be used with this product.
Failuretofollowthewarningsandinstructionsmay
resultinelectricshock,reand/orseriousinjury.
Important safety instructions for the
adaptor and wireless unit
1. Do not disassemble or tamper with the wire-
less unit and the adaptor.
2. Keep the wireless unit and adaptor away from
young children. If the wireless unit is acci-
dentally swallowed, seek medical attention
immediately.
3. Use the wireless unit only with Makita tools.
4. Never handle the adaptor with wet hands.
Doingsomaycauseelectricshock.
5. Do not block the vents on the adaptor.
6. Do not use the adaptor’s cord for carrying and
unplugging.
7. Do not expose the wireless unit and the adap-
tor to rain or wet conditions.Liquidcomeinside
theappliancemaycausemalfunctionand/or
electric shock.
8. Do not use the wireless unit in places where
the temperature exceeds 50°C (122°F).
9. Do not operate the wireless unit in places
where medical instruments, such as heart
pace makers are near by.
10. Do not operate the wireless unit in places
where automated devices are near by. If oper-
ated,automateddevicesmaydevelopmalfunction
or error.
11. Do not operate the wireless unit in places
under high temperature or places where
static electricity or electrical noise could be
generated.
12.
The wireless unit can produce electromagnetic
elds (EMF) but they are not harmful to the user.
13. The wireless unit is an accurate instrument. Be
careful not to drop or strike the wireless unit.
14. Avoid touching the terminal of the wireless
unit with bare hands or metallic materials.
15. Always remove the battery on the product
when installing the wireless unit into it.
16. When opening the lid of the slot, avoid the
place where dust and water may come into the
slot. Always keep the inlet of the slot clean.
17. Always insert the wireless unit in the correct
direction.
18. Do not press the wireless activation button
on the wireless unit too hard and/or press the
button with an object with a sharp edge.
19.
Always close the lid of the slot when operating.
20. Do not remove the wireless unit from the slot
while the power is being supplied. Doing so
maycauseamalfunctionofthewirelessunit.
21. Do not remove the sticker on the wireless unit.
22. Do not put any sticker on the wireless unit.
23. Do not leave the wireless unit in a place where
static electricity or electrical noise could be
generated.

5ENGLISH
24. Do not leave the wireless unit and the adaptor
in a place subject to high heat, such as a car
sitting in the sun.
25. Do not leave the wireless unit and the adaptor
in a dusty or powdery place or in a place corro-
sive gas could be generated.
26. Sudden change of the temperature may bedew
the wireless unit. Do not use the wireless unit
until the dew is completely dried.
27. When cleaning the wireless unit, gently wipe
with a dry soft cloth. Do not use benzine, thin-
ner, conductive grease or the like.
28. When storing the wireless unit, keep it in the
supplied case or a static-free container.
29.
Do not insert any devices other than Makita wire-
less unit into the slot on the adaptor and the tool.
30. Do not use the tool and/or adaptor with the lid
of the slot damaged. Water, dust, and dirt come
intotheslotmaycausemalfunction.
31. Do not pull and/or twist the lid of the slot more
than necessary. Restore the lid if it comes off.
32. Replace the lid of the slot if it is lost or
damaged.
SAVE THESE INSTRUCTIONS.
INTRODUCTION
Parts description
►Fig.1
1Adaptor 2Lid
3Wireless activation
button
4Wireless activation
lamp
5Hook 6Clamping screw
7Cord 8Channelnumber
indicator
9Channelsettingbutton 10 Caution lamp
11 Band - -
Intended use
ThisadaptorenablestousesupportedMakitabat-
tery-poweredtoolswhenusingtheautostart/stopfunc-
tion of a mains-operated vacuum cleaner.
TheadaptorconnectedtoaMakitavacuumcleanerreceives
thesignalfromthetoolwirelesslyandtransmitittothevac-
uum cleaner to support to determine the starting or stopping
of the vacuum cleaner. (wireless activation function)
INITIAL SETUP
Installing the wireless unit
NOTE: The wireless unit is supplied as an optional
accessoryinsomecountries.
NOTICE: For the precautions for handling the
wireless unit, refer to the instruction manual of
the tool to be used with this adaptor.
Install the wireless units into the adaptor and tool as
illustrated. When inserting the wireless unit, align the
projectionswiththerecessedportionsontheslot.
►Fig.2: 1. Adaptor 2. Lid 3. Wireless unit
4.Projection5. Recessed portion
Toremovethewirelessunit,openthelidslowly.The
hooksonthebackofthelidwillliftthewirelessunitas
youpullupthelid.
►Fig.3: 1. Wireless unit 2. Hook 3. Lid
After removing the wireless unit, keep it in the supplied
case or a static-free container.
NOTICE: Always use the hooks on the back of
the lid when removing the wireless unit. If the
hooks do not catch the wireless unit, close the lid
completelyandopenitslowlyagain.
Installing the adaptor
NOTICE: Do not insert the adaptor's plug into
the outlet of other appliances than the outlet of
the vacuum cleaner for auto start/stop function.
Makesurethatthestand-byswitchonthevacuum
cleaner is set to "O (OFF)".
Plug the vacuum cleaner’s power cord into the mains
and then plug the adaptor’s cord into the cleaner’s
outlet.
►Fig.4
NOTE: Due to the detecting method of vacuum clean-
er'sautostart/stopfunction,somevacuumcleaner
mayautomaticallyrunforafewsecondswhen;
— Pluggingtheadaptor'scordwhenthestand-by
switch on the vacuum cleaner is set to “AUTO”
orequivalentor;
— Changingthestand-byswitchonthevacuum
cleanerto“AUTO”orequivalentwiththeadap-
tor's plug connected to the outlet of the vacuum
cleaner.
This is not a malfunction.
Topreventtheadaptorfromfallingoff,alwayssecure
itwiththebandorhook,orplaceitonastablesurface.
Usethebandorhookforsecuringtheadaptorontothe
vacuum cleaner. To use the hook, loosen the clamping
screw and extend the hook and then tighten the clamp-
ing screw.
When not using the adaptor, disconnect the adaptor’s
cord from the vacuum cleaner.
►Fig.5: 1. Band 2. Hook 3. Clamping screw

6ENGLISH
Tool registration for the adaptor
To register a tool to the adaptor (wireless unit), follow
the instructions in the instruction manual of the tool to
beusedwiththisadaptor.Refertothesectionabout
“tool registration”.
NOTE:
In the tool's instruction manual, follow the
instructionsbysubstitutingthewirelessactivationbut-
ton/lamp“onthevacuumcleaner”with“ontheadaptor”.
NOTE:
Makesurethatthewirelessunitisinstalledto
the adaptor and the adaptor is plugged into the outlet
ofthevacuumcleanerbeforestartingtoolregistration.
NOTE:
The tool registration information is saved to
the wireless unit inserted to the adaptor. You can use a
pair of wireless units, of which the tool registration has
beennished,withanothertoolandvacuumcleaner.
Channel setting
Thesuitablecommunicationchannelvariesdepending
onthevacuumcleanertobeusedwiththeadaptor.
Performthechannelsettingwhen;
— Usingtheadaptorforthersttimeor;
— Using another vacuum cleaner which have not
beenusedwiththeadaptor.
NOTE:Thelastchannelthatyousetwillbesaved
evenafteryouunplugtheadaptor.
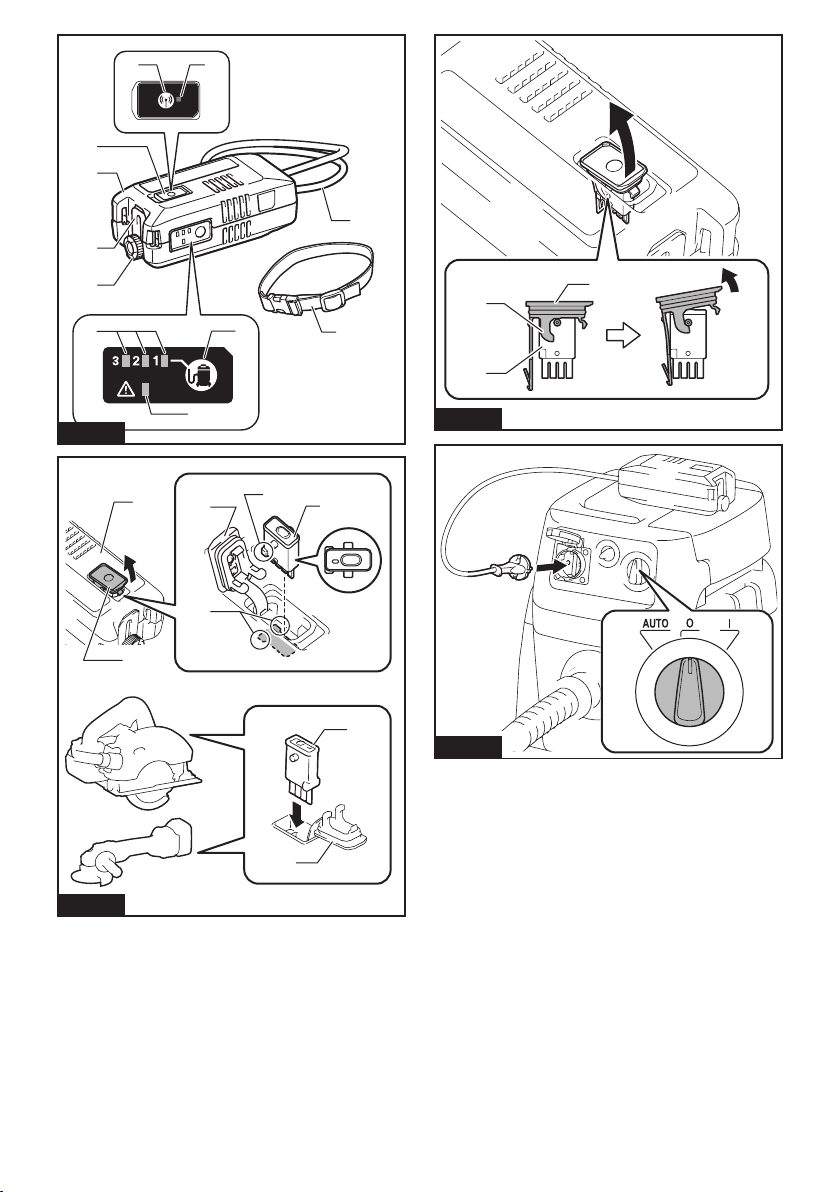
1. Setthestand-byswitchonthevacuumcleanerto
“AUTO”.
►Fig.6: 1.Stand-byswitch
NOTE:Onsomecleaners,thestand-byswitch
“AUTO”isdescribedasaniconordifferentword.In
thiscase,setthevacuumcleanertoautostart/stop
function.
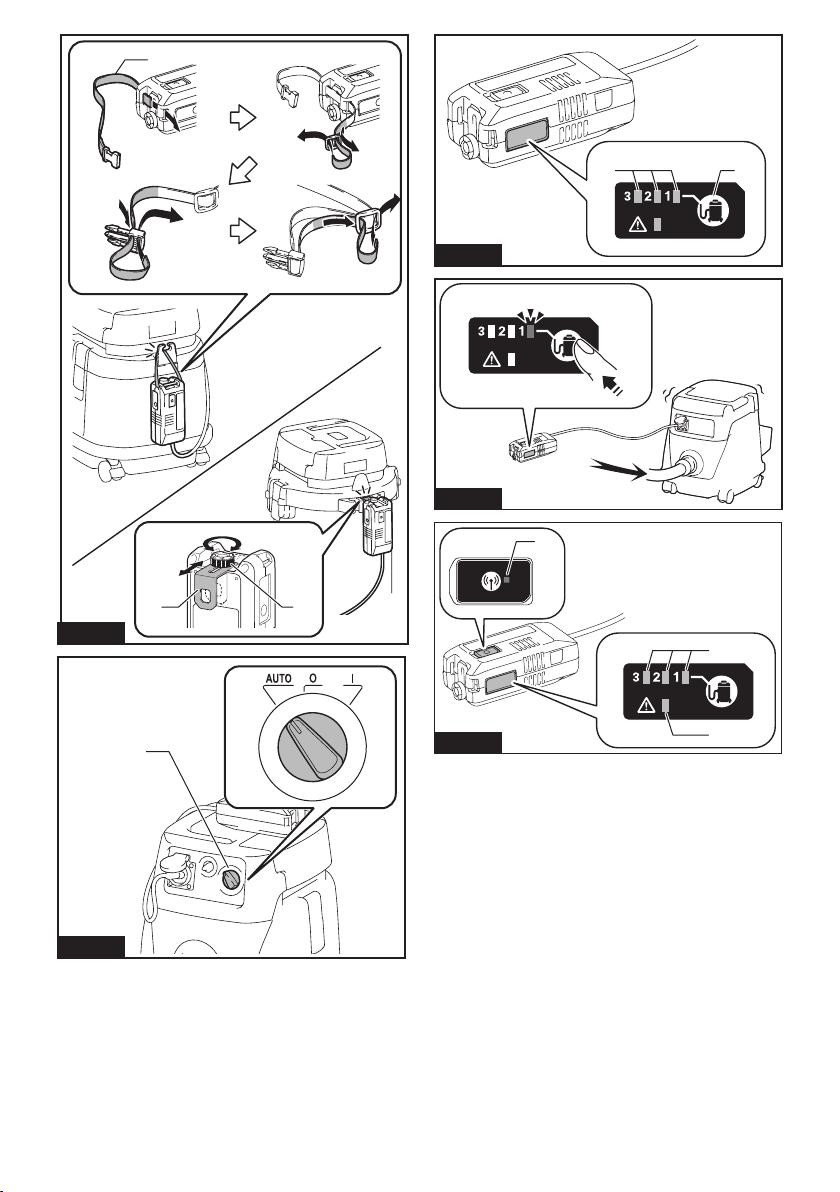
2. Conrmthenumberbesidethelightedchannel
numberindicator.Itisthechannelnumbercurrently
beingselected.
►Fig.7: 1.Channelsettingbutton2.Channelnumber
indicator
3. Pushandholdthechannelsettingbuttonforlon-
ger than 2 seconds for testing.
Thechannelnumberindicatorwillblinkingreenfor15
seconds.
►Fig.8: 1.Holdingthechannelsettingbutton(2sec-
onds or longer) 2.Channelnumberindicator
blinks(for15seconds)3. Vacuum cleaner
runswhilethechannelnumberindicatoris
blinking
4. Checkifthevacuumcleanerautomaticallyruns
correctlywhilethechannelnumberindicatorisblinking.
If so, the channel setting is completed.
Ifthevacuumcleanerdoesnotrunorrunincorrectly,go
on to the next step.
NOTE: For example, when the vacuum cleaner runs
incorrectly;thevacuumcleanerrunsbutstopssoon
or;thelevelofthesuctionpowerisdifferentfromthe
setting on the vacuum cleaner.
5. Pushthechannelsettingbuttonbrieytoselect
anotherchannelnumber.
6. Holdthechannelsettingbuttonforlongerthan2
seconds for testing and check if the vacuum cleaner
runscorrectly.
If not, repeat the step 5 to 6 again.
Ifthevacuumcleanerdoesnotruninanyofthechannel
number,thevacuumcleanermaynotbesupportedor
theremaybeaproblemintheconguration.
OPERATION
For the following operations, refer to the instruction
manualofthetooltobeusedwiththisadaptor:
• Starting the wireless activation function
• Cancelling tool registration
NOTE: In the tool's instruction manual, follow the
instructionsbysubstitutingthewirelessactivation
button/lamp“onthevacuumcleaner”with“onthe
adaptor”.
NOTE:Beforeperformingtheaboveoperations,be
sureto;
— Installthewirelessunittotheadaptorand;
— Plug the adaptor into the outlet of the vacuum
cleanerwiththestand-byswitchonthevacuum
cleaner "O (OFF)".
NOTE: The wireless transmission distance varies
dependingonthevacuumcleanermodeltobeused.
Erasing all tool registrations
You can erase all tool registrations from the adaptor
(wireless unit) as follows.
1. Makesurethatthestand-byswitchonthevacuum
cleaner is set to “O (OFF)” and then plug the vacuum
cleaner’s power cord into the mains.
2. Install the wireless units to the adaptor.
3. Plug the adaptor’s cord into the cleaner’s outlet.
4. Setthestand-byswitchonthevacuumcleanerto
“AUTO”.
NOTE:Onsomecleaners,thestand-byswitch
“AUTO”isdescribedasaniconordifferentword.In
thiscase,setthevacuumcleanertoautostart/stop
function.
5. Holddownthewirelessactivationbuttononthe
adaptorforabout6secondsuntilthewirelessactivation
lampblinksinred(abouttwiceperonesecond).
6. Whenthewirelessactivationlampstartsblinking
inred,releaseyourngerfromthewirelessactivation
button.Thereafter,holddownthewirelessactivation
buttonagainforabout6seconds.
7. Whenthewirelessactivationlampstartsblinking
fast(about5timesperonesecond)inred,releaseyour
ngerfromthewirelessactivationbutton.Whenthe
wireless activation lamp lights up in red and later lights
off, all tool registrations are erased.
NOTE:Ifthewirelessactivationlampdoesnotblink
inred,pressthewirelessactivationbuttonbrieyand
tryagain.

7ENGLISH
Description of the lamp status
Refertothebelowtableforthemeaningofthelampstatus.
►Fig.9: 1. Wireless activation lamp 2.Channelnumberindicator3. Caution lamp
Lamp Status Color
On
Blinking
Duration Description
Wireless
activation
lamp
Standby Blue Adaptor:con-
tinuing
Tool:2hours
Waiting for the tool registration or the wireless
activationfunctionisavailable.
Thelampontheadaptorblinkswhenthestand-by
switch on the vacuum cleaner is set to “AUTO” or
equivalent.
Thelamponthetoolblinkswhenthewireless
activationbuttonispushed.Thelamponthetool
willautomaticallyturnoffwhennooperationis
performed for 2 hours.
When the tool is
running.
The wireless activation of the vacuum cleaner is
availableandthetoolisrunning.
Tool
registration
Green 20 seconds Readyforthetoolregistration.Searchingthetoolto
beregistered.
2 seconds Thetoolregistrationhasbeennished.Thewireless
activationlampwillstartblinkinginblue.
Cancelling/
erasing
tool
registration
Red
(slow:2times/sec.)
20 seconds Readyforthecancellationofthetoolregistration.
Searchingthetooltobecancelled.
(fast:5times/sec.)
When the
wireless acti-
vationbuttonis
pressed down.
Readytoerasealltoolregistrations.
2 seconds Thetoolregistrationhasbeencancelled/erased.
Thewirelessactivationlampwillstartblinkingin
blue.
Others Red 3 seconds The power is supplied to the wireless unit and the
wireless activation function is starting up.
Off - - Thestand-byswitchonthevacuumcleanerisnot
setto“AUTO”orequivalent.
Channel
number
indicator
Channel
number
selection
Green Continuing Thelightedchannelnumberisselected.
Testing Green 15 seconds The adaptor is testing the communication to the
vacuum cleaner through the selected channel
number.
Caution
lamp
Overheated
or other
trouble
Red Continuing Theadaptorisoverheatedorinothertrouble.
Unplug the adaptor from the vacuum cleaner. Clean
the vents on the adaptor and cool it down for a while
andthencheckifitworksproperly.
Iftheadaptordoesnotworkproperly,contactour
authorized service center for repairs.

8ENGLISH
Troubleshooting for wireless activation function
Beforestartingthetroubleshooting,checkfollowing:
• The wireless unit is installed into the adaptor.
• The adaptor is plugged into the outlet of the vacuum cleaner.
Conductyourowninspectionrstbeforeaskingforrepairs.Alsorefertothetroubleshootingsectionoftool'sinstruc-
tion manual.
Ifyoundaproblemthatisnotexplainedinthemanual,donotattempttodismantlethetool.Instead,askMakita
AuthorizedServiceCenters,alwaysusingMakitareplacementpartsforrepairs.
State of abnormality Probable cause (malfunction) Remedy
Cannotnishtoolregistration/can-
cellingtoolregistrationsuccessfully.
The tool registration procedures for the
tooloradaptorhasnotbeennished.
Performthetoolregistrationproceduresforboththe
tool and the adaptor at the same timing.
The vacuum cleaner does not run
along with the switch operation of
the tool.
Thewirelessactivationbuttononthe
toolhasnotbeenpushed.
Pushthewirelessactivationbuttonbrieyandmake
surethatthewirelessactivationlampisblinking
inblue.
Thestand-byswitchonthevacuum
cleaner is not set to “AUTO”.
Setthestand-byswitchonthevacuumcleanerto
“AUTO”.
Thetoolandadaptorisawayfromeach
other (out of the transmission range).
Get the tool and adaptor closer each other. The
maximumtransmissiondistanceisapproximately
10mhoweveritmayvaryaccordingtothe
circumstances.
Incorrect channel setting The current channel setting is not appropriate for
thevacuumcleanerbeingused.Referto“Channel
setting”forhowtocongure.
Using a vacuum cleaner which is not
supported.
UseaMakitacleanerwithautostart/stopfunction.
Morethan10toolsareregisteredto
the adaptor.
Perform the tool registration again.
If more than 10 tools are registered to the adap-
tor,thetoolregisteredearliestwillbecancelled
automatically.
The adaptor erased all tool
registrations.
Perform the tool registration again.
Cannot erase all tool registrations Pressingthewirelessactivationbutton
on the tool.
Pressthewirelessactivationbuttonontheadaptor
for erasing all tool registrations.
Thestand-byswitchonthevacuum
cleaner is not set to “AUTO”.
Setthestand-byswitchonthevacuumcleanerto
“AUTO”.
Thewirelessactivationbuttonisnot
helddowncorrectly.
Holddownthewirelessactivationbuttonformore
than 6 seconds and then release it when the wire-
lessactivationlampblinksinred.Holddownthe
wirelessactivationbuttonformorethan6seconds
againuntilthewirelessactivationbuttonrapidly
blinksinredandthenreleasethebutton.
Thevacuumcleanerautomatically
runswhen;
- Plugging the adaptor to the vacuum
cleaneror;
-Changingthestand-byswitchon
the vacuum cleaner to “AUTO”.
The detecting method of vacuum clean-
er'sautostart/stopfunction.
If the vacuum cleaner stops running in a few sec-
onds,youcanusethewirelessactivationfunction
as usual.
If the vacuum cleaner continues to run for 20 sec-
ondsorlonger,andyoucanstopitbyunplugging
theadaptor,themalfunctionoftheadaptorcanbe
thought. Contact our authorized service center.
NOTE:Onsomecleaners,thestand-byswitch“AUTO”isdescribedasaniconordifferentword.Inthiscase,set
thevacuumcleanertoautostart/stopfunction.

9
MAINTENANCE
CAUTION: Always be sure that the adaptor is
unplugged before attempting to perform inspec-
tion or maintenance.
NOTICE: Never use gasoline, benzine, thinner,
alcohol or the like. Discoloration, deformation or
cracks may result.
To maintain product SAFETY and RELIABILITY,
repairs,anyothermaintenanceoradjustmentshould
beperformedbyMakitaAuthorizedorFactoryService
Centers,alwaysusingMakitareplacementparts.
OPTIONAL
ACCESSORIES
CAUTION: These accessories or attachments
are recommended for use with your Makita tool
specied in this manual.Theuseofanyother
accessories or attachments might present a risk of
injurytopersons.Onlyuseaccessoryorattachment
for its stated purpose.
Ifyouneedanyassistanceformoredetailsregard-
ingtheseaccessories,askyourlocalMakitaService
Center.
• Wireless unit
NOTE:Someitemsinthelistmaybeincludedinthe
toolpackageasstandardaccessories.Theymay
differfromcountrytocountry.
ENGLISH
Table of contents
Other Makita Adapter manuals

Makita
Makita ADP04 User manual

Makita
Makita ADP10 User manual

Makita
Makita BAP182 User manual

Makita
Makita ADP10 User manual

Makita
Makita BAP36N User manual

Makita
Makita ADP07 User guide

Makita
Makita BAP182 User manual

Makita
Makita ADP03 User manual

Makita
Makita BPS01 User manual

Makita
Makita ADP10 User manual