Makita UB001C User manual

UB001C
EN Battery Powered Blower INSTRUCTION MANUAL 9
SL Akumulatorski puhalnik NAVODILA ZA UPORABO 18
SQ Fryrëse me bateri MANUALI I PËRDORIMIT 26
BG Акумулаторна
въздуходувка РЪКОВОДСТВО ЗА
ЕКСПЛОАТАЦИЯ 35
HR Akumulatorski ventilator PRIRUČNIK S UPUTAMA 45
МК Дувалка со батериско
напојување УПАТСТВО ЗА УПОТРЕБА 53
SR Дувалица с напајањем на
батерије УПУТСТВО ЗА УПОТРЕБУ 62
RO Suantă cu acumulator MANUAL DE INSTRUCŢIUNI 71
UK Акумуляторна повітродувка ІНСТРУКЦІЯ З
ЕКСПЛУАТАЦІЇ 80
RU Аккумуляторная
воздуходувка РУКОВОДСТВО ПО
ЭКСПЛУАТАЦИИ 90

2 3
11
Fig.1
1 2
Fig.2
2
1
Fig.3
1
3
2
Fig.4
2
3
1
4
Fig.5
2
1
Fig.6
2

1
2
2
Fig.7
Fig.8
1
2
3
Fig.9
1
2
3
Fig.10
1
2
Fig.11
1
Fig.12
3

1
Fig.13
1
Fig.14
2
1
Fig.15
1
Fig.16
1
2
Fig.17
2
1
Fig.18
4

1
Fig.19
1
2
Fig.20
1
2
Fig.21
2
1
Fig.22
Fig.23
1
2
Fig.24
Fig.25
5

1
2
3
Fig.26
1
Fig.27
Fig.28
Fig.29
Fig.30
1
Fig.31
6

1
Fig.32
1
Fig.33
1
1
Fig.34
Fig.35
Fig.36
Fig.37
7

15m (50ft)
Fig.38
Fig.39
Fig.40
1
Fig.41
1
Fig.42
8

9ENGLISH
ENGLISH (Original instructions)
SPECIFICATIONS
Model: UB001C
Capacities Air volume 0 - 17.6 m3/min
Air speed (average) 0 - 58.0 m/s
Air speed (max.) 0 - 70.0 m/s
Overall length (with end nozzle) 960 mm / 1,010 mm / 1,060 mm
Rated voltage D.C. 36 V - 40 V max
Net weight 2.6 - 2.9 kg
Protection degree IPX4
•
Due to our continuing program of research and development, the specications herein are subject to change without notice.
• Specications may dier from country to country.
• Weight according to EPTA-Procedure 01/2014
Applicable portable power pack
PDC1200 / PDC01
WARNING: Only use the portable power
packs listed above. Use of any other portable power
packs may cause injury and/or re.
Symbols
The followings show the symbols which may be used
for the equipment. Be sure that you understand their
meaning before use.
Take particular care and attention.
Read instruction manual.
Keep hands away from rotating parts.
Long hair may cause entanglement
accident.
Keep bystanders away.
Wear eye and ear protection.
Do not expose to moisture.
Ni-MH
Li-ion
Only for EU countries
Do not dispose of electric equipment or
battery pack together with household waste
material!
In observance of the European Directives,
on Waste Electric and Electronic
Equipment and Batteries and Accumulators
and Waste Batteries and Accumulators
and their implementation in accordance
with national laws, electric equipment and
batteries and battery pack(s) that have
reached the end of their life must be col-
lected separately and returned to an envi-
ronmentally compatible recycling facility.
Intended use
The machine is intended for blowing dust.
Noise
The typical A-weighted noise level determined accord-
ing to EN50636-2-100:
Sound pressure level (LpA) : 83.4 dB(A)
Uncertainty (K) : 2.2 dB(A)
Sound power level (LWA) : 91.4 dB (A)
Uncertainty (K) : 2.5 dB(A)
NOTE: The declared noise emission value(s) has
been measured in accordance with a standard test
method and may be used for comparing one tool with
another.
NOTE: The declared noise emission value(s)
may also be used in a preliminary assessment of
exposure.
WARNING: Wear ear protection.
WARNING: The noise emission during actual
use of the power tool can dier from the declared
value(s) depending on the ways in which the
tool is used especially what kind of workpiece is
processed.
WARNING: Be sure to identify safety mea-
sures to protect the operator that are based on an
estimation of exposure in the actual conditions of
use (taking account of all parts of the operating
cycle such as the times when the tool is switched
o and when it is running idle in addition to the
trigger time).
Vibration
The vibration total value (tri-axial vector sum) deter-
mined according to EN50636-2-100:
Work mode: operation without load
Vibration emission (ah) : 2.5 m/s2or less
Uncertainty (K) : 1.5 m/s2

10 ENGLISH
NOTE: The declared vibration total value(s) has been
measured in accordance with a standard test method
and may be used for comparing one tool with another.
NOTE: The declared vibration total value(s) may also
be used in a preliminary assessment of exposure.
WARNING: The vibration emission during
actual use of the power tool can dier from the
declared value(s) depending on the ways in which
the tool is used especially what kind of workpiece
is processed.
WARNING: Be sure to identify safety mea-
sures to protect the operator that are based on an
estimation of exposure in the actual conditions of
use (taking account of all parts of the operating
cycle such as the times when the tool is switched
o and when it is running idle in addition to the
trigger time).
EC Declaration of Conformity
For European countries only
The EC declaration of conformity is included as Annex A
to this instruction manual.
SAFETY WARNINGS
Battery Powered Blower Safety
Instructions
WARNING: Read all safety warnings and
all instructions. Failure to follow the warnings and
instructions may result in electric shock, re and/or
serious injury.
Save all warnings and instruc-
tions for future reference.
Training
1. Read the instructions carefully. Be familiar
with the controls and the correct use of the
blower.
2. Never allow children, persons with reduced
physical, sensory or mental capabilities or
lack of experience and knowledge or people
unfamiliar with these instructions to use the
blower. Local regulations may restrict the age
of the operator.
3. Never operate the blower while people, espe-
cially children, or pets are nearby.
4. Keep in mind that the operator or user is
responsible for accidents or hazards occurring
to other people or their property.
Preparation
1. Always wear substantial footwear and long
trousers while operating the blower.
2. Do not wear loose clothing or jewellery that
can be drawn into the air inlet. Keep long hair
away from the air inlets.
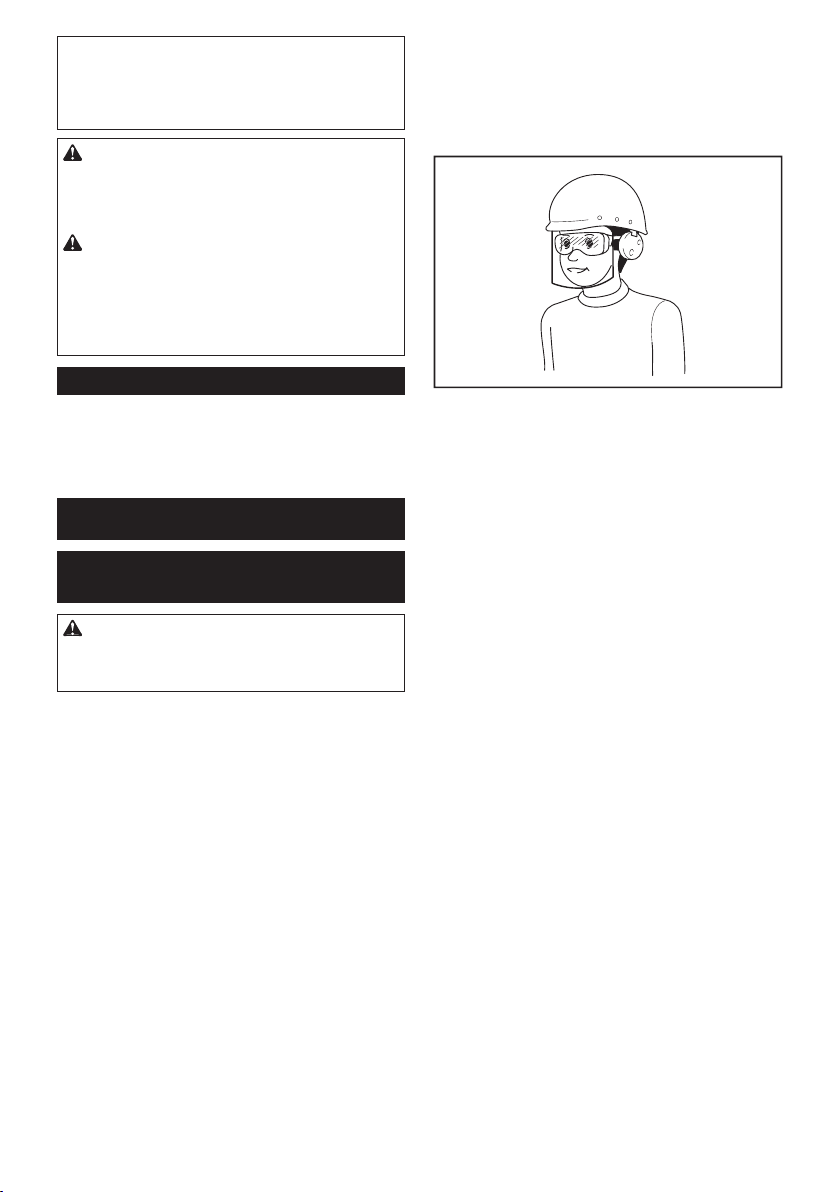
3. Always wear protective goggles to protect
your eyes from injury when using power tools.
The goggles must comply with ANSI Z87.1 in
the USA, EN 166 in Europe, or AS/NZS 1336
in Australia/New Zealand. In Australia/New
Zealand, it is legally required to wear a face
shield to protect your face, too.
It is an employer's responsibility to enforce
the use of appropriate safety protective equip-
ments by the tool operators and by other per-
sons in the immediate working area.
4. To prevent dust irritation the wearing of a face
mask is recommended.
5. While operating the machine, always wear
non-slip and protective footwear. Non-skid,
closed-toed safety boots and shoes will reduce the
risk of injury.
6. Use personal protective equipment. Always
wear eye protection. Protective equipment such
as a dust mask, non-skid safety shoes, hard hat or
hearing protection used for appropriate conditions
will reduce personal injuries.
7. Inspect the cord before operating the machine.
If the cord is damaged, ask Makita Authorized
Service Centers for repair.
Operation
1. Switch o the blower and remove the battery
and make sure that all moving parts have
come to a complete stop
• whenever you leave the blower.
• before clearing blockages.
• before checking, cleaning or working on
the blower.
• if the blower starts to vibrate abnormally.
2. Operate the blower only in daylight or in good
articial light.
3. Do not overreach and keep proper balance and
footing at all times.
4. Always be sure of your footing on slopes.
5. Walk, never run.
6. Keep all cooling air inlets clear of debris.
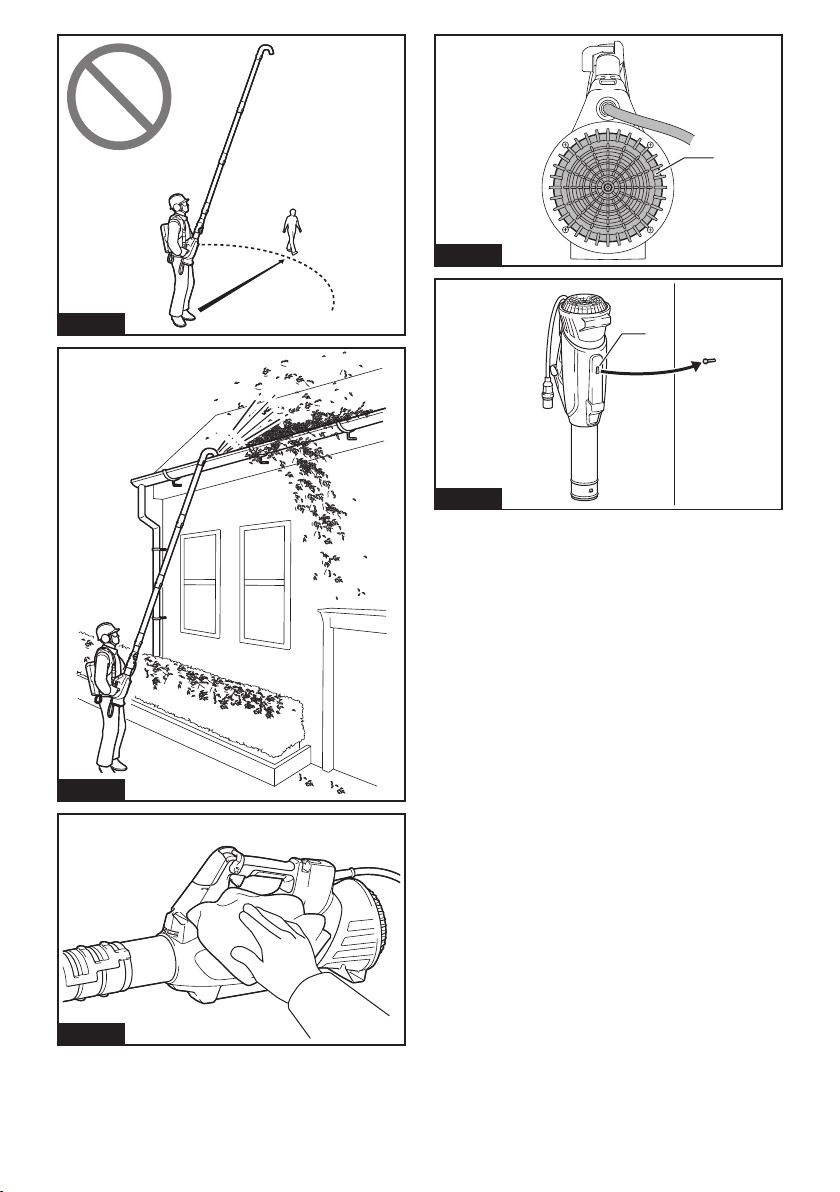
7. Never blow debris in the direction of
bystanders.
8. Operate the blower in a recommended position
and on a rm surface.
9. Do not operate the blower at high places.
10. Never point the nozzle at anyone in the vicinity
when using the blower.

11 ENGLISH
11. Never block suction inlet and/or blower outlet.
• Be careful not to block suction inlet or
blower outlet with dust or dirt when oper-
ating in dusty area.
• Do not use nozzles other than the nozzles
provided by Makita.
• Do not use the blower to inate balls,
rubber boat or the similar.
12.
Do not operate the blower near open window, etc.
13. Operating the blower only at reasonable hours
is recommended - not early in the morning or
late at night when people might be disturbed.
14. Using rakes and brooms to loosen debris
before blowing is recommended.
15. If the blower strikes any foreign objects or
should start making any unusual noise or
vibration, immediately switch o the blower
to stop it. Remove the battery from the blower
and inspect the blower for damage before
restarting and operating the blower. If the
blower is damaged, ask Makita Authorized
Service Centers for repair.
16. Do not insert ngers or other objects into
suction inlet or blower outlet.
17. Prevent unintentional starting. Ensure the
switch is in the o-position before inserting
battery, picking up or carrying the blower.
Carrying the blower with your nger on the
switch or energizing the blower that has the
switch on invites accidents.
18. Never blow dangerous materials, such as
nails, fragments of glass, or blades.
19.
Do not operate the blower near ammable materials.
20. Avoid operating the blower for a long time in
low temperature environment.
21. Do not use the machine when there is a risk of
lightning.
22. When you use the machine on muddy ground,
wet slope, or slippery place, pay attention to
your footing.
23. Avoid working in poor environment where
increased user fatigue is expected.
24. Do not use the machine in bad weather where
visibility is limited. Failure to do so may cause
fall or incorrect operation due to low visibility.
25. Do not submerge the machine into a puddle.
26. When wet leaves or dirt adhere to the suc-
tion mouth (ventilation window) due to rain,
remove them.
Maintenance and storage
1. Keep all nuts, bolts and screws tight to be sure
the blower is in safe working condition.
2. If the parts are worn or damaged, replace them
with parts provided by Makita.
3. Store the blower in a dry place out of the reach
of children.
4. When you stop the blower for inspection, ser-
vicing, storage, or changing accessory, switch
o the blower and make sure that all moving
parts come to a complete stop, and remove the
battery. Cool down the blower before making
any work on the blower. Maintain the blower
with care and keep it clean.
5. Always cool down the blower before storing.
6. Do not expose the blower to rain. Store the
blower indoors.
7. When you lift the blower, be sure to bend your
knees and be careful not to hurt your back.
8. Do not leave the machine unattended outdoors
in the rain.
9. Do not wash the machine with high pressure
water.
10. When storing the machine, avoid direct sun-
light and rain, and store it in a place where it
does not get hot or humid.
11. Perform inspection or maintenance in a place
where rain can be avoided.
12. After using the machine, remove the adhered
dirt and dry the machine completely before
storing. Depending on the season or the area,
there is a risk of malfunction due to freezing.
13. Do not pick up or carry the machine by holding
only the cord.
Battery tool use and care
1. Recharge only with the charger specied by
the manufacturer. A charger that is suitable for
one type of battery pack may create a risk of re
when used with another battery pack.
2. Use power tools only with specically desig-
nated battery packs. Use of any other battery
packs may create a risk of injury and re.
3. When battery pack is not in use, keep it away
from other metal objects, like paper clips,
coins, keys, nails, screws or other small metal
objects, that can make a connection from one
terminal to another. Shorting the battery termi-
nals together may cause burns or a re.
4. Under abusive conditions, liquid may be
ejected from the battery; avoid contact. If con-
tact accidentally occurs, ush with water. If
liquid contacts eyes, additionally seek medical
help. Liquid ejected from the battery may cause
irritation or burns.
5. Do not use a battery pack or tool that is dam-
aged or modied. Damaged or modied batteries
may exhibit unpredictable behaviour resulting in
re, explosion or risk of injury.
6. Do not expose a battery pack or tool to re or
excessive temperature. Exposure to re or tem-
perature above 130 °C may cause explosion.
7. Follow all charging instructions and do not
charge the battery pack or tool outside the
temperature range specied in the instruc-
tions. Charging improperly or at temperatures
outside the specied range may damage the
battery and increase the risk of re.
Electrical and battery safety
1. Do not dispose of the battery(ies) in a re.
The cell may explode. Check with local codes for
possible special disposal instructions.
2. Do not open or mutilate the battery(ies).
Released electrolyte is corrosive and may cause
damage to the eyes or skin. It may be toxic if
swallowed.
3. Do not charge battery in rain, or in wet
locations.

12 ENGLISH
4. Do not charge the battery outdoors.
5. Do not handle charger, including charger plug,
and charger terminals with wet hands.
6. Do not replace the battery in the rain.
7. Do not wet the terminal of battery with liquid
such as water, or submerge the battery. Do not
leave the battery in the rain, nor charge, use,
or store the battery in a damp or wet place. If
the terminal gets wet or liquid enters inside of bat-
tery, the battery may be short circuited and there is
a risk of overheat, re, or explosion.
8. After removing the battery from the machine or
charger, be sure to attach the battery cover to
the battery and store it in a dry place.
9. Do not replace the battery with wet hands.
10. If the battery gets wet, drain the water inside
and then wipe it with a dry cloth. Dry the bat-
tery completely in a dry place before use.
Service
1. Have your power tool serviced by a qualied
repair person using only identical replacement
parts. This will ensure that the safety of the power
tool is maintained.
2. Never service damaged battery packs. Service
of battery packs should only be performed by the
manufacturer or authorized service providers.
SAVE THESE INSTRUCTIONS.
WARNING: DO NOT let comfort or familiarity
with product (gained from repeated use) replace
strict adherence to safety rules for the subject
product.
MISUSE or failure to follow the safety rules stated
in this instruction manual may cause serious
personal injury.
Important safety instructions for
battery cartridge
1. Before using battery cartridge, read all instruc-
tions and cautionary markings on (1) battery
charger, (2) battery, and (3) product using
battery.
2. Do not disassemble or tamper with the battery
cartridge. It may result in a re, excessive heat,
or explosion.
3. If operating time has become excessively
shorter, stop operating immediately. It may
result in a risk of overheating, possible burns
and even an explosion.
4. If electrolyte gets into your eyes, rinse them
out with clear water and seek medical atten-
tion right away. It may result in loss of your
eyesight.
5. Do not short the battery cartridge:
(1) Do not touch the terminals with any con-
ductive material.
(2) Avoid storing battery cartridge in a con-
tainer with other metal objects such as
nails, coins, etc.
(3) Do not expose battery cartridge to water
or rain.
A battery short can cause a large current
ow, overheating, possible burns and even a
breakdown.
6. Do not store and use the tool and battery car-
tridge in locations where the temperature may
reach or exceed 50 °C (122 °F).
7. Do not incinerate the battery cartridge even if
it is severely damaged or is completely worn
out. The battery cartridge can explode in a re.
8. Do not nail, cut, crush, throw, drop the battery
cartridge, or hit against a hard object to the
battery cartridge. Such conduct may result in a
re, excessive heat, or explosion.
9. Do not use a damaged battery.
10. The contained lithium-ion batteries are subject
to the Dangerous Goods Legislation require-
ments.
For commercial transports e.g. by third parties,
forwarding agents, special requirement on pack-
aging and labeling must be observed.
For preparation of the item being shipped, consult-
ing an expert for hazardous material is required.
Please also observe possibly more detailed
national regulations.
Tape or mask o open contacts and pack up the
battery in such a manner that it cannot move
around in the packaging.
11. When disposing the battery cartridge, remove
it from the tool and dispose of it in a safe
place. Follow your local regulations relating to
disposal of battery.
12. Use the batteries only with the products
specied by Makita. Installing the batteries to
non-compliant products may result in a re, exces-
sive heat, explosion, or leak of electrolyte.
13. If the tool is not used for a long period of time,
the battery must be removed from the tool.
14. During and after use, the battery cartridge may
take on heat which can cause burns or low
temperature burns. Pay attention to the han-
dling of hot battery cartridges.
15. Do not touch the terminal of the tool imme-
diately after use as it may get hot enough to
cause burns.
16. Do not allow chips, dust, or soil stuck into the
terminals, holes, and grooves of the battery
cartridge. It may result in poor performance or
breakdown of the tool or battery cartridge.
17. Unless the tool supports the use near
high-voltage electrical power lines, do not use
the battery cartridge near high-voltage electri-
cal power lines. It may result in a malfunction or
breakdown of the tool or battery cartridge.
18. Keep the battery away from children.
SAVE THESE INSTRUCTIONS.
CAUTION: Only use genuine Makita batteries.
Use of non-genuine Makita batteries, or batteries that
have been altered, may result in the battery bursting
causing res, personal injury and damage. It will
also void the Makita warranty for the Makita tool and
charger.

13 ENGLISH
Tips for maintaining maximum
battery life
1. Charge the battery cartridge before completely
discharged. Always stop tool operation and
charge the battery cartridge when you notice
less tool power.
2. Never recharge a fully charged battery car-
tridge. Overcharging shortens the battery
service life.
3. Charge the battery cartridge with room tem-
perature at 10 °C - 40 °C (50 °F - 104 °F). Let
a hot battery cartridge cool down before
charging it.
4. When not using the battery cartridge, remove
it from the tool or the charger.
5. Charge the battery cartridge if you do not use
it for a long period (more than six months).
ASSEMBLY
CAUTION: Always be sure that the machine is
switched o and the portable power pack is dis-
connected from the machine before carrying out
any work on the machine.
Installing the end nozzle
Align the triangle mark on the end nozzle with the trian-
gle mark on the front pipe, then attach the end nozzle
to the front pipe, and then turn the end nozzle to lock it
into place.
Install the end nozzle so that the tip of the nozzle faces
downward. Depending on the working environment, you
can install the end nozzle so that the tip of the nozzle is
facing up.
► Fig.1: 1. Triangle mark 2. End nozzle 3. Front pipe
To remove the end nozzle, perform the installation
procedure in reverse.
NOTE: The length of the nozzle can be changed by
moving the nozzle as shown in the gure.
► Fig.2: 1. End nozzle 2. Front pipe
Installing the at nozzle or
extension nozzle
Optional accessory
1. Align the groove on the adapter pipe with the pro-
trusion on the front pipe, then attach the adapter pipe to
the front pipe, and then turn it to lock it into place.
► Fig.3: 1. Adapter pipe 2. Front pipe
2. Align the groove on the at nozzle or extension
nozzle with the protrusion on the adapter pipe, then
attach the at nozzle or extension nozzle to the adapter
pipe, and then turn it to lock it into place.
► Fig.4: 1. Flat nozzle 2. Extension nozzle 3. Adapter
pipe
Installing the gutter nozzle set
Optional accessory
1. Align the groove on the adapter pipe with the pro-
trusion on the front pipe, then attach the adapter pipe to
the front pipe, and then turn it to lock it into place.
Insert the adapter pipe as far as it will go so that the
protrusion ts into the deepest groove on the adapter
pipe.
► Fig.5: 1. Screw 2. Hose clamp 3. Adapter pipe
4. Front pipe
2. Loosen the screws on the hose clamps, and pass
the large hose clamp through the adapter pipe, and
then pass the small hose clamp.
3. Connect the extension pipe to the adapter pipe.
Align the groove on the extension pipe with the protru-
sion on the adapter pipe, and then slide the extension
pipe along its groove so that the triangle markings face
each other.
► Fig.6: 1. Extension pipe 2. Adapter pipe
4. Place the hose clamps onto the grooves as illus-
trated and tighten the screws.
► Fig.7: 1. Screw 2. Hose clamp
5. According to the working height, connect the rest
of extension pipes to the extension pipe which has
already been attached.
CAUTION: Do not attach the extension pipe
if the total length including the blower body
exceeds 4 m (14 ft).
6. Turn the outlet of the end nozzle as shown in the
gure.
► Fig.8
7. Connect the end nozzle to the extension pipe.
When connecting, align the triangle marking on the end
nozzle and the extension pipe, and then push the end
nozzle until it clicks. After that, rotate the end nozzle to
a suitable position for your work.
► Fig.9: 1. End nozzle 2. Extension pipe 3. Triangle
marking
When removing the end nozzle, align the triangle mark-
ings on the end nozzle and extension pipe, and then
pull out the end nozzle from the extension pipe.
► Fig.10: 1. End nozzle 2. Extension pipe 3. Triangle
marking

14 ENGLISH
FUNCTIONAL DESCRIPTION
CAUTION: Always be sure that the machine
is switched o and the portable power pack is
disconnected from the machine before adjusting
or checking function on the machine.
Machine / battery protection system
The machine is equipped with a machine/battery
protection system. This system automatically cuts o
power to the motor to extend machine and battery life.
The machine will automatically stop during operation if
the machine or battery is placed under one of the fol-
lowing conditions:
Overload protection
When the machine or battery is operated in a manner
that causes it to draw an abnormally high current, the
machine automatically stops and the main power lamp
of the machine blinks in green. In this situation, turn the
machine o and stop the application that caused the
machine to become overloaded. Then turn the machine
on to restart.
Overheat protection
When the machine or battery is overheated, the
machine stops automatically. When the machine is
overheated, the main power lamp of the machine
lights up in red. When the battery is overheated, the
main power lamp of the machine blinks in red. Let
the machine and battery cool down before turning the
machine on again.
Overdischarge protection
When the battery capacity is not enough, the machine
stops automatically and the main power lamp of the
machine blinks in red. In this case, remove the battery
from the machine and charge the battery or change the
battery to fully charged one.
Main power switch
WARNING: Always turn o the main power
switch when not in use.
To turn on the machine, press the main power switch.
The main power lamp lights up in green. To turn o,
press the main power switch again.
► Fig.11: 1. Main power lamp 2. Main power switch
NOTE: This machine employs the auto power-o
function. To avoid unintentional start up, the main
power switch will automatically shut down when the
switch trigger is not pulled for a certain period after
the main power switch is turned on.
NOTE: If you press the main power switch when the
control lever is not fully returned to the o position,
or while you are pulling the switch trigger, the main
power lamp blinks in green. In this case, fully return
the control lever, or release the switch trigger, and
then press the main power switch.
Switch action
WARNING: Before connecting the portable
power pack to the machine, always check to see
that the switch trigger actuates properly and
returns to the "OFF" position when released.
To start the machine, simply pull the switch trigger. The
speed increases by increasing pressure on the switch
trigger. Release the switch trigger to stop.
► Fig.12: 1. Switch trigger
You can use the machine in the Boost mode. In the
Boost mode, the air volume becomes larger than in the
normal mode. To use the machine in the Boost mode,
pull the switch trigger until the switch trigger stops in the
halfway position, and then pull the switch trigger fully.
► Fig.13: 1. Switch trigger
NOTE: Depending on the usage conditions, use of
the Boost mode is restricted to protect the machine.
If the main power lamp of the machine blinks in green
when you pull the switch trigger fully or while you
are using the machine in the Boost mode, the Boost
mode is not available.
NOTE: The Boost mode is not available by turning
the control lever.
Cruise control function
The cruise control function allows the operator to main-
tain a constant speed without pulling the trigger. To
increase the speed, turn the control lever forward. To
decrease the speed, turn the control lever backward.
► Fig.14: 1. Control lever
Accidental re-start preventive
function
Even if you connect the portable power pack to the
machine while pulling the switch trigger, the machine
does not start. To start the machine, rst release the
switch trigger and return the control lever fully, and then
pull the switch trigger.

15 ENGLISH
OPERATION
Connecting the portable power pack
CAUTION: When you use the machine in com-
bination of the backpack-type power supply such
as portable power pack, use the hanging band
included in the machine package or the hanging
band recommended by Makita.
If you put on the shoulder harness not recommended
by Makita and the shoulder harness of the back-
pack-type power supply at the same time, removing
the machine or backpack-type power supply is dif-
cult in case of an emergency, and it may cause an
accident or injury. For the recommended hanging
band, ask Makita Authorized Service Centers.
CAUTION: Before operation, make sure that
the buckles on the waist belt is locked and the
machine is securely attached to the hook of the
hanging band.
CAUTION: To prevent unintentional start up,
make sure that the machine and portable power
pack are turned o before starting this procedure.
CAUTION: Before performing this procedure,
nish the adjustments for the waist belt and
shoulder harness. Refer to the instruction manual of
the portable power pack for details.
For PDC1200
CAUTION: When removing the battery, press
the lock button while holding the handle rmly.
Before removing the battery, set the waist belt to
the lowest position.
► Fig.15: 1. Handle 2. Lock button
CAUTION: Be careful not to pinch your n-
gers or thumbs between the battery and the base
plate when attaching the battery.
CAUTION: Make sure that the battery is
securely xed to the base plate. Otherwise, the
battery may fall when you wear the unit or use the
unit, and cause an injury. If you can see the red indi-
cator as shown in the gure, the battery is not locked
completely.
► Fig.16: 1. Red indicator
For PDC01
NOTE: Before performing this procedure, install the
battery cartridge(s) to the portable power pack. Refer
to the instruction manual of the portable power pack
for details.
1.
Pull out the cord from either left or right side of the battery.
For PDC1200
Remove the battery from the base plate, and then pull
out the cord from either left or right side of the battery,
and then attach the battery to the base plate. When
pulling out the cord, be sure to set the cord in the hold-
ers as shown in the gure.
► Fig.17: 1. Cord 2. Holder
For PDC01
When pulling out the cord, be sure to set the cord in the
holders as shown in the gure.
► Fig.18: 1. Cord 2. Holder
2. Attach the cord to the cord holders.
► Fig.19: 1. Cord holder
3. Attach the hooks of the hanging band to the rings
of the shoulder harness and waist belt.
► Fig.20: 1. Ring 2. Hook
4. Press the power button on the portable power
pack. The main power lamp will light up.
For PDC1200
► Fig.21: 1. Power button 2. Main power lamp
For PDC01
► Fig.22: 1. Power button 2. Main power lamp
5. Wear the shoulder harness of the portable power
pack and lock the buckle on the waist belt.
► Fig.23
6. Attach the shoulder harness to the machine using
the hook on the hanging band. Be sure to hook on the
hanger of the machine.
► Fig.24: 1. Hook 2. Hanger
Adjust the length of the hanging band as necessary.
► Fig.25
7. Insert the plug of the machine into the socket of
the portable power pack.
When inserting, align the triangle marking on both the
plug and the socket.
► Fig.26: 1. Plug 2. Socket 3. Triangle marking
8. Press the main power switch to turn on the
machine.
The machine is ready to operate. The machine will run
when you pull the switch trigger.
► Fig.27: 1. Main power switch
NOTE: You can also use the hanging band as shown
in the gure.
► Fig.28
Adjust the length of the hanging band as necessary.
► Fig.29
Blower operation
CAUTION: Do not place the machine on the
ground while it is switched on. Sand or dust may
enter from suction inlet and cause a malfunction or
personal injury.
Hold the machine rmly with a hand and perform the
blowing operation by moving it around slowly. When
blowing around building, big stone or vehicle, direct the
nozzle away from them. When performing an operation
in a corner, start from the corner and then move to wide
area.
► Fig.30

16 ENGLISH
When setting down the machine, unlock the buckle
on the hanging band with one hand while holding the
machine with the other hand.
► Fig.31: 1. Buckle
► Fig.32: 1. Buckle
When setting down the machine and the portable power
pack at the same time, unlock the buckle on the waist
belt, and then set down the machine and the portable
power pack.
► Fig.33: 1. Buckle
NOTE: When unlocking the buckle, press the claws
of the buckle on both sides. When locking the buckle,
insert the claws until they are locked.
► Fig.34: 1. Claw
Using the gutter nozzle set
CAUTION: When using the gutter nozzle set,
do not use the machine in the Boost mode. You
may loose balance and it may cause an accident
since the air volume becomes larger in the Boost
mode.
CAUTION: When using the gutter nozzle set,
do not hold the blower with single hand but with
both hands.
► Fig.35
CAUTION: Do not use the gutter nozzle set
near electric wires.
► Fig.36
CAUTION: Do not use the gutter nozzle set on
windy day.
► Fig.37
CAUTION: When using the gutter nozzle set,
keep other people or animal more than 15 m (50 ft)
away from the blower.
► Fig.38
Hold the blower upright by grabbing the handle of the
blower. Place the outlet of the blower on the gutter and
then turn on the blower.
► Fig.39
MAINTENANCE
CAUTION: Always be sure that the machine is
switched o and the portable power pack is dis-
connected from the machine before attempting to
perform inspection or maintenance.
To maintain product SAFETY and RELIABILITY,
repairs, any other maintenance or adjustment should
be performed by Makita Authorized or Factory Service
Centers, always using Makita replacement parts.
Cleaning the machine
Clean the machine by wiping o dust with a dry cloth or
one dipped in soapy water and wrung out.
► Fig.40
NOTICE: Never use gasoline, benzine, thinner,
alcohol or the like. Discoloration, deformation or
cracks may result.
Remove dust or dirt from the suction inlet at the rear of
the machine.
► Fig.41: 1. Suction inlet
Storage
Before storing the machine, disconnect the portable
power pack from the machine, and perform full main-
tenance. Store the machine in a place out of the reach
of children and not exposed to moisture, rain, or direct
sunlight.
The hook hole on the bottom of the machine is conve-
nient for hanging the machine from a nail or screw on
the wall.
► Fig.42: 1. Hole

17 ENGLISH
TROUBLESHOOTING
Before asking for repairs, conduct your own inspection rst. If you nd a problem that is not explained in the man-
ual, do not attempt to dismantle the machine. Instead, ask Makita Authorized Service Centers, always using Makita
replacement parts for repairs.
State of abnormality Probable cause (malfunction) Remedy
Motor does not run. Battery is not installed. Install the battery.
Battery problem (under voltage) Recharge the battery. If recharging is not eective,
replace battery.
The drive system does not work
correctly. Ask your local authorized service center for repair.
Motor stops running after a little use. Battery's charge level is low. Recharge the battery. If recharging is not eective,
replace battery.
Overheating. Stop using the machine to allow it to cool down.
The machine does not reach the
maximum speed. Battery is installed improperly. Install the battery as described in this manual.
Battery power is dropping. Recharge the battery. If recharging is not eective,
replace battery.
The drive system does not work
correctly. Ask your local authorized service center for repair.
Abnormal vibration:
stop the machine immediately!
The drive system does not work
correctly. Ask your local authorized service center for repair.
Motor cannot stop:
Remove the battery immediately!
Electric or electronic malfunction. Remove the battery and ask your local authorized
service center for repair.
OPTIONAL
ACCESSORIES
CAUTION: These accessories or attachments
are recommended for use with your Makita prod-
uct specied in this manual. The use of any other
accessories or attachments might present a risk of
injury to persons. Only use accessory or attachment
for its stated purpose.
If you need any assistance for more details regard-
ing these accessories, ask your local Makita Service
Center.
• Adapter pipe
• Extension nozzle
• Flat nozzle
• Gutter nozzle set
• Band assembly
• Makita genuine battery and charger
NOTE: Some items in the list may be included in the
product package as standard accessories. They may
dier from country to country.

18 SLOVENŠČINA
SLOVENŠČINA (Originalna navodila)
TEHNIČNI PODATKI
Model: UB001C
Zmogljivosti Volumen zraka 0 – 17,6 m3/min
Hitrost zraka (povprečna) 0 – 58,0 m/s
Hitrost zraka (največja) 0 – 70,0 m/s
Celotna dolžina (s končno šobo) 960 mm/1.010 mm/1.060 mm
Nazivna napetost D.C. od 36 V do najv. 40 V
Neto teža 2,6 – 2,9 kg
Stopnja zaščite IPX4
•
Ker nenehno opravljamo raziskave in razvijamo svoje izdelke, se lahko tehnični podatki v tem dokumentu spremenijo brez obvestila.
• Tehnični podatki se lahko razlikujejo od države do države.
• Teža v skladu s postopkom EPTA 01/2014
Uporabna prenosna polnilna enota
PDC1200/PDC01
OPOZORILO:
Uporabljajte le zgoraj navedene
prenosne polnilne enote. Uporaba drugih prenosnih pol-
nilnih enot lahko povzroči telesne poškodbe in/ali požar.
Simboli
Naslednji simboli se lahko uporabljajo v povezavi s
strojem. Pred uporabo izdelka se obvezno seznanite z
njihovim pomenom.
Potrebna je posebna pozornost in
previdnost.
Preberite navodila za uporabo.
Ne približujte rok vrtečim se delom.
Dolgi lasje se pri uporabi stroja lahko
zapletejo.
Osebe v bližini naj se ne približujejo stroju.
Uporabljajte zaščito za oči in ušesa.
Ne izpostavljajte vlagi.
Ni-MH
Li-ion
Samo za države EU
Ne zavrzite izrabljene električne opreme ali
akumulatorskega sklopa med gospodinjske
odpadke!
V skladu z Evropskimi direktivami o
odpadni električni in elektronski opremi,
baterijah in akumulatorjih, odpadnih bate-
rijah in akumulatorjih ter upoštevanjem
njihovih določil v skladu z državno zako-
nodajo je treba električno opremo, baterije
in akumulatorje, katerih življenjski cikel
je pretekel, zbirati ločeno in jih dostaviti
v ustrezen obrat za recikliranje, ki deluje
skladno z okoljevarstvenimi zahtevami.
Predvidena uporaba
Stroj je namenjen odpihovanju prahu.
Hrup
Običajna A-ovrednotena raven hrupa v skladu z
EN50636-2-100:
Raven zvočnega tlaka (LpA): 83,4 dB (A)
Odstopanje (K): 2,2 dB (A)
Raven zvočne moči (LWA): 91,4 dB (A)
Odstopanje (K): 2,5 dB (A)
OPOMBA: Navedene vrednosti oddajanja hrupa so
bile izmerjene v skladu s standardnimi metodami
testiranja in se lahko uporabljajo za primerjavo orodij.
OPOMBA: Navedene vrednosti oddajanja hrupa
se lahko uporabljajo tudi pri predhodni oceni
izpostavljenosti.
OPOZORILO: Uporabljajte zaščito za sluh.
OPOZORILO: Oddajanje hrupa med dejansko
uporabo električnega orodja se lahko razlikuje od
navedenih vrednosti, odvisno od načina uporabe
orodja in predvsem vrste obdelovanca.
OPOZORILO: Upravljavec mora za lastno
zaščito poznati varnostne ukrepe, ki temeljijo
na oceni izpostavljenosti v dejanskih pogojih
uporabe (poleg časa proženja je treba upoštevati
celoten delovni cikel, vključno s časom, ko je
orodje izklopljeno, in časom, ko deluje v prostem
teku).
Vibracije
Skupne vrednosti vibracij (vektorska vsota treh osi) v
skladu z EN50636-2-100:
Delovni način: delovanje brez obremenitev
Emisije vibracij (ah): 2,5 m/s2 ali manj
Odstopanje (K): 1,5 m/s2

19 SLOVENŠČINA
OPOMBA: Navedene skupne vrednosti oddajanja
vibracij so bile izmerjene v skladu s standardnimi
metodami testiranja in se lahko uporabljajo za primer-
javo orodij.
OPOMBA: Navedene skupne vrednosti oddajanja
vibracij se lahko uporabljajo tudi pri predhodni oceni
izpostavljenosti.
OPOZORILO: Oddajanje vibracij med
dejansko uporabo električnega orodja se lahko
razlikuje od navedenih vrednosti, odvisno
od načina uporabe orodja in predvsem vrste
obdelovanca.
OPOZORILO: Upravljavec mora za lastno
zaščito poznati varnostne ukrepe, ki temeljijo
na oceni izpostavljenosti v dejanskih pogojih
uporabe (poleg časa proženja je treba upoštevati
celoten delovni cikel, vključno s časom, ko je
orodje izklopljeno, in časom, ko deluje v prostem
teku).
Izjava o skladnosti ES
Samo za evropske države
Izjava ES o skladnosti je vključena v dodatku A, ki je
priložen tem navodilom za uporabo.
VARNOSTNA
OPOZORILA
Varnostna navodila za
akumulatorski puhalnik
OPOZORILO: Preberite vsa varnostna opo-
zorila in navodila. Neupoštevanje opozoril in navodil
lahko privede do električnega udara, požara in/ali
resnih telesnih poškodb.
Shranite vsa opozorila in navo-
dila za poznejšo uporabo.
Usposabljanje
1. Pozorno preberite navodila. Seznanite se s
funkcijami za upravljanje in pravilno uporabo
puhalnika.
2. Nikoli ne dovolite uporabe orodja otrokom,
osebam z zmanjšanimi zičnimi, čutilnimi ali
psihičnimi sposobnostmi ter s pomanjkanjem
izkušenj in znanja ter osebam, ki niso sezna-
njene s temi navodili za uporabo puhalnika.
Lokalni predpisi morda omejujejo starost
uporabnika stroja.
3. Nikoli ne uporabljajte puhalnika v bližini ljudi,
še posebej otrok, ali hišnih ljubljenčkov.
4. Upoštevajte, da je upravljavec ali uporabnik
odgovoren za nesreče ali nevarnosti, ki se
zgodijo drugim ljudem ali njihovi lastnini.
Priprava
1. Pri delu s puhalnikom vedno nosite kakovo-
stno obutev in dolge hlače.
2. Ne nosite ohlapnih oblačil ali nakita, ki bi jih
lahko potegnilo v dovod zraka. Z dolgimi lasmi
se ne zadržujte v bližini dovodov zraka.
3. Pri uporabi električnih orodij vedno nosite
zaščitna očala, da preprečite poškodbe oči.
Očala morajo ustrezati standardu ANSI Z87.1
v ZDA, EN 166 v Evropi ali AS/NZS 1336 v
Avstraliji/Novi Zelandiji. V Avstraliji/Novi
Zelandiji je zakonsko zahtevano tudi nošenje
obrazne zaščite.
Delodajalec mora zagotoviti, da upravljavci
orodja in druge osebe v neposrednem delov-
nem območju uporabljajo ustrezno zaščitno
opremo.
4. Da preprečite draženje zaradi prahu, priporo-
čamo, da nosite obrazno masko.
5.
Med delom s strojem vedno nosite zaščitno
obutev z nedrsečim podplatom. Zaprti zaščitni škor-
nji in čevlji, ki ne drsijo, zmanjšajo nevarnost poškodb.
6.
Uporabljajte osebno zaščitno opremo. Vedno
uporabljajte zaščito za oči. Uporaba zaščitne
opreme (npr. protiprašna maska, nedrseči zaščitni
čevlji, trdo pokrivalo ali zaščita za sluh) v primernih
pogojih bo zmanjšala možnost telesnih poškodb.
7. Pred upravljanjem naprave preverite kabel. Če
je kabel poškodovan, se za popravilo obrnite
na pooblaščene servisne centre Makita.
Uporaba
1. Izklopite puhalnik, odstranite baterijo in se pre-
pričajte, da so se vsi premični deli popolnoma
ustavili
• kadar pustite puhalnik nenadzorovan,
• preden odstranite ovire,
• pred pregledom, čiščenjem ali izvajanjem
del na puhalniku,
• če začne puhalnik neobičajno vibrirati.
2. Puhalnik upravljajte samo podnevi ali ob dobri
umetni svetlobi.
3. Ne segajte predaleč z orodjem in stalno ohra-
njajte ravnotežje.
4. Pri hoji po pobočjih bodite vedno previdni.
5. Hodite, ne tecite.
6. Poskrbite, da se na dovodih hladilnega zraka
ne bo zadrževala umazanija.
7. Ne pihajte umazanije v smeri oseb, ki se zadr-
žujejo v bližini.

20 SLOVENŠČINA
8. Puhalnik uporabljajte v priporočenem položaju
na trdni podlagi.
9. Puhalnika ne uporabljajte na visokih mestih.
10. Med uporabo puhalnika šobe ne usmerjajte v
bližnje osebe.
11. Nikoli ne smete zamašiti sesalnega vhoda in/
ali izhoda puhalnika.
• Pazite, da ne zamašite sesalnega vhoda
in/ali izhoda puhalnika, kadar ga uporab-
ljate v prašnem prostoru.
• Ne uporabljajte šob, ki jih ni priložilo
podjetje Makita.
• Puhalnika ne uporabljajte za napihova-
nje žog, gumijastih čolnov ali podobnih
predmetov.
12. Ne uporabljajte puhalnika v bližini odprtih
oken itn.
13. Priporočena je uporaba puhalnika ob razumnih
urah – ne zgodaj zjutraj ali pozno ponoči, ko bi
lahko motili ljudi.
14. Pred odpihovanjem priporočamo, da umaza-
nijo razrahljate z grabljami in metlo.
15. Puhalnik nemudoma izklopite, če med uporabo
naletite na tujke in če se pojavi nenavaden
zvok ali tresenje. Odstranite baterijo iz puhal-
nika in pred vklopom za ponovno uporabo
preverite, ali je poškodovan. Če je puhalnik
poškodovan, se za popravilo obrnite na
pooblaščene servisne centre Makita.
16. V sesalni vhod ali izhod puhalnika ne vtikajte
prstov ali drugih predmetov.
17. Preprečite nenamerni zagon. Preden vstavite
baterijo, dvignete puhalnik ali ga prenašate,
preverite, ali je stikalo v položaju za izklop.
Prenašanje puhalnika s prstom na stikalu ali
napajanje puhalnika z vklopljenim stikalom
lahko povzroči nesrečo.
18. Ne odpihujte nevarnih predmetov, kot so žeblji,
delčki stekla ali rezila.
19. Puhalnika ne uporabljajte v bližini vnetljivih
snovi.
20. Izogibajte se dolgotrajni uporabi puhalnika v
prostoru z nizko temperaturo.
21. Naprave ne uporabljajte, kadar obstaja nevar-
nost udara strele.
22. Kadar stroj uporabljate na blatnih tleh,
mokrem pobočju ali kraju, na katerem drsi,
pazite, da vam ne spodrsne.
23. Izogibajte se delu v okolju, kjer je mogoče
pričakovati večjo utrujenost uporabnika.
24. Stroja ne uporabljajte v slabem vremenu, ko je
vidljivost omejena.Če tega ne upoštevate, lahko
stroj pade ali pride do nepravilnega delovanja
zaradi slabe vidljivosti.
25. Stroja ne potapljajte v lužo.
26. Kadar se v sesalno odprtino (odprtino za pre-
zračevanje) zaradi dežja prilepijo mokri listi ali
umazanija, te tujke odstranite.
Vzdrževanje in shranjevanje
1. Vse matice, čepi in vijaki naj bodo trdno priviti,
da zagotovite varno delovanje puhalnika.
2. Obrabljene ali poškodovane dele zamenjajte z
nadomestnimi deli, ki jih dobavi Makita.
3.
Hranite ga na suhem mestu in izven dosega otrok.
4.
Če želite puhalnik zaustaviti za pregled, ser-
visiranje, shranjevanje ali menjavo dodatne
opreme, izklopite puhalnik in počakajte, da se
vsi premični deli popolnoma zaustavijo, ter
odstranite baterijo. Počakajte, da se puhalnik
ohladi, preden začnete na njem izvajati kakršna
koli dela. Puhalnik redno vzdržujte in čistite.
5. Počakajte, da se puhalnik ohladi, preden ga
shranite.
6. Puhalnika ne izpostavljajte dežju. Puhalnik
shranjujte v zaprtem prostoru.
7. Pokrčite kolena, kadar dvigujete puhalnik, da
si ne poškodujete hrbta.
8. Stroja ne puščajte zunaj v dežju brez nadzora.
9. Stroja ne perite z vodo pod visokim tlakom.
10. Pri shranjevanju stroja se izogibajte neposre-
dni sončni svetlobi in dežju; stroj hranite na
mestu, kjer se ne bo segrel ali navlažil.
11. Pregled ali vzdrževanje opravite na mestu, kjer
se lahko izognete dežju.
12. Po uporabi stroja odstranite prilepljeno uma-
zanijo in pred shranjevanjem stroj povsem
osušite.Odvisno od sezone ali območja obstaja
nevarnost okvare zaradi zmrzovanja.
13. Naprave ne dvigajte ali prenašajte le z drža-
njem kabla.
Uporaba akumulatorskega orodja in ravnanje z njim
1. Orodje polnite samo s polnilnikom, ki ga je
določil proizvajalec. Polnilnik, ki je primeren za
eno vrsto akumulatorskih baterij, lahko pomeni
nevarnost požara, če ga uporabljate z drugimi
akumulatorskimi baterijami.
2. Električno orodje uporabljajte le s posebej
označenimi akumulatorskimi baterijami.
Uporaba drugih akumulatorskih baterij lahko
pomeni nevarnost telesnih poškodb in požara.
3.
Ko akumulatorske baterije ne uporabljate, je ne
hranite ob kovinskih predmetih, kot so sponke
za papir, kovanci, ključi, žeblji, vijaki ali drugi
manjši kovinski predmeti, ki lahko povzročijo
stik med priključkoma. Kratek stik akumulator-
skih priključkov lahko povzroči opekline ali požar.
4. V neprimernih pogojih lahko iz akumulatorja
uhaja tekočina; izogibajte se stiku. Če pride do
nenamernega stika, sperite z vodo. Če pride
tekočina v stik z očmi, takoj poiščite zdrav-
niško pomoč. Tekočina iz akumulatorja lahko
povzroči draženje ali opekline.
5. Ne uporabljajte akumulatorskega sklopa ali
orodja, ki je poškodovano ali spremenjeno.
Delovanje poškodovanih ali spremenjenih akumu-
latorjev je nepredvidljivo in lahko povzroči požar,
eksplozijo ali telesne poškodbe.
6. Akumulatorskega sklopa in orodja ne
izpostavljajte ognju ali previsoki temperaturi.
Izpostavljenost ognju ali temperaturam nad 130
°C lahko povzroči eksplozijo.
7. Upoštevajte vsa navodila glede polnjenja in
akumulatorskih baterij ali orodja ne polnite
zunaj določenega temperaturnega obsega.
Nepravilno polnjenje ali polnjenje pri temperatu-
rah, ki so zunaj določenega obsega, lahko poško-
duje akumulator in poveča nevarnost požara.
Other manuals for UB001C
6
Table of contents
Languages:
Other Makita Blower manuals

Makita
Makita UB0800 User guide

Makita
Makita UB120D User manual

Makita
Makita UB1102 User manual

Makita
Makita DUB362 User manual

Makita
Makita EB7660TH User guide

Makita
Makita BHX2501 User manual

Makita
Makita UB002CZ01 User manual

Makita
Makita EB7660TH User guide

Makita
Makita EB5300TH Operating instructions

Makita
Makita AS001G User manual

Makita
Makita DUB362 User manual

Makita
Makita UB001G User manual

Makita
Makita XGT 40 V Max User manual

Makita
Makita DAS180 User manual

Makita
Makita DUB185 User manual

Makita
Makita BUB360 User manual

Makita
Makita AS001G User manual

Makita
Makita DUB362 User manual

Makita
Makita DUB187 User manual

Makita
Makita PM7651H User guide