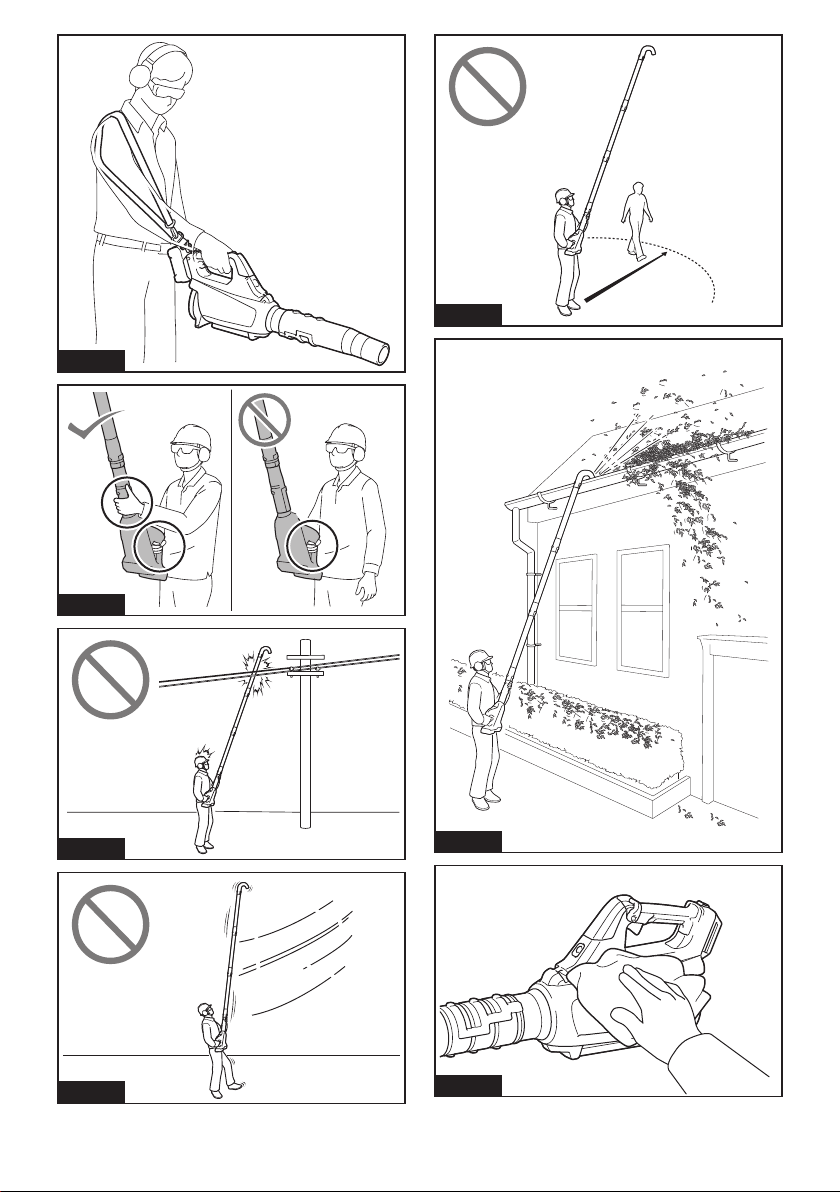
Makita UB001G User manual

UB001G
EN Cordless Blower INSTRUCTION MANUAL 7
FR SOUFFLEUR SANS FIL MANUEL D’INSTRUCTIONS 16
DE Gebläse BETRIEBSANLEITUNG 25
IT ISTRUZIONI PER L’USO 35
NL GEBRUIKSAANWIJZING 45
ES MANUAL DE
INSTRUCCIONES 54
PT MANUAL DE INSTRUÇÕES 63
DA Akku blæser BRUGSANVISNING 72
EL 81
TR KULLANMA KILAVUZU 91

2 3
11
1 2
2
1
1
3
2
2
3
1
4
2
1
2

1
2
2
1
2
3
1
2
3
1
1
1
3

2 3
1
1
1
2
1
2
1
1
1
4

15m
5

1
1
6

7ENGLISH
SPECIFICATIONS
Model: UB001G
Capacities Air volume 0 - 16.0 m3/min
Air speed (average) 0 - 53.5 m/s
Air speed (max.) 0 - 64.0 m/s
Overall length (with end nozzle) 850 mm / 900 mm / 950 mm
Rated voltage D.C. 36 V - 40 V max
Net weight 3.1 - 3.9 kg
Protection degree IPX4
without notice.
-
Charger DC40RA / DC40RB / DC40RC
residence.
WARNING:
Take particular care and attention.
Read instruction manual.
accident.
Do not expose to moisture.
Ni-MH
Li-ion
Due to the presence of hazardous com-
ponents in the equipment, waste electrical
and electronic equipment, accumulators
on the environment and human health.
Do not dispose of electrical and electronic
waste!
on waste electrical and electronic equip-
as well as their adaptation to national law,
and delivered to a separate collection point
for municipal waste, operating in accor-
dance with the regulations on environmen-
tal protection.
equipment.

8ENGLISH
-
Sound pressure level (LpA
Sound power level (LWA
NOTE: The declared noise emission value(s) has
another.
NOTE: The declared noise emission value(s)
exposure.
WARNING:
WARNING:
WARNING: -
-
hor less
NOTE:
measured in accordance with a standard test method
NOTE:
WARNING:
WARNING: -
For European countries only
to this instruction manual.
SAFETY WARNINGS
WARNING:
-
1.
3. -
4.
1.
3.
-
-
4.
5.
Non-skid, closed-toed

9ENGLISH
6.
Protective equipment such
hearing protection used for appropriate conditions
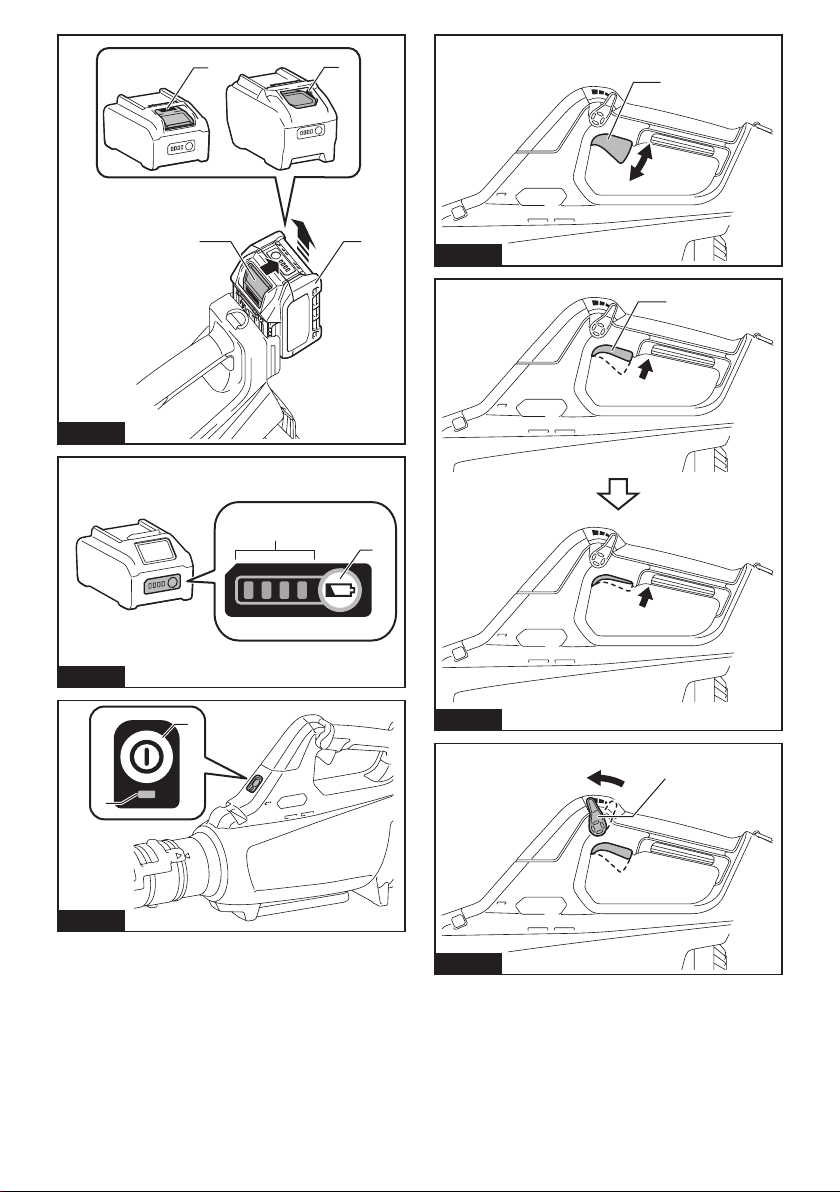
1.
•
•
•
•
3.
4.
5.
6.
8.
9.
10.
11.
•
-
•
•
13.
14.
15.
16.
18.
19.
-
1.
3.
4. -
5.
6.
8.
9.
10. -
11.
Depending on the season or the area,
there is a risk of malfunction due to freezing.
1.
-
3.
-

10 ENGLISH
4.
-
5. -
6.
-
-
1.
swallowed.
3.
4.
5.
6.
If
-
8.
9.
10.
-
11.
Water entering the machine will increase
the risk of electric shock.
1.
tool is maintained.
Service
manufacturer or authorized service providers.
WARNING:
1. -
or explosion.
3.
4.
-
5.
(1) -
-
(3)
6. -
8.
9.
10.
-
forwarding agents, special requirement on pack-
-
ing an expert for hazardous material is required.
national regulations.
around in the packaging.

11 ENGLISH
11.
-
13.
14.
-
15. -
16.
-
18.
CAUTION:
charger.
1.
-
3. -
4.
5.
ASSEMBLY
CAUTION:
Align the triangle mark on the end nozzle with the trian-
gle mark on the front pipe, then attach the end nozzle
to the front pipe, and then turn the end nozzle to lock it
into place.
Install the end nozzle so that the tip of the nozzle faces
can install the end nozzle so that the tip of the nozzle is
facing up.
Triangle mark
To remove the end nozzle, perform the installation
procedure in reverse.
NOTE:
Optional accessory
Align the groove on the adapter pipe with the pro-
trusion on the front pipe, then attach the adapter pipe to
the front pipe, and then turn it to lock it into place.
Adapter pipe
nozzle with the protrusion on the adapter pipe, then
pipe, and then turn it to lock it into place.
Adapter
pipe
Optional accessory
Align the groove on the adapter pipe with the pro-
trusion on the front pipe, then attach the adapter pipe to
the front pipe, and then turn it to lock it into place.
Insert the adapter pipe as far as it will go so that the
pipe.
Screw Hose clamp Adapter pipe
Loosen the screws on the hose clamps, and pass
the large hose clamp through the adapter pipe, and
then pass the small hose clamp.
Connect the extension pipe to the adapter pipe.
Align the groove on the extension pipe with the protru-
sion on the adapter pipe, and then slide the extension
pipe along its groove so that the triangle markings face
each other.
Adapter pipe

12 ENGLISH
Place the hose clamps onto the grooves as illus-
trated and tighten the screws.
Screw Hose clamp
According to the working height, connect the rest
of extension pipes to the extension pipe which has
CAUTION:
Turn the outlet of the end nozzle as shown in the
Connect the end nozzle to the extension pipe.
When connecting, align the triangle marking on the end
nozzle and the extension pipe, and then push the end
nozzle until it clicks. After that, rotate the end nozzle to
Triangle
marking
When removing the end nozzle, align the triangle mark-
ings on the end nozzle and extension pipe, and then
pull out the end nozzle from the extension pipe.
Triangle
marking
CAUTION: -
machine package and the shoulder harness of the
CAUTION:
If the
CAUTION:
Using other shoulder
Attach the hooks of the shoulder strap to the machine
Hook
You can also attach the shoulder strap to the machine
Buckle
FUNCTIONAL DESCRIPTION
CAUTION:
CAUTION:
CAUTION:
-
CAUTION:
If not,
CAUTION:
Red indicator Button
-
light up for a few seconds.
Indicator lamps
Charge the
malfunctioned.

13 ENGLISH
NOTE: Depending on the conditions of use and the
NOTE:
-
on to restart.
overheated, the main power lamp of the machine
machine on again.
WARNING:
To turn on the machine, press the main power switch.
press the main power switch again.
Main power switch Main power lamp
NOTE:
function. To avoid unintentional start up, the main
switch trigger is not pulled for a certain period after
the main power switch is turned on.
NOTE:
the control lever, or release the switch trigger, and
then press the main power switch.
WARNING: -
trigger. Release the switch trigger to stop.
Switch trigger
You can use the machine in the Boost mode. In the
normal mode. To use the machine in the Boost mode,
pull the switch trigger until the switch trigger stops in the
Switch trigger
NOTE:
conditions, use of the Boost mode is restricted to
protect the machine. If the main power lamp of the
NOTE:
the control lever.
The cruise control function allows the operator to main-
tain a constant speed without pulling the trigger. To
increase the speed, turn the control lever forward. To
Control lever
switch trigger, the machine does not start. To start the
OPERATION
CAUTION:
enter from suction inlet and cause a malfunction or
in a corner, start from the corner and then move to wide
area.

14 ENGLISH
CAUTION:
You
CAUTION:
CAUTION:
CAUTION:
CAUTION:
MAINTENANCE
CAUTION:
NOTICE:
Remove dust or dirt from the suction inlet at the rear of
the machine.
Suction inlet
-
tridge from the machine, and perform full maintenance.
Store the machine in a place out of the reach of children
and not exposed to moisture, rain, or direct sunlight.
for hanging the machine from a nail or screw on the wall.
Hole
TROUBLESHOOTING
-
replacement parts for repairs.
Motor does not run.
Motor stops running after a little use.
Overheating. Stop using the machine to allow it to cool down.
The machine does not reach the
maximum speed.
manual.
service center for repair.

15 ENGLISH
OPTIONAL
ACCESSORIES
CAUTION:
-
accessories or attachments might present a risk of
for its stated purpose.
-
Center.
• Adapter pipe
• Gutter nozzle set
• Shoulder strap
NOTE:

16 FRANÇAIS
SPÉCIFICATIONS
Modèle : UB001G
Capacités Volume d’air 0 - 16,0 m3/min
0 - 53,5 m/s
Vitesse de l’air (max.) 0 - 64,0 m/s
850 mm/900 mm/950 mm
Tension nominale 36 V - 40 V c.c. max.
Poids net 3,1 - 3,9 kg
Degré de protection IPX4
Batterie
Chargeur DC40RA / DC40RB / DC40RC
•
AVERTISSEMENT : L’utilisation
•
Veuillez être prudent et rester attentif.
Lire le mode d’emploi.
rotation.
Les cheveux longs risquent de se prendre
Porter des lunettes de protection et un
Ni-MH
Li-ion
uniquement
dangereux dans l’équipement, les déchets
d’équipements électriques et électro-
peuvent avoir un impact négatif sur l’envi-
ronnement et la santé humaine.
relative aux déchets d’équipements élec-
triques et électroniques et aux déchets
les déchets d’équipements électriques,
être collectés séparément et déposés dans
un point de collecte distinct pour déchets
-

17 FRANÇAIS
Niveau de pression sonore (LpA
Niveau de puissance sonore (LWA
NOTE :-
de test standard et peuvent être utilisées pour com-
parer les outils entre eux.
NOTE :-
rées peuvent aussi être utilisées pour l’évaluation
préliminaire de l’exposition.
AVERTISSEMENT :
AVERTISSEMENT :
AVERTISSEMENT :
hou moins
NOTE :-
de test standard et peuvent être utilisées pour com-
parer les outils entre eux.
NOTE :-
rées peuvent aussi être utilisées pour l’évaluation
préliminaire de l’exposition.
AVERTISSEMENT :
AVERTISSEMENT :
Pour les pays européens uniquement
CONSIGNES DE
SÉCURITÉ
AVERTISSEMENT :
Il
sont pas respectées.
-
1.
-
3. -
4. -
1.
3.
-

18 FRANÇAIS
4.
5.
de sécurité fermées et antidérapantes permet de
6. -
-
Les équipements de sécurité tels que les
de sécurité antidérapantes, les casques ou les
protecteurs d’oreilles utilisés pour les conditions
1. -
•
•
• -
•
3.
4.
5.
6.
8. -
9.
10.
11.
•
•
•
13. -
14.
15.
-
16.
-
-
18.
19. -
-
Le non-respect de
cette précaution pourrait entraîner votre chute ou

19 FRANÇAIS
1.
3.
4. -
-
5.
6.
-
8.
9.
10.
11.
Selon la saison ou la région, le gel peut
1. -
Un chargeur qui
présenter un risque d’incendie s’il est utilisé avec
L’utilisation
3.
-
incendie.
4.
Le
5.
-
6.
L’exposition au feu
provoquer une explosion.
-
-
ture en dehors de la plage indiquée peut endomma-
1.
L’élément de la pile pourrait exploser. Consultez
-
toxique en cas d’ingestion.
3.
4.
5.
6.
-
-
8.
9.
10. -
11.
Le risque
la machine.
1.
La sécurité de l’outil élec-
trique sera ainsi préservée.
-

20 FRANÇAIS
AVERTISSEMENT :
-
1.
Cela pourrait entraîner un incendie, une
chaleur excessive ou une explosion.
3.
4.
5.
(1) -
-
(3)
6.
-
8.
-
Cela pourrait entraîner
un incendie, une chaleur excessive ou une
explosion.
9.
10.
Lors du transport commercial par des tierces
parties ou des transitaires par exemple, des exi-
Pour la préparation de l’article expédié, il est néces-
saire de consulter un expert en matériau dangereux.
Veuillez également respecter les réglementations
11. -
L’insertion de
provoquer un incendie, une chaleur excessive,
13.
14.
15. -
16.
Cela pourrait réduire les
Cela pourrait
18.
ATTENTION :
-
risque d’incendie, de dommages matériels et corpo-
rels. Cela annulera également la garantie Makita pour
l’outil et le chargeur Makita.
1. -
-
3.
4. -
5. -
Other manuals for UB001G
7
This manual suits for next models
1
Table of contents
Languages:
Other Makita Blower manuals

Makita
Makita XBU03Z User manual

Makita
Makita BUB360 User manual

Makita
Makita UB001G User manual

Makita
Makita DUB362 User manual

Makita
Makita UB402MP User guide

Makita
Makita DUB362 User manual

Makita
Makita UB001C User manual

Makita
Makita BHX2500 User manual

Makita
Makita AS001GZ User manual

Makita
Makita DUB361 User manual

Makita
Makita DUB361 User manual

Makita
Makita BHX2501 User manual

Makita
Makita DUB184RF User manual

Makita
Makita PM7651H Manual

Makita
Makita BUB360 User manual

Makita
Makita DUB184Z User manual

Makita
Makita HG5002 User manual

Makita
Makita DUB187 User manual

Makita
Makita UB001G User manual

Makita
Makita UB360DWB User manual