Makita LM001C User manual

LM001C
EN Battery Powered Lawn Mower INSTRUCTION MANUAL 10
SV Batteridriven gräsklippare BRUKSANVISNING 22
NO Batteridrevet gressklipper BRUKSANVISNING 34
FI Akkukäyttöinen
ruohonleikkuri KÄYTTÖOHJE 46
DA Batteridreven plæneklipper BRUGSANVISNING 58
LV Ar akumulatoru darbināma
zāles pļaujmašīna LIETOŠANAS INSTRUKCIJA 70
LT Akumuliatorinė vejapjovė NAUDOJIMO INSTRUKCIJA 82
ET Akutoitega muruniiduk KASUTUSJUHEND 94
RU Аккумуляторная
газонокосилка РУКОВОДСТВО ПО
ЭКСПЛУАТАЦИИ 106

2
1
Fig.1
3
4
5
2
1
Fig.2
12
Fig.3
1
Fig.4
1
2
Fig.5
1
2
Fig.6
1
Fig.7
2

Fig.8
1
Fig.9
1
2
3
Fig.10
1
2
Fig.11
1
2
Fig.12
1
2
Fig.13
1
2
Fig.14
1
2
Fig.15
3

1
2
Fig.16
21
3
Fig.17
1
2
3
4
Fig.18
1
2
Fig.19
1
2
Fig.20
2
3
1
Fig.21
4

1
2
3
4
Fig.22
1
2
Fig.23
1
2
3
4
5
Fig.24
1
Fig.25
1
2
Fig.26
2
1
Fig.27
1 2
Fig.28
5

1
Fig.29
1
Fig.30
1
2
3
Fig.31
1
Fig.32
1
Fig.33
1
2
Fig.34
1
Fig.35
6

1
2
Fig.36
Fig.37
Fig.38
1
2 3
Fig.39
Fig.40
Fig.41
1
23
Fig.42
1
Fig.43
7

12
Fig.44
2
1
3
Fig.45
3
2
4
1
Fig.46
1
2
3
Fig.47
3
2
1
4
Fig.48
3
2
1
2
1
Fig.49
8

3
2
5
6
4
1
1
1
Fig.50
9

10 ENGLISH
ENGLISH (Original instructions)
SPECIFICATIONS
Model: LM001C
Mowing width (blade diameter) 534 mm
No load speed Normal mode 2,800 min-1
Soft no-load mode 2,300 - 2,800 min-1
Noise reduction mode 2,300 min-1
Part number of replacement
mower blade
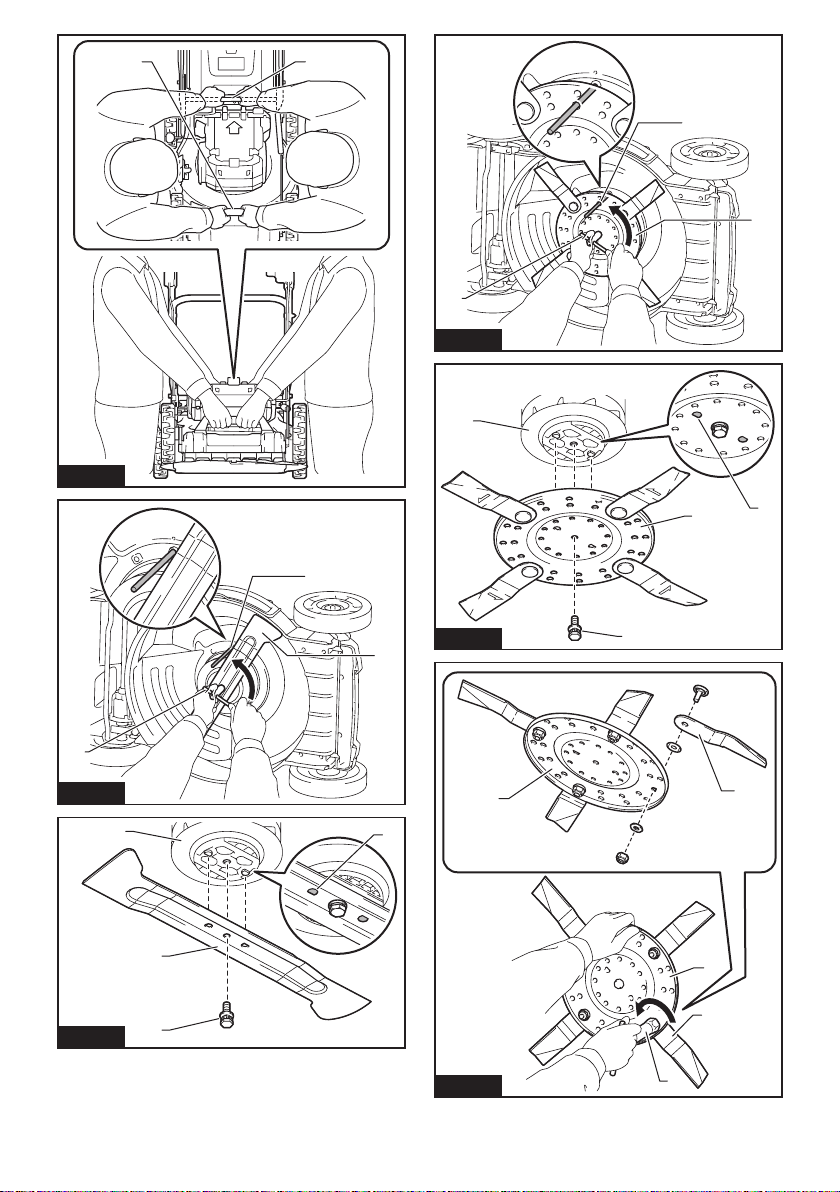
Straight mower blade 191D52-7
Swing back mower blades *1 191D50-1
Swing back mower blades *2 191D48-8
Dimensions
(L x W x H)
L: 1,630 mm to 1,715 mm
W: 590 mm
H: 990 mm to 1,095 mm
Traveling speed 2.5 - 5.0 km/h
Rated voltage D.C. 36 V - 40 V max
Net weight
When straight mower blade is installed
42.1 - 48.9 kg
When swing back mower
blades are installed
42.8 - 49.5 kg
Protection degree IPX4
*1. Base plate and individual mower blades. *2. Individual mower blades only.
• Duetoourcontinuingprogramofresearchanddevelopment,thespecicationshereinaresubjecttochange
without notice.
• Specicationsmaydierfromcountrytocountry.
• Theweightmaydierdependingontheattachment(s),includingthebatterycartridge.Thelightestandheavi-
est combination, according to EPTA-Procedure 01/2014, are shown in the table.
Applicable portable power pack
PDC1200 / PDC01
WARNING: Only use the portable power
packs listed above. Use of any other portable power
packsmaycauseinjuryand/orre.
Symbols
The followings show the symbols which may be used
for the equipment. Be sure that you understand their
meaning before use.
Take particular care and attention.
Read instruction manual.
Danger;beawareofthrownobjects.
The distance between the tool and
bystanders must be at least 15 m.
Never put your hands and feet near the
blade under the mower. Blades continue to
rotateafterthemotorisswitchedo.
Remove the lock key before inspecting,
adjusting,cleaning,servicing,leavingand
storing the mower.
Electrical hazard. Contact with water can
cause electric shock.
Do not pour water.
Attach the cord to the cord holders.
Ni-MH
Li-ion
Only for EU countries
Due to the presence of hazardous com-
ponents in the equipment, waste electrical
and electronic equipment, accumulators
and batteries may have a negative impact
on the environment and human health.
Do not dispose of electrical and electronic
appliances or batteries with household
waste!
In accordance with the European Directive
on waste electrical and electronic equip-
ment and on accumulators and batteries
and waste accumulators and batteries,
as well as their adaptation to national law,
waste electrical equipment, batteries and
accumulators should be stored separately
and delivered to a separate collection point
for municipal waste, operating in accor-
dance with the regulations on environmen-
tal protection.
This is indicated by the symbol of the
crossed-out wheeled bin placed on the
equipment.

11 ENGLISH
Intended use
The machine is intended for lawn mowing.
About this instruction manual
The term "battery" or "battery cartridge" in this instruc-
tion manual refers to the followings:
• Portable power pack
• Portable power pack to which battery cartridges
are installed
• Battery cartridge which is installed to portable
power pack
Noise
The typical A-weighted noise level determined accord-
ing to EN60335-2-77:
NOTE: The values have been measured with the
mower equipped with the straight mower blade.
Sound pressure level (LpA) : 80.0 dB(A)
Sound power level (LWA) : 91.2 dB (A)
Uncertainty (K) : 3 dB(A)
The noise level under working may exceed 80 dB (A).
NOTE: The declared noise emission value(s) has
been measured in accordance with a standard test
method and may be used for comparing one tool with
another.
NOTE: The declared noise emission value(s)
may also be used in a preliminary assessment of
exposure.
WARNING: Wear ear protection.
WARNING: The noise emission during actual
use of the power tool can dier from the declared
value(s) depending on the ways in which the
tool is used especially what kind of workpiece is
processed.
WARNING: Be sure to identify safety mea-
sures to protect the operator that are based on an
estimation of exposure in the actual conditions of
use (taking account of all parts of the operating
cycle such as the times when the tool is switched
o and when it is running idle in addition to the
trigger time).
Vibration
The vibration total value (tri-axial vector sum) deter-
mined according to EN60335-2-77:
NOTE: The values have been measured with the
mower equipped with the straight mower blade.
Vibration emission (ah) : 2.5 m/s2or less
Uncertainty (K) : 1.5 m/s2
NOTE: The declared vibration total value(s) has been
measured in accordance with a standard test method
and may be used for comparing one tool with another.
NOTE: The declared vibration total value(s) may also
be used in a preliminary assessment of exposure.
WARNING: The vibration emission during
actual use of the power tool can dier from the
declared value(s) depending on the ways in which
the tool is used especially what kind of workpiece
is processed.
WARNING: Be sure to identify safety mea-
sures to protect the operator that are based on an
estimation of exposure in the actual conditions of
use (taking account of all parts of the operating
cycle such as the times when the tool is switched
o and when it is running idle in addition to the
trigger time).
EC Declaration of Conformity
For European countries only
The EC declaration of conformity is included as Annex A
to this instruction manual.
SAFETY WARNINGS
IMPORTANT SAFETY
INSTRUCTIONS
WARNING: Read all safety warnings and
all instructions. Failure to follow the warnings and
instructionsmayresultinelectricshock,reand/or
seriousinjury.
Save all warnings and instruc-
tions for future reference.
Training
1.
Read the instructions carefully. Be familiar with
the controls and the proper use of the mower.
2. Never allow children or people unfamiliar with
these instructions to use the mower. Local
regulations can restrict the age of the operator.
3. Never operate the mower while people, espe-
cially children, or pets are nearby.
4. Keep in mind that the operator or user is
responsible for accidents or hazards occurring
to other people or their property.
5. Children should be supervised to ensure that
they do not play with the mower.
6. Physical condition - Do not operate mower
while under the inuence of drugs, alcohol, or
any medication.
Preparation
1.
While operating the mower, always wear sub-
stantial footwear and long trousers. Do not
operate the mower when barefoot or wearing
open sandals. Avoid wearing clothing or jewelry
that is loose tting or that has hanging cords or
ties. They can be caught in moving parts.
2.
Before use, always visually inspect the mower for
damaged, missing or misplaced guards or shields.
3. Be sure the area is clear of other people before
mowing. Stop mower if anyone enters the area.

12 ENGLISH
4. Do not insert the lock key into mower until it is
ready to be used.
5. Always wear protective goggles to protect
your eyes from injury when using power tools.
The goggles must comply with ANSI Z87.1 in
the USA, EN 166 in Europe, or AS/NZS 1336
in Australia/New Zealand. In Australia/New
Zealand, it is legally required to wear a face
shield to protect your face, too.
It is an employer's responsibility to enforce
the use of appropriate safety protective equip-
ments by the tool operators and by other per-
sons in the immediate working area.
6. Check the blades or blade bolts carefully for
cracks or damage before operation. Replace
cracked or damaged blades or blade bolts
immediately.
7. Remove foreign matters such as rocks, wire,
bottles, bones and large sticks from the work
area before mowing to prevent personal injury
or damage to the mower.
8. Objects struck by the mower blade can cause
severe injuries to persons. The lawn should
always be carefully examined and cleared of
all objects prior to each mowing.
9. Watch for holes, ruts, bumps, rocks, or other
hidden objects. Uneven terrain could cause a slip
and fall accident. Tall grass can hide obstacles.
10.
Do not insert or remove the lock key in the rain.
11. Use personal protective equipment. Always
wear eye protection. Protective equipment such
as a dust mask, non-skid safety shoes, hard hat or
hearing protection used for appropriate conditions
willreducepersonalinjuries.
Operation
1. Do not overreach. Keep the balance at all
times. Always be sure of the footing on slopes.
Walk, never run.
2. Stop the mower and remove the lock key, and
make sure that all moving parts have come to
a complete stop:
- whenever you leave the mower,
- before clearing blockages or unclogging chute,
- before checking, cleaning or working on the
mower,
- after striking a foreign object. Inspect the
mower for damage and make repairs before
restarting and operating the mower,
- whenever the mower starts vibrating
abnormally.
3.
Never operate the mower with defective guards
or shields, or without safety devices, for exam-
ple deectors and/or grass basket, in place.
4.
Avoid using the mower in bad weather condi-
tions especially when there is a risk of lightning.
5. Wear eye protection and stout shoes at all
times while operating the mower.
6. Operate the mower only in daylight or in good
articial light.
7.
Switch on the mower carefully according to instruc-
tions and with feet well away from the blade(s).
8. Take care against injury to feet and hands from
the mower blades.
9. Always ensure that the ventilation openings
are kept clear of debris.
10. Mow across the face of slopes, never up and
down. Exercise extreme caution when chang-
ing direction on slopes. Do not mow exces-
sively steep slopes.
11. Use extreme caution when reversing or pulling
the mower towards you.
12. Stop the blade(s) if the mower has to be tilted
for transportation when crossing surfaces
other than grass, and when transporting the
mower to and from the area to be used.
13.
Do not tilt the mower when switching on the
motor, except if the mower has to be tilted for
starting. In this case, do not tilt it more than
absolutely necessary and lift only the part,
which is away from the operator. Always ensure
that both hands are in the operating position
before returning the mower to the ground.
14.
Do not put hands or feet near or under rotating parts.
Keep clear of the discharge opening at all times.
15. Do not transport the mower while the mower is
turned on.
16. Avoid operating the mower in wet grass.
17. Always keep a rm hold on the handle.
18.
Don't grasp the exposed cutting blades or cutting
edges when picking up or holding the mower.
19.
Keep hands and feet away from rotating blades.
Caution - Blades coast after the mower is switched o.
20. Stop operation immediately if you notice
anything unusual. Switch o the mower and
remove the lock key. Then inspect the mower.
21. Never attempt to make cutting height adjust-
ments while mower is running if the mower
has cutting height adjustment feature.
22. Release switch lever and wait for blade rota-
tion to stop before crossing driveways, walks,
roads, and any gravel-covered areas. Also
remove the lock key if you leave the mower,
reach to pick up or remove something out of
your way, or for any other reason that may
distract you from what you are doing.
23. If the mower strikes a foreign object, follow
these steps:
- Stop the mower, release the switch lever and
wait until the blade comes to a complete stop.
- Remove the lock key and the battery cartridge.
- Thoroughly inspect the mower for any damage.
- Replace the blade if it is damaged in any way.
Repair any damage before restarting and con-
tinuing to operate the mower.

13 ENGLISH
24. Do not start the mower when standing in front
of the discharge opening.
25. If the mower starts to vibrate abnormally
(check immediately)
- inspect for damage,
- replace or repair any damaged parts,
- check for and tighten any loose parts.
26. Never direct discharged material toward
anyone. Avoid discharging material against a
wall or obstruction. Material may ricochet back
toward the operator. Stop the blade when crossing
gravel surfaces.
27. Do not pull the mower backwards unless
absolutely necessary. When you are compelled
to back the mower from a fence or other similar
obstruction, look down and behind before and
while moving backwards.
28.
Shut the motor o and wait until the blade comes
to a complete stop before removing the grass
catcher.Bewarethatthebladescoastafterturno.
29. When you use the machine on muddy ground,
wet slope, or slippery place, pay attention to
your footing.
30. Avoid working in poor environment where
increased user fatigue is expected.
31. Do not use the machine in bad weather where
visibility is limited. Failure to do so may cause
fall or incorrect operation due to low visibility.
32. Do not submerge the machine into a puddle.
33. When wet leaves or dirt adhere to the suc-
tion mouth (ventilation window) due to rain,
remove them.
34. Do not use the machine in the snow.
35. If the cut-o grass is wet, it is likely to be
clogged inside of the machine. Check the con-
dition of the machine regularly, and remove the
adhered grass as necessary.
36. When operating the machine, pay attention to
piping and wiring.
Maintenance and storage
1. Replace worn or damaged parts for safety.
Use only genuine replacement parts and
accessories.
2. Inspect and maintain the mower regularly.
3. When not in use, store the mower out of the
reach of children.
4. Keep all nuts, bolts, and screws tight to
be sure the equipment is in safe working
condition.
5. Check the grass basket frequently for wear or
deterioration. For storage, always make sure
the grass basket is empty. Replace a worn
grass basket with a new factory replacement
for safety.
6. Use only the manufacturer genuine blades
specied in this manual.
7. Be careful during adjustment of the mower
to prevent entrapment of the ngers between
moving blades and xed parts of the mower.
8. Check the blade mounting bolt at frequent
intervals for proper tightness.
9. Always allow the mower to cool down before
storing.
10. When servicing the blades be aware that, even
though the power source is switched o, the
blades can still be moved.
11. Never remove or tamper with safety devices.
Check their proper operation regularly. Never
do anything to interfere with the intended
function of a safety device or to reduce the
protection provided by a safety device.
12.
Do not leave the machine unattended outdoors in the rain.
13.
Do not wash the machine with high pressure water.
14. When washing the machine, be sure to remove
the battery and lock key, and pour water
toward the bottom of the machine to which the
blade is attached.
15. When storing the machine, avoid direct sun-
light and rain, and store it in a place where it
does not get hot or humid.
16. Perform inspection or maintenance in a place
where rain can be avoided.
17. After using the machine, remove the adhered
dirt and dry the machine completely before
storing. Depending on the season or the area,
there is a risk of malfunction due to freezing.
Battery tool use and care
1. Recharge only with the charger specied by
the manufacturer. A charger that is suitable for
onetypeofbatterypackmaycreateariskofre
when used with another battery pack.
2. Use power tools only with specically desig-
nated battery packs. Use of any other battery
packsmaycreateariskofinjuryandre.
3. When battery pack is not in use, keep it away
from other metal objects, like paper clips,
coins, keys, nails, screws or other small metal
objects, that can make a connection from one
terminal to another. Shorting the battery termi-
nalstogethermaycauseburnsorare.
4. Under abusive conditions, liquid may be
ejected from the battery; avoid contact. If con-
tact accidentally occurs, ush with water. If
liquid contacts eyes, additionally seek medical
help.Liquidejectedfromthebatterymaycause
irritation or burns.
5. Do not use a battery pack or tool that is dam-
aged or modied.Damagedormodiedbatteries
may exhibit unpredictable behaviour resulting in
re,explosionorriskofinjury.
6. Do not expose a battery pack or tool to re or
excessive temperature.Exposuretoreortem-
perature above 130 °C may cause explosion.
7. Follow all charging instructions and do not
charge the battery pack or tool outside the
temperature range specied in the instruc-
tions. Charging improperly or at temperatures
outsidethespeciedrangemaydamagethe
batteryandincreasetheriskofre.
Electrical and battery safety
1. Do not dispose of the battery(ies) in a re.
The cell may explode. Check with local codes for
possible special disposal instructions.
2. Do not open or mutilate the battery(ies).
Released electrolyte is corrosive and may cause
damage to the eyes or skin. It may be toxic if
swallowed.

14 ENGLISH
3. Do not charge battery in rain, or in wet
locations.
4. Do not charge the battery outdoors.
5. Do not handle charger, including charger plug,
and charger terminals with wet hands.
6. Do not replace the battery in the rain.
7. Do not wet the terminal of battery with liquid
such as water, or submerge the battery. Do not
leave the battery in the rain, nor charge, use,
or store the battery in a damp or wet place. If
the terminal gets wet or liquid enters inside of bat-
tery, the battery may be short circuited and there is
ariskofoverheat,re,orexplosion.
8. After removing the battery from the machine or
charger, be sure to attach the battery cover to
the battery and store it in a dry place.
9. Do not replace the battery with wet hands.
10. If the battery cartridge gets wet, drain the
water inside and then wipe it with a dry cloth.
Dry the battery cartridge completely in a dry
place before use.
11. Avoid dangerous environment. Don't use the
machine in dump or wet locations or expose it
to rain. Water entering the machine will increase
the risk of electric shock.
Service
1. Have your power tool serviced by a qualied
repair person using only identical replacement
parts. This will ensure that the safety of the power
tool is maintained.
2. Never service damaged battery packs. Service
of battery packs should only be performed by the
manufacturer or authorized service providers.
SAVE THESE INSTRUCTIONS.
WARNING: DO NOT let comfort or familiarity
with product (gained from repeated use) replace
strict adherence to safety rules for the subject
product.
MISUSE or failure to follow the safety rules stated
in this instruction manual may cause serious
personal injury.
Important safety instructions for
battery cartridge
1. Before using battery cartridge, read all instruc-
tions and cautionary markings on (1) battery
charger, (2) battery, and (3) product using
battery.
2. Do not disassemble or tamper with the battery
cartridge.Itmayresultinare,excessiveheat,
or explosion.
3. If operating time has become excessively
shorter, stop operating immediately. It may
result in a risk of overheating, possible burns
and even an explosion.
4. If electrolyte gets into your eyes, rinse them
out with clear water and seek medical atten-
tion right away. It may result in loss of your
eyesight.
5. Do not short the battery cartridge:
(1) Do not touch the terminals with any con-
ductive material.
(2) Avoid storing battery cartridge in a con-
tainer with other metal objects such as
nails, coins, etc.
(3) Do not expose battery cartridge to water
or rain.
A battery short can cause a large current ow,
overheating, possible burns and even a breakdown.
6. Do not store and use the tool and battery car-
tridge in locations where the temperature may
reach or exceed 50 °C (122 °F).
7. Do not incinerate the battery cartridge even if
it is severely damaged or is completely worn
out. The battery cartridge can explode in a re.
8. Do not nail, cut, crush, throw, drop the battery
cartridge, or hit against a hard object to the
battery cartridge. Such conduct may result in a
re,excessiveheat,orexplosion.
9. Do not use a damaged battery.
10.
The contained lithium-ion batteries are subject to
the Dangerous Goods Legislation requirements.
For commercial transports e.g. by third parties,
forwarding agents, special requirement on pack-
aging and labeling must be observed.
For preparation of the item being shipped, consulting an
expert for hazardous material is required. Please also
observe possibly more detailed national regulations.
Tapeormaskoopencontactsandpackupthe
battery in such a manner that it cannot move
around in the packaging.
11.
When disposing the battery cartridge, remove it from
the tool and dispose of it in a safe place. Follow your
local regulations relating to disposal of battery.
12. Use the batteries only with the products
specied by Makita. Installing the batteries to
non-compliantproductsmayresultinare,exces-
sive heat, explosion, or leak of electrolyte.
13. If the tool is not used for a long period of time,
the battery must be removed from the tool.
14. During and after use, the battery cartridge may
take on heat which can cause burns or low
temperature burns. Pay attention to the han-
dling of hot battery cartridges.
15.
Do not touch the terminal of the tool immediately
after use as it may get hot enough to cause burns.
16. Do not allow chips, dust, or soil stuck into the
terminals, holes, and grooves of the battery
cartridge. It may result in poor performance or
breakdown of the tool or battery cartridge.
17. Unless the tool supports the use near
high-voltage electrical power lines, do not use
the battery cartridge near high-voltage electri-
cal power lines. It may result in a malfunction or
breakdown of the tool or battery cartridge.
18. Keep the battery away from children.
SAVE THESE INSTRUCTIONS.
CAUTION:
Only use genuine Makita batteries.
Use of non-genuine Makita batteries, or batteries that
have been altered, may result in the battery bursting
causingres,personalinjuryanddamage.Itwillalso
void the Makita warranty for the Makita tool and charger.

15 ENGLISH
Tips for maintaining maximum
battery life
1. Charge the battery cartridge before completely
discharged. Always stop tool operation and
charge the battery cartridge when you notice
less tool power.
2. Never recharge a fully charged battery car-
tridge. Overcharging shortens the battery
service life.
3. Charge the battery cartridge with room tem-
perature at 10 °C - 40 °C (50 °F - 104 °F). Let
a hot battery cartridge cool down before
charging it.
4. When not using the battery cartridge, remove
it from the tool or the charger.
5. Charge the battery cartridge if you do not use
it for a long period (more than six months).
ASSEMBLY
WARNING: Always be sure that the lock key
and battery cartridge are removed before carrying
out any work on the mower. Failure to remove the
lock key and the battery cartridge may result in seri-
ouspersonalinjuryfromaccidentalstart-up.
WARNING: Never start the mower unless it is
completely assembled. Operation of the machine
in a partially assembled state may result in serious
personalinjuryfromaccidentalstart-up.
Installing the handle
NOTICE: When installing handles, position the
cords so that they are not caught by anything
between the handles. If the cord is damaged, the
mower switch may not work.
1. Align the holes in the lower handle with the holes
in the mower body, and then tighten 4 bolts temporarily.
►Fig.1: 1. Lower handle 2. Bolt
2. Firmly tighten 4 bolts which were temporarily
tightened in step 1 using box wrench 13.
3. Align the hole in the lower handle with the hole in
the upper handle, then insert the bolt from inside, and
then tighten the nut from outside with box wrench 13.
Perform the same procedure on the other side.
►Fig.2: 1. Bolt 2. Lower handle 3. Nut 4. Hole
5. Upper handle
CAUTION: Hold the upper handle rmly so
that it does not drop o your hand. Otherwise, the
handlemayfallandcauseaninjury.
4. Attach the holders to the handle.
Align the protrusions on the holder with the holes on the
handlesothattheprotrusionstintheholes.Position
thecordsasshowninthegure.
►Fig.3: 1. Cord 2. Holder
Removing the mulching plug
1. Open the rear cover.
►Fig.4: 1. Rear cover
2. Remove the mulching plug while holding down the
lever.
►Fig.5: 1. Lever 2. Mulching plug
Assembling the grass basket
1. Insert the frame into the grass basket as far as it
will go.
►Fig.6: 1. Frame 2. Grass basket
2. Attach the top clip to the frame as shown in the
gure.
►Fig.7: 1. Clip
3. Attach all the clips to the frame as shown in the
gure.Makesurethatalltheclipsaresecurelyattached
to the frame.
►Fig.8
Installing or removing the grass
basket
To install the grass basket, follow the steps below.
1. Open the rear cover.
►Fig.9: 1. Rear cover
2. Hold the handle of the grass basket, and then
hook the grass basket on the rod of the mower body as
showninthegure.
►Fig.10: 1. Rod 2. Handle 3. Grass basket
To remove the grass basket, open the rear cover, and
then remove the grass basket by holding the handle.
Attaching the mulching plug
1. Open the rear cover, and then remove the grass
basket.
►Fig.11: 1. Rear cover 2. Grass basket
2. Attach the mulching plug while holding down the
lever, and then release the lever to lock the mulching
plug.
►Fig.12: 1. Lever 2. Mulching plug
Attaching the discharge attachment
1. Open the rear cover, and then remove the grass
basket.
►Fig.13: 1. Rear cover 2. Grass basket
2. Attach the mulching plug while holding down the
lever, and then release the lever to lock the mulching
plug.
►Fig.14: 1. Lever 2. Mulching plug
3. Open the right side cover, and then attach the
discharge attachment.
Insert the hooks of the discharge attachment under the
rod of the right side cover.
►Fig.15: 1. Right side cover 2. Discharge attachment

16 ENGLISH
FUNCTIONAL
DESCRIPTION
Installing or removing portable
power pack
CAUTION: Always switch o the machine
before installing or removing the portable power
pack.
CAUTION: Hold the machine and the portable
power pack rmly when installing or removing
portable power pack.Failuretoholdthemrmly
maycausethemtoslipoyourhandsandresultin
damage to the machine and portable power pack and
apersonalinjury.
CAUTION: Make sure that the portable power
pack is securely installed to the machine. If not,
it may accidentally fall out of the machine, causing
injurytoyouorsomeonearoundyou.
CAUTION: Before operation, make sure that
the cord is securely attached to the cord holders
and the socket is inserted into the plug all the
way.
For PDC1200
1. Place the cord of the portable power pack as
showninthegure.
►Fig.16: 1. Portable power pack 2. Cord
2. Install the portable power pack to the machine as
showninthegure.
►Fig.17: 1. Battery support lever 2. Portable power
pack 3. Lock button
CAUTION: Make sure that the portable power
pack is securely locked to the battery support
levers and the lock button is securely locked.
3. Attach the cord to the cord holders as shown in
thegure.Opentheplugcover,thenalignthearrow
mark on the socket with that on the machine, and then
insert the socket into the plug all the way.
►Fig.18: 1. Plug cover 2. Arrow mark 3. Socket
4. Cord
NOTICE: Do not insert the socket forcibly. If
the socket cannot be inserted easily, it is not being
inserted correctly.
NOTICE: When disconnecting the socket from
the plug, do not hold the cord but hold the socket.
Otherwise, the cord may be damaged and cause a
malfunction of the machine.
4. Open the lock key cover, then insert the lock key
intheplaceshowninthegureasfarasitwillgo,and
then close the lock key cover.
►Fig.19: 1. Lock key 2. Lock key cover
To remove the portable power pack, perform the instal-
lation procedure in reverse.
For PDC01
NOTE: Before installing the portable power pack to
the machine, install at least one battery to battery port
1 or 2, and at least one battery to battery port 3 or 4.
1. Place the cord of the portable power pack as
showninthegure.
►Fig.20: 1. Portable power pack 2. Cord
2. Install the portable power pack to the machine
asshowninthegure.Lockthelockingleversonboth
sides of the portable power pack.
►Fig.21: 1. Battery support lever 2. Locking lever
3. Portable power pack
CAUTION: Make sure that the portable power
pack is securely locked to the battery support
levers and the locking levers are securely locked.
3. Attach the cord to the cord holders as shown in
thegure.Opentheplugcover,thenalignthearrow
mark on the socket with that on the machine, and then
insert the socket into the plug all the way.
►Fig.22:
1. Plug cover 2. Arrow mark 3. Socket 4. Cord
NOTICE:
Do not insert the socket forcibly. If the socket
cannot be inserted easily, it is not being inserted correctly.
NOTICE:
When disconnecting the socket from the plug,
do not hold the cord but hold the socket. Otherwise, the cord
may be damaged and cause a malfunction of the machine.
4. Open the lock key cover, then insert the lock key
intheplaceshowninthegureasfarasitwillgo,and
then close the lock key cover.
►Fig.23: 1. Lock key 2. Lock key cover
To remove the portable power pack, perform the instal-
lation procedure in reverse.
Machine / battery protection system
The machine is equipped with a machine/battery protec-
tionsystem.Thissystemautomaticallycutsopowerto
the motor to extend machine and battery life. The machine
will automatically stop during operation if the machine or
battery is placed under one of the following conditions:
Overload protection
When the battery is operated in a manner that causes it to draw
an abnormally high current, the machine automatically stops and
the main power lamp blinks in green. In this situation, turn the
machineoandstoptheapplicationthatcausedthemachineto
become overloaded. Then turn the machine on to restart.
Overheat protection
When the machine or battery is overheated, the machine stops auto-
matically and the main power lamp lights up in red. In this case, let the
machine and battery cool before turning the machine on again.
Overdischarge protection
When the battery capacity is not enough, the machine
stops automatically, and the main power lamp blinks
in red, and the indicator lamp lights up. In this case,
remove the battery from the machine and charge the
battery or change the battery to fully charged ones.

17 ENGLISH
Control panel
The control panel has the main power switch and the
mode switching button.
►Fig.24: 1. Soft no-load mode lamp 2. Noise reduc-
tion mode lamp 3. Mode switching button
4. Main power lamp 5. Main power switch
Main power switch
WARNING: Always turn o the main power
switch when not in use.
To turn on the machine, press the main power switch.
Themainpowerlamplightsupingreen.Toturnothe
machine, press the main power switch again.
NOTE: If the main power lamp lights up in red or
blinks in red or green, refer to the instructions for
machine/battery protection system.
NOTE:Thismachineemploystheautopower-o
function. To avoid unintentional start up, the main
power switch will automatically shut down when the
switch lever and drive lever (if equipped) are not
pulled for a certain period after the main power switch
is turned on.
Mode switching button
You can switch the operating mode by pressing the
mode switching button. When the machine is turned on,
the machine starts up in the normal mode.
When you press the mode switching button, the
machine shifts to the soft no-load mode and the soft
no-load mode lamp lights up in green. In the soft
no-load mode, you can minimizes start-up shock.
When you press the mode switching button again, the
machine shifts to the noise reduction mode and the noise
reduction mode lamp lights up in green. In the noise
reduction mode, you can decrease the noise at mowing.
When you press the mode switching button again, the
machine returns to the normal mode.
Indicating the remaining battery capacity
When the remaining battery capacity becomes low, the
indicator lamp blinks or lights up.
►Fig.25: 1. Indicator lamp
Indicator lamp Remaining
capacity
O Blinking Lighted
20% to 100%
0% to 20%
Charge the
battery.
NOTE:
The indicator lamp for remaining battery capac-
ityisjustforareference.Theactualbatterycapacity
maydierdependingontheusageconditions.
NOTE: The display of the indicator lamp is updated
when the machine stops operation.
Switch action
WARNING: Before installing the portable
power pack, always check to see that the switch
lever actuates properly and returns to the original
position when released. Operating the machine with
a switch that does not actuate properly can lead to
lossofcontrolandseriouspersonalinjury.
NOTE: The mower does not start without pressing the
switch button even the switch lever is pulled.
NOTE: Mower may not start due to the overload
when you try to mow long or dense grass at a time.
Increase the mowing height in this case.
This mower is equipped with the lock key and handle
switch. If you notice anything unusual with either of the
lock key or switch, stop the operation immediately and
have them checked by your nearest Makita Authorized
Service Center.
1. Install the portable power pack, and then insert the
lock key.
2. Press the power button on the portable power
pack. The main power lamp will light up.
For PDC1200
►Fig.26: 1. Power button 2. Main power lamp
For PDC01
►Fig.27: 1. Power button 2. Main power lamp
3. Press the main power switch.
4. Pull the switch lever toward you while holding
down the switch button. Release the switch button as
soon as the motor starts running.
►Fig.28: 1. Switch button 2. Switch lever
NOTE: If the lock key is not inserted, the power lamp
blinks in green when you pull the switch lever.
5. While holding the switch lever, push the drive lever
forward and hold it to drive the rear wheels.
►Fig.29: 1. Drive lever
NOTE: You can drive the rear wheels by pushing
the drive lever forward and hold it without pulling the
switch lever.
6. Release the drive lever and the switch lever to
stop the machine.
Adjusting the mowing height
WARNING: Never put your hand or leg under
the mower body when adjusting the mowing
height.
WARNING: Always make sure that the lever
ts in the groove properly before operation.
Themowingheightcanbeadjustedintherangeof
between 20 mm and 100 mm.
Remove the lock key, and then pull the mowing height
adjustingleveroutwardofthemowerbodyandmoveit
to your desired mowing height.
►Fig.30: 1.Mowingheightadjustinglever

18 ENGLISH
The table below shows the relationship between the
number on the mower body and the approximate mow-
ing height.
Number Mowing height
120 mm
226 mm
332 mm
439 mm
547 mm
655 mm
763 mm
874 mm
986 mm
10 100 mm
Hold the front grip or the lower handle with one hand,
andthenmovethemowingheightadjustingleverwith
the other hand.
►Fig.31: 1.Mowingheightadjustinglever2. Lower
handle 3. Front grip
NOTE:Themowingheightguresshouldbeused
justasaguideline.Dependingontheconditionsof
the lawn or the ground, the actual lawn height may
becomeslightlydierentfromthesetheight.
NOTE: Try a test mowing of grass in a less conspicu-
ous place to get your desired height.
Grass level indicator
Grass level indicator shows the volume of mowed
grass. When the grass basket is not full, the indicator
oatswhilethebladesarerunning.
►Fig.32: 1. Grass level indicator
When the grass basket is almost full, the indicator does
notoatwhilethebladesarerunning.Inthiscase,stop
the operation immediately and empty the basket.
►Fig.33: 1. Grass level indicator
NOTE: This indicator is a rough guide. Depending on
the conditions of inside of the basket, this indicator
may not work properly.
Adjusting the handle height
CAUTION: Before removing the bolts, hold
the upper handle rmly. Otherwise, the handle may
fallandcauseaninjury.
Thehandleheightcanbeadjustedintwolevels.
1. Remove the upper bolts of the lower handle using
box wrench 13, and then loosen the lower bolts.
►Fig.34: 1. Upper bolt 2. Lower bolt
2. Adjustthehandleheight,andthentightenthe
upperandlowerboltsrmly.
Adjusting the traveling speed
►Fig.35: 1. Speed lever
Thetravelingspeedcanbeadjustedwiththespeed
lever. To decrease the speed, pull the lever toward you,
and to increase the speed, turn the lever forward.
Using mulching plug
The mulching plug allows you to return the cut grass to
the ground without gathering the cut grass in the grass
basket. When you operate the machine with the mulch-
ing plug, be sure to remove the grass basket.
NOTICE: When using the machine with the
mulching plug, make sure that the total length of
grass after cutting is 30 mm or more, and the cut
length is 15 mm or less.
►Fig.36: (1) 30 mm or more (2) 15 mm or less
Using discharge attachment
The discharge attachment allows you to discharge the cut
grass to the ground from the right side of the machine without
gathering the cut grass in the grass basket. When you operate
the machine with the discharge attachment, be sure to install
the mulching plug and remove the grass basket.
Electronic function
The machine is equipped with the electronic functions
for easy operation.
• Constant speed control of blade rotation
Electronic speed control for obtaining constant speed.
Possibletogetnenish,becausetherotatingspeed
is kept constant even under load condition.
• Soft start at driving
The soft-start function minimizes start-up shock,
and makes the machine start smoothly.
• Electric brake
This machine is equipped with an electric brake. If the
machine consistently fails to quickly stop the mower
blades after releasing the switch lever, have the
machine serviced at Makita Authorized Service Center.
OPERATION
Mowing
WARNING: Before mowing, clear away sticks
and stones from mowing area. Furthermore, clear
away any weeds from mowing area in advance.
WARNING: Always wear the safety goggles or
safety glasses with side shields when operating
the mower.
CAUTION: If the cut grass or foreign object
blocks up inside of the mower body, be sure to
remove the lock key and battery cartridge and
wear gloves before removing the grass or foreign
object.

19 ENGLISH
NOTICE: Use this machine for mowing lawn only.
Do not mow weeds with this machine.
►Fig.37
Firmly hold the handle with both hands when mowing.
The mowing speed guideline is approximately 7 to 14
meters per 10 seconds.
►Fig.38
The center lines of the front wheels are guidelines to
mowing width. Using the center lines as guidelines,
mow in strips. Overlap by one half to one third the previ-
ous strip to mow the lawn evenly.
►Fig.39: 1. Mowing width 2. Overlapping area
3. Center line
Change the mowing direction each time to prevent the
grassgrainpatternfromforminginjustonedirection.
►Fig.40
Periodically check the grass basket for mowed grass.
Empty the grass before it becomes full. Before every
periodical check, be sure to stop the mower then
remove the lock key and the socket of the portable
power pack.
NOTICE: Using the mower with the grass basket
full prevents smooth blade rotation and places
an extra load on the motor, which may cause
breakdown.
Mowing a long-grass lawn
Do not try to cut long grass all at once. Instead, mow
the lawn in steps. Leave a day or two between mowings
until the lawn becomes evenly short.
►Fig.41
NOTE: Mowing long grass to a short length all at
once may cause the grass to die. The cut grass may
also block up inside of the mower body.
Emptying the grass basket
WARNING: To reduce a risk of accident, reg-
ularly check the grass basket for any damage or
weakened strength. Replace the grass basket if
necessary.
1. Release the switch lever and drive lever.
2. Remove the lock key.
3. Open the rear cover and take out the grass basket
by holding the handle.
►Fig.42: 1. Rear cover 2. Handle 3. Grass basket
4. Empty the grass basket.
MAINTENANCE
WARNING: Always be sure that the lock key
and portable power pack are removed from the
mower before storing or carrying the mower or
attempting to perform inspection or maintenance.
WARNING: Always remove the lock key when
the mower is not in use. Store the lock key in a
safe place out of reach of children.
WARNING: Wear gloves when performing
inspection or maintenance.
WARNING: Always wear the safety goggles or
safety glasses with side shields when performing
inspection or maintenance.
NOTICE: Never use gasoline, benzine, thinner,
alcohol or the like. Discoloration, deformation or
cracks may result.
To maintain product SAFETY and RELIABILITY,
repairs,anyothermaintenanceoradjustmentshould
be performed by Makita Authorized or Factory Service
Centers, always using Makita replacement parts.
Maintenance
1. Remove the lock key and portable power pack.
2. Put the mower on its side so that the mowing
heightadjustinglevercomestotheupperside.Clean
grass clippings accumulated on the underside of mower
deck.
3. Pour water toward the bottom of the machine to
which the blade is attached.
NOTICE: Do not wash the machine with high
pressure water.
4. Check all nuts, bolts, screws, etc. for tightness.
5. Inspect moving parts for damage, breakage, and
wear. Damaged or missing parts should be repaired or
replaced.
6. Store the mower in a safe place out of the reach of
children.
NOTICE: Do not pour water to the area shown in
the gure. Pouring water to the motor unit may cause
a malfunction of the machine.
►Fig.43: 1. Area where water should not be poured
Carrying the mower
When carrying the mower, hold the front grip and rear
gripwithtwopeopleasshowninthegure.
►Fig.44: 1. Front grip 2. Rear grip
Storing
Store mower indoors in a cool, dry and locked place.
Don't store the mower and charger in locations where
the temperature may reach or exceed 40 °C.

20 ENGLISH
Removing or installing the mower
blade
WARNING: The blade coasts for a few sec-
onds after releasing the switch. Do not start any
operation until the blade comes to a complete
stop.
WARNING: Always remove the lock key and
portable power pack when removing or installing
the blade. Failure to remove the lock key and por-
table power pack may cause a serious injury.
WARNING: Always wear gloves when han-
dling the blade.
Removing the mower blade
For models equipped with straight mower
blade
1. Put the mower on its side so that the mowing
heightadjustinglevercomestotheupperside.
2. To lock the blade, insert the pin into a hole on the
mower body.
3. Turn the bolt counterclockwise with box wrench
17.
►Fig.45: 1. Mower blade 2. Pin 3. Box wrench
4. Remove the bolt, and then mower blade.
►Fig.46: 1. Blade support 2. Mower blade 3. Bolt
4. Protrusion
NOTICE: When installing the mower blade, make
sure that the protrusions on the blade support t
in the holes in the mower blade.
For models equipped with swing back
mower blades
1. Put the mower on its side so that the mowing
heightadjustinglevercomestotheupperside.
2. To lock the base plate, insert the pin into a hole on
the mower body through a hole on the base plate.
3. Turn the bolt counterclockwise with box wrench
17.
►Fig.47: 1. Pin 2. Base plate 3. Box wrench
4. Remove the bolt, and then base plate.
►Fig.48: 1. Blade support 2. Base plate 3. Bolt
4. Protrusion
NOTICE: When installing the mower blades,
make sure that the protrusions on the blade sup-
port t in the holes in the base plate.
5. To remove the individual mower blade, turn the
bolt counterclockwise with box wrench 17 while holding
the base plate.
►Fig.49: 1. Base plate 2. Mower blade 3. Box wrench
6. Remove the nut, washer, spring washer, mower
blade, and bolt in order.
►Fig.50: 1. Bolt hole 2. Bolt 3. Mower blade 4. Spring
washer 5. Washer 6. Nut
NOTICE: When tightening the nuts to install the
individual mower blades, apply 30 N•m as tighten-
ing torque.
NOTICE: When installing the individual mower
blade, be sure to attach the spring washer in the
direction as shown in the gure.
NOTICE: When installing the individual mower
blade, be sure to insert the bolts into the bolt
holes shown in the gure.
Installing the mower blade
WARNING: Install the mower blade carefully.
It has a top/bottom facing.
WARNING: Tighten the bolt clockwise rmly
to secure the blade.
WARNING: Make sure that the mower blade
and all the xing parts are installed correctly and
tightened securely.
WARNING: When you replace the blades,
always follow the instructions provided in this
manual.
NOTICE: After installing the mower blades,
remove the pin from the mower body.
To install the mower blades, perform the removal proce-
dure in reverse.
Other manuals for LM001C
7
Table of contents
Languages:
Other Makita Lawn Mower manuals

Makita
Makita ELM4110 User guide

Makita
Makita ELM4121 User manual

Makita
Makita LM003J User manual

Makita
Makita PLM5600N User manual

Makita
Makita DLM533 User manual

Makita
Makita DLM533 User manual

Makita
Makita LM001G User manual

Makita
Makita DLM380 User manual

Makita
Makita DLM382 User manual

Makita
Makita DLM480 User manual

Makita
Makita PLM4626 User manual

Makita
Makita DLM460 User manual

Makita
Makita DLM536 User manual

Makita
Makita DLM330 User manual

Makita
Makita DLM480 User manual

Makita
Makita DLM380 User manual

Makita
Makita UV380 User manual

Makita
Makita DLM481 User manual

Makita
Makita PLM4815 User manual

Makita
Makita DLM533 User manual