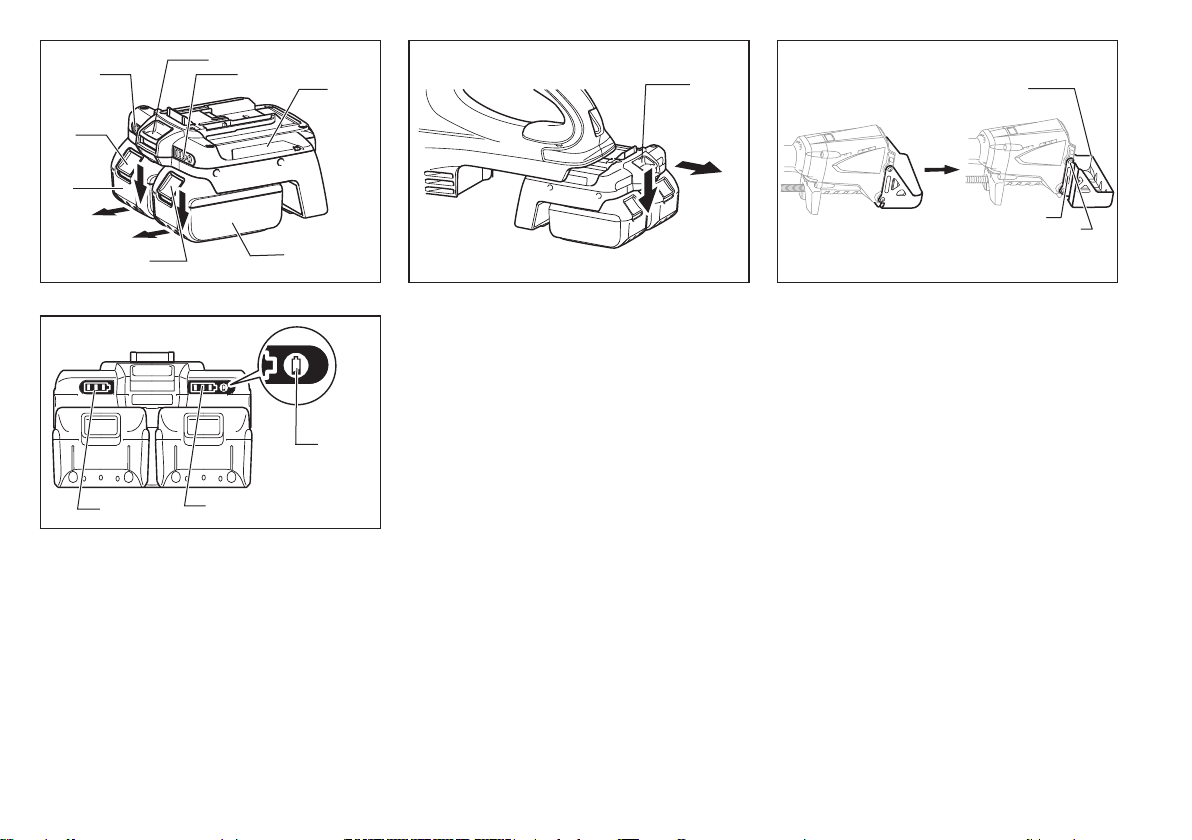
1 Bouton
2 Batterie
3 Adaptateur-transfo
ceinture de batterie
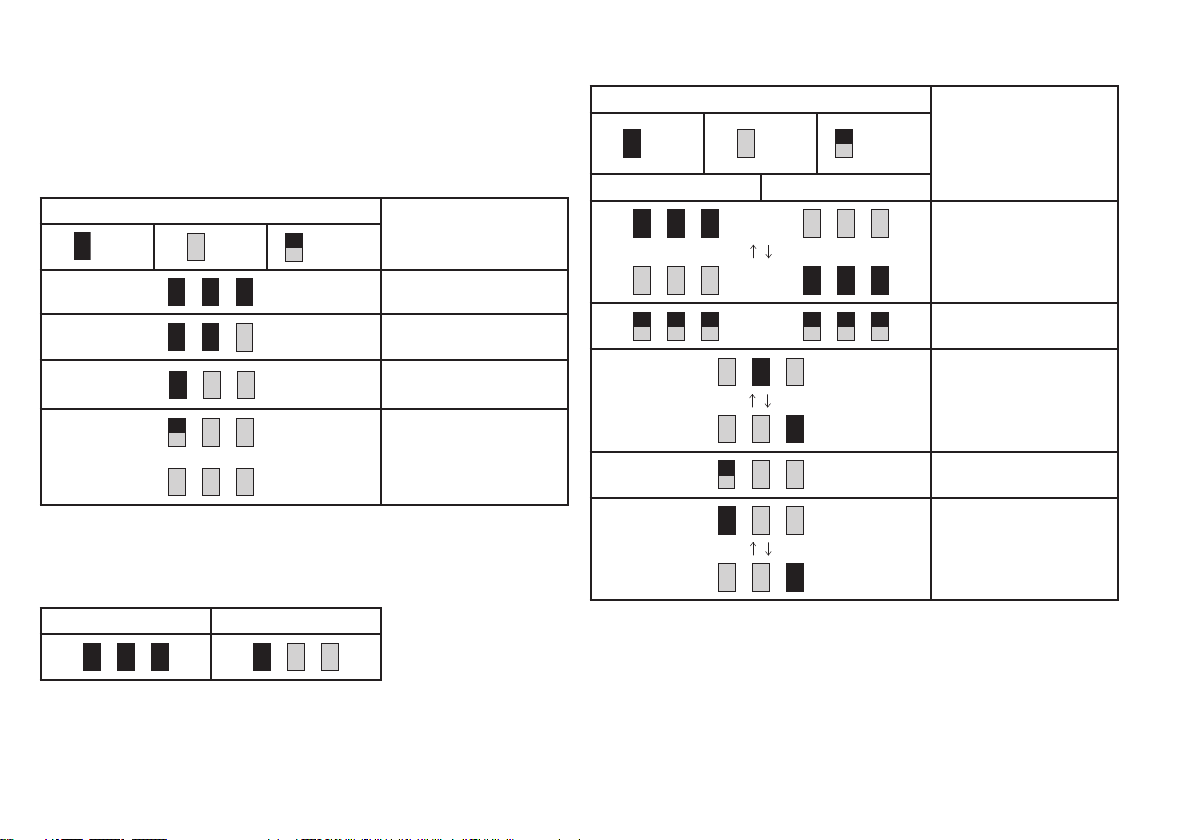
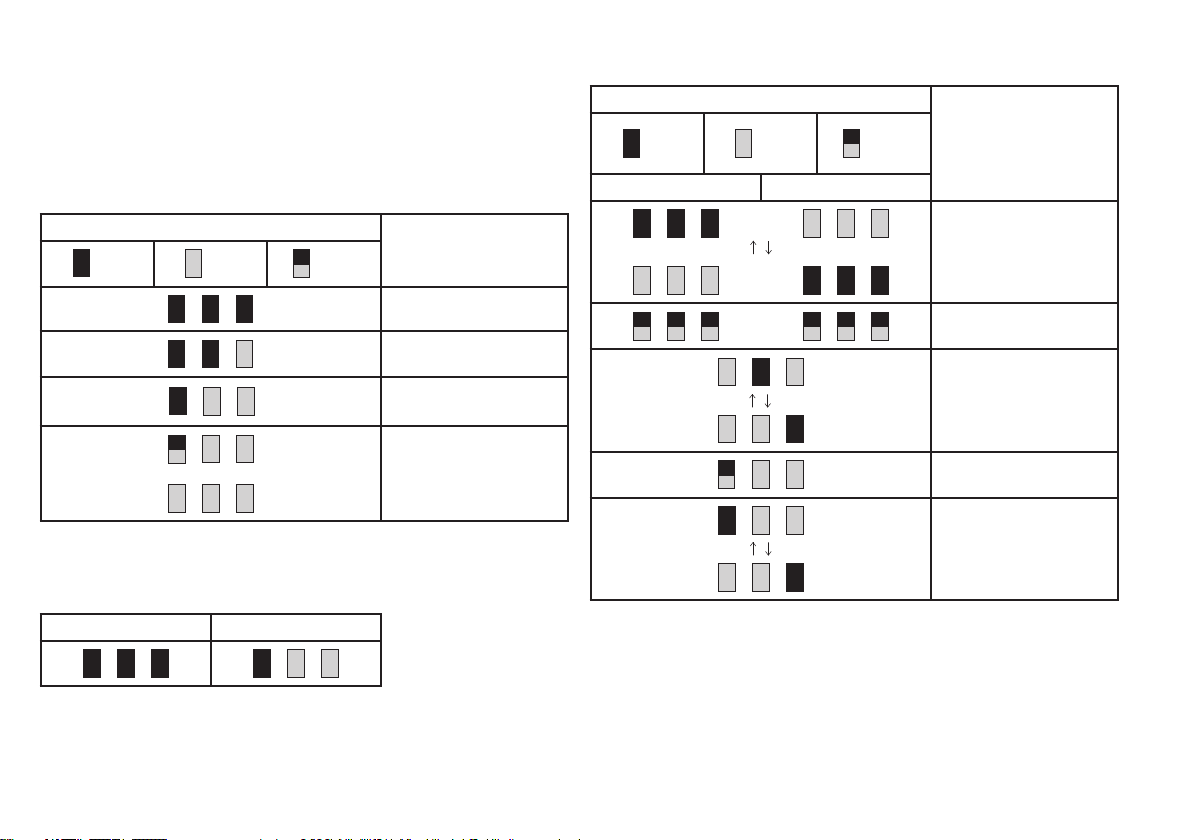
4 Témoin de charge
restante de la Batte-
rie 1
5 Témoin de charge
restante de la Batte-
rie 2
6 Bouton
7 Carter de protection
de batterie
8 Partie saillante
9 Vis
10 Bouton d’afchage
de la charge restante
de la batterie
Français (Instructions originales)
Descriptif
Applications
Ces adaptateurs-transfo ceinture de batterie, prévu pour l’utilisation avec deux batte-
ries de 18 V, peut être utilisé avec les outils alimentés par des batteries d’une tension
totale de 36 V.
Batterie compatible : BL1815N, BL1830, BL1840
Note : La BL1815 ne peut être utilisée avec les adaptateurs-transfo ceinture de bat-
terie.
ATTENTION :
• Vous devez lire attentivement le manuel d’instructions de l’outil avant l’utilisation.
• Ces adaptateurs-transfo ceinture de batterie est conçu exclusivement pour l’utilisa-
tion avec des batteries de 18 V. Ne l’utilisez pas avec des batteries de 14,4 V.
• Installez deux batteries 18 V lors de l’utilisation. Ces adaptateurs-transfo ceinture de
batterie ne peut être utilisé avec une seule batterie 18 V.
• N’insérez pas l’adaptateur-transfo ceinture de batterie dans le chargeur. La charge
n’est pas possible dans ce cas.
Retrait ou pose des batteries et de l’adaptateur-transfo ceinture de
batterie
ATTENTION :
• Mettez toujours l’outil hors tension avant de poser ou de retirer les batteries.
• Tenez fermement l’adaptateur-transfo ceinture de batterie et les batteries lorsque
vous remplacez les batteries.
Vous risquez de vous blesser grièvement et d’abîmer l’adaptateur-transfo ceinture
de batterie et les batteries si vous ne les tenez pas fermement.
• Lorsque vous remplacez les batteries alors que l’adaptateur-transfo ceinture de bat-
terie est posé sur l’outil, tenez fermement les batteries et l’outil.
• Lorsque vous retirez l’adaptateur-transfo ceinture de batterie, tenez fermement l’outil
et l’adaptateur-transfo. Si vous ne tenez pas fermement l’outil et l’adaptateur-transfo
ceinture de batterie, vous risquez de vous blesser grièvement et de les abîmer en
les échappant.
Retrait/pose des batteries sur l’adaptateur-transfo ceinture de batterie
(Fig. 1)
1. Pour retirer la batterie de l’adaptateur-transfo ceinture de batterie, faites-la glisser
hors de adaptateur-transfo tout en faisant glisser le bouton sur la face avant de la
batterie.
2. Pour poser la batterie, alignez sa languette sur la rainure à l’intérieur de l’adapta-
teur-transfo ceinture de batterie, et faites-la glisser en place. Insérez-le toujours à
fond, jusqu’à ce qu’il se mette en place avec un léger déclic. Si vous pouvez voir
l’indicateur rouge du côté supérieur du bouton, le convertisseur pour batterie n’est
pas complètement verrouillé. Insérez-la complètement, jusqu’à ce que l’indicateur
rouge ne soit plus visible. Sinon, elle pourrait tomber accidentellement de l’adapta-
teur-transfo ceinture de batterie, au risque de vous blesser ou de blesser quelqu’un
se trouvant près de vous. Ne forcez pas pour poser la batterie. Si elle ne glisse pas
facilement, c’est que vous ne l’insérez pas correctement.
Retrait/pose de l’adaptateur-transfo ceinture de batterie sur l’outil (Fig. 2)
1. Pour retirer le convertisseur pour batterie, faites-le glisser hors de l’outil tout en
faisant glisser le bouton sur la face avant de l’adaptateur-transfo.
2. Pour poser l’adaptateur-transfo ceinture de batterie, alignez sa languette sur la rai-
nure de l’outil et glissez l’adaptateur-transfo pour le mettre en place. Insérez-la tou-
jours à fond, jusqu’à ce qu’elle se mette en place avec un léger déclic. Si vous pouvez
voir l’indicateur rouge du côté supérieur du bouton, l’adaptateur-transfo ceinture de
batterie n’est pas complètement verrouillé. Insérez-le complètement, jusqu’à ce que
l’indicateur rouge ne soit plus visible. Sinon, il pourrait tomber accidentellement de
l’outil, au risque de vous blesser ou de blesser quelqu’un se trouvant près de vous.
Ne forcez pas pour poser l’adaptateur-transfo ceinture de batterie. Si l’adaptateur-
transfo ceinture de batterie ne glisse pas facilement, c’est que vous ne l’insérez
pas correctement.
ATTENTION :
• Évitez de vous pincer les doigts en insérant les batteries et l’adaptateur-transfo cein-
ture de batterie.
Utiliser ce convertisseur sur les modèles de débroussailleuse sans l
36 V (Fig. 3)
Pour utiliser l’adaptateur-transfo sur les débroussailleuses sans l ci-dessus, montez
le carter de protection de batterie en option.
Pour poser le carter de protection de batterie en option, placez-le sur la partie saillante
de l’outil, puis xez-le à l’aide de vis.
Pour retirer le carter de protection de batterie en option, dévissez-le et faites le sortir
en glissant.