Makita BCV01 User manual

GB Battery converter Instruction Manual
FAdaptateur-Transfo Ceinture
de Batterie Manuel d’instructions
D Akku-Adapter Gebrauchsanleitung
I Convertitore batteria Manuale di istruzioni
NL Accudraaghouder Gebruiksaanwijzing
E Convertidor de Baterías Manual de instrucciones
P Conversor de bateria Manual de instruções
DK Akku-konverter Brugervejledning
S Batteriadapter Bruksanvisning
NO Batterikonverter Bruksanvisning
FIN Vaihtosuunnin Käyttöohje
GR Μετατροπέας μπαταριών Εγχειρίδιο οδηγιών
PL Konwerter Akumulatorów Instrukcja obsługi
LV Akumulatoru pārveidotājs Lietošanas rokasgrāmata
EE Akumuundur Kasutusjuhend
LT Akumuliatoriaus keitiklis Naudojimo instrukcija
HU Akkumulátor átalakító Használati útmutató
RO Transformator cu baterii Manual de instrucţiuni
SK Adaptér batérií Návod na obsluhu
CZ Akumulátorový konvertor Návod k použití
UR Адаптер для акумуляторів Інструкція з експлуатації
RU
Аккумуляторный
Преобразователь Тока Инструкция по эксплуатации
TR Batarya dönüştürücü Kullanım Kılavuzu
TH
ID Konverter baterai Buku Petunjuk
VT Bộ chuyển đổi pin Hướng dẫn sử dụng
CS 电池转换器 使用说明书
KR 배터리 컨버터 사용 설명서
PR
BCV01

2
1
2 3
4 5
6
1
2
3
4
5
6
7
8
10
7
89
11
12
13 14
15

3
1 Cover
2 Battery
3 Lock lever
4 Product
5 Product mounting adapter
6 Cord
7 Hook
8 Belt
9 Screw
10 Shoulder strap
11 Battery capacity display button
12 Remaining battery capacity
indication lamp for Battery 1
13 Remaining battery capacity
indication lamp for Battery 2
14 Battery 1
15 Battery 2
English (Original instructions)
Explanation of general view
Applications
This battery converter enables the main unit and batteries to be separated, making it suitable for work performed over
long times, etc.
This battery converter uses two 18 V batteries, and can be used with 36 V battery-powered products.
Compatible battery: BL1815N, BL1830, BL1840
Note: BL1815 cannot be used with the battery converter.
CAUTION
• Be sure to carefully read the product main unit instruction manual before use.
• This battery converter is designed exclusively for use with 18 V batteries. Do not use 14.4 V batteries.
• Install two 18 V batteries for use. This battery converter cannot be used with only one 18 V battery.
• Do not pick up or carry the battery converter by holding only the cord.
• Do not insert the product mounting adaptor into the charger. Charging is not possible in this case.
• During operation, keep the cord away from obstacles such as branches.The cord caught by obstacles may cause
serious injury.
Installing the batteries (Fig. 1 & 2)
CAUTION
• Be careful not to pinch your fingers with the cover when inserting the batteries.
• Be careful not to drop the batteries when removing them.
• Be careful when removing the batteries with the batteries facing downward, as they may fall out and drop.
1. Slide the lock lever of the adapter used to house the 18 V batteries, and open the cover.
2. Insert the batteries firmly all the way, until the red color of the button is no longer visible.
3. Be sure to secure the cover with the lock lever.
4. Set the hook onto your belt, etc. (Fig. 3)
5. Attach the product mounting adapter to the product.
6. You can also remove the hook and pass the belt through it as shown in the illustration
Attaching the optional shoulder strap
The optional shoulder strap can be attached as shown in the illustration. (Fig. 4)
Operation
Attach the battery converter to your body for work as shown in the illustration. (Fig. 5)

4
Remaining battery capasity indication (Fig. 6)
Press the remaining battery capacity display button to light the indicator lamps and indicate the remaining battery
capacities for approximately 10 seconds. The indicator lamps correspond to each battery.
NOTE
• When only the lowermost indicator lamp blinks for either Battery 1 or Battery 2, this means that the battery capac-
ity is low, so the product does not operate. In these cases, charge the battery that is low, or replace it with a fully
charged battery. The product does not operate when either of the batteries has run out.
• The indicated charge may be slightly lower than the actual level during use or immediately after using the product.
How to read the remaining battery capacity indication
Indicator lamps (Battery 1 or Battery 2)
Remaining charge or indication contents
: On : Off : Blinking
50% to 100%
20% to 50%
0% to 20%
or Charge the battery
• Depending on the conditions of use and the ambient temperature, the remaining capacity may not be indicated cor-
rectly.
Example of remaining charge indication (Battery 1: 80%, Battery 2: 10%)
Battery 1 Battery 2

5
Abnormal indications during use
The BCV01 indicates various states using the remaining battery capacity indication.
Indicator lamps
Indication contents
: On : Off : Blinking
Battery 1 Battery 2
The BCV01 may have malfunctioned.
The protective function operated.
Charge the battery.
The BCV01 detected an abnormally high voltage.
1. BCV01 malfunction
When the three indicator lamps for Battery 1 and the three indicator lamps for Battery 2 light alternately, the
BCV01 may have malfunctioned. Contact your Makita dealer or nearest Makita Sales Center to request inspection
and/or repair.
2. BCV01 protective function
When a product is used continuously at a high load, the motor may stop automatically. This is due to the BCV01’s
protective function, and is not a malfunction. If the product does not operate even when the product switches are
operated, stop use, disconnect the product and batteries from the BCV01, and let the BCV01 cool down.
3. Battery protective function
The batteries have an internal protective function that automatically stops power output in order to extend the bat-
tery life. When the following states occur during product use, the motor stops automatically, but this is due to the
battery’s protective function, and is not a malfunction.
When the battery temperature rises above a certain level, the motor stops automatically, and remains stopped
even when the switches are operated. In these cases, stop battery use, remove the batteries from the BCV01, and
allow the batteries to cool or charge the batteries.
When the battery capacity becomes low, the product’s motor stops automatically. If the product does not operate
even when the switches are operated, remove the batteries from the BCV01 and charge the batteries.
4. BCV01 abnormally high voltage detection
When the BCV01 detects an abnormally high battery voltage, the motor stops automatically. This is due to the
BCV01’s protective function, and is not a malfunction. In these cases, the motor remains stopped even when the
switches are operated.
Remove the batteries from the BCV01, and use different batteries with normal voltage.
NOTE
When the product stops automatically without any BCV01 indication
When the product enters an overload state, power output stops automatically in order to extend the battery life. This
is due to the battery’s protective function, and is not a malfunction. In addition, in these cases the BCV01 does not
indicate anything, but this is not a malfunction.When this happens, release the switch, and remove the cause of the
overload. The product can then be used again by operating the switch again.

6
1 Couvercle
2 Batterie
3 Levier de verrouillage
4 Outil
5 Adaptateur pour raccordement
à l’outil
6 Cordon
7 Crochet
8 Ceinture
9 Vis
10 Bandoulière
11 Bouton d’affichage de la charge
restante de la batterie
12 Témoin de charge restante de
la Batterie 1
13 Témoin de charge restante de
la Batterie 2
14 Batterie 1
15 Batterie 2
Français (Instructions originales)
Descriptif
Applications
Ce convertisseur de batteries, en permettant l’utilisation séparée de l’outil et des batteries, facilite notamment
l’exécution du travail continu sur de longues périodes.
Ce convertisseur de batteries, prévu pour l’utilisation avec deux batteries de 18 V, peut être utilisé avec les outils
alimentés par des batteries d’une tension totale de 36 V.
Batterie compatible : BL1815N, BL1830, BL1840
Note : La BL1815 ne peut être utilisée avec le convertisseur de batteries.
ATTENTION
• Vous devez lire attentivement le manuel d’instructions de l’outil avant l’utilisation.
• Ce convertisseur de batteries est conçu exclusivement pour l’utilisation avec des batteries de 18 V. Ne l’utilisez pas
avec des batteries de 14,4 V.
• Installez deux batteries 18 V lors de l’utilisation. Ce convertisseur de batteries ne peut être utilisé avec une seule
batterie 18 V.
• Évitez de saisir ou de transporter le convertisseur de batteries uniquement par son cordon.
• N’insérez pas dans le chargeur l’adaptateur pour raccordement à l’outil. La charge n’est pas possible dans ce cas.
• Pendant l’utilisation, gardez le cordon à l’écart des obstacles tels que les branches. Il y a risque de blessure grave
si le cordon est retenu par des obstacles.
Insertion des batteries (Fig. 1 et 2)
ATTENTION
• Prenez garde de vous pincer les doigts sous le couvercle en insérant les batteries.
• Prenez garde d’échapper les batteries en les retirant.
• Soyez prudent lorsque vous retirez les batteries alors qu’elles sont orientées vers le bas, car elles risquent de sortir
de l’adaptateur et de tomber.
1. Faites glisser le levier de verrouillage de l’adaptateur utilisé pour loger les batteries 18 V, et ouvrez le couvercle.
2. Insérez les batteries à fond, jusqu’à ce que la partie rouge du bouton ne soit plus visible.
3. N’oubliez pas de verrouiller le couvercle avec le levier de verrouillage.
4. Fixez le crochet à votre ceinture ou à un dispositif similaire. (Fig. 3)
5. Fixez sur l’outil l’adaptateur pour raccordement à l’outil.
6. Vous pouvez aussi retirer le crochet et y faire passer la ceinture, tel qu’illustré.
Fixation de la bandoulière en option
La bandoulière en option peut être fixée tel qu’illustré. (Fig. 4)
Utilisation
Fixez le convertisseur de batteries sur vos vêtements, tel qu’illustré. (Fig. 5)
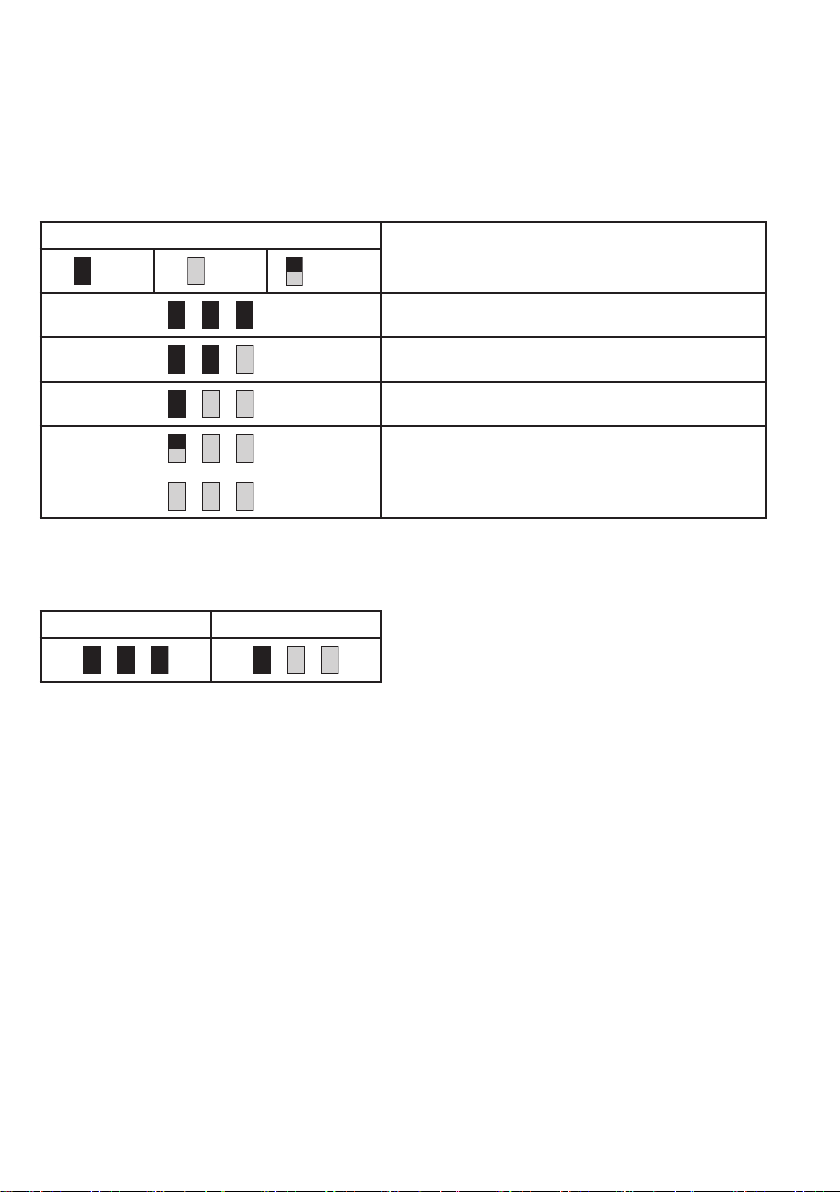
Indication de la charge restante des batteries (Fig. 6)
Appuyez sur le bouton d’affichage de la charge restante des batteries pour allumer les témoins et indiquer la charge
restante des batteries pendant environ 10 secondes. Les témoins correspondent à chacune des deux batteries.
NOTE
• Lorsque seul le témoin inférieur clignote pour la batterie 1 ou la batterie 2, cela signifie que la charge restante de
la batterie est faible, et l’outil ne fonctionne pas. Le cas échéant, chargez la batterie faible ou remplacez-la par une
batterie pleinement chargée. L’outil ne fonctionne pas lorsque l’une ou l’autre des deux batteries est épuisée.
• Pendant ou juste après l’utilisation de l’outil, la charge indiquée peut être légèrement inférieure au véritable niveau
de charge.

7
Lecture de l’indication de charge restante des batteries
Témoins (batterie 1 et batterie 2)
Charge restante ou situation indiquée
: Allumé : Éteint : Clignotant
50% à 100%
20% à 50%
0% à 20%
ou Chargez la batterie
• Suivant les conditions d’utilisation et la température ambiante, il se peut que la charge restante ne soit pas indiquée
correctement.
Exemple d’indication de charge restante (batterie 1 : 80%, batterie 2 : 10%)
Batterie 1 Batterie 2
Indications d’anomalies pendant l’utilisation
Les témoins de charge restante du BCV01 indiquent divers états de fonctionnement.
Témoins
Situation indiquée
: Allumé : Éteint : Clignotant
Batterie 1 Batterie 2
Il y a peut-être un dysfonctionnement du BCV01.
La fonction de protection s’est activée.
Chargez la batterie.
Le BCV01 a détecté une tension anormalement élevée.

8
1. Dysfonctionnement du BCV01
Lorsque les trois témoins de la batterie 1 et les trois témoins de la batterie 2 clignotent alternativement, cela
indique une possibilité de dysfonctionnement sur le BCV01. Contactez votre revendeur ou le centre de ventes
Makita le plus près pour faire une demande d’inspection ou de réparation.
2. Fonction de protection du BCV01
Il se peut que le moteur s’arrête automatiquement lorsqu’un outil est utilisé de manière continue à charge élevée.
Cet arrêt est causé par la fonction de protection du BCV01, et non par un dysfonctionnement. Si l’outil ne fonc-
tionne pas même si vous activez les interrupteurs, cessez l’utilisation, débranchez l’outil, retirez les batteries du
BCV01 et laissez refroidir le BCV01.
3. Fonction de protection de la batterie
Les batteries sont dotées d’une fonction de protection interne qui coupe automatiquement l’alimentation pour
prolonger la durée de service de la batterie. Lorsque les situations suivantes se produisent pendant l’utilisation de
l’outil, le moteur s’arrête automatiquement ; cela est causé par la fonction de protection de la batterie, et non par
un dysfonctionnement.
Lorsque la température des batteries dépasse un certain niveau, le moteur s’arrête automatiquement et demeure
arrêté même si vous activez les interrupteurs. Le cas échéant, cessez d’utiliser les batteries, retirez-les du BCV01,
et laissez-les refroidir ou chargez-les.
Lorsque la charge restante des batteries est trop basse, le moteur de l’outil s’arrête automatiquement. Si l’outil ne
fonctionne pas même si vous activez les interrupteurs, retirez les batteries du BCV01 et chargez-les.
4. Détection de tension anormalement élevée sur le BCV01
Le moteur s’arrête automatiquement quand le BCV01 détecte une tension de batterie anormalement élevée.
Cet arrêt est causé par la fonction de protection du BCV01, et non par un dysfonctionnement. Le cas échéant, le
moteur reste arrêté même si vous activez les interrupteurs.
Retirez les batteries du BCV01 et utilisez d’autres batteries, d’une tension normale.
NOTE
Si l’outil s’arrête automatiquement sans aucune indication sur le BCV01
Lorsque l’outil est soumis à une surcharge, l’alimentation s’arrête automatiquement pour prolonger la durée de ser-
vice de la batterie. Cet arrêt est causé par la fonction de protection des batteries, et non par un dysfonctionnement.
De plus le BCV01 n’indique rien dans ce cas, mais il ne s’agit pas d’un dysfonctionnement. Le cas échéant,
libérez l’interrupteur et corrigez la cause de la surcharge. Vous pouvez alors utiliser l’outil de nouveau en réactivant
l’interrupteur.

9
1 Abdeckung
2 Akku
3 Verriegelungshebel
4 Produkt
5 Produkt-Montageadapter
6 Kabel
7 Haken
8 Gürtel
9 Schraube
10 Schulterriemen
11 Akkukapazität-Anzeigetaste
12 Akku-Restkapazitäts-Anzei-
gelampe für Akku 1
13 Akku-Restkapazitäts-Anzei-
gelampe für Akku 2
14 Akku 1
15 Akku 2
Deutsch (Originale Anleitungen)
Übersicht
Anwendungen
Dieser Akkukonverter ermöglicht es, Hauptgerät und Akkus zu trennen, und eignet sich somit für Arbeiten, die über
längere Zeitspannen durchgeführt werden usw.
Dieser Akkukonverter verwendet zwei 18-V-Akkus und kann mit 36-V-Akkugeräten eingesetzt werden.
Kompatibler Akku: BL1815N, BL1830, BL1840
Hinweis: BL1815 kann nicht mit die Akkukonverter verwendet werden.
VORSICHT
• Lesen Sie vor Gebrauch unbedingt die Gebrauchsanleitung des Hauptgerätes aufmerksam durch.
• Dieser Akkukonverter ist ausschließlich für den Einsatz mit 18-V-Akkus ausgelegt. Verwenden Sie keine 14,4-V-Ak-
kus.
• Setzen Sie zum Gebrauch zwei 18-V-Akkus ein. Dieser Akkukonverter kann nicht mit nur einem 18-V-Akku benutzt
werden.
• Halten oder tragen Sie den Akkukonverter nicht nur am Kabel.
• Führen Sie den Produkt-Montageadapter nicht in das Ladegerät ein. In diesem Fall ist Laden nicht möglich.
• Halten Sie das Kabel während der Arbeit von Hindernissen, wie z. B. Ästen, fern. Falls das Kabel an Hindernissen
hängen bleibt, kann es zu ernsthaften Verletzungen kommen.
Einsetzen der Akkus (Abb. 1 und 2)
VORSICHT
• Achten Sie beim Einsetzen der Akkus darauf, dass Sie sich nicht die Finger an der Abdeckung klemmen.
• Lassen Sie die Akkus beim Abnehmen nicht fallen.
• Gehen Sie beim Entfernen der nach unten weisenden Akkus vorsichtig vor, damit sie nicht herunterfallen.
1. Verschieben Sie den Verriegelungshebel des Adapters für die 18-V-Akkus, und öffnen Sie die Abdeckung.
2. Schieben Sie die Akkus bis zum Anschlag fest ein, bis die rote Farbe des Knopfes nicht mehr sichtbar ist.
3. Sichern Sie die Abdeckung unbedingt mit dem Verriegelungshebel.
4. Hängen Sie den Haken an Ihren Gürtel usw. (Abb. 3)
5. Bringen Sie den Produkt-Montageadapter am Produkt an.
6. Sie können den Haken auch abnehmen und den Gürtel durch die Ösen ziehen, wie in der Abbildung gezeigt
Anbringen des optionalen Schulterriemens
Der optionale Schulterriemen kann so angebracht werden, wie in der Abbildung gezeigt. (Abb. 4)
Betrieb
Befestigen Sie den Akkukonverter zum Arbeiten an Ihrem Körper, wie in der Abbildung gezeigt. (Abb. 5)
Akku-Restkapazitätsanzeige (Abb. 6)
Drücken Sie die Akku-Restkapazitäts-Anzeigetaste, um die Anzeigelampen zum Aufleuchten zu bringen und die
Akku-Restkapazität für ca. 10 Sekunden anzuzeigen. Jedem Akku sind eigene Anzeigelampen zugeordnet.
HINWEIS
• Wenn nur die niedrigste Anzeigelampe entweder für Akku 1 oder Akku 2 blinkt, bedeutet dies, dass die Akkukapa-
zität zu niedrig ist, so dass das Produkt nicht funktioniert. Laden Sie in einem solchen Fall den schwachen Akku
auf, oder ersetzen Sie ihn durch einen voll aufgeladenen. Das Produkt funktioniert nicht, wenn einer der Akkus
erschöpft ist.
• Während des Gebrauchs oder unmittelbar nach der Benutzung des Produkts kann die angezeigte Ladung etwas
niedriger als das tatsächliche Ladeniveau sein.

10
Ableseweise der Akku-Restkapazitätsanzeige
Anzeigelampen (Akku 1 oder Akku 2)
Restladung oder Anzeigeinhalt
: Ein : Aus : Blinkt
50 bis 100 %
20 bis 50 %
0 bis 20%
oder Den Akku aufladen.
• Je nach den Benutzungsbedingungen und der Umgebungstemperatur wird die Akku-Restkapazität eventuell nicht
korrekt angezeigt.
Beispiel der Restkapazitätsanzeige (Akku 1: 80 %, Akku 2: 10 %)
Akku 1 Akku 2
Anormale Anzeigen während des Gebrauchs
Der BCV01 zeigt unterschiedliche Zustände mit der Akku-Restkapazitätsanzeige an.
Anzeigelampen
Anzeigeinhalt
: Ein : Aus : Blinkt
Akku 1 Akku 2
Möglicherweise liegt eine Funktionsstörung im BCV01 vor.
Die Schutzfunktion wurde aktiviert.
Den Akku aufladen.
Der BCV01 hat eine Überspannung erkannt.

11
1. Funktionsstörung des BCV01
Wenn jeweils die drei Anzeigelampen für Akku 1 und Akku 2 abwechselnd aufleuchten, liegt möglicherweise eine
Funktionsstörung des BCV01 vor. Wenden Sie sich bezüglich einer Überprüfung und/oder Reparatur an Ihren
Makita-Händler oder das nächste Makita-Vertriebszentrum.
2. Schutzfunktion des BCV01
Wenn ein Produkt ununterbrochen bei hoher Last benutzt wird, kann sich der Motor automatisch abschalten. Dies
ist auf die Schutzfunktion des BCV01 zurückzuführen und stellt keine Funktionsstörung dar. Falls das Produkt trotz
Betätigung der Schalter am Produkt nicht funktioniert, stellen Sie die Benutzung ein, trennen Sie Produkt und Ak-
kus vom BCV01, und lassen Sie den BCV01 abkühlen.
3. Akku-Schutzfunktion
Die Akkus besitzen eine interne Schutzfunktion, welche automatisch die Stromausgabe unterbricht, um die Ak-
kulebensdauer zu verlängern. Wenn die folgenden Zustände während des Produktgebrauchs auftreten, schaltet
sich der Motor automatisch ab. Dies ist auf die Schutzfunktion des Akkus zurückzuführen und stellt keine Funk-
tionsstörung dar.
Wenn die Akkutemperatur eine bestimmte Schwelle überschreitet, schaltet sich der Motor automatisch ab und
bleibt in diesem Zustand, selbst wenn die Schalter betätigt werden. Brechen Sie in solchen Fällen die Benutzung
ab, und entfernen Sie die Akkus vom BCV01. Lassen Sie die Akkus entweder abkühlen, oder laden Sie sie auf.
Wenn die Akkukapazität niedrig wird, schaltet sich der Motor des Produkts automatisch ab. Falls das Produkt trotz
Betätigung der Schalter nicht funktioniert, entfernen Sie die Akkus vom BCV01, und laden Sie sie auf.
4. Überspannungserkennung des BCV01
Wenn der BCV01 eine Überspannung des Akkus erkennt, schaltet sich der Motor automatisch ab. Dies ist auf die
Schutzfunktion des BCV01 zurückzuführen und stellt keine Funktionsstörung dar. In solchen Fällen bleibt der Mo-
tor trotz Betätigung der Schalter abgeschaltet.
Entfernen Sie die Akkus vom BCV01, und benutzen Sie andere Akkus mit normaler Spannung.
HINWEIS
Wenn das Produkt ohne jegliche Anzeige am BCV01 automatisch stehen bleibt
Wenn das Produkt einen Überlastungszustand erreicht, wird die Stromausgabe automatisch unterbrochen, um die
Lebensdauer der Akkus zu verlängern. Dies ist auf die Schutzfunktion des Akkus zurückzuführen und stellt keine
Funktionsstörung dar. Außerdem erscheint in solchen Fällen keine Anzeige am BCV01, was aber keine Funktions-
störung darstellt. Wenn dies eintritt, lassen Sie den Schalter los, und beseitigen Sie die Ursache der Überlastung.
Das Produkt kann dann durch erneute Betätigung des Schalters wieder benutzt werden.

12
1 Coperchio
2 Batteria
3 Leva di blocco
4 Prodotto
5 Adattatore di montaggio
prodotto
6 Cavo
7 Gancio
8 Cinghia
9 Vite
10 Tracolla
11 Pulsante di visualizzazione
capacità batterie
12 Spia di capacità restante bat-
teria per la Batteria 1
13 Spia di capacità restante bat-
teria per la Batteria 2
14 Batteria 1
15 Batteria 2
Italiano (Istruzioni originali)
Visione
Applicazioni
Questo convertitore batterie permette di separare l'unità principale e le batterie, ciò che lo rende adatto ai lavori
eseguiti per lunghi periodi di tempo, ecc.
Questo convertitore batterie impiega due batterie di 18 V, e può essere usato con i prodotti alimentati da batterie di
36 V.
Batteria compatibile: BL1815N, BL1830, BL1840
Nota: La BL1815 non può essere usata con il convertitore batteria.
PRECAUZIONI
• Leggere attentamente il manuale di istruzioni dell'unità principale prima dell'uso.
• Questo convertitore batterie è progettato per l'uso con le batterie di 18 V. Non deve essere usato con le batterie di
14,4 V.
• Installare due batterie di 18 V per l'uso. Questo convertitore batterie non può essere usato con una sola batteria di
18 V.
• Non prendere o trasportare il convertitore batterie tenendolo soltanto per il cavo.
• Non inserire l'adattatore di montaggio prodotto nel caricatore. In questo caso, la carica non è possibile.
• Durante l’utilizzo dell’utensile, tenere il cavo lontano dagli ostacoli, come i rami. Il cavo agganciato da un ostacolo
potrebbe causare un serio incidente.
Installazione delle batterie (Figg. 1 e 2)
PRECAUZIONI
• Fare attenzione a non incastrare le dita nel coperchio quando si inseriscono le batterie.
• Rimuovendo le batterie, fare attenzione che non cadano.
• Rimuovendo le batterie mentre sono rivolte in basso, fare attenzione che non cadano.
1. Spingere la leva di blocco dell'adattatore usato per alloggiare le batterie di 18 V e aprire il coperchio.
2. Inserire saldamente e completamente le batterie finché il colore rosso del bottone non è più visibile.
3. Chiudere saldamente il coperchio con la leva di blocco.
4. Sistemare il gancio sulla cintura dei pantaloni, ecc. (Fig. 3)
5. Attaccare l'adattatore di montaggio prodotto al prodotto.
6. Si può anche rimuovere il gancio e infilare la cinghia come mostrato nella illustrazione.
Modo di attaccare la tracolla opzionale
La tracolla opzionale può essere attaccata come mostrato nella illustrazione. (Fig. 4)
Funzionamento
Attaccare il convertitore batterie al proprio corpo per lavorare, come mostrato nella illustrazione. (Fig. 5)
Indicazione della capacità restante delle batterie (Fig. 6)
Premere il pulsante di visualizzazione capacità restante batterie per accendere le spie e vedere la capacità restante
delle batterie per 10 secondi circa. Le spie corrispondono a ciascuna batteria.
NOTA
• Se lampeggia soltanto la spia più bassa per la Batteria 1 o la Batteria 2, vuol dire che la capacità restante è bassa
per cui il prodotto non funziona. In tal caso, caricare la batteria con la capacità restante bassa o sostituirla con una
batteria completamente carica. Il prodotto non funziona se una delle due batterie è scarica.
• La carica indicata potrebbe essere leggermente inferiore al livello reale durante l'utilizzo o immediatamente dopo
l'utilizzo del prodotto.

13
Modo di leggere l'indicazione della capacità restante delle batterie
Spie (Batteria 1 o Batteria 2)
Carica restante o significato dell'indicazione
: Accesa : Spenta : Lampeg-
giante
Dal 50% al 100%
Dal 20% al 50%
Dal 0% al 20%
oCaricare la batteria
• A seconda delle condizioni di utilizzo e della temperatura ambiente, la capacità restante potrebbe non essere
indicata correttamente.
Esempio di indicazione della carica restante (Batteria 1: 80%, Batteria 2: 10%)
Batteria 1 Batteria 2
Indicazione anormale durante l'uso
Il BCV01 indica vari stati usando l'indicazione della capacità restante delle batterie.
Spie
Significato dell'indicazione
: Accesa : Spenta : Lampeg-
giante
Batteria 1 Batteria 2
Si potrebbe essere verificato un malfunzionamento del
BCV01.
La funzione di protezione si è attivata.
Caricare la batteria.
Il BCV01 ha rilevato una tensione anormalmente alta.

14
1. Malfunzionamento del BCV01
Se le tre spie della Batteria 1 e le tre spie della Batteria 2 si accendono alternativamente, si potrebbe essere
verificato un malfunzionamento del BCV01. Rivolgersi al rivenditore o al Centro di Assistenza Makita più vicino per
richiedere l'ispezione e/o la riparazione.
2. Funzione di protezione del BCV01
Se si usa continuamente il prodotto con un alto carico, il motore potrebbe arrestarsi automaticamente. Ciò è cau-
sato dalla funzione di protezione del BCV01, e non è un malfunzionamento. Se il prodotto non funziona anche se
si azionano i suoi interruttori, smettere di usarlo, staccare il prodotto e le batterie dal BCV01 e lasciare raffreddare
il BCV01.
3. Funzione di protezione batterie
Le batterie sono dotate di una funzione interna di protezione, che interrompe automaticamente la corrente per pro-
lungarne la vita di servizio. Se durante l'utilizzo si verificano le condizioni seguenti, il motore si arresta automatica-
mente, ma ciò è causato dalla funzione di protezione delle batterie e non è un malfunzionamento.
Se la temperatura delle batterie sale oltre un certo livello, il motore si arresta automaticamente e rimane fermo
anche se si azionano gli interruttori. In tal caso, smettere di usare le batterie, rimuovere le batterie dal BCV01 e
lasciare raffreddare le batterie o caricarle.
Quando la capacità delle batterie diventa bassa, il motore del prodotto si arresta automaticamente. Se il prodotto
non funziona anche se si azionano gli interruttori, rimuovere le batterie dal BCV01 e caricarle.
4. Rilevamento di una tensione anormalmente alta del BCV01
Se il BCV01 rileva una tensione anormalmente alta delle batterie, il motore si arresta automaticamente. Ciò è
causato dalla funzione di protezione del BCV01, e non è un malfunzionamento. In tal caso, il motore rimane fermo
anche se si azionano gli interruttori.
Rimuovere le batterie dal BCV01 e usare altre batterie con una tensione normale.
NOTA
Se il prodotto si arresta automaticamente senza alcuna indicazione del BCV01
Se si verifica un sovraccarico del prodotto, l'uscita di corrente si arresta automaticamente per prolungare la vita di
servizio delle batterie. Ciò è causato dalla funzione di protezione delle batterie e non è un malfunzionamento. Inoltre,
in questo caso il BCV01 non mostra alcuna indicazione, ma ciò non è un malfunzionamento. In tal caso, rilasciare
l'interruttore ed eliminare la causa del sovraccarico. Il prodotto può poi essere usato di nuovo azionando di nuovo
l'interruttore.

15
1 Deksel
2 Accu
3 Vergrendelknop
4 Gereedschap
5 Gereedschapsaansluitadapter
6 Snoer
7 Gesp
8 Riem
9 Schroef
10 Schouderband
11 Accuspanningscontroletoets
12 Restspanningslampje voor
Accu 1
13 Restspanningslampje voor
Accu 2
14 Accu 1
15 Accu 2
Nederlands (Originele instructies)
Verklaring van algemene gegevens
Toepassingen
Deze accudraaghouder stelt u in staat een stel accu's afzonderlijk van het gereedschap neer te zetten of te dragen,
hetgeen handig is wanneer u lang achtereen werkt met het gereedschap.
Deze accudraaghouder is geschikt voor twee 18 V accu's, voor gereedschap dat werkt op 36 V accuspanning.
Geschikte accu: BL1815N, BL1830, BL1840
Opmerking: De BL1815 is niet te gebruiken in deze accudraaghouder.
WAARSCHUWING
• Lees voor het gebruik ook vooral de gebruiksaanwijzing van uw gereedschap.
• Deze accudraaghouder is uitsluitend geschikt voor gebruik met 18 V accu's. Niet gebruiken voor 14,4 V accu's.
• Installeer twee gebruiksklare 18 V accu's. Deze accudraaghouder is niet te gebruiken met een enkele 18 V accu.
• U mag de accudraaghouder niet optillen of meedragen aan het snoer.
• Plaats de gereedschapsaansluitadapter niet in een oplaadapparaat. De adapter is niet geschikt voor opladen.
• Tijdens gebruik dient u het snoer verre te houden van obstakels zoals takken. Als het snoer blijft haken aan ob-
stakels, kan dat ernstige ongelukken veroorzaken.
Aanbrengen van de accu's (Fig. 1 en 2)
WAARSCHUWING
• Let bij het aanbrengen van de accu's op dat uw vingers niet knel raken tussen het deksel.
• Pas op dat u de accu's niet laat vallen wanneer u ze verwijdert.
• Wees voorzichtig bij het verwijderen van de accu's, want als ze omlaag gericht zijn, zouden ze eruit kunnen vallen.
1. Verschuif de vergrendelknop van de adapter voor de 18 V accu's en open het deksel.
2. Steek de accu's stevig helemaal erin, zodat de rode kleur van de knop niet langer zichtbaar is.
3. Zorg dat het deksel vergrendeld is met de vergrendelknop.
4. Bevestig de gesp aan uw broekriem e.d. (Fig. 3)
5. Bevestig de gereedschapsaansluitadapter aan uw gereedschap.
6. U kunt de gesp ook losmaken om uw riem erdoorheen te steken, zoals getoond in de afbeelding.
Aanbrengen van de optionele schouderband
De optionele schouderband is vast te maken zoals getoond in de afbeelding. (Fig. 4)
Toepassing
U kunt de accudraaghouder tijdens het werk met u meedragen, zoals getoond in de afbeelding. (Fig. 5)
Aanduiding van de resterende accuspanning (Fig. 6)
Druk op de accuspanningscontroletoets om de spanningslampjes te laten oplichten, waaraan u ongeveer 10 secon-
den lang de resterende accuspanning kunt aflezen. De spanningslampjes lichten op voor de bijbehorende accu.
OPMERKING
• Wanneer alleen het laatste lampje knippert voor accu 1 of voor accu 2, betekent dit dat de totale accuspanning
zo laag is dat het gereedschap niet werkt. In dat geval laadt u de lege accu bij of vervangt u die door een volledig
opgeladen accu. Het gereedschap zal niet werken wanneer een van de beide accu's leeg is.
• De aangegeven accuspanning kan iets minder zijn dan de feitelijke spanning, tijdens of onmiddellijk na het gebruik
van het gereedschap.

16
Aflezen van de resterende accuspanning
Spanningslampjes (accu 1 of accu 2)
Resterende accuspanning of betekenis van de aanduiding
: Aan : Uit : Knippert
50% tot 100%
20% tot 50%
0% tot 20%
of Accu opladen
• Afhankelijk van de gebruiksomstandigheden en de omgevingstemperatuur kan de resterende accuspanning niet
altijd juist worden aangegeven.
Voorbeeld van de resterende accuspanningsaanduiding (Accu 1: 80%, Accu 2: 10%)
Accu 1 Accu 2
Abnormale aanduidingen tijdens het gebruik
Naast het tonen van de resterende accuspanning kan de BCV01 diverse toestanden aangeven.
Spanningslampjes
Betekenis van de aanduiding
: Aan : Uit : Knippert
Accu 1 Accu 2
Er is mogelijk storing in de BCV01.
De beveiligingsfunctie is in werking getreden.
Laad de accu op.
De BCV01 heeft een abnormaal hoge spanning
waargenomen.

17
1. Storing in de BCV01
Wanneer de drie spanningslampjes voor accu 1 en de drie spanningslampjes voor accu 2 beurtelings oplichten,
kan er sprake zijn van een storing in de BCV01. Neem contact op met uw Makita handelaar of dichtstbijzijnde
Makita servicecentrum om inspectie en/of reparatie te verzoeken.
2. BCV01 beveiligingsfunctie
Wanneer u het gereedschap lang achtereen met hoge belastingen gebruikt, kan de motor automatisch afslaan.
Dit komt door de beveiligingsfunctie van de BCV01; het duidt niet op storing. Als het gereedschap niet werkt, ook
wanneer u de knoppen bedient, staakt u het gebruik, maakt u het gereedschap en de accu's los van de BCV01 en
laat u de BCV01 afkoelen.
3. Accubeveiligingsfunctie
De accu's hebben een ingebouwde beveiligingsfunctie die de stroomtoevoer automatisch afsluit, om de levensduur
van de accu's te sparen. Wanneer een van de volgende problemen zich voordoet tijdens het gebruik van het ger-
eedschap, slaat de motor automatisch af, door de beveiligingsfunctie van de accu's; dit duidt niet op storing.
Wanneer de temperatuur van de accu's boven een bepaalde waarde stijgt, slaat de motor automatisch af en blijft
daarna uitgeschakeld, ook wanneer u de knoppen bedient. In dat geval staakt u het gebruik van de accu's, verwi-
jdert u de accu's uit de BCV01 en laat u de accu's afkoelen of laadt u ze opnieuw op.
Wanneer de accuspanning te gering wordt, slaat de motor van het gereedschap automatisch af. Als het gereedsc-
hap niet werkt, ook wanneer u de knoppen bedient, verwijdert u de accu's uit de BCV01 en laadt u de accu's op.
4. Abnormaal hoge spanning waargenomen in de BCV01
Wanneer de BCV01 een abnormaal hoge accuspanning waarneemt, slaat de motor automatisch af. Dit komt door
de beveiligingsfunctie van de BCV01; het duidt niet op storing. In dat geval zal de motor niet aanslaan, ook niet
wanneer u de knoppen bedient.
Verwijder de accu's uit de BCV01 en gebruik andere accu's met een meer normale spanning.
OPMERKING
Wanneer het gereedschap automatisch afslaat, zonder aanduiding van de BCV01
Wanneer het gereedschap overbelast raakt, wordt de stroomtoevoer automatisch afgesloten, om de levensduur van
de accu's te sparen. Dit komt door de beveiligingsfunctie van de accu's; het duidt niet op storing. Bovendien zal in dit
geval de BCV01 niets aangeven, maar dat duidt niet op storing. In dat geval zet u de schakelaar in de uit-stand en
verwijdert u de oorzaak van de overbelasting. Daarna kunt u het gereedschap opnieuw gebruiken, gewoon door de
schakelaar te bedienen.

18
1 Cubierta
2 Batería
3 Palanca de bloqueo
4 Producto
5 Adaptador de montaje del
producto
6 Cable
7 Gancho
8 Correa
9 Tornillo
10 Correa de bandolera
11 Botón de visualización de la
capacidad de batería
12 Lámpara de indicación de la
capacidad de batería restante
para Batería 1
13 Lámpara de indicación de la
capacidad de batería restante
para Batería 2
14 Batería 1
15 Batería 2
Español (Instrucciones originales)
Explicación de los dibujos
Aplicaciones
Este convertidor de batería permite tener separadas la unidad principal y las baterías, haciéndolo idóneo para traba-
jos realizados durante largo tiempo, etc.
Este convertidor de batería utiliza dos baterías de 18 V, y se puede usar con productos que funcionan con batería de
36 V.
Batería compatible: BL1815N, BL1830, BL1840
Nota: La BL1815 no se puede utilizar con el convertidor de baterías.
PRECAUCIÓN
• Asegúrese de leer atentamente el manual de instrucciones de la unidad principal del producto antes de utilizarlo.
• Este convertidor de batería ha sido diseñado para ser utilizado exclusivamente con baterías de 18 V. No utilice
baterías de 14,4 V.
• Instale las dos baterías de 18 V que va a utilizar. Este convertidor de batería no se puede utilizar con solamente
una batería de 18 V.
• No levante ni transporte el convertidor de batería agarrándolo solamente del cordón.
• No inserte el adaptador de montaje del producto en el cargador. En ese caso no se podrá realizar la carga.
• Durante la operación mantenga el cable alejado de obstáculos tales como ramas. Si el cable se engancha en los
obstáculos podrá ocasionar heridas graves.
Instalación de las baterías (Fig. 1 y 2)
PRECAUCIÓN
• Tenga cuidado de no pillarse los dedos con la cubierta cuando inserte las baterías.
• Tenga cuidado de no dejar caer las baterías cuando las extraiga.
• Tenga cuidado cuando extraiga las baterías con las baterías orientadas hacia abajo, porque podrán salirse y
caerse.
1. Deslice la palanca de bloqueo del adaptador utilizado para alojar las baterías de 18 V, y abra la cubierta.
2. Inserte las baterías firmemente a fondo, hasta que el color rojo del botón no se pueda ver.
3. Asegúrese de sujetar la cubierta con la palanca de bloqueo.
4. Ponga el gancho en su cinturón, etc. (Fig. 3)
5. Coloque el adaptador de montaje del producto en el producto.
6. También puede quitar el gancho y pasar la correa a través de él como se muestra en la figura.
Colocación de la correa de bandolera opcional
La correa de bandolera opcional se puede colocar como se muestra en la ilustración. (Fig. 4)
Operación
Coloque el convertidor de batería en su cuerpo para trabajar como se muestra en la ilustración. (Fig. 5)
Indicación de la capacidad de batería restante (Fig. 6)
Pulse el botón de visualización de la capacidad de batería restante para iluminar las lámparas indicadoras e indicar
las capacidades de batería restante durante 10 segundos aproximadamente. Las lámparas indicadoras correspon-
den a cada batería.
NOTA
• Cuando solamente parpadee la lámpara indicadora más baja para la batería 1 o la batería 2, significa que la
capacidad de batería es baja, por lo que el producto no funciona. En estos casos, cargue la batería que está baja,
o reemplácela con una batería cargada completamente. El producto no funciona cuando una de las baterías se ha
agotado.
• La carga indicada podrá ser ligeramente inferior que el nivel real durante la utilización o inmediatamente después
de utilizar el producto.

19
Modo de leer la indicación de capacidad de batería restante
Lámparas indicadoras (Batería 1 o Batería 2)
Carga restante o indicaciones
: Encendida : Apagada : Parpade-
ando
50% a 100%
20% a 50%
0% a 20%
oCargue la batería
• Dependiendo de las condiciones de utilización y la temperatura ambiente, es posible que la capacidad restante no
se indique correctamente.
Ejemplo de indicación de carga restante (Batería 1: 80%, Batería 2: 10%)
Batería 1 Batería 2
Indicaciones anormales durante la utilización
El BCV01 indica varios estados utilizando la indicación de la capacidad de batería restante.
Lámparas indicadoras
Indicaciones
: Encendida : Apagada : Parpade-
ando
Batería 1 Batería 2
Es posible que el BCV01 no funcione bien.
Se ha activado la función de protección.
Cargue la batería.
El BCV01 ha detectado una tensión anormalmente alta.

20
1. Malfuncionamiento del BCV01
Cuando las tres lámparas indicadoras de la batería 1 y las tres lámparas indicadoras de la batería 2 se enciendan
alternativamente, es posible que el BCV01 no esté funcionando bien. Póngase en contacto con el distribuidor
Makita o Centro de venta de Makita más cercano para solicitar una inspección y/o reparación.
2. Función de protección del BCV01
Cuando un producto sea utilizado continuamente sometido a mucha carga, el motor podrá detenerse automática-
mente. Esto se debe a la función de protección del BCV01, y no es un malfuncionamiento. Si el producto no fun-
ciona aunque se accionen los interruptores del producto, deje de utilizarlo, desconecte el producto y las baterías
del BCV01, y deje que el BCV01 se enfríe.
3. Función de protección de la batería
Las baterías tienen una función de protección interna que detiene la salida de corriente automáticamente para
alargar la vida útil de la batería. Cuando se produzcan los estados siguientes durante la utilización del producto,
el motor se detendrá automáticamente, pero esto se debe a la función de protección de la batería, y no es un
malfuncionamiento.
Cuando la temperatura de la batería ascienda por encima de un cierto nivel, el motor se detendrá automática-
mente, y se mantendrá detenido aunque se accionen los interruptores. En estos casos, deje de utilizar la batería,
extraiga las baterías del BCV01, y deje que las baterías se enfríen o cargue las baterías.
Cuando la capacidad de batería sea baja, el motor del producto se detendrá automáticamente. Si el producto no
funciona aunque se accionen los interruptores, extraiga las baterías del BCV01 y cargue las baterías.
4. Detección de tensión anormalmente alta del BCV01
Cuando el BCV01 detecta una tensión de batería anormalmente alta, el motor se detiene automáticamente. Esto
se debe a la función de protección del BCV01, y no es un malfuncionamiento. En estos casos, el motor se man-
tendrá detenido aunque se accionen los interruptores.
Extraiga las baterías del BCV01, y utilice baterías diferentes de tensión normal.
NOTA
Cuando el producto se detenga automáticamente sin ninguna indicación del BCV01
Cuando el producto entra en un estado de sobrecarga, se detiene la salida de corriente automáticamente para
alargar la vida útil de la batería. Esto se debe a la función de protección de la batería, y no es un malfuncionamiento.
Además, en estos casos el BCV01 no indica nada, pero esto no es un malfuncionamiento. Cuando ocurra esto,
suelte el interruptor, y elimine la causa de la sobrecarga. El producto podrá utilizarse de nuevo accionando el inter-
ruptor otra vez.
Table of contents
Languages:
Other Makita Media Converter manuals