Makita EY402MP User manual

INSTRUCTION MANUAL
MANUEL D'INSTRUCTION
MANUAL DE INSTRUCCIONES
Pole Saw Attachment
Tête Élagueuse à Perche
Accesorio para Sierra de Extensión
EY402MP
IMPORTANT: Read Before Using.
IMPORTANT : Lire avant usage.
IMPORTANTE: Lea antes de usar.

2ENGLISH
ENGLISH (Original instructions)
SPECIFICATIONS
Model: EY402MP
Overall length (without guide bar) 913 mm
(36″)
Net weight 1.4 kg (3.1 lbs)
Standard guide bar length 250 mm
(10″)
Recommended guide bar
length
with 90PX 250 mm
(10″)
with 91PX 250 mm
(10″)
Applicable saw chain type
(refer to the table below)
90PX
91PX
Standard sprocket Number of teeth 6
Pitch 3/8″
Chain oil tank volume 160 cm3 (5.4 oz)
• Due to our continuing program of research and development, the specications herein are subject to change
without notice.
• Specications may dier from country to country.
• Weight according to EPTA-Procedure 01/2014
Saw chain, guide bar, and sprocket combination
Saw chain type 90PX
Number of drive links 40
Guide bar Guide bar length 250 mm
(10″)
Cutting length 240 mm
(9-1/2″)
Pitch 3/8″
Gauge 1.1 mm
(0.043″)
Type Sprocket nose bar
Sprocket Number of teeth 6
Pitch 3/8″
Saw chain type 91PX
Number of drive links 40
Guide bar Guide bar length 250 mm
(10″)
Cutting length 240 mm
(9-1/2″)
Pitch 3/8″
Gauge 1.3 mm
(0.050″)
Type Sprocket nose bar
Sprocket Number of teeth 6
Pitch 3/8″
WARNING: Use appropriate combination of the guide bar and saw chain. Otherwise personal injury may
result.

3ENGLISH
Approved power unit
This attachment is approved to use only with the follow-
ing power unit(s):
• DUX60 Cordless multi function power head
• XUX01 Cordless multi function power head
• DUX18 Cordless multi function power head
• XUX02 Cordless multi function power head
• UX01G Cordless multi function power head
• GUX01 Cordless multi function power head
• EX2650LH Multi function power head
WARNING: Never use the attachment with
non-approved power unit. Non-approved combi-
nation may cause serious injury.
Symbols
The followings show the symbols which may be used
for the equipment. Be sure that you understand their
meaning before use.
Read instruction manual.
Wear a helmet, goggles and ear protection.
Wear protective gloves.
Wear sturdy boots with nonslip soles.
Steeltoed safety boots are recommended.
Beware of electrical lines, risk of electrical
shock.
Keep distance at least 15 m.
Maximum permissible cut length
Direction of chain travel
Chain oil tank
Hot surfaces - Burns to ngers or hands.
About this instruction manual
The term "tool" in this instruction manual refers to the
combination of the attachment and the power unit.
The term "motor" in this instruction manual refers to
electric or engine motor of the power unit.
SAFETY WARNINGS
Important safety instructions
WARNING: Read all safety warnings, instruc-
tions, illustrations and specications provided
with this machine as well as the instruction man-
ual of the power unit before using. Failure to follow
all instructions listed below may result in electric
shock, re, and/or serious injury to the operator and/
or bystanders.
WARNING: Do not operate near electrical
power lines. The unit has not been designed to
provide protection from electric shock in the
event of contact with overhead electric lines,
Consult local regulations for safe distances from
overhead electric power lines and ensure that the
operating position is safe and secure before oper-
ating the saw chain pole pruner.
WARNING: When using electric gardening
appliances, basic safety precautions should
always be followed to reduce the risk of re,
electric shock, and personal injury, including the
following:
READ ALL INSTRUCTIONS.
1. Avoid Dangerous Environment - Do not use
appliances in damp or wet locations.
2. Don’t Use In Rain.
3. Keep Children Away - All visitors should be kept
at a distance from work area.
4. Dress Properly - Do not wear loose clothing or
jewelry. They can be caught in moving parts. Use
of rubber gloves and substantial footwear is rec-
ommended when working outdoors. Wear protec-
tive hair covering to contain long hair.
5. Use Safety Glasses – Always use face or dust
mask if operation is dusty.
6. Use Right Appliance - Do not use appliance for
any job except that for which it is intended.
7. Avoid Unintentional Starting - Do not carry
appliance with nger on switch. Be sure switch is
o before inserting battery pack.
8.
Do not grasp the exposed cutting blades or cutting
edges when picking up or holding the appliance.
9. Do not Force Appliance - It will do the job better
and with less likelihood of a risk of injury at the
rate for which it was designed.
10. Do not Overreach - Keep proper footing and
balance at all times.
11.
Stay Alert - Watch what you are doing. Use common
sense. Do not operate appliance when you are tired.
12. Store Idle Appliances Indoors - When not in use,
appliances should be stored indoors in dry, and
high or locked-up place out of reach of children.
13. Maintain Appliance With Care - Keep cutting
edge sharp and clean for best performance and
to reduce the risk of injury. Follow instructions for
lubricating and changing accessories. Keep han-
dles dry, clean, and free from oil and grease.

4ENGLISH
14.
Check Damaged Parts - Before further use of the
appliance, a guard or other part that is damaged
should be carefully checked to determine that it will
operate properly and perform its intended function.
Check for alignment of moving parts, binding of
moving parts, breakage of parts, mounting, and any
other condition that may aect its operation. A guard
or other part that is damaged should be properly
repaired or replaced by an authorized service cen-
ter unless indicated elsewhere in this manual.
15. Keep all parts of the body away from the saw
chain. Do not remove cut material or hold
material to be cut when blades are moving.
Make sure the switch is o when clearing
jammed material. Saw chain continues to move
after the switch is turned o. A moment of inatten-
tion while operating the extended-reach pruner
may result in serious personal injury.
16.
Carry the pole pruner by the handle with the saw
chain stopped. When transporting or storing
the pole pruner, always t the saw chain device
cover. Proper handling of the pole pruner will reduce
possible personal injury from the saw chain.
17.
Hold the pole pruner by insulated gripping sur-
faces only, because the saw chain may contact
hidden wiring. A saw chain contacting a ″live″ wire
may make exposed metal parts of the pole pruner
″live″ and could give the operator an electric shock.
18. Do not use the pole pruner in bad weather
conditions, especially when there is a risk of
lightning. This decreases the risk of being struck
by lightning.
19. To reduce the risk of electrocution, never use
near any electrical power lines. Contact with or
use near power lines may cause serious injury or
electric shock resulting in death.
20. Always use two hands when operating the pole
pruner. Hold the pole pruner with both hands
to avoid loss of control.
21. Always use head protection when operating
the pole pruner overhead. Falling debris can
result in serious personal injury.
22. When replacing batteries, all batteries should
be replaced at the same time in case the
tool employs more than one battery. Mixing
fresh and discharged batteries could increase
internal cell pressure and rupture the discharge
battery(ies).
23.
Remove or disconnect battery before servicing,
cleaning or removing material from the appli-
ance. Such preventive safety measures reduce the
risk of starting the appliance accidentally.
24. Use only the battery(ies) listed in
“SPECIFICATIONS”. Use of any other batteries
may create a risk of re.
25. Exercise care in handling batteries in order not
to short the battery with conducting materials
such as rings, bracelets, and keys. The battery
or conductor may overheat and cause burns.
26. A battery operated appliance with integral
batteries or a separate battery pack must be
recharged only with the specied charger for
the battery. A charger that may be suitable for one
type of battery may create a risk of re when used
with another battery.
27. Remove adjusting keys or wrenches before
turning the appliance on. A wrench or a key that
is left attached to a rotating part of the appliance
may result in personal injury.
28. When battery pack is not in use, keep it away
from other metal objects like: paper clips,
coins, keys, nails, screws, or other small metal
objects that can make a connection from one
terminal to another. Shorting the battery termi-
nals together may cause sparks, burns, or a re.
29. Under abusive conditions, liquid may be
ejected from the battery; avoid contact. If con-
tact accidentally occurs, ush with water. If
liquid contacts eyes, additionally seek medical
help. Liquid ejected from the battery may cause
irritation or burns.
30. Use only accessories that are recom-
mended by the manufacturer for your model.
Accessories that may be suitable for one appli-
ance may create a risk of injury when used on
another appliance.
31. Appliance service must be performed only by
qualied repair personnel. Service or mainte-
nance performed by unqualied personnel may
result in a risk of injury.
32. When servicing an appliance, use only identi-
cal replacement parts. Follow instructions in
the Maintenance section of this manual. Use of
unauthorized parts or failure to follow Maintenance
instructions may create a risk of shock or injury.
33. This appliance is not intended for use by per-
sons (including children) with reduced phys-
ical, sensory or mental capabilities, or lack of
experience and knowledge. Children should be
supervised to ensure that they do not play with
the appliance.
34. Do not operate appliances in explosive atmo-
spheres, such as in the presence of ammable
liquids, gases, or dust. Appliances create sparks
which may ignite the dust or fumes.
General precautions
1. Before starting the tool, read this instruction
manual to become familiar with the handling of
the tool.
2. Do not lend the tool to a person with insu-
cient experience or knowledge regarding han-
dling of the tool.
3. When lending the tool, always attach this
instruction manual.
4. Do not allow children or young persons under
18 years old to use the tool. Keep them away
from the tool.
5. Handle the tool with the utmost care and
attention.
6. Never use the tool after consuming alcohol or
drugs, or if feeling tired or ill.
7. Never attempt to modify the tool.
8. Do not use the tool in bad weather conditions,
especially when there is a risk of lightning.
This decreases the risk of being struck by
lightning.
9. National regulations may restrict of the use of
the tool. Follow the regulations about handling
of the tool in your country.

5ENGLISH
Personal protective equipment
1. Wear safety helmet, protective goggles and
protective gloves to protect yourself from
ying debris or falling objects.
2. Always wear protective goggles to protect
your eyes from injury when using the machine.
The goggles must comply with ANSI Z87.1 in
the USA, EN 166 in Europe, or AS/NZS 1336
in Australia/New Zealand. In Australia/New
Zealand, it is legally required to wear a face
shield to protect your face, too.
It is an employer's responsibility to enforce
the use of appropriate safety protective equip-
ments by the tool operators and by other per-
sons in the immediate working area.
3. Wear ear protection such as ear mus to pre-
vent hearing loss.
4. Wear proper clothing and shoes for safe
operation, such as a work overall and sturdy,
non-slip shoes. Do not wear loose clothing or
jewelry. Loose clothes, jewelry or long hair can be
caught in moving parts.
5. When handling the saw chain or adjusting the
chain tension, wear protective gloves. Saw
chain can cut bare hands severely.
Work area safety
1. Keep the tool at least 15 m (50 ft) away from
electric lines and communication cables
(including any branches contacting them).
Touching or approaching high-voltage lines
with the tool can result in death or serious
injury. Watch power lines and electrical
fences around the work area before starting
operation.
2. Operate the tool under good visibility and day-
light conditions only. Do not operate the tool in
darkness or fog.
3. During operation, never stand on an unstable
or slippery surface or a steep slope. During
the cold season, beware of ice and snow and
always ensure secure footing.
4. During operation, keep bystanders or animals
at least 15 m (50 ft) away from the tool. Stop
the tool as soon as someone approaches.
5. When working with two or more people, keep
a distance of at least 15 m (50 ft) or more
between each other, and put a supervisor.
6. Before operation, examine the work area for
wire fences, walls, or other solid objects. They
can damage the saw chain.
Preparation
1. Before assembling or adjusting the tool,
switch o the tool and remove the battery
cartridge or the spark plug cap.
2. Before handling the saw chain or adjusting the
chain tension, wear protective gloves.
3. Before starting the tool, inspect the tool for
damages, loose screws/nuts or improper
assembly. Sharpen blunt saw chain. If the saw
chain is bent or damaged, replace it. Check all
control levers and switches for easy action.
Clean and dry the grips and handles.
4. Never attempt to start the tool if the tool is
damaged or not fully assembled. Otherwise
serious injury may result.
5. Adjust the shoulder harness to suit the opera-
tor’s body size.
6. Adjust the chain tension properly. Rell the
chain oil, if necessary.
Refueling
1.
Stop the engine before refueling. Keep away from
open ames and sparks. Never smoke during
refueling. Otherwise re and/or explosion may result.
2. Refuel outdoors. Refueling in a closed room can
cause explosion of fuel vapor.
3. Avoid contact with fuel or engine oil. Do not
inhale fuel vapor. If fuel or oil spills, wipe it o
from the machine and/or ground immediately.
If fuel spills on your clothes, change it immedi-
ately to prevent it from catching re.
4. After refueling, carefully tighten the fuel tank
cap and check for fuel leak. Move at least 3 m
(10 feet) away from the fueling source and site
before starting engine.
5.
Only transport and store fuel in approved con-
tainers. Keep children away from the stored fuel.
Starting the tool
1. Wear the personal protective equipments
before starting the tool.
2. Before starting the tool, make sure that there
is no person or animal in the work area.
3. When installing the battery cartridge or start-
ing the engine, keep the saw chain and guide
bar clear of your body and other object, includ-
ing the ground. The saw chain may move when
starting and may cause serious injury or damage
to the saw chain and/or property.
4. Place the tool on rm ground. Maintain good
balance and secure footing.
5. Check that there is sucient dierence
between idling and engagement speed to
ensure that the attachment is at a standstill
while the engine is idling (if necessary reduce
idling speed).
6. If the saw chain moves at idle, stop the engine
and adjust the idle speed down.
Operation
1. In the event of an emergency, switch o the
tool immediately.
2. If you notice any unusual condition (e.g. noise,
vibration) during operation, switch o the tool.
Do not use the tool until the cause is recog-
nized and solved.

6ENGLISH
3. The saw chain continues to move for a short
period after switching o the tool. Don’t rush
to contact the saw chain.
4. During operation, use the shoulder harness.
Keep the tool on your right side rmly.
5. Hold the front grip or front handle with your
left hand and the rear grip or rear handle with
your right hand, no matter you are right-hander
or left-hander. Wrap your ngers and thumbs
around the grips or handles.
6.
Hold the tool by insulated gripping surfaces only,
because the saw chain may contact hidden wir-
ing. A saw chain contacting a “live” wire may make
exposed metal parts of the extended-reach pruner
“live” and could give the operator an electric shock.
7. Never attempt to operate the tool with one
hand. Loss of control may result in serious or
fatal injury. To reduce the risk of injury, keep
your hands and feet away from the saw chain.
8.
Do not overreach. Keep proper footing and balance
at all times. Watch for hidden obstacles such as
tree stumps, roots and ditches to avoid stumbling.
Clear fallen branches and other objects away.
9.
Never work on a ladder or tree to avoid loss of control.
10. If the tool gets heavy impact or fall, check the
condition before continuing work. If there is
any damage or doubt, ask Makita authorized
service center for the inspection and repair.
11. Do not touch the head of the tool. The head of
the tool becomes hot during operation.
12. Take a rest to prevent loss of control caused
by fatigue. We recommend to take a 10 to
20-minute rest every hour.
13. When you leave the tool, even if it is a short
time, always switch o the tool and remove
the battery cartridge or the spark plug cap.
The running and unattended tool may be used by
unauthorized person and cause serious accident.
14. When operating the tool, do not raise your
right hand above your shoulder height.
15. During operation, never hit the saw chain
against hard obstacles such stones and nails.
Take particular care when cutting branches
next to walls, wire fences or the like.
16. If branches get caught in the tool, always stop
the tool and remove the battery cartridge or
the spark plug cap. Otherwise unintentional start
may cause serious injury.
17. If the saw chain becomes clogged, always
switch o the tool and remove the battery car-
tridge or the spark plug cap before cleaning.
18.
Accelerating the tool with the saw chain blocked
increases the load and will damage the tool.
19. Before cutting limbs, keep an escape area
away from the falling limb. First, clear
obstructs such as limbs and branches from
the work area. Move all tools and goods from
the escape area to another safe place.
20. Before cutting branches and limbs, check
the falling direction of them, considering the
condition of branches and limbs, adjoining
trees, wind direction, etc. Pay full attention to
the falling direction, and the rebound of the
branch, which hit the ground.
21. Never hold the tool at an angle of more than
60°. Otherwise falling objects can hit the oper-
ator and cause serious injury. Never stand
underneath the limb being cut.
22. Pay attention to broken or bent branches. They
may bounce back in cutting, causing unexpected
injury.
23. Before cutting limbs that you intend to cut,
remove branches and leaves around them.
Otherwise the saw chain may be caught by them.
24. To prevent the saw chain from being caught in
the kerf, do not release the lever before pulling
the saw chain out of the kerf.
25. If the saw chain is bound in the kerf, immedi-
ately stop the tool, carefully move the branch
to open the kerf and release the saw chain.
26. Avoid kickback (rotational reactive force
towards the operator). To prevent kickback,
never use the guide bar nose or perform a
penetrating cut. Always beware of the position
of the guide bar nose.
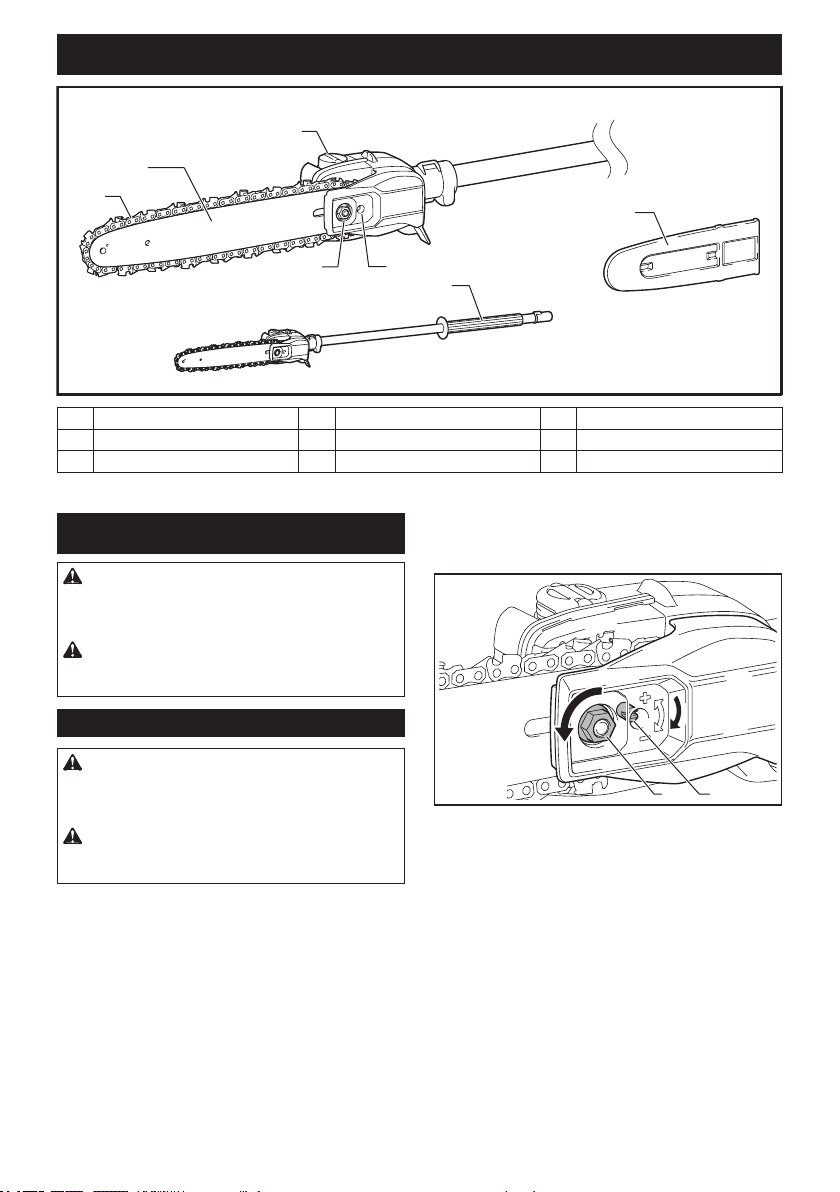
27. Check the chain tension frequently. When
checking or adjusting the chain tension,
switch o the tool and remove the battery
cartridge or the spark plug cap. If the tension
is loose, tighten it.
28. Pay attention to the environment. Avoid unnec-
essary throttle operation for less pollution
and noise emissions. Adjust the carburetor
correctly.
29. During or after operation, do not put the hot
tool onto dry grass or combustible materials.
Transport
1. Before transporting the tool, switch o the tool
and remove the battery cartridge or the spark
plug cap. Always t the guide bar cover during
transportation.
2. When transporting the tool, carry it in a hori-
zontal position by holding the grip or handle.
3. Keep the hot muer away from your body.
4. When transporting the equipment in a vehicle,
properly secure it to avoid turnover. Otherwise,
fuel spillage and damage to the equipment and
other baggage may result.
Maintenance
1. Have your equipment serviced by our autho-
rized service center, always using only genu-
ine replacement parts. Incorrect repair and poor
maintenance can shorten the life of the tool and
increase the risk of accidents.
2. Before doing any maintenance or repair work
or cleaning the tool, always switch o the tool
and remove the battery cartridge or the spark
plug cap. Wait until the tool cools down.
3. Always wear protective gloves when handling
the saw chain.
4. After each use, tighten all screws and nuts,
except for adjustment screws.
5. Keep the saw chain sharp. If the saw chain
has become blunt and cutting performance is
poor, ask Makita authorized service center to
sharpen it or replace it with new one.

7ENGLISH
6. Do not attempt any maintenance or repair
not described in this instruction manual. Ask
Makita authorized service center for such
work.
7. Always use Makita genuine spare parts and
accessories only. Using parts or accessories
supplied by a third party may result in the tool
breakdown, property damage and/or serious
injury.
8. To reduce the risk of re, never service the
equipment in the vicinity of re.
Battery tool use and care
1. Prevent unintentional starting. Ensure the
switch is in the o-position before connecting
to battery pack, picking up or carrying the
machine. Carrying the machine with your nger
on the switch or energizing machine that have the
switch on invites accidents.
2. Disconnect the battery pack from the machine
before making any adjustments, changing
accessories, or storing machine. Such preven-
tive safety measures reduce the risk of starting the
machine accidentally.
3. Recharge only with the charger specied by
the manufacturer. A charger that is suitable for
one type of battery pack may create a risk of re
when used with another battery pack.
4. Use machines only with specically desig-
nated battery packs. Use of any other battery
packs may create a risk of injury and re.
5. When battery pack is not in use, keep it away
from other metal objects, like paper clips,
coins, keys, nails, screws or other small metal
objects, that can make a connection from one
terminal to another. Shorting the battery termi-
nals together may cause burns or a re.
6. Under abusive conditions, liquid may be
ejected from the battery; avoid contact. If con-
tact accidentally occurs, ush with water. If
liquid contacts eyes, seek medical help. Liquid
ejected from the battery may cause irritation or
burns.
7. Do not use a battery pack or machine that is
damaged or modied. Damaged or modied
batteries may exhibit unpredictable behaviour
resulting in re, explosion or risk of injury.
8. Do not expose a battery pack or machine to
re or excessive temperature. Exposure to re
or temperature above 130°C (265°F) may cause
explosion.
9. Follow all charging instructions and do not
charge the battery pack or machine outside of
the temperature range specied in the instruc-
tions. Charging improperly or at temperatures
outside of the specied range may damage the
battery and increase the risk of re.
10. Have servicing performed by a qualied repair
person using only identical replacement parts.
This will ensure that the safety of the product is
maintained.
11. Do not modify or attempt to repair the machine
or the battery pack except as indicated in the
instructions for use and care.
Electrical and battery safety
1. Do not dispose of the battery(ies) in a re.
The cell may explode. Check with local codes for
possible special disposal instructions.
2. Do not open or mutilate the battery(ies).
Released electrolyte is corrosive and may cause
damage to the eyes or skin. It may be toxic if
swallowed.
3. Do not charge battery in rain, or in wet
locations.
4. Do not charge the battery outdoors.
5. Do not handle charger, including charger plug,
and charger terminals with wet hands.
6. Avoid dangerous environment. Don't use the
tool in dump or wet locations or expose it to
rain. Water entering the tool will increase the risk
of electric shock.
Storage
1. Before storing the tool, perform full cleaning
and maintenance. Fit the guide bar cover.
Remove the battery cartridge or the spark plug
cap. Drain the fuel and chain oil after the tool
cools down.
2. Store the tool in a dry and high or locked loca-
tion out of reach of children.
3. Do not prop the tool against something, such
as a wall. Otherwise it may fall suddenly and
cause an injury.
First Aid
1. In case of accident make sure that a rst-aid
box is available in the vicinity of the opera-
tions. Immediately replace any item taken from
the rst aid box.
2. When asking for help, give the following
information:
— Place of accident
— What happened
— Number of injured persons
— Kind of injuries
— Your name
SAVE THESE INSTRUCTIONS.
WARNING: DO NOT let comfort or familiarity
with product (gained from repeated use) replace
strict adherence to safety rules for the subject
product.
MISUSE or failure to follow the safety rules stated
in this instruction manual may cause serious
personal injury.
WARNING: Use of this product can create
dust containing chemicals which may cause
respiratory or other illnesses. Some examples of
these chemicals are compounds found in pesti-
cides, insecticides, fertilizers and herbicides.
Your risk from these exposures varies, depend-
ing on how often you do this type of work. To
reduce your exposure to these chemicals: work
in a well ventilated area, and work with approved
safety equipment, such as those dust masks that
are specially designed to lter out microscopic
particles.

8ENGLISH
PARTS DESCRIPTION
1
2
3
45
7
6
1Saw chain 2Guide bar 3Oil tank cap
4Retaining nut 5Chain adjusting screw 6Front grip
7Guide bar cover ----
ASSEMBLY
CAUTION: Always be sure that the motor is
switched o and the battery cartridge or the spark
plug cap is removed before carrying out any work
on the tool.
CAUTION: Do not touch the saw chain with
bare hands. Always wear gloves when handling
the saw chain.
Removing or installing saw chain
CAUTION: The saw chain and the guide bar
are still hot just after the operation. Let them cool
down enough before carrying out any work on
the tool.
CAUTION: Carry out the procedure of install-
ing or removing saw chain in a clean place free
from sawdust and the like.
To remove the saw chain, perform the following steps:
1. Loosen the chain adjusting screw, then the retain-
ing nut.
21
► 1. Chain adjusting screw 2. Retaining nut
2. Remove the sprocket cover, and then remove the
saw chain and guide bar from the tool body.
To install the saw chain, perform the following steps:
1. Check the direction of the saw chain. Match the
direction of the saw chain with that of the mark on the
tool body.
2. Fit one end of the saw chain on the top of the
guide bar. Fit the other end of the saw chain around the
sprocket. Make sure that the saw chain is properly tted
on the sprocket and properly tted in the groove of the
guide bar.

9ENGLISH
3. Attach the guide bar to the tool body, aligning the
hole on the guide bar with the pin on the tool body.
1
2
► 1. Sprocket 2. Hole
4. Insert the protrusion on the sprocket cover to the
tool body, and then close the cover so that the bolt and
pin on the tool body meet their counterparts on the
cover.
1
2
3
4
► 1. Protrusion 2. Sprocket cover 3. Bolt 4. Pin
5. Tighten the retaining nut to secure the sprocket
cover, then loosen it a bit for tension adjustment.
1
► 1. Retaining nut
Adjusting saw chain tension
CAUTION:
Do not tighten the saw chain too
much. Excessively high tension of saw chain may cause
breakage of saw chain and wear of the guide bar.
CAUTION: A chain which is too loose can
jump o the bar and it may cause an injury
accident.
The saw chain may become loose after many hours
of use. From time to time check the saw chain tension
before use.
1. Loosen the retaining nut a bit to loosen the
sprocket cover lightly.
1
► 1. Retaining nut
2. Lift up the guide bar tip slightly and adjust the
chain tension. Turn the chain adjusting screw counter-
clockwise to tighten, turn it clockwise to loosen.
Tighten the saw chain until the lower side of the saw
chain ts in the guide bar rail as illustrated.
1
2
3
► 1. Guide bar 2. Saw chain 3. Chain adjusting screw
3. Keep holding the guide bar lightly and attach the
sprocket cover.
Make sure that the saw chain does not loose at the
lower side.

10 ENGLISH
4. Tighten the retaining nut to secure the sprocket
cover.
1
► 1. Retaining nut
Mounting the attachment pipe
CAUTION: Always check that the attachment
pipe is secured after installation. Improper instal-
lation may cause the attachment falling o from the
power unit and cause personal injury.
Mount the attachment pipe to the power unit.
1. Turn the lever of the power unit toward the attach-
ment side.
1
► 1. Lever
2. Remove the cap of the attachment. Align the pin
with the arrow mark and insert the attachment pipe until
the release button pops up.
1
2
3
► 1. Release button 2. Arrow mark 3. Pin
3. Turn the lever toward the power unit side.
1
► 1. Lever
Make sure that the surface of the lever is parallel to the
pipe.
To remove the pipe, turn the lever toward the attach-
ment side and pull the pipe out while pressing down the
release button.
Fig.12
3
1
2
► 1. Release button 2. Lever 3. Pipe
OPERATION
Lubrication
NOTICE: When lling the chain oil for the rst
time, or relling the tank after it has been com-
pletely emptied, add oil up to the bottom edge of
the ller neck. The oil delivery may otherwise be
impaired.
NOTICE: Use the saw chain oil exclusively for
Makita chain saws or equivalent oil available in
the market.
NOTICE: Never use oil including dust and parti-
cles or volatile oil.
NOTICE: When pruning trees, use botanical oil.
Mineral oil may harm trees.
NOTICE: Before the cutting operation, make sure
that the oil tank cap is tightened securely.

11 ENGLISH
Saw chain is automatically lubricated when the tool is in
operation. Check the amount of remaining oil in the oil
tank periodically.
1
► 1. Oil tank
To rell the tank, place the tool on a at surface, then
push the button on the oil tank cap so that the button on
the other side stands up, and then remove the oil tank
cap by turning it.
The proper amount of oil is 160 ml (5.4 oz). After rell-
ing the tank, make sure that the oil tank cap is tightened
securely.
1
23
► 1. Oil tank cap 2. Tighten 3. Loosen
NOTE: If it is dicult to remove the oil tank cap,
insert the box wrench into the slot of the oil tank
cap, and then remove the oil tank cap by turning it
counterclockwise.
1
2
► 1. Slot 2. Box wrench
After relling, hold the tool away from the tree. Start it
and wait until lubrication on saw chain is adequate.
Working with the tool
CAUTION: Keep all parts of the body away
from the saw chain when the motor is operating.
CAUTION: Hold the tool rmly with both
hands when the motor is running.
CAUTION: Do not overreach. Keep proper
footing and balance at all times.
CAUTION: When cutting through branches,
be careful not to lose your balance due to the
weight of the tool head.
CAUTION: Always keep escape route in case
a cut branch falls towards the operator.
CAUTION: Never use the tip of the guide bar
for cutting. Otherwise, dangerous kickback may
occur, and it may result in personal injury.

12 ENGLISH
NOTICE: Never toss or drop the tool.
NOTICE: Do not cover the vents of the tool.
NOTICE: Do not force the tool. Otherwise, it may
damage the tool.
Stand on a stable surface, and hold the tool away from
the branches so that the angle of the tool becomes 60°
or less against the horizontal ground.
1
► 1. 60° or less
Start the tool, and then press the saw chain onto the
branch lightly.
When cutting long branches, in order to control the drop
position of cut branches, divide the branch in sections
and cut the branch from the tip. Pay attention to the
falling branches since they may bounce in the direction
of the operator after hitting the ground.
When cutting thick branches, rst make a shallow
undercut and then make the nish cut from the top.
1
2
If you try to cut o thick branches from the bottom, the
branch may close in and pinch the saw chain in the cut.
If you try to cut o thick branches from the top without a
shallow undercut, the branch may splinter.
Carrying tool
Before carrying the tool, always remove the battery
cartridge or the spark plug cap, and then attach the
guide bar cover. Also cover the battery cartridge with
the battery cover.
1
2
► 1. Guide bar cover 2. Battery cover
MAINTENANCE
CAUTION: Always be sure that the motor is
switched o and the battery cartridge or the spark
plug cap is removed before attempting to perform
inspection or maintenance.
CAUTION: Always wear gloves when perform-
ing any inspection or maintenance.
NOTICE: Never use gasoline, benzine, thinner,
alcohol or the like. Discoloration, deformation or
cracks may result.
To maintain product SAFETY and RELIABILITY,
repairs, any other maintenance or adjustment should
be performed by Makita Authorized or Factory Service
Centers, always using Makita replacement parts.

13 ENGLISH
Sharpening the saw chain
Sharpen the saw chain when:
•
Mealy sawdust is produced when damp wood is cut;
• The chain penetrates the wood with diculty, even
when heavy pressure is applied;
• The cutting edge is obviously damaged;
• The saw pulls to the left or right in the wood.
(caused by uneven sharpening of the saw chain or
damage to one side only)
Sharpen the saw chain frequently but a little each time. Two
or three strokes with a le are usually sucient for routine
resharpening. When the saw chain has been resharpened sev-
eral times, have it sharpened in our authorized service center.
Sharpening criteria:
WARNING: An excessive distance between
the cutting edge and depth gauge increases the
risk of kickback.
22
11
31
►
1. Cutter length 2. Distance between cutting edge and
depth gauge 3. Minimum cutter length (3 mm (1/8"))
— All cutter length must be equal. Dierent cutter
lengths prevent the saw chain from running
smoothly and may cause the saw chain to break.
— Do not sharpen the chain when the cutter length
has reached 3 mm (1/8") or shorter. The chain
must be replaced with new one.
— The chip thickness is determined by the distance
between the depth gauge (round nose) and the
cutting edge.
— The best cutting results are obtained with following
distance between cutting edge and depth gauge.
• Chain blade 90PX : 0.65 mm (1/32″)
• Chain blade 91PX : 0.65 mm (1/32″)
30
30
55 55
— The sharpening angle of 30° must be the same on
all cutters. Dierent cutter angles cause the chain
to run roughly and unevenly, accelerate wear, and
lead to chain breaks.
— Use a suitable round le so that the proper sharp-
ening angle is kept against the teeth.
• Chain blade 90PX : 55°
• Chain blade 91PX : 55°
File and le guiding
— Use a special round le (optional accessory) for
saw chains to sharpen the chain. Normal round
les are not suitable.
— Diameter of the round le for each saw chain is as
follows:
• Chain blade 90PX : 4.5 mm (3/16″)
• Chain blade 91PX : 4.0 mm (5/32″)
— The le should only engage the cutter on the for-
ward stroke. Lift the le o the cutter on the return
stroke.
— Sharpen the shortest cutter rst. Then the length
of this shortest cutter becomes the standard for all
other cutters on the saw chain.
— Guide the le as shown in the gure.
1
2
► 1. File 2. Saw chain
— The le can be guided more easily if a le holder
(optional accessory) is employed. The le holder
has markings for the correct sharpening angle of
30° (align the markings parallel to the saw chain)
and limits the depth of penetration (to 4/5 of the
le diameter).
30
1/5
1
► 1. File holder

14 ENGLISH
— After sharpening the chain, check the height of the
depth gauge using the chain gauge tool (optional
accessory).
— Remove any projecting material, however small,
with a special at le (optional accessory).
— Round o the front of the depth gauge again.
Cleaning the guide bar
Chips and sawdust will build up in the guide bar groove.
They may clog the bar groove and impair the oil ow.
Clean out the chips and sawdust every time when you
sharpen or replace the saw chain.
Cleaning the sprocket cover
Chips and saw dust will accumulate inside of the
sprocket cover. Remove the sprocket cover and saw
chain from the tool then clean the chips and saw dust.
Cleaning the oil discharge hole
Small dust or particles may be built up in the oil dis-
charge hole during operation. These dust or particles
may impair the oil to ow and cause an insucient
lubrication on the whole saw chain. When a poor chain
oil delivery occurs at the top of guide bar, clean the oil
discharge hole as follows.
1. Remove the sprocket cover and saw chain from
the tool.
2. Remove the small dust or particles using a slotted
screwdriver or the like.
1
2
► 1. Slotted screwdriver 2. Oil discharge hole
3. Install the battery cartridge to the power unit or
attach the spark plug cap to the power unit. Pull the
switch trigger to ow built-up dust or particles o the oil
discharge hole by discharging chain oil.
4. Remove the battery cartridge from the power
unit or remove the spark plug cap from the power unit.
Reinstall the sprocket cover and saw chain on the tool.
Replacing the sprocket
CAUTION: A worn sprocket will damage a
new saw chain. Have the sprocket replaced in this
case.
Before tting a new saw chain, check the condition of
the sprocket. If the sprocket is worn or damaged, ask
Makita Authorized Service Centers for replacement.
2
1
► 1. Sprocket 2. Areas to be worn out

15 ENGLISH
Overall inspection
Check for damaged parts. Ask our authorized service
center to replace them if necessary.
Lubricating moving parts
NOTICE: Follow the instruction of the frequency
and amount of grease supplied. Otherwise insu-
cient lubrication may damage moving parts.
Drive axle:
Apply grease (Makita grease N No.2 or equivalent)
every 25 hours of operation.
NOTE: Genuine Makita grease may be purchased
from your local Makita dealer.
Storing the tool
WARNING: Follow the warnings and precau-
tions in the chapter “SAFETY WARNINGS” and
the instruction manual of the power unit.
1. Clean the tool before storing. Remove any chips
and sawdust from the tool after removing the sprocket
cover.
2. After cleaning the tool, run it under no load to lubri-
cate the saw chain and guide bar.
3. Cover the guide bar with the guide bar cover.
4. Empty the oil tank.
When storing the attachment separated from the power
unit, put the cap onto the end of the shaft.
Instructions for periodic maintenance
To ensure long life, prevent damage and ensure the full functioning of the safety features, the following maintenance
must be performed regularly. Warranty claims can be recognized only if this work is performed regularly and properly.
Failure to perform the prescribed maintenance work can lead to accidents! The user of the tool must not perform
maintenance work which is not described in the instruction manual. All such work must be carried out by our autho-
rized service center.
Check item / Operating time Before
operation
Everyday Every week Every 3
month
Annually Before
storage
Entire tool Inspection. -----
Cleaning. -----
Check at
authorized
service center.
----
Saw chain Inspection. -----
Sharpening if
necessary.
-----
Guide bar Inspection. ----
Remove from
the tool.
-----
Chain
lubrication
Check the oil
feed rate.
-----
Oil tank cap Check
tightness.
-----
Screws and
nuts
Inspection. - - ---

16 ENGLISH
TROUBLESHOOTING
Before asking for repairs, conduct your own inspection rst. If you nd a problem that is not explained in the manual,
do not attempt to dismantle the tool. Instead, ask Makita Authorized Service Centers, always using Makita replace-
ment parts for repairs.
Malfunction status Cause Action
The tool does not start. Battery cartridge is not installed. Install a charged battery cartridge.
Battery problem (low voltage). Recharge the battery cartridges. If recharg-
ing is not eective, replace the battery
cartridge.
Main power switch is o. The tool is automatically turned o if it is
un-operated for a certain period. Turn on
the main power switch again.
The motor stops running after a little use. Battery's charge level is low. Recharge the battery cartridges. If recharg-
ing is not eective, replace the battery
cartridge.
No oil on the chain. Oil tank is empty. Fill the oil tank.
Oil guide groove is dirty. Clean the groove.
The tool does not reach maximum RPM. Battery cartridge is installed improperly. Install the battery cartridges as described
in this manual.
Battery power is dropping. Recharge the battery cartridge. If recharg-
ing is not eective, replace the battery
cartridge.
The drive system does not work correctly. Ask the authorized service center in your
region for repair.
Abnormal vibration:
Stop the tool immediately!
Loose guide bar or saw chain. Adjust the guide bar and saw chain
tension.
Tool malfunction. Ask the authorized service center in your
region for repair.
The saw chain cannot be installed. The combination of saw chain and
sprocket is not correct.
Use the correct combination of saw chain
and sprocket by referring to the section for
specications.
OPTIONAL
ACCESSORIES
CAUTION: These accessories or attachments
are recommended for use with your Makita tool
specied in this manual. The use of any other
accessories or attachments might present a risk of
injury to persons. Only use accessory or attachment
for its stated purpose.
If you need any assistance for more details regard-
ing these accessories, ask your local Makita Service
Center.
• Saw chain
• Guide bar
• Guide bar cover
• File
WARNING: If you purchase a guide bar of
dierent length from the standard guide bar, also
purchase a suitable guide bar cover together. It
must t and fully cover the guide bar on the tool.
NOTE: Some items in the list may be included in the
tool package as standard accessories. They may
dier from country to country.

17 FRANÇAIS
FRANÇAIS (Mode d’emploi original)
SPÉCIFICATIONS
Modèle : EY402MP
Longueur totale (sans guide-chaîne) 913 mm
(36″)
Poids net 1,4 kg (3,1 lbs)
Longueur du guide-chaîne standard 250 mm
(10″)
Longueur recommandée du
guide-chaîne
avec 90PX 250 mm
(10″)
avec 91PX 250 mm
(10″)
Type de chaîne applicable
(voir le tableau ci-dessous)
90PX
91PX
Pignon standard Nombre de dents 6
Pas 3/8″
Volume du réservoir d’huile à chaîne 160 cm3 (5,4 oz)
• Étant donné l’évolution constante de notre programme de recherche et de développement, les spécications
contenues dans ce manuel sont sujettes à modication sans préavis.
• Les spécications peuvent varier suivant les pays.
• Poids selon la procédure EPTA 01/2014
Combinaison de chaîne, guide-chaîne et pignon
Type de chaîne 90PX
Nombre de maillons d’entraînement 40
Guide-chaîne Longueur du guide-chaîne 250 mm
(10″)
Longueur de coupe 240 mm
(9-1/2″)
Pas 3/8″
Jauge 1,1 mm
(0,043″)
Type Guide-chaîne à pignon de renvoi
Pignon Nombre de dents 6
Pas 3/8″
Type de chaîne 91PX
Nombre de maillons d’entraînement 40
Guide-chaîne Longueur du guide-chaîne 250 mm
(10″)
Longueur de coupe 240 mm
(9-1/2″)
Pas 3/8″
Jauge 1,3 mm
(0,050″)
Type Guide-chaîne à pignon de renvoi
Pignon Nombre de dents 6
Pas 3/8″
MISE EN GARDE : Utilisez la bonne combinaison de guide-chaîne et de chaîne. Autrement il y a risque de
blessure.

18 FRANÇAIS
Unité d’alimentation approuvée
Cette xation est approuvée uniquement pour l’utilisa-
tion avec les unités d’alimentation suivantes :
• Moteur multi-fonctions sans l DUX60
• Moteur multi-fonctions sans l XUX01
• Moteur multi-fonctions sans l DUX18
• Moteur multi-fonctions sans l XUX02
• Moteur multi-fonctions sans l UX01G
• Moteur multi-fonctions sans l GUX01
• Moteur multi-fonctions EX2650LH
MISE EN GARDE : N’utilisez jamais la xa-
tion avec une unité d’alimentation non approuvée.
Une combinaison non approuvée peut entraîner
une grave blessure.
Symboles
Les symboles qui peuvent être utilisés pour l’équipe-
ment sont indiqués ci-dessous. Vous devez avoir com-
pris leur signication avant l’utilisation.
Veuillez lire ce manuel d’instructions.
Portez un casque, des lunettes de protec-
tion et des protections auditives.
Portez des gants de protection.
Portez des chaussures robustes à semelle
antidérapante. Les bottes de sécurité à
embout d’acier sont recommandées.
Veuillez prendre garde aux lignes élec-
triques, risque de décharge électrique.
Gardez une distance d’au moins 15 m.
Longueur de coupe maximale admissible
Sens de progression de la chaîne
Réservoir d’huile à chaîne
Surfaces chaudes - Brûlures aux doigts ou
aux mains.
À propos de ce manuel
d’instructions
Dans le présent manuel d’instructions, le terme « outil
» désigne la combinaison de l’accessoire et de l’unité
d’alimentation.
Dans le présent manuel d’instructions, le terme «
moteur » désigne le moteur électrique ou le moteur de
l’unité d’alimentation.
CONSIGNES DE SÉCURITÉ
Importantes consignes de sécurité
MISE EN GARDE : Avant l’utilisation, veuil-
lez lire toutes les mises en garde, instructions,
illustrations et spécications qui accompagnent
cette machine, ainsi que le manuel d’instructions
de l’unité d’alimentation. Ne pas suivre toutes les
instructions ci-dessous peut entraîner une décharge
électrique, un incendie et/ou une blessure grave à
l’utilisateur et/ou aux personnes présentes.
MISE EN GARDE : Évitez l’utilisation près
des lignes électriques. Cet outil n’a pas été conçu
pour fournir une protection contre les décharges
électriques en cas de contact avec les lignes élec-
triques aériennes. Consultez la réglementation
locale au sujet de la distance sécuritaire sous les
lignes électriques aériennes, et assurez-vous que
l’emplacement d’exécution du travail est sécu-
ritaire avant d’utiliser la tronçonneuse coupe-
branche sur perche.
MISE EN GARDE : Pour réduire les risques
d’incendie, de choc électrique et de blessure lors
de l’utilisation des appareils électriques de jardi-
nage, il importe de toujours prendre des mesures
de sécurité élémentaires, dont les suivantes :
LISEZ TOUTES LES
INSTRUCTIONS.
1. Évitez les environnements dangereux -
N’utilisez pas les appareils dans les endroits
humides ou mouillés.
2. Évitez l’utilisation sous la pluie.
3. Tenez les enfants à l’écart - Toute autre per-
sonne que l’utilisateur doit se tenir à une bonne
distance de la zone de travail.
4.
Portez des vêtements adéquats - Ne portez ni
vêtements amples ni bijoux. Ils risqueraient d’être
happés par les pièces en mouvement. Le port de
gants de caoutchouc et de chaussures solides est
recommandé pour les travaux extérieurs. Portez un
let de protection pour envelopper les cheveux longs.
5. Portez des lunettes de sécurité - Si le travail
génère de la poussière, portez toujours un écran
facial ou un masque anti-poussières.
6. Utilisez le bon appareil - N’utilisez pas l’appareil
pour eectuer un travail pour lequel il n’a pas été
conçu.
7. Évitez le démarrage accidentel - Ne transpor-
tez pas l’appareil avec le doigt sur l’interrupteur.
Pensez à couper le contact avant d’insérer la
batterie.
8. Lorsque vous prenez ou tenez l’appareil, ne
le faites pas par les lames nues ou par les
tranchants.
9. Ne forcez pas l’appareil - Il eectuera un travail
de meilleure qualité et avec moins de risques de
blessure s’il est utilisé au régime pour lequel il a
été conçu.

19 FRANÇAIS
10. Ne vous étirez pas trop - Assurez-vous d’une
bonne prise au sol et d’une bonne position d’équi-
libre en tout temps.
11. Restez vigilant - Soyez attentif à vos gestes.
Faites preuve de bon sens. N’utilisez pas l’appa-
reil lorsque vous êtes fatigué.
12. Après l’utilisation, rangez les appareils à l’inté-
rieur - Lorsqu’ils ne sont pas utilisés, les appareils
doivent être rangés à l’intérieur dans un emplace-
ment sec et élevé ou verrouillé, hors de la portée
des enfants.
13. Prenez bien soin de l’appareil - Gardez le tran-
chant aûté et propre pour assurer un rendement
optimal et réduire les risques de blessure. Suivez
les instructions concernant le graissage et le
remplacement des accessoires. Maintenez les
poignées sèches, propres et exemptes d’huile ou
de graisse.
14. Vériez les pièces endommagées - Avant de
poursuivre l’utilisation de l’appareil, il est impé-
ratif de vérier soigneusement si un protecteur
ou autre pièce endommagé fonctionne bien et
remplit la fonction pour lequel il a été conçu.
Assurez-vous que les pièces mobiles ne sont pas
désalignées ou coincées, et qu’aucune pièce n’est
cassée, mal montée ou n’a subi des dommages
pouvant aecter son fonctionnement. Un protec-
teur ou toute autre pièce endommagé doit être
adéquatement réparé ou remplacé par un centre
de service après-vente agréé, sauf indication
contraire dans le présent manuel.
15. Gardez toutes les parties de votre corps à
l’écart de la chaîne. Pendant que les lames
sont en mouvement, évitez de retirer le maté-
riau coupé ou de tenir le matériau à couper.
Avant de retirer un matériau coincé, veillez
à mettre l’interrupteur en position d’arrêt. La
chaîne continue de bouger une fois l’interrupteur
en position d’arrêt. Un moment d’inattention pen-
dant l’utilisation du coupe-branche longue portée
peut entraîner une grave blessure.
16. Transportez le coupe-branche sur perche par
la poignée, avec la chaîne arrêtée. Lorsque
vous transportez ou rangez le coupe-branche
sur perche, installez toujours le couvre-chaîne.
Une manipulation adéquate du coupe-branche sur
perche réduira les risques de blessure au contact
de la chaîne.
17. Tenez le coupe-branche sur perche unique-
ment par ses surfaces de prise isolées, car
la chaîne pourrait venir en contact avec un
câblage dissimulé. En cas de contact de la
chaîne avec un conducteur sous tension, les
pièces métalliques à découvert du coupe-branche
sur perche pourraient se mettre sous tension et
transmettre une décharge électrique à l’utilisateur.
18. N’utilisez pas le coupe-branche sur perche
sous de mauvaises conditions météo, et tout
spécialement lorsqu’il y a risque de foudre.
Cela réduit le risque d’être frappé par la foudre.
19. Pour réduire le risque d’électrocution, ne
l’utilisez jamais près des lignes électriques. Le
contact avec des lignes électriques ou l’utilisation
près de celles-ci peut entraîner une grave bles-
sure ou une décharge électrique mortelle.
20. Utilisez toujours le coupe-branche sur perche
à deux mains. Tenez le coupe-branche sur
perche à deux mains pour éviter d’en perdre le
contrôle.
21. Portez toujours un casque protecteur lorsque
vous utilisez le coupe-branche sur perche
au-dessus de votre tête. La chute de débris peut
entraîner une grave blessure.
22. Lors du remplacement des batteries, elles
doivent être toutes remplacées en même
temps si l’outil est alimenté par plus d’une
batterie. Mélanger des batteries fraîches et des
batteries déchargées peut faire augmenter la
pression interne de la cellule et causer la rupture
des batteries déchargées.
23. Retirez ou déconnectez la batterie avant de
réparer l’appareil, de le nettoyer ou d’en retirer
un matériau. Ces mesures préventives de sécu-
rité réduisent les risques de démarrage accidentel
de l’appareil.
24. Utilisez exclusivement les batteries qui
gurent dans les « SPÉCIFICATIONS ».
L’utilisation de toutes autres batteries peut entraî-
ner un risque d’incendie.
25. Manipulez les batteries soigneusement, pour
ne pas les court-circuiter avec des matériaux
conducteurs tels que les anneaux/bagues,
bracelets et clés. La batterie ou le conducteur ris-
querait de surchauer et de causer des brûlures.
26. Un appareil alimenté par des batteries inté-
grées ou une batterie séparée ne doit être
rechargé qu’avec le chargeur spécié pour les-
dites batteries. Un chargeur conçu pour un type
donné de batterie comporte un risque d’incendie
lorsqu’il est utilisé avec un autre type de batterie.
27. Avant d’allumer l’appareil, retirez les clés ou
clés de réglage. Toute clé laissée en place sur
une pièce rotative de l’appareil peut entraîner une
blessure.
28. Lorsque vous n’utilisez pas la batterie, ran-
gez-le à l’écart des objets métalliques tels
que : trombones, pièces de monnaie, clés,
clous, vis ou autres petits objets métalliques
qui risquent d’établir une connexion entre les
bornes. Court-circuiter les bornes de batterie
peut causer des étincelles, des brûlures ou un
incendie.
29. Dans des conditions d’utilisation inadéquates
de la batterie, il peut y avoir fuite d’électrolyte;
évitez tout contact avec ce liquide. En cas
de contact accidentel, rincez avec beaucoup
d’eau. Si le liquide pénètre dans vos yeux, il
faut aussi consulter un médecin. L’électrolyte
qui s’échappe de la batterie peut causer des
irritations ou des brûlures.
30. Utilisez exclusivement les accessoires recom-
mandés par le fabricant pour votre modèle.
Les accessoires conçus pour une appareil donné
peuvent entraîner un risque de blessure lorsque
utilisés sur un autre appareil.
31. La réparation de l’appareil doit être conée
exclusivement à des réparateurs qualiés.
Coné à une personne non qualiée, la réparation
ou l’entretien peut entraîner un risque de blessure.

20 FRANÇAIS
32. Pour réparer l’appareil, utilisez exclusivement
des pièces de rechange identiques aux pièces
d’origine. Suivez les instructions de la sec-
tion Entretien du présent manuel. L’utilisation
de pièces non autorisées ou le non-respect des
instructions d’entretien peut entraîner un risque de
choc électrique ou de blessure.
33. Cet appareil n’est pas conçu pour être utilisé
par des personnes (y compris les enfants)
atteintes d’un handicap physique, sensoriel ou
mental, ou ne possédant pas l’expérience ou
les connaissances nécessaires. Les enfants
doivent être surveillés, pour s’assurer qu’ils
ne jouent pas avec l’appareil.
34. N’utilisez pas les appareils dans les atmos-
phères explosives, par exemple en présence
de liquides, gaz ou poussières inammables.
Les appareils produisent des étincelles au contact
desquelles la poussière ou les vapeurs peuvent
s’enammer.
Précautions générales
1. Avant de démarrer l’outil, veuillez lire ce
manuel d’instructions pour vous familiariser
avec la manipulation de l’outil.
2. Ne prêtez l’outil à aucune personne dont l’ex-
périence ou les connaissances sont insu-
santes pour la manipulation de l’outil.
3. Lorsque vous prêtez l’outil, joignez toujours ce
manuel d’instructions.
4. Ne laissez pas les enfants ou les jeunes de
moins de 18 ans utiliser l’outil. Ne les laissez
pas approcher de l’outil.
5. Manipulez l’outil avec le plus grand soin et la
plus grande prudence.
6. N’utilisez jamais l’outil après avoir consommé
de l’alcool ou des drogues, ou si vous vous
sentez fatigué ou malade.
7. N’essayez jamais de modier l’outil.
8. N’utilisez pas l’outil sous de mauvaises condi-
tions météo, et tout spécialement lorsqu’il y
a risque de foudre. Cela réduit le risque d’être
frappé par la foudre.
9. La réglementation nationale peut restreindre
l’utilisation de l’outil. Respectez la réglementa-
tion en vigueur dans votre pays en matière de
manipulation de l’outil.
Équipement de protection individuelle
1. Portez un casque de sécurité, des lunettes à
coques et des gants de protection pour vous
protéger contre les projections de débris ou la
chute d’objets.
2. Portez toujours des lunettes à coques de pro-
tection pour protéger vos yeux contre les bles-
sures lorsque vous utilisez la machine. Les
lunettes à coques de protection doivent être
conformes à ANSI Z87.1 aux États-Unis, à EN
166 en Europe, ou à AS/NZS 1336 en Australie/
Nouvelle-Zélande. En Australie/Nouvelle-
Zélande, la loi exige également de porter un
écran facial pour se protéger le visage.
L’employeur a la responsabilité d’imposer
l’utilisation d’équipements de protection de
sécurité adéquats aux utilisateurs des outils
et à toute autre personne se trouvant dans la
zone de travail immédiate.
3. Portez une protection d’oreilles telle qu’un
protège-oreilles pour prévenir les lésions de
l’ouïe.
4. Portez des vêtements et chaussures sécuri-
taires, tels qu’une combinaison de travail et
des chaussures robustes à semelle antidé-
rapante. Ne portez ni vêtements amples ni
bijoux. Les vêtements amples, bijoux ou cheveux
longs peuvent être happés par les pièces en
mouvement.
5. Portez des gants de protection lorsque vous
manipulez la chaîne ou réglez sa tension. La
chaîne peut couper sévèrement les mains nues.
Sécurité de la zone de travail
1. Gardez l’outil à au moins 15 m (50 pi) des
lignes électriques et câbles de communication
(y compris les branches qui les touchent).
Toucher les lignes haute tension ou s’en
approcher avec l’outil peut entraîner la mort
ou une grave blessure. Avant de commencer
le travail, vériez s’il y a des lignes électriques
ou des clôtures électriques aux environs de la
zone de travail.
2. N’utilisez l’outil que dans des conditions
de bonne visibilité et à la lumière du jour.
N’utilisez pas l’outil dans l’obscurité ou le
brouillard.
3. Pendant l’exécution du travail, ne vous tenez
jamais sur une surface instable ou glissante,
ou dans une pente abrupte. Pendant la saison
froide, prenez garde à la glace et à la neige, et
assurez-vous toujours d’une bonne prise au
sol.
4. Pendant l’exécution du travail, ne laissez pas
les curieux ou les animaux approcher à moins
de 15 m (50 pi) de l’outil. Arrêtez l’outil dès que
quelqu’un approche.
5. Lorsque vous travaillez avec deux autres
personnes ou plus, gardez une distance d’au
moins 15 m (50 pi) entre chaque personne, et
désignez un superviseur.
6. Avant l’exécution du travail, vériez l’absence
de clôtures grillagées et de murs ou autres
objets solides dans la zone de travail. Ils
peuvent endommager la chaîne.
Table of contents
Languages:
Other Makita Pole Saw manuals

Makita
Makita UA004G User manual

Makita
Makita GAU02 User manual

Makita
Makita DUA301 User manual

Makita
Makita DUA301Z User manual

Makita
Makita DUC101 User manual

Makita
Makita EY2650H User guide

Makita
Makita EY2650H User manual

Makita
Makita AR-3733 User manual

Makita
Makita DUA300 User manual

Makita
Makita UA003G User manual

Makita
Makita EY2650H User manual

Makita
Makita DUC101Z01 User manual

Makita
Makita EY401MP User guide

Makita
Makita DUC101 User manual

Makita
Makita UA003GM101 User manual

Makita
Makita XAU02 User manual

Makita
Makita UC100D User manual

Makita
Makita DUC101 User manual

Makita
Makita DUP361Z User manual

Makita
Makita EY2650H User manual