Makita MSS700 User manual

1
ENGLISH
INSTRUCTION MANUAL
DOUBLE INSULATION
WARNING:
For your personal safety, READ and UNDERSTAND before using.
SAVE THESE INSTRUCTIONS FOR FUTURE REFERENCE.
Circular Saw
MSS700
004026

2
ENGLISH
SPECIFICATIONS
Model MSS700
Blade diameter 185 mm
at 90° 66 mm
Max. cutting depth at 45° 44 mm
No load speed (min-1) 4,700
Overall length 286 mm
Net weight 3.5 kg
Safety class /II
• Due to our continuing programme of research and development, the specifications herein are subject to change without notice.
• Note: Specifications may differ from country to country.
ENA001-2
SAFETY INSTRUCTIONS
WARNING! When using electric tools, basic safety
precautions, including the following, should always
be followed to reduce the risk of fire, electric shock
and personal injury. Read all these instructions
before operating this product and save these
instructions.
For safe operations:
1. Keep work area clean.
Cluttered areas and benches invite injuries.
2. Consider work area environment.
Do not expose power tools to rain. Do not use
power tools in damp or wet locations. Keep work
area well lit. Do not use power tools where there is
risk to cause fire or explosion.
3. Guard against electric shock.
Avoid body contact with earthed or grounded
surfaces (e.g. pipes, radiators, ranges,
refrigerators).
4. Keep children away.
Do not let visitors touch the tool or extension cord.
All visitors should be kept away from work area.
5. Store idle tools.
When not in use, tools should be stored in a dry,
high or locked up place, out of reach of children.
6. Do not force the tool.
It will do the job better and safer at the rate for
which it was intended.
7. Use the right tool.
Do not force small tools or attachments to do the
job of a heavy duty tool. Do not use tools for
purposes not intended; for example, do not use
circular saws to cut tree limbs or logs.
8. Dress properly.
Do not wear loose clothing or jewellery, they can
be caught in moving parts. Rubber gloves and
non-skid footwear are recommended when
working outdoors. Wear protecting hair covering
to contain long hair.
9. Use safety glasses and hearing protection.
Also use face or dust mask if the cutting operation
is dusty.
10. Connect dust extraction equipment.
If devices are provided for the connection of dust
extraction and collection facilities ensure these
are connected and properly used.
11. Do not abuse the cord.
Never carry the tool by the cord or yank it to
disconnect it from the socket. Keep the cord away
from heat, oil and sharp edges.
12. Secure work.
Use clamps or a vice to hold the work. It is safer
than using your hand and it frees both hands to
operate the tool.
13. Do not overreach.
Keep proper footing and balance at all times.
14. Maintain tools with care.
Keep cutting tools sharp and clean for better and
safer performance. Follow instructions for
lubrication and changing accessories. Inspect tool
cord periodically and if damaged have it repaired
by an authorized service facility. Inspect extension
cords periodically and replace, if damaged. Keep
handles dry, clean and free from oil and grease.
15. Disconnect tools.
When not in use, before servicing and when
changing accessories such as blades, bits and
cutters.
16. Remove adjusting keys and wrenches.
Form the habit of checking to see that keys and
adjusting wrenches are removed from the tool
before turning it on.
17. Avoid unintentional starting.
Do not carry a plugged-in tool with a finger on the
switch. Ensure switch is off when plugging in.
18. Use outdoor extension leads.
When tool is used outdoors, use only extension
cords intended for outdoor use.

3
19. Stay alert.
Watch what you are doing. Use common sense.
Do not operate tool when you are tired.
20. Check damaged parts.
Before further use of the tool, a guard or other part
that is damaged should be carefully checked to
determine that it will operate properly and perform
its intended function. Check for alignment of
moving parts, free running of moving parts,
breakage of parts, mounting and any other
conditions that may affect its operation. A guard or
other part that is damaged should be properly
repaired or replaced by an authorized service
center unless otherwise indicated in this
instruction manual. Have defective switches
replaced by an authorized service facility. Do not
use the tool if the switch does not turn it on and
off.
21. Warning.
The use of any accessory or attachment, other
than those recommended in this instruction
manual or the catalog, may present a risk of
personal injury.
22. Have your tool repaired by a qualified person.
This electric tool is in accordance with the relevant
safety requirements. Repairs should only be
carried out by qualified persons using original
spare parts, otherwise this may result in
considerable danger to the user.
ENB036-5
ADDITIONAL SAFETY RULES
FOR TOOL
Danger:
1. Keep hands away from cutting area and the
blade. Keep your second hand on auxiliary
handle, or motor housing. If both hands are
holding the saw, they cannot be cut by blade.
2. Do not reach underneath the workpiece. The
guard cannot protect you from the blade below the
workpiece.
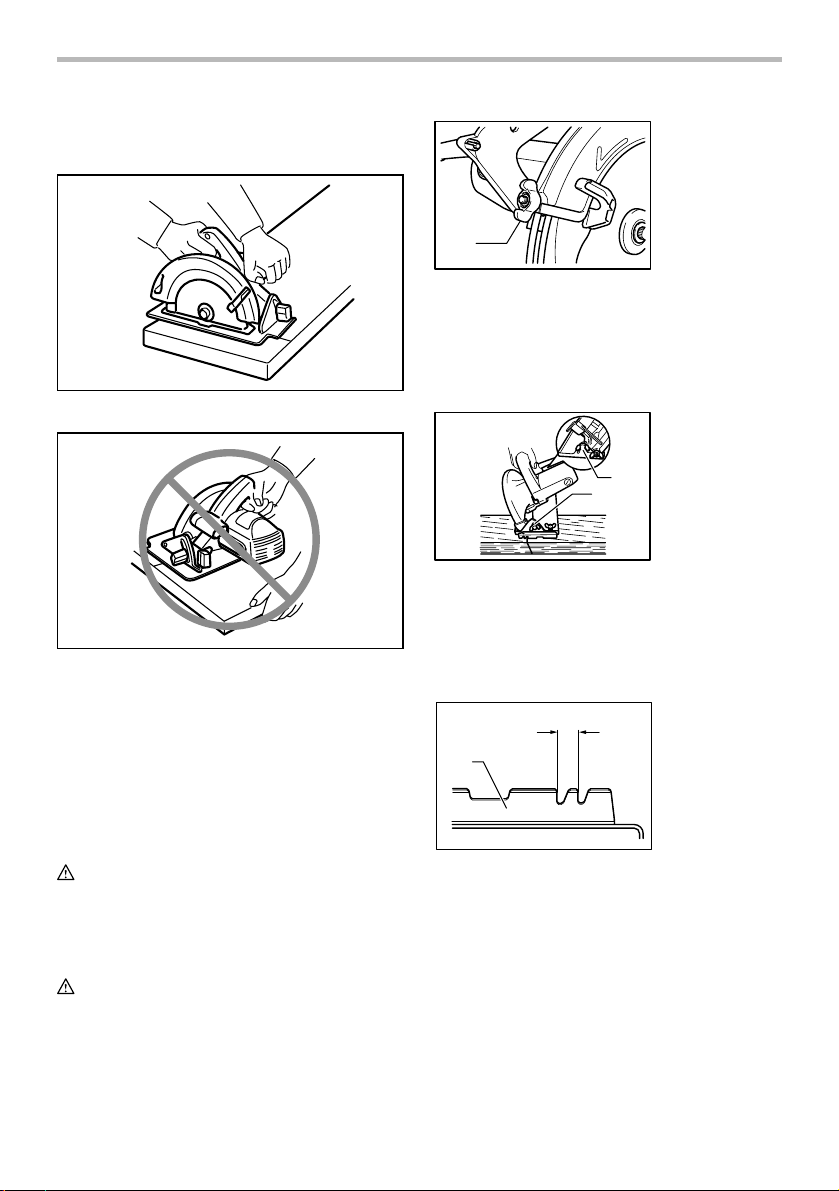
3. Adjust the cutting depth to the thickness of
the workpiece. Less than a full tooth of the blade
teeth should be visible below the workpiece.
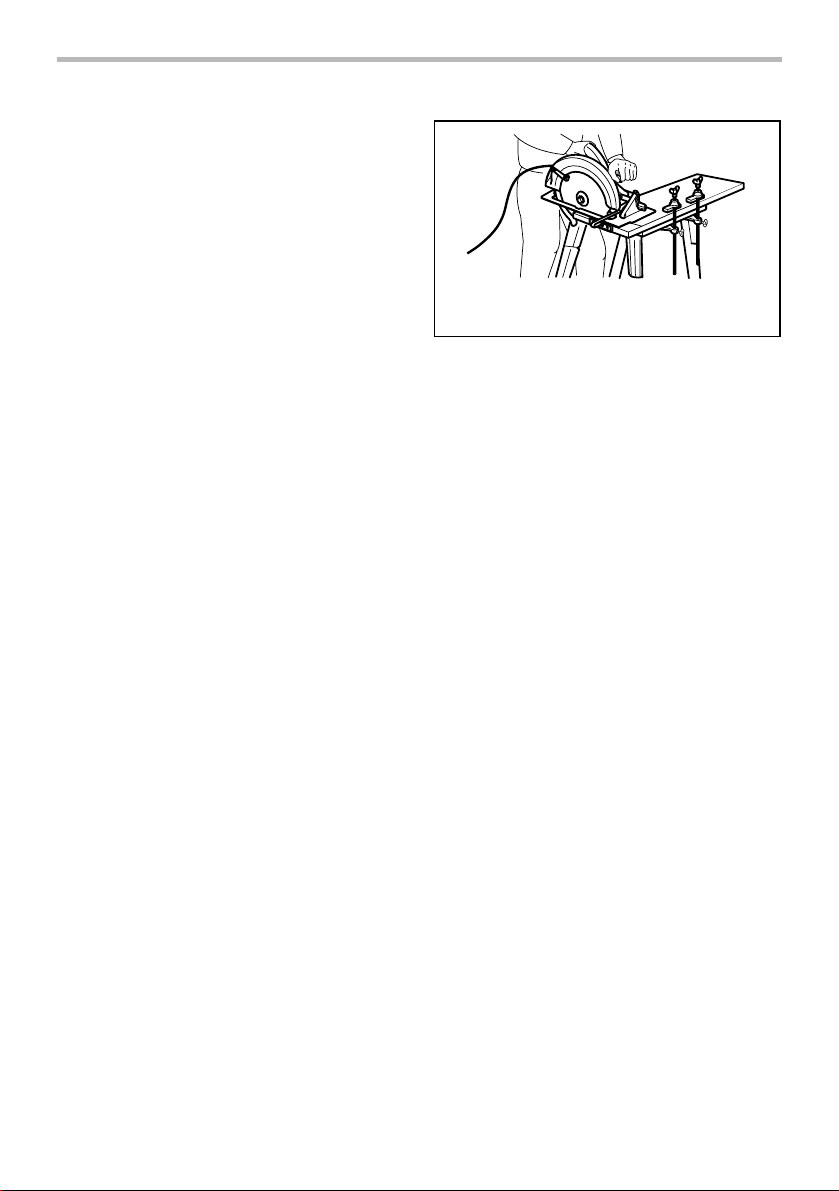
4. Never hold piece being cut in your hands or
across your leg. Secure the workpiece to a
stable platform. It is important to support the
work properly to minimize body exposure, blade
binding, or loss of control.
A typical illustration of proper hand support, workpiece
support, and supply cord routing (if applicable).
000157
5. Hold power tool by insulated gripping
surfaces when performing an operation where
the cutting tool may contact hidden wiring or
its own cord. Contact with a "live" wire will also
make exposed metal parts of the power tool "live"
and shock the operator.
6. When ripping always use a rip fence or
straight edge guide. This improves the accuracy
of cut and reduces the chance for blade binding.
7. Always use blades with correct size and shape
(diamond versus round) of arbour holes.
Blades that do not match the mounting hardware
of the saw will run eccentrically, causing loss of
control.
8. Never use damaged or incorrect blade
washers or bolts. The blade washers and bolt
were specially designed for your saw, for optimum
performance and safety of operation.
9. Causes and operator prevention of kickback;
• Kickback is a sudden reaction to a pinched, bound
or misaligned saw blade, causing an uncontrolled
saw to lift up and out of the workpiece toward the
operator.
• When the blade is pinched or bound tightly by the
kerf closing down, the blade stalls and the motor
reaction drives the unit rapidly back toward the
operator.
• if the blade becomes twisted or misaligned in the
cut, the teeth at the back edge of the blade can dig
into the top surface of the wood causing the blade
to climb out of the kerf and jump back toward the
operator.
Kickback is the result of saw misuse and/or incorrect
operating procedures or conditions and can be avoided
by taking proper precautions as given below.
(1) Maintain a firm grip with both hands on
the saw and position your arms to resist
kickback forces. Position your body to
either side of the blade, but not in line with
the blade. Kickback could cause the saw to

4
jump backwards, but kickback forces can be
controlled by the operator, if proper
precautions are taken.
(2) When blade is binding, or when
interrupting a cut for any reason, release
the trigger and hold the saw motionless in
the material until the blade comes to a
complete stop. Never attempt to remove
the saw from the work or pull the saw
backward while the blade is in motion or
kickback may occur. Investigate and take
corrective actions to eliminate the cause of
blade binding.
(3) When restarting a saw in the workpiece,
center the saw blade in the kerf and check
that saw teeth are not engaged into the
material. If saw blade is binding, it may walk
up or KICKBACK from the workpiece as the
saw is restarted.
(4) Support large panels to minimise the risk
of blade pinching and kickback. Large
panels tend to sag under their own weight.
Supports must be placed under the panel on
both sides, near the line of cut and near the
edge of the panel.
To avoid kickback, do support
board or panel near the cut.
000154
Do not support board or
panel away from the cut.
000156
(5) Do not use dull or damaged blades.
Unsharpened or improperly set blades
produce narrow kerf causing excessive
friction, blade binding and kickback.
(6) Blade depth and bevel adjusting locking
levers must be tight and secure before
making cut. If blade adjustment shifts while
cutting, it may cause binding and kickback.
(7) Use extra caution when making a "plunge
cut" into existing walls or other blind
areas. The protruding blade may cut objects
that can cause kickback.
10. Check lower guard for proper closing before
each use. Do not operate the saw if lower
guard does not move freely and close instantly.
Never clamp or tie the lower guard into the
open position. If saw is accidentally dropped,
lower guard may be bent. Raise the lower guard
with the retracting handle and make sure it moves
freely and does not touch the blade or any other
part, in all angles and depths of cut.
11. Check the operation and condition of the lower
guard spring. If the guard and the spring are
not operating properly, they must be serviced
before use. Lower guard may operate sluggishly
due to damaged parts, gummy deposits, or a
buildup of debris.
12. Lower guard should be retracted manually
only for special cuts such as "plunge cuts"
and "compound cuts." Raise lower guard by
retracting handle and as soon as blade enters
the material, the lower guard must be released.
For all other sawing, the lower guard should
operate automatically.
13. Always observe that the lower guard is
covering the blade before placing saw down
on bench or floor. An unprotected, coasting
blade will cause the saw to walk backwards,
cutting whatever is in its path. Be aware of the
time it takes for the blade to stop after switch is
released.
14. Do not stop the blades by lateral pressure on
the saw blade.
15. DANGER:
Do not attempt to remove cut material when
blade is moving.
CAUTION: Blades coast after turn off.
16. Avoid Cutting Nails.
Inspect for and remove all nails from lumber
before cutting.
17. Place the wider portion of the saw base on that
part of the workpiece which is solidly
supported, not on the section that will fall off
when the cut is made.
As example, Fig. 1 illustrates the RIGHT way to
cut off the end of a board, and Fig. 2 the

5
WRONG way. If the workpiece is short or small,
clamp it down. DO NOT TRY TO HOLD SHORT
PIECES BY HAND! (Fig. 2)
Fig. 1
000147
Fig. 2
000150
18. Never attempt to saw with the circular saw
held upside down in a vise. This is extremely
dangerous and can lead to serious accidents.
19. Do not use any abrasive wheel.
SAVE THESE INSTRUCTIONS.
FUNCTIONAL DESCRIPTION
CAUTION:
• Always be sure that the tool is switched off and
unplugged before adjusting or checking function on
the tool.
Adjusting depth of cut
CAUTION:
• After adjusting the depth of cut, always tighten the
clamping screws securely.
Loosen the clamping screw on the depth guide and
move the base up or down. At the desired depth of cut,
secure the base by tightening the clamping screw.
1
004027
For cleaner, safer cuts, set cut depth so that no more
than one blade tooth projects below workpiece. Using
proper cut depth helps to reduce potential for dangerous
KICKBACKS which can cause personal injury.
Bevel cutting
1
1
004028
Loosen two clamping screws on the bevel plates on the
front and back of the base. Set for the desired angle (0° -
45°) by tilting accordingly, then tighten the clamping
screws securely.
Sighting
1
BA
004029
For straight cuts, align the A position on the front of the
base with your cutting line. For 45° bevel cuts, align the
B position with it.
1. Base plate
1. Clamping screw
1. Clamping screw

6
Switch action
1
2
004030
CAUTION:
• Before plugging in the tool, always check to see
that the switch trigger actuates properly and
returns to the "OFF" position when released.
For tool with lock button
To start the tool, simply pull the switch trigger. Release
the switch trigger to stop.
For continuous operation, pull the switch trigger and
then push in the lock button.
To stop the tool from the locked position, pull the switch
trigger fully, then release it.
For tool without lock button
To start the tool, simply pull the switch trigger. Release
the switch trigger to stop.
ASSEMBLY
CAUTION:
• Always be sure that the tool is switched off and
unplugged before carrying out any work on the
tool.
Removing or installing saw blade
1
2
004031
CAUTION:
• Be sure the blade is installed with teeth pointing up
at the front of the tool.
• Use only the Makita wrench to install or remove the
blade.
To remove the blade, press the shaft lock so that the
blade cannot revolve and use the wrench to loosen the
hex bolt counterclockwise. Then remove the hex bolt,
outer flange and blade.
To install the blade, follow the removal procedure in
reverse. BE SURE TO TIGHTEN THE HEX BOLT
CLOCKWISE SECURELY.
1
2
3
4
004032
CAUTION:
• The inner flange has a 20 mm diameter on one
side and a 19 mm diameter on the other. The side
with 19 mm diameter is marked by "19". Use the
correct side for the hole diameter of the blade you
intend to use. Mounting the blade on the wrong
side can result in the dangerous vibration.
12
34
5
6
004033
Side grip (auxiliary handle) (Accessory)
004034
Align the hole in the grip holder with the hole in the blade
case (upper blade guard) and secure the grip holder
onto the blade case using the screw as shown in the
figure. Securely screw the side grip clockwise into the
hole in the grip holder.
1. Mounting shaft
2. Inner flange
3. 19 mm marking
4. Saw blade
5. Outer flange
6. Hex bolt
1. Hex bolt
2. Outer flange
3. Saw blade
4. Inner flange
1. Hex wrench
2. Shaft lock
1. Switch trigger
2. Lock button

7
Hex wrench storage
004035
When not in use, store the hex wrench as shown in the
figure to keep it from being lost.
OPERATION
CAUTION:
• Be sure to move the tool forward in a straight line
gently. Forcing or twisting the tool will result in
overheating the motor and dangerous kickback,
possibly causing severe injury.
Hold the tool firmly. Set the base plate on the workpiece
to be cut without the blade making any contact. Then
turn the tool on and wait until the blade attains full speed.
Now simply move the tool forward over the workpiece
surface, keeping it flat and advancing slowly until the
sawing is completed. To get clear cuts, keep your
sawing line straight and your speed of advancing
uniform.
004036
Rip fence (Guide rule)
1
2
004037
The handy rip fence allows you to do extra-accurate
straight cuts. Simply slide the rip fence up snugly against
the side of the workpiece and secure it in position with
the screw on the front of the base. It also makes
repeated cuts of uniform width possible.
MAINTENANCE
CAUTION:
• Always be sure that the tool is switched off and
unplugged before attempting to perform inspection
or maintenance.
Replacing carbon brushes
1
001145
Remove and check the carbon brushes regularly.
Replace when they wear down to the limit mark. Keep
the carbon brushes clean and free to slip in the holders.
Both carbon brushes should be replaced at the same
time. Use only identical carbon brushes.
Use a screwdriver to remove the brush holder caps.
Take out the worn carbon brushes, insert the new ones
and secure the brush holder caps.
1
2
004038
To maintain product SAFETY and RELIABILITY, repairs,
any other maintenance or adjustment should be
performed by Makita Authorized Service Centers,
always using Makita replacement parts.
1. Brush holder
cap
2. Screwdriver
1. Limit mark
1. Screw
2. Rip fence

8
Makita Corporation Anjo, Aichi, Japan
884750-3
Table of contents
Other Makita Saw manuals

Makita
Makita JR3061T User manual

Makita
Makita LS1040 User manual

Makita
Makita JR3050T User manual

Makita
Makita DJR186 User manual

Makita
Makita SD100D User manual

Makita
Makita N5900B User manual

Makita
Makita DHS900 User manual

Makita
Makita N5900B User manual

Makita
Makita DLW140 User manual

Makita
Makita MAKSTAR BJR240SH User manual

Makita
Makita DSS610RFE User manual

Makita
Makita 2107FXK User manual

Makita
Makita HS7101 User manual

Makita
Makita HS0600 User manual

Makita
Makita LS1011 User manual

Makita
Makita LS1013F User manual

Makita
Makita HS7611 User manual

Makita
Makita LC1230 User manual

Makita
Makita MLT100 User manual

Makita
Makita SP6000 User manual