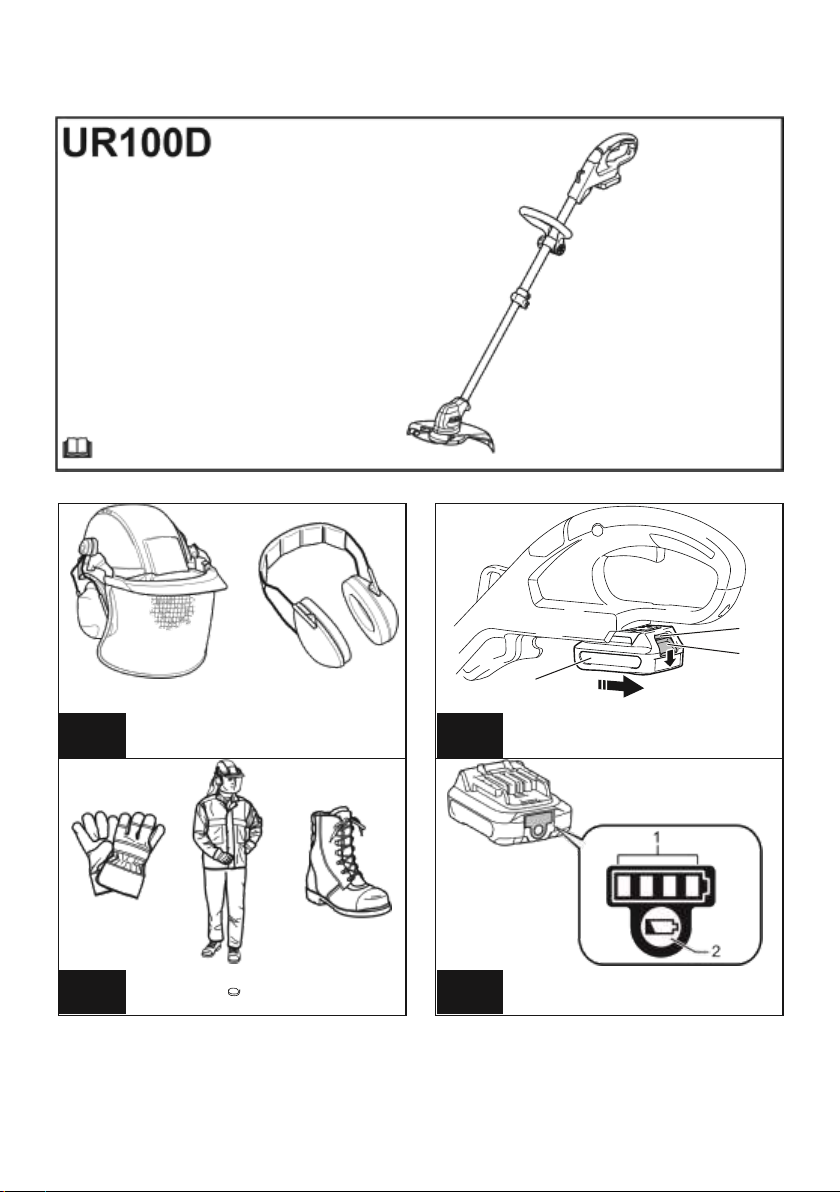
Makita UR100D User manual

EN
Cordless Grass Trimmer
INSTRUCTION MANUAL
8
PL
Akumulatorowa wykaszarka
do trawy
INSTRUKCJA OBSŁUGI
17
HU
Vezeték nélküli fűkasza
HASZNÁLATI KÉZIKÖNYV
27
SK
Akumulátorová kosačka
NÁVOD NA OBSLUHU
36
CS
Akumulátorový vyžínač
NÁVOD K OBSLUZE
45
UK
Акумуляторна
газонокосарка
ІНСТРУКЦІЯ З
ЕКСПЛУАТАЦІЇ
54
RO
Motocositoare pentru iarbă
fără cablu
MANUAL DE INSTRUCŢIUNI
64
DE
Akku-Rasentrimmer
BETRIEBSANLEITUNG
73

2
Fig.1
Fig.5
Fig.2
Fig.6
1
2
3

3

4
1

5
Fig.15

6

7
Fig.22
Fig.19

8

9
Fig.29
Fig.25
1

10

11
Fig.26
Fig.30

12
Fig.31

13

14
Fig.32

15 ENGLISH
ENGLISH (Original instructions)
SPECIFICATIONS
Model:
UR100D
No load speed
(without cutting tool)
10,000 min-1
Overall length
(without cutting tool)
835 - 1,185 mm
Nylon cord diameter
1.65 mm
Applicable cutting tool and
cutting diameter
Nylon cutting head
(P/N 198852-2 / 198853-0)
260 mm
Rated voltage
D.C. 10.8 V - 12 V max
Standard battery cartridge
BL1015 / BL1016 / BL1020B / BL1021B / BL1040B / BL1041B
Net weight
1.9 - 2.1 kg
•Due to our continuing program of research and development,
the specifications herein are subject to change without
notice.
•Specifications and battery cartridge may differ from country to
country.
•The weight may differ depending on the attachment(s), including the battery cartridge. The lightest and
heaviest combination, according to EPTA-Procedure 01/2014, are shown in the table.
Noise
Applicable standard : EN50636
Type
Sound pressure level average
LPA(dB(A))
Uncertainty K (dB(A))
Nylon cutting head
74
0.74
• Even if the sound pressure level listed above is 80 dB (A) or less, the level under working may exceed 80 dB
(A). Wear ear protection.
Vibration
Applicable standard : EN50636
Type
Left hand
Right hand

16 ENGLISH
ah,W (m/s2)
Uncertainty K
(m/s2)
ah,W (m/s2)
Uncertainty K
(m/s2)
Nylon cutting head
2.5
0.1
2.5
0.5
NOTE: The declared vibration emission value has been measured in accordance with the standard test method
and may be used for comparing one tool with another.
NOTE: The declared vibration emission value may also be used in a preliminary assessment of exposure.
WARNING: The vibration emission during actual use of the power tool can differ from the declared emission
value depending on the ways in which the tool is used.
WARNING: Be sure to identify safety measures to protect the operator that are based on an estimation of
exposure in the actual conditions of use (taking account of all parts of the operating cycle such as the times when
the tool is switched off and when it is running idle in addition to the trigger time).
Only for EU countries Do not dispose of
electric equipment or battery pack together
with household waste material! In
observance of the European Directives, on
Waste Electric and Electronic Equipment
and Batteries and Accumulators and Waste
Batteries and Accumulators and their
implementation in accordance with national
laws, electric equipment and batteries and
battery pack(s) that have reached the end
of their life must be collected separately
and returned to an environmentally
compatible recycling facility.
EC Declaration of Conformity
For European countries only
The EC declaration of conformity is included as Annex A
to this instruction manual.
SAFETY WARNINGS
IMPORTANT SAFETY
INSTRUCTIONS
WARNING: Read all safety warnings and
all instructions. Failure to follow the warnings and
instructions may result in
electric shock, fire and/or
serious injury.
Save all warnings and
instructions for future reference.
1. Be familiar with the controls and proper use of
the equipment.
2. Cutting elements continue to rotate after the
motor is switched off.
3. Never allow children or people unfamiliar with
the instructions to use the machine. Local
Symbols
The following show the symbols used for the equip-
ment. Be sure that you understand their meaning before
use.
Take particular care and attention.
Read instruction manual.
Danger; be aware of
thrown objects.
The distance between the tool and
bystanders must be at least 15 m.

17 ENGLISH
regulations may restrict the age of the
operator.
4. Stop using the machine while people,
especially children, or pets are nearby.
5. Only use the machine in daylight or good
artificial light. Avoid using the machine in bad
weather conditions especially when there is a
risk of lightning.
6. Before using the machine and after any
impact, check for signs of wear or damage and
repair as necessary.
7. Take care against injury from any device fitted
for trimming the filament line length. After
extending new cutter line always return the
machine to its normal operating position
before switching on.
8. Never fit metal cutting elements.
9. This appliance is not intended for use by
persons (including children) with reduced
physical, sensory or mental capabilities, or
lack of experience and knowledge, unless they
have been given supervision or instruction
concerning use of the appliance by a person
responsible for their safety. Children should be
supervised to ensure that they do not play with
the appliance.
10. Use the tool with the utmost care and
attention.
11. Operate the tool only if you are in good
physical condition. Perform all work calmly
and carefully. Use common sense and keep in
mind that the operator or user is responsible
for accidents or hazards occurring to other
people or their property.
12. Never operate the tool when tired, feeling ill or
under the influence of alcohol or drugs.
13. The tool should be switched off immediately if
it shows any signs of unusual operation.
14. Keep fingers away from switch trigger when
not operating the tool and when moving from
one operating position to another.
Intended use of the tool
1. Use right tool. The cordless grass trimmer is
only intended for cutting grass, light weeds. It
should not be used for any other purpose such
as hedge cutting as this may cause injury.
Personal protective equipment
►Fig.1
►Fig.2
1. Dress Properly. The clothing worn should be
functional and appropriate, i.e. it should be
tight-fitting but not cause hindrance. Do not
wear either jewelry or clothing which could
become entangled with high grass. Wear
protective hair covering to contain long hair.
2. When using the tool, always wear sturdy shoes
with a non-slip sole. This protects against
injuries and ensures a good footing.
3. Always wear protective goggles to protect
your eyes from injury when using power tools.
The goggles must comply with ANSI Z87.1 in
the USA, EN 166 in Europe, or AS/NZS 1336 in
Australia/New Zealand. In Australia/New
Zealand, it is legally required to wear a face
shield to protect your face, too.
It is an employer's responsibility to enforce the
use of appropriate safety protective
equipments by the tool operators and by other
persons in the immediate working area.
Electrical and battery safety
1. Avoid dangerous environment. Don't use the
tool in damp or wet locations or expose it to
rain. Water entering the tool will increase the
risk of electric shock.
2. Recharge only with the charger specified by
the manufacturer. A charger that is suitable for
one type of battery pack may create a risk of
fire when used with another battery pack.
3. Use power tools only with specifically
designated battery packs. Use of any other
battery packs may create a risk of injury and
fire.
4. When battery pack is not in use, keep it away
from other metal objects, like paper clips,
coins, keys, nails, screws or other small metal
objects, that can make a connection from one
terminal to another. Shorting the battery
terminals together may cause burns or a fire.
5. Under abusive conditions, liquid may be
ejected from the battery; avoid contact. If
contact accidentally occurs, flush with water. If
liquid contacts eyes, seek medical help. Liquid
ejected from the battery may cause irritation or
burns.

18 ENGLISH
6. Do not dispose of the battery(ies) in a fire. The
cell may explode. Check with local codes for
possible special disposal instructions.
7. Do not open or mutilate the battery(ies).
Released electrolyte is corrosive and may
cause damage to the eyes or skin. It may be
toxic if swallowed.
Starting up the tool
►Fig.3
1. Make sure that there are no children or other
people within a working range of 15 meters (50
ft), also pay attention to any animals in the
working vicinity. Otherwise stop using the tool.
2. Before use always check that the tool is safe
for operation. Check the security of the cutting
tool and the guard and the switch trigger/lever
for easy and proper action. Check for clean
and dry handles and test the on/off function of
the switch.
3. Check damaged parts before further use of the
tool. A guard or other part that is damaged
should be carefully checked to determine that
it will operate properly and perform its
intended function. Check for alignment of
moving parts, binding of moving parts,
breakage of parts, mounting, and any other
condition that may affect its operation. A guard
or other part that is damaged should be
properly repaired or replaced by our
authorized service center unless indicated
elsewhere in this manual.
4. Switch on the motor only when hands and feet
are away from the cutting tool.
5. Before starting make sure that the cutting tool
has no contact with hard objects such as
branches, stones etc. as the cutting tool will
revolve when starting.
6. Make sure there are no electrical cables, water
pipes, gas pipes etc. that could cause a hazard
if damaged by use of the tool.
Method of operation
1. Never operate the machine with damaged
guards or without the guards in place.
2. Only use the tool in good light and visibility.
During the winter season beware of slippery or
wet areas, ice and snow (risk of slipping).
Always ensure a safe footing.
3. Take care against injury to feet and hands from
the cutting tool.
4. Keep hands and feet away from the cutting
means at all times and especially when
switching on the motor.
5. Never cut above waist height.
6. Never stand on a ladder and run the tool.
7. Never work on unstable surfaces.
8. Don't overreach. Keep proper footing and
balance at all times.
9. Remove sand, stones, nails etc. found within
the working range. Foreign particles may
damage the cutting tool and can cause to be
thrown away, resulting in a serious injury.
10. Should the cutting tool hit stones or other hard
objects, immediately switch off the motor and
inspect the cutting tool.
11. Before commencing cutting, the cutting tool
must have reached full working speed.
12. During operation always hold the tool with
both hands. Never hold the tool with one hand
during use. Always ensure a safe footing.
13. All protective equipment such as guards
supplied with the tool must be used during
operation.
14. Except in case of emergency, never drop or
cast the tool to the ground or this may
severely damage the tool.
15. Never drag the tool on the ground when
moving from place to place, the tool may
become damaged if moved in this manner.
16. Always remove the battery cartridge from the
tool:
—whenever leaving the tool unattended;
—before clearing a blockage;
—before checking, cleaning or working on
the tool;
—before making any adjustments,
changing accessories or storing;
—whenever the tool starts vibrating
unusually;
—whenever transporting the tool.
17. Don't force the tool. It will do the job better and
with less likelihood of a risk of injury at the
rate for which it was designed.
18. Do not operate power tools in explosive
atmospheres, such as in the presence of
flammable liquids, gases or dust. Power tools
create sparks which may ignite the dust or fumes.
19. Take a rest to prevent loss of control caused
by fatigue. We recommend to take a 10 to 20-
minute rest every hour.
20. Do not use the tool on steep slopes.
21. The shoulder harness must be used during
operation, if supplied with the tool.
Maintenance instructions
1. The condition of the cutting tool, protective
devices and shoulder harness must be
checked before commencing work.

19 ENGLISH
2. Turn off the motor and remove the battery
cartridge before carrying out maintenance,
replacing the cutting tool and cleaning the
tool.
3. After use, disconnect the battery cartridge
from the tool and check for damage.
4. Check for loose fasteners and damaged parts
such as nearly halfway cut-off state in the
cutting tool.
5. When not in use store the equipment in a dry
location that is locked up or out of children's
reach.
6. Use only the manufacturer's recommended
replacement parts and accessories.
7. Always ensure that ventilation openings are
kept clear of debris.
8. Inspect and maintain the tool regularly,
especially before/after use. Have the tool
repaired only by our authorized service center.
9. Keep handles dry, clean and free from oil and
grease.
SAVE THESE INSTRUCTIONS.
WARNING: DO NOT let comfort or familiarity
with product (gained from repeated use) replace
strict adherence to safety rules for the subject
product. MISUSE or failure to follow the safety
rules stated in this instruction manual may cause
serious personal injury.
Important safety instructions for
battery cartridge
1. Before using battery cartridge, read all
instructions and cautionary markings on (1)
battery charger, (2) battery, and (3) product
using battery.
2. Do not disassemble battery cartridge.
3. If operating time has become excessively
shorter, stop operating immediately. It may
result in a risk of overheating, possible burns
and even an explosion.
4. If electrolyte gets into your eyes, rinse them
out with clear water and seek medical attention
right away. It may result in loss of your
eyesight.
5. Do not short the battery cartridge:
(1) Do not touch the terminals with any
conductive material.
(2) Avoid storing battery cartridge in a
container with other metal objects such
as nails, coins, etc.
(3) Do not expose battery cartridge to water
or rain.
A battery short can cause a large current flow,
overheating, possible burns and even a
breakdown.
6. Do not store the tool and battery cartridge in
locations where the temperature may reach or
exceed 50 °C (122 °F).
7. Do not incinerate the battery cartridge even if it
is severely damaged or is completely worn out.
The battery cartridge can explode in a fire.
8. Be careful not to drop or strike battery.
9. Do not use a damaged battery.
10. The contained lithium-ion batteries are subject
to the Dangerous Goods Legislation
requirements.
For commercial transports e.g. by third parties,
forwarding agents, special requirement on
packaging and labeling must be observed. For
preparation of the item being shipped, consulting
an expert for hazardous material is required.
Please also observe possibly more detailed
national regulations.
Tape or mask off open contacts and pack up the
battery in such a manner that it cannot move
around in the packaging.
11. Follow your local regulations relating to
disposal of battery.
12. Use the batteries only with the products
specified by Makita. Installing the batteries to
non-compliant products may result
in a fire, excessive
heat, explosion, or leak of electrolyte.
SAVE THESE INSTRUCTIONS.
CAUTION: Only use genuine Makita batteries.
Use of non-genuine Makita batteries, or batteries that
have been altered, may result in the battery bursting
causing fires, personal injury and
damage. It will also
void the Makita warranty for the Makita tool and
charger.
Tips for maintaining maximum
battery life
1. Charge the battery cartridge before completely
discharged. Always stop tool operation and
charge the battery cartridge when you notice
less tool power.
2. Never recharge a fully charged battery
cartridge. Overcharging shortens the battery
service life.
3. Charge the battery cartridge with room
temperature at 10 °C - 40 °C (50 °F - 104 °F). Let

20 ENGLISH
a hot battery cartridge cool down before
charging it.
PARTS DESCRIPTION
Parts description (with nylon
cutting head)
►Fig.4
1
Switch trigger
2
Battery cartridge
3
Lock lever
4
Protector
5
Nylon cutting head
6
Nylon cord
7
Wire guard
8
Thumb nut
9
Front grip
10
Hanger for shoulder
harness
11
Indication lamp
12
Lock-off button
FUNCTIONAL
DESCRIPTION
WARNING: Always be sure that the tool is
switched off and the battery cartridge is removed
before adjusting or checking function on the tool.
Failure to switch off and remove the battery cartridge
may result in serious
personal injury from
accidental start-up.
Installing or removing battery
cartridge
CAUTION: Always switch off the tool before
installing or removing of the battery cartridge.
CAUTION: Hold the tool and the battery
cartridge firmly when installing or removing
battery cartridge. Failure to hold the tool and the
battery cartridge firmly may cause
them to slip off
your hands and result in
damage to the tool and battery cartridge and a
personal injury.
►Fig.5: 1. Red indicator 2. Button 3. Battery
cartridge
To remove the battery cartridge, slide it from the tool
while sliding the button on the front of the cartridge.
To install the battery cartridge, align the tongue on the
battery cartridge with the groove in the housing and slip
it into place. Insert it all the way until it locks in place
with a little click. If you can see the red indicator on the
upper side of the button, it is not locked completely.
CAUTION: Always install the battery cartridge
fully until the red indicator cannot be seen. If not, it
may accidentally fall
out of the tool,
causing injury to you or
someone around you.
CAUTION: Do not install the battery cartridge
forcibly. If the cartridge does not slide in easily, it is
not being inserted correctly.
Battery protection system
The tool is equipped with a battery protection system.
This system automatically cuts off power to the motor to
extend battery life.
The tool will automatically stop during operation if the
tool and/or battery are placed under one of the following
conditions:
Overloaded:
The tool is operated in a manner that causes it to draw
an abnormally high current.
In this situation, turn the tool off and stop the application
that caused the tool to become overloaded. Then turn
the tool on to restart.
If the tool does not start, the battery is overheated. In
this situation, let the battery cool before turning the tool
on again.
Low battery voltage:
The remaining battery capacity is too low and the tool
will not operate. If you turn the tool on, the motor runs
again but stops soon. In this situation, remove and
recharge the battery.
Indicating the remaining battery
capacity
Only for battery cartridges with the indicator ►
Fig.6: 1. Indicator lamps 2. Check button
Press the check button on the battery cartridge to
indicate the remaining battery capacity. The indicator
lamps light up for a few seconds.
Indicator lamps
Remaining
capacity
Lighted
f
Of
75% to 100%
Other manuals for UR100D
10
Table of contents
Languages:
Other Makita Trimmer manuals

Makita
Makita EM2500U User manual

Makita
Makita EE400MP User manual

Makita
Makita DUR368L User manual

Makita
Makita RT0700C User manual

Makita
Makita UM3830 User manual

Makita
Makita UR3000 User manual

Makita
Makita XHU06 User manual

Makita
Makita DUR364L User manual

Makita
Makita UH420D User manual

Makita
Makita HTR4900 User manual

Makita
Makita DUH551RF2 User manual

Makita
Makita BUR181 User manual

Makita
Makita DUH504S User manual

Makita
Makita EH7500S User manual

Makita
Makita EN4950H User manual

Makita
Makita DUN461W User manual

Makita
Makita BUH550 User manual

Makita
Makita EH5000W User manual

Makita
Makita RBC201 Quick start guide

Makita
Makita EM4251 Quick start guide