MALTEC DH-2200 User manual
Osuszacz DH-2200
Instrukcja Obsługi
iKonserwacji

Instrukcję należy zachować dla późniejszego wglądu.
1IN TRUKCJA BEZPIECZEŃ TWA
Sprawdź tab iczkę znamionową na urządzeniu. Zaprojektowany został d a napięcia
220-240V.
Umieść urządzenie na płaskiej powierzchni i upewnij się że nie jest narażone na
bezpośrednie działanie promieni słonecznych.
Nie umieszczaj innych przedmiotów w bezpośrednim sąsiedztwie urządzenia
(rekomendowane 10 cm odstępu z każdej strony).
Nie umieszczaj urządzenia w wi gotnych ub mokrych pomieszczeniach, może to
spowodować kondensację wody na obudowie urządzenia, powodując uszkodzenia
izo acji.
Odłączając urządzenie od zasi ania trzymaj za wtyczkę nie za przewód.
Nie wkładaj pa ców i innych przedmiotów z tyłu urządzenia
Nie używaj urządzenia jeże i przewód zasi ający jest uszkodzony.
Sprawdzaj przewód zasi ający regu arnie. Jeże i u egł uszkodzeniu musi zostać
wymieniony przez producenta ub autoryzowany serwis.
Urządzenie wyłącznie do użytku domowego.
Nie zwijaj ub związuj przewodu, może u ec przegrzaniu.
Nie używaj łatwopa nych sprayów takich jak akier ub farba w pob iżu urządzenia.
Może spowodować wybuch pożaru.
Nie umieszczaj urządzenia w pomieszczeniach w których składowane są
substancje łatwopa ne w tym a koho .
Nie zanurzaj urządzenia, w tym przewodu, do wody.
Przed przystąpieniem do czyszczenia, ub po każdym użyciu, odłącz urządzenie od
zasi ania.
Nie spryskuj urządzenia wodą ub środkiem czyszczącym.
Nie używaj ostrych przedmiotów do czyszczenia powierzchni urządzenia.
Leki, ub inne substancje nie mogą być składowane w urządzeniu.
Nie umieszczaj ciężkich przedmiotów na urządzeniu.
Urządzenia można używać jedynie według wytycznych zawartych w instrukcji.
Urządzenie to nie jest przystosowane do użytku przez osoby z ograniczoną
zdo nością motoryczną i psychiczną, chyba że jest ona pod nadzorem osoby za nią
odpowiedzia nej.
Na eży dołożyć wsze kich starań aby dzieci nie bawiły się urządzeniem.
Urządzenie przystosowane do działania wyłącznie z orygina nym przewodem
zasi ającym.
2/15

2WŁAŚCIWOŚCI
Osuszacz wykorzystuje zjawisko Pe tier’a (nie wymaga kompresora), co czyni go ekkim i
cichym. Duża wi gotność i słaba wenty acja może powodować brzydkie zapachy i p eśń w
pomieszczeniu. Osuszacz zapobiega temu prob emowi.
Aby uniknąć porażenia prądem, nie rozkręcaj urządzenia.
3PODŁĄCZENIE I IN TALACJA
4Po usunięciu opakowania, powinny znajdować się w nim 2 przedmioty:
◦Osuszacz
◦Przewód zasi ający
IN TALACJA:
1. Aby zacząć pracę z osuszaczem, na samym początku ustaw go na płaskiej i
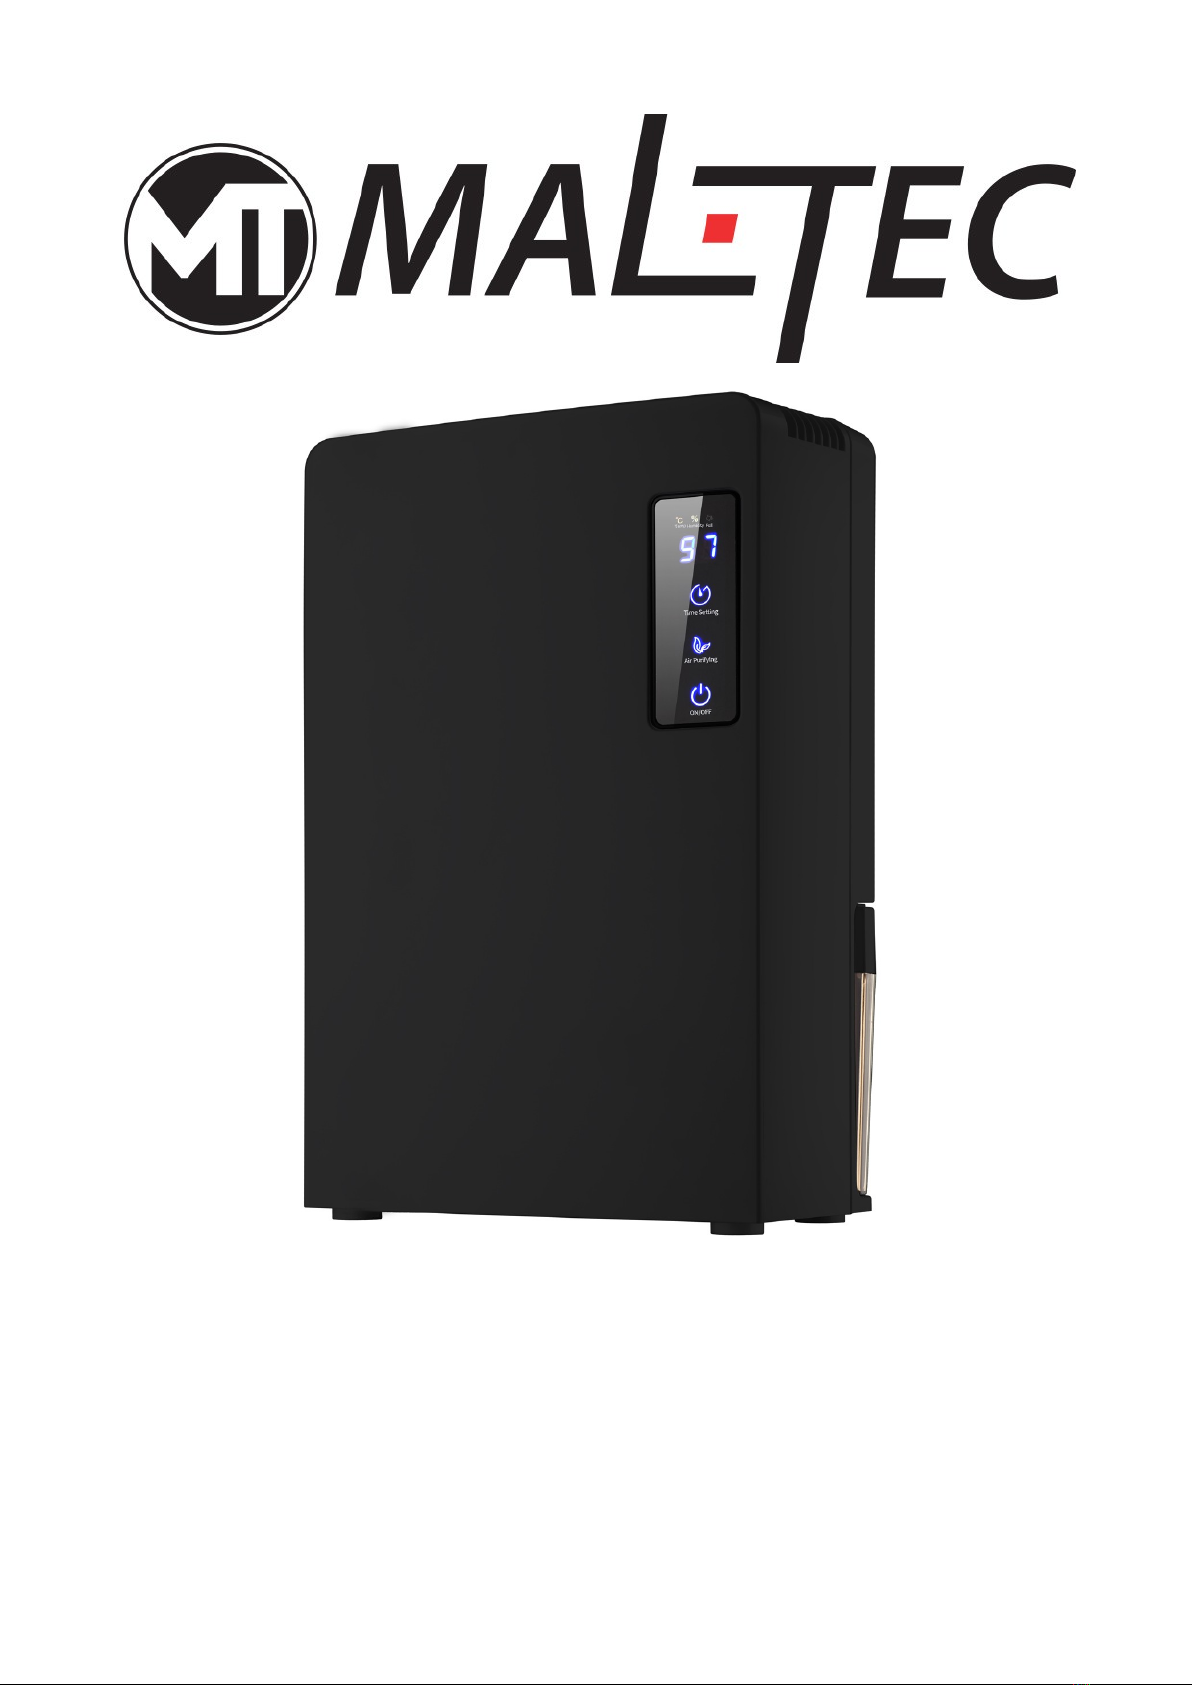
stabi nej powierzchni. Podłącz przewód zasi ający do odpowiedniego źródła
zasi ania. Następnie dotknij przycisku ON/OFF, zaświeci się niebieska ampka, a
osuszacz zacznie działać.
2. Nasłuchuj czy powietrze przepływa przez urządzenie. Aby je wyłączyć, ponownie
dotknij przycisku ON/OFF.
3. Aby użyć funkcji oczyszczania powietrza, włącz urządzenie następnie dotknij
przycisku „Air Purifying”, zaświeci się niebieska ampka oraz boczne niebieskie
podświet enie, oznacza to iż oczyszczanie zostało włączone. Aby je wyłączyć
wciśnij ten sam przycisk ponownie.
4. Aby użyć funkcji timera, gdy urządzenie jest włączone dotknij przycisku „Time
Setting” aby ustawić od iczanie od 1 do 24 godzin. Gdy dobiegnie ono końca
urządzenie automatycznie wyłączy się.
5. Urządzenie posiada funkcję automatycznego odmrażania, nie trzeba tego robić
manua nie.
6. Wskaźnik LED będzie naprzemiennie wskazywać temperaturę, wi gotność i
ustawienia timera (jeże i jest ustawiony).
3/15
Osuszacz posiada funkcję automatycznego wyłączania się. W chwili kiedy pojemnik
na wodę się napełni, osuszacz wyłączy się automatycznie oraz zapali się czerwona
lampka na przodzie urządzenia.

PANEL KONTROLNY:
5WYJMOWANY ZBIORNIK NA WODĘ
Gdy zbiornik zapełni się (około 2200m ) po zebraniu wody, urządzenie automatycznie
wyłączy się i zaświeci się czerwona ampka.
Na eży wtedy wyłączyć urządzenie, odłączyć je od zasi ania, wyjąć zbiornik z wodą i wy ać
z niego wodę. Następnie zamontować zbiornik w urządzeniu, podłączyć je do zasi ania i
włączyć.
6CZY ZCZENIE WNĘTRZA ZBIORNIKA NA WODĘ
Uwaga: Pokrywa zbiornika na wodę jest wyjmowa na jedynie d a ce ów czyszczenia
zbiornika. Po pierwsze wyłącz osuszacz i odłącz go od zasi ania, przed wyjęciem
zbiornika. Pozbądź się wody za egającej w zbiorniku, następnie wyczyść jego wnętrze,
umieść pokrywę, pływak i przymocuj do urządzenia.
(PONOWNE) MONTOWANIE POKRYWY ZBIORNIKA NA WODĘ
Po wyczyszczeniu zbiornika na wodę:
1. Odwróć pokrywę zbiornika i umieść ją na płaskiej powierzchni.
2. Włóż pływak do otworu w pokrywie.
3. Umieścić zbiornik na wodę na pokrywie i gładko wciśnij.
4. Włóż zbiornik na wodę z powrotem do osuszacza
4/15

CZY ZCZENIE O U ZACZA
Przed czyszczeniem urządzenia na eży odłączyć je od źródła prądu. Przy pomocy miękkiej
ściereczki na eży wyczyścić powierzchnię zewnętrzną urządzenia a za pomocą szczotki o
miękkim włosiu na eży usunąć kurz z kratek w otu I wy otu powietrza.
7UWAGA
1. Gdy przestaniesz używać osuszacza wyłącz go poprzez przyciśnięcie przycisku
„Power”.
2. Nie umieszczaj zasi acza urządzenia na mokrym ub wi gotnym podłożu, dopi nuj by
pomieszczenie w którym znajduje się osuszacz było dobrze wenty owane.
3. Nie zakrywaj w otu i wy otu powietrza, nie umieszczaj na nim ubrań, kawałków
materiałów i fo ii.
4. Adapter AC/DC stanie się ciepły w trakcie użytkowania, jest to norma ne zjawisko i
nie oznacza awarii.
5. Zawsze umieszczaj urządzenie w pozycji pionowej, aby zapobiec wyciekaniu wody.
8DEKLARACJA CE
Ma is B. Machoński sp. k. Dek aruje że urządzenie Ma tec Osuszacz DH-2200 spełnia
wsze kie wymogi dotyczące urządzeń chłodniczych LVD 2014/35/EU, EC 2014/30/EU oraz
spełnia następujące standardy:
62321-4:2013+AMD1:2017
62321-5:2013
62321-6:2015
62321-7-1:2015
62321-7-2:2017
62321-8:2017
EN 55014-1:2017
EN 55014-2:2015
EN 61000-3-2:2014
EN 61000-3-3:2013
EN 60335-1:2012+A11:2014
9IMPORTER:
Ma is B. Machoński sp. k.
u . Zbożowa 2E, Wysogotowo
62-081 Przeźmierowo
www.ma tec.p
5/15

DH-2200 Dehumidifier
Operation and
Maintenance Manua

Keep this manual for future reference.
AFETY IN TRUCTION :
Check the vo tage indicated on the rating p ate. This too is designed for 220V-240V
e ectric supp y.
P ace the app iance on a f at surface and make sure the dehumidifier is not
positioned in direct sun ight.
Do not p ace any object c ose to the unit (recommended 4” c earance from sides
and back).
Do not insta this app iance in damp or wet ocation as this wi cause condensation
to co ect on the outside of the dehumidifier and may cause damage to the
insu ation.
When disconnecting the p ug from the out et, firm y ho d and pu the p ug itse f.
Do not p ace your fingers or any object into the back of the app iance.
Do not use the app iance if the cord or p ug is damaged.
Check the power cord of this app iance regu ar y. A damaged cord must be rep aced
by the manufacturer, an after-sa es service or a qua ified professiona in order to
avoid injury and damage to property.
This app iance is for indoor househo d use on y. Do not use this app iance outdoors.
Do not tight y wind or bund e the power cord. It might overheat.
Do not use f ammab e sprays such as acquer and paint near the app iance. It might
cause the app iance to ignite.
High y vo ati e and f ammab e materia s such as ether, petro , propane gas,
adhesive agents and pure a coho , etc. are iab e to exp ode. Do not store these
inside this app iance.
Do not immerse the unit, power cord and p ug into water.
Unp ug the app iance before c eaning or after each use.
Do not sp ash water direct y on the outer cabinet or the interior. This may ead to
rusting and deterioration of the e ectrica insu ation.
Do not use sharp objects such as knives, screwdrivers, scissors, etc. to scrape or
c ean the unit.
Medications (drugs), chemica s, research and experimenta substances shou d not
be stored in this app iance.
Do not p ace heavy or fragi e objects on top of the app iance.
Use this app iance on y as it is described in this manua .
This app iance can be used by chi dren aged from 8 years and above and persons
with reduced physica , sensory or menta capabi ities or ack of experience and
know edge if they have been given supervision or instruction concerning use of the
app iance in a safe way and understand the hazards invo ved.
Chi dren shou d not p ay with the app iance. C eaning and user maintenance sha
not be made by chi dren without supervision.
7/15

FEATURE
The dehumidifier uses Pe tier techno ogy (no compressor), which makes it ight and quiet.
It is perfect for sma rooms. Poor venti ation causes musty odor and fungus in wardrobes,
arder, cabinet or storage room...etc. The mini dehumidifier e iminates this prob em by
keeping them free of unwanted moisture.
To avoid e ectric shock. Do not open. There are no user serviceab e parts inside.
Specifications are subject to change for improvement without prior notice.
CONNECTION AND ET UP
1. After removing the packaging materia s, there shou d be 2 items:
Dehumidifier
AC Wire Cord
Use the dehumidifier at home:
1. To start to use your dehumidifier, first, put the dehumidifier on the f at p ace, connect
the AC input p ug to the appropriate main socket. Then, touch the "ON/OFF" button
on the front face of the dehumidifier, the “ON/OFF” B ue LED wi ight, and the
dehumidifier wi begin to operate. Listen and fee for the air b owing from two sides
dry air out et. Touch the “ON/OFF” again, the dehumidifier wi stop.
2. To using the air purifying function, first, turn on the dehumidifier in the first step, then
touch the “Air Purifying” button, the “Air Purifying ” B ue LED wi ight, and the
two sides UV ight wi turn on, the purify function start to working. To touching the
“Air Purifying ” button again, the purifying function wi stop working.
3. To set the time, when the dehumidifier is working, you can touch the “Time Setting”
bottom to set the time from 1 hour to 24hours. Once the time over , the dehumidifier
wi stop working automatica y.
4. The dehumidifier have automatic defrost function, no need to defrost manua y.
5. The indicator window wi showing “Temperature”“Humidity”“Timer (if set)”
circu ar y.
8/15
The dehumidifier have auto-stop function. When the water tank is full, the
dehumidifier will auto-stop, and the red LED on the front of dehumidifier will turn on.

CONTROL PANEL:
REMOVABLE WATER TANK
When the water tank is fu , with approximate y 2200m of water co ected, the unit wi
automatica y switched off and the red co or " Water tank fu " LED wi come on.
To remove the water tank, first , turn off the mini dehumidifier, then, remove the water tank
from the unit and pour the water out to the toi et or bathroom. Put the water tank back into
the unit. To continue dehumidifying, touch the “ON/OFF” position again.
CLEANING THE IN IDE OF THE WATER TANK
Important: The Water Tank Cover is detachab e for c eaning purposes on y. First, turn off
the dehumidifier and unp ug it before removing the water tank. Dispose of the water and
c ean the inside of the tank. After c eaning, p ace the cover and f oating ba back into the
dehumidifier.
HOW TO (RE)IN TALL YOUR WATER TANK COVER
After c eaning your water tank,
1. Turn the tank cover over and p ace it on a f at surface.
2. Insert the f oat into the cover’s aperture.
3. P ace the water tank over the cover, and press in smooth y.
4. Rep ace water tank into dehumidifier.
9/15

CLEANING THE DEHUMIDIFIER
Before c eaning the unit, turn off the mini dehumidifier and unp ug the p ug from the main
socket first. Use a soft c oth to c ean the surface of the unit and a soft brist ed brush to
remove dust from the air in et and out et gri s.
CAUTION
1. After having finished using the dehumidifier, the user shou d switch the unit off.
2. Avoid using the wire in wet or damp p ace, and position it in areas where the air
venti ation is good.
3. Keep the side out et gri and the back in et gri c ear at a times and do not cover with
c othing or po y bags etc.
4. A ways keep the unit at an up-right position to avoid water eakage.
CE DECLARATION
Ma is B. Machoński sp. k. dec ares that the Ma tec Dryer DH-2200 device meets a the
requirements for LVD 2014/35 / EU, EC 2014/30 / EU refrigeration devices and meets the
fo owing standards:
62321-4: 2013 + AMD1: 2017
62321-5: 2013
62321-6: 2015
62321-7-1: 2015
62321-7-2: 2017
62321-8: 2017
EN 55014-1: 2017
EN 55014-2: 2015
EN 61000-3-2: 2014
EN 61000-3-3: 2013
EN 60335-1: 2012 + A11: 2014
10IMPORTER:
Ma is B. Machoński sp. k.
u . Zbożowa 2E, Wysogotowo
62-081 Przeźmierowo
www.ma tec.p
10/15
Table of contents
Languages:
Other MALTEC Dehumidifier manuals


