MALTEC DH-900 User manual

Maltec Osuszacz DH-900
Instrukcja Obsługi

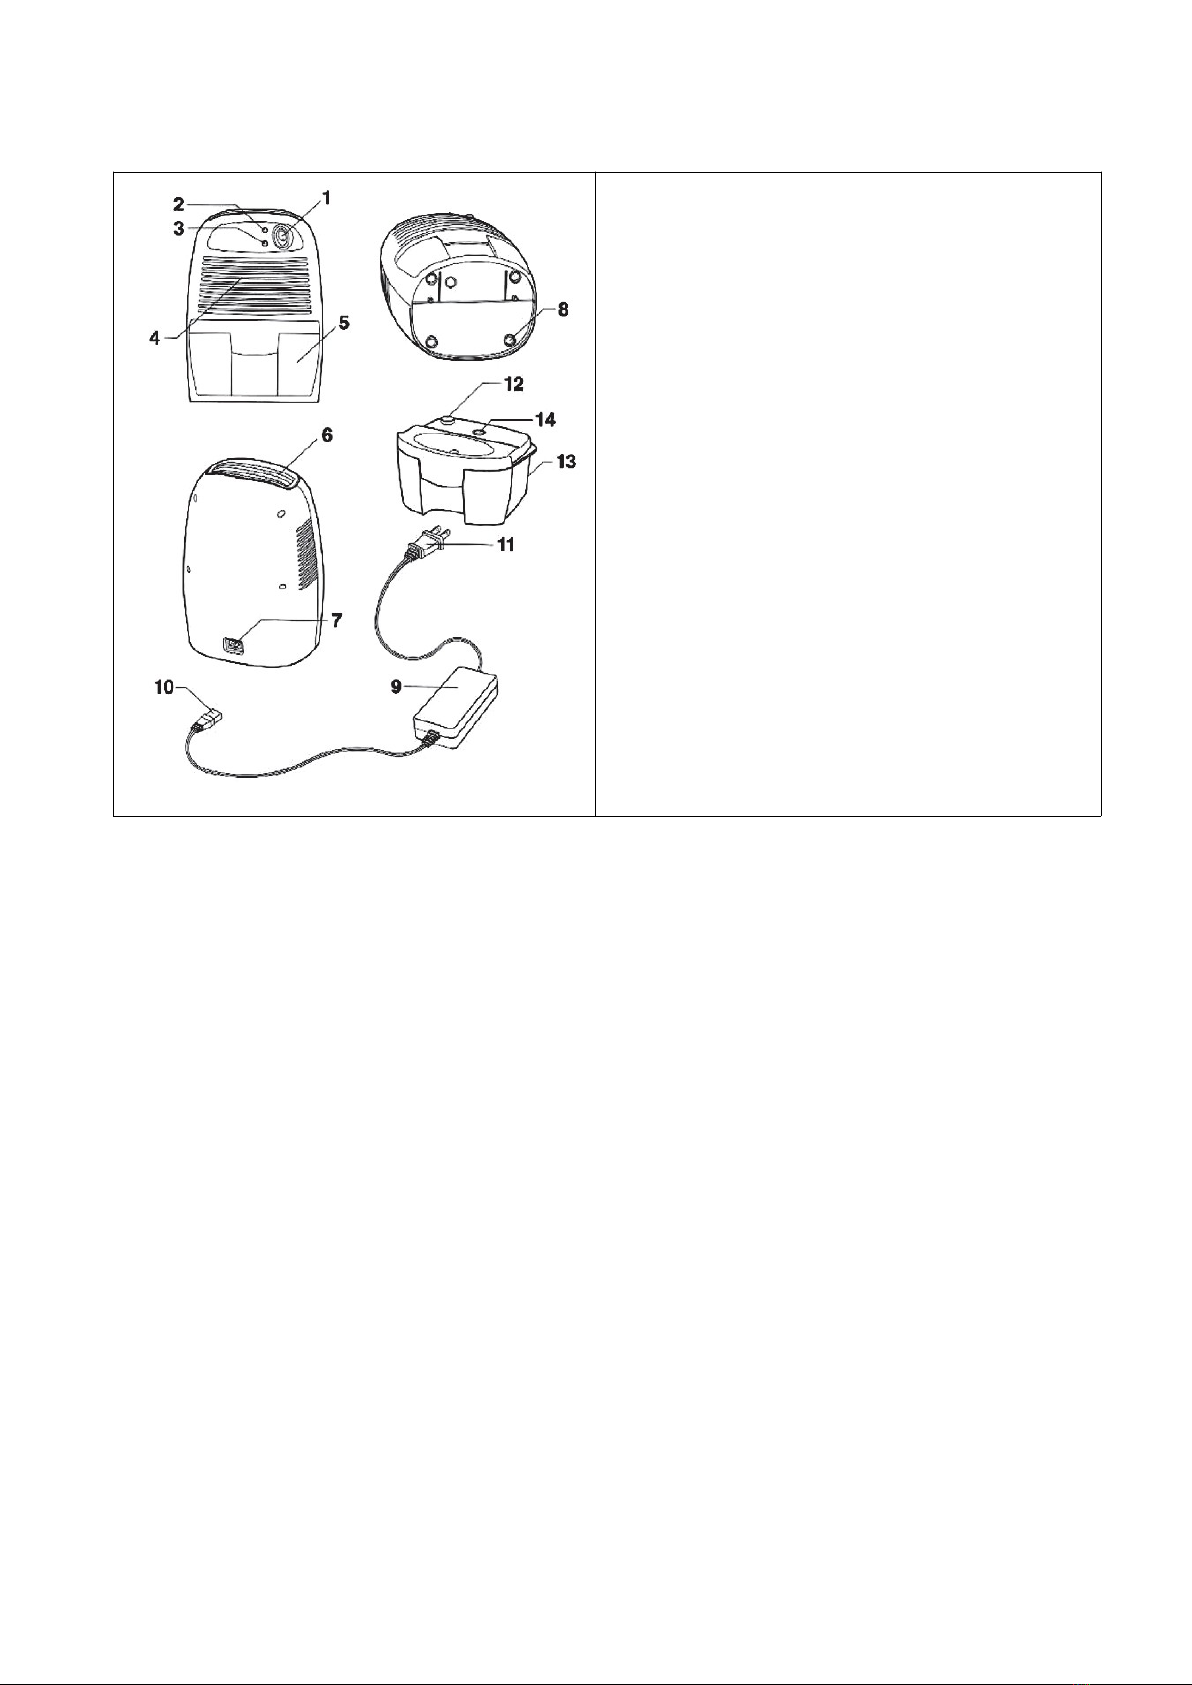
Spis części
1. Przycisk On/Off
2. Włączony – Zielona LED
3. Pełen zbiornik – Czer ona LED
4. Wlot po ietrza
5. Zbiornik ody
6. Wylot suchego po ietrza
7. Gniazdo do zasilania
8. Gumo e podkładki
9. Zasilacz AC/DC
10.Wtyczka do gniazda zasilania
11. Wtyczka z zasilaczem
12.Ot ór yporo y ody
13.Zbiornik ody
14.Zabezpieczenie yłączające
Sposób ziałania
Osuszacz DH-900 działa oparciu o technologię Peltiera (nie korzysta z kompresora),
dzięki czemu jest lekki i cichy użytko aniu, co czyni go idealnym dla małych
pomieszczeń. Zbyt mała entylacja pomieszczenia po adzi do po sta ania zatęchłego
zapachu oraz sprzyja roz ojo i pleśni. Osuszacz eliminuje te problemy pozby ając się
nadmiernej ilgoci z po ietrza.
Aby unikną porażenia elektrycznego, nie należy rozkręcać urządzenia na łasną
rękę. W środku nie znajdują się żadne komponenty które można ymienić
samodzielnie.
Każda napra a musi zostać przepro adzona przez yk alifiko anego technika
lub za pośrednict em dystrybutora.
Specyfikacja urzą zenia
Osuszanie: około 200-250ml/dzień przy temp. Otoczenia 30°C, ilgotność 80%RH
Element chłodzący: termo-elektryczny moduł Peltiera
Wentylator: 80x80 mm DC silnik bez szczotko y
Zasilacz: 12V DC 3Amp
Pobór prądu: 36W
Zbiornik na odę: 800ml
Wykry anie poziomu ody: Automatyczne rozłączanie po przekroczeniu
niebezpiecznego poziomu.
Wymiary produktu: 154 x 218 x 130 mm
2/12

Środo isko pracy: Po yżej 15°C, ponad 40% ilgotności
Montaż
1. W opako aniu po inny się znajdo ać 2 elementy: Osuszacz oraz Zasilacz.
2. Po rozpako aniu należy najpier podłączyć zasilacz do urządzenia, a następnie
podłączyć tyczkę zasilacza do odpo iedniego gniazda zasilającego.
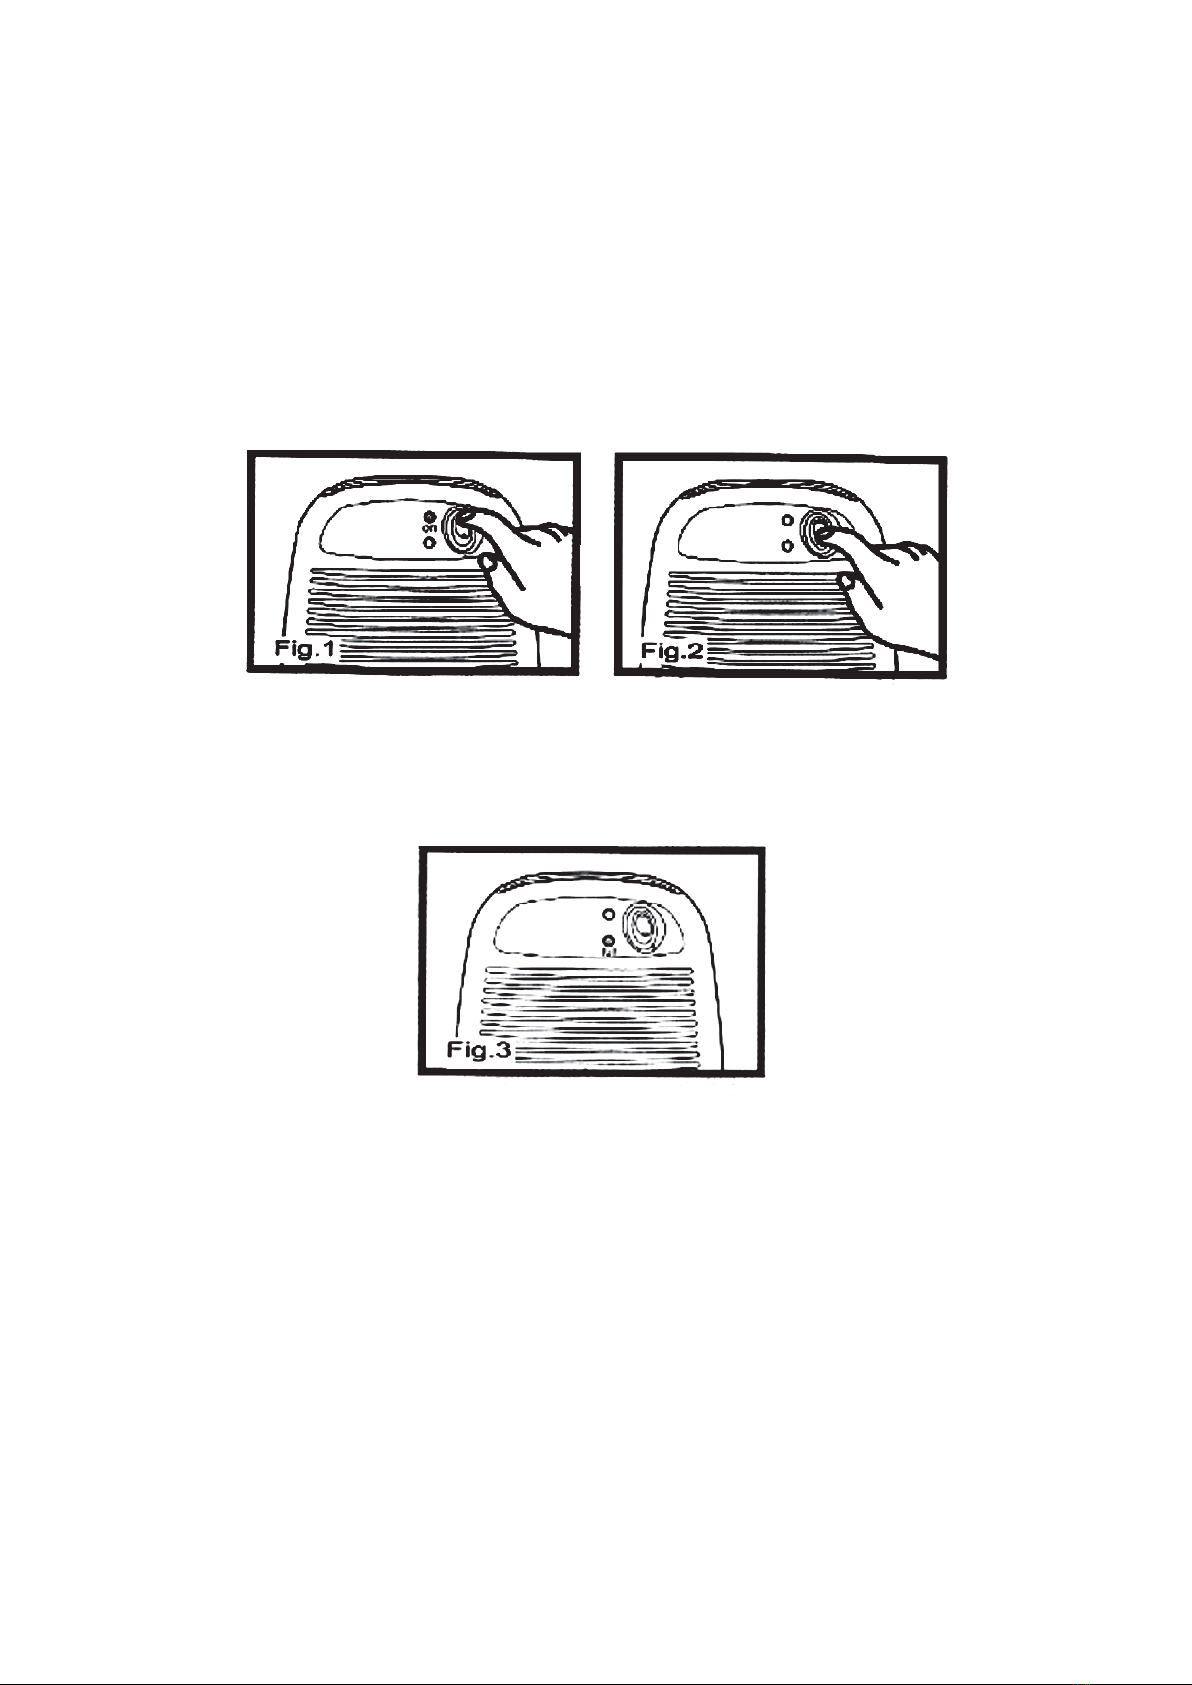
3. Następnie łącz urządzenie poprzez usta ienie przycisku On/Off na pozycję „On”.
Urządzenie po inno zacząć praco ać, zapali się zielona lampka LED, a z ylotu
zacznie dmuchać suche po ietrze.
4. Aby yłączyć urządzenie należy usta ić przycisk On/Off na pozycję „Off”
Zbiornik na wo ę
Gdy zbiornik na odę zostanie napełniony, około 500ml zebranej ody, urządzenie
yłączy się automatycznie i zaś ieci się żółta/czer ona lampka LED
Aby opróżnić zbiornik, należy pier szej kolejności yłączyć urządzenie (przycisk na
pozycję „Off”) następnie yjąć zbiornik z urządzenia i ylać z niego odę. Pono nie
umieść zbiornik urządzeniu i analogicznie należy łączyć urządzenie (przycisk na
pozycję „On”).
Czyszczenie
Przed przystąpieniem do czyszczenia należy yłączyć urządzenie, a następnie odłączyć
je od zasilania. Do czyszczenia obudo y należy uży ać lekko z ilżonej ścierki, a do
pozby ania się kurzu z ylotu po ietrza - szczotki.
3/12

Uwaga
1. Po skończonym użytko aniu osuszacza należy go yłączyć usta iając przycisk
On/Off na pozycję „Off”.
2. Zasilacz nie może znajdo ać się na mokrej lub ilgotnej po ierzchni. Należy
umieszczać go na suchym podłożu.
3. Wlot i ylot po ietrza musi być olny od jakichkol iek przeszkód które mogłyby
spo odo ać zator (zasłony, firany, plastiko e torby itp.)
4. Jeżeli urządzenie jest podłączone pra idło o do zasilania, ale nie dmucha
po ietrzem, lub diody kontrolne nie ś iecą się, należy oddać urządzenie do
ser isu.
5. Urządzenie musi za sze znajdo ać się pozycji piono ej, aby uniknąć yle ania
się ody.
Deklaracja CE
Malis B. Machoński sp. k. Deklaruje że urządzenie Maltec Osuszacz DH-900 spełnia
szelkie ymogi dotyczące urządzeń chłodniczych LVD 2014/35/EU, EC 2014/30/EU oraz
spełnia następujące standardy:
62321-4:2013+AMD1:2017
62321-5:2013
62321-6:2015
62321-7-1:2015
62321-7-2:2017
62321-8:2017
EN 55014-1:2017
EN 55014-2:2015
EN 61000-3-2:2014
EN 61000-3-3:2013
Importer:
Malis B. Machoński sp. k.
ul. Zbożo a 2E, Wysogoto o
62-081 Przeźmiero o
.maltec.pl
4/12

Maltec Dehumi ifier DH-900
Instruction Manual

NAMES AND FUNCTIONS OF PARTS
1. On/Off button
2. „On“ green LED
3. „Full“ red LED
4. Air inlet
5. Removable ater tank
6. Dry air inlet
7. DC Po er Socket
8. Rubber feet
9. AC/DC po er adapter
10.DC po er jack
11. AC plug ith po er cord
12.Water displacement hole
13.Water tank
14.Hydraulic Cut-off
FEATURES
The mini dehumidifier uses Peltier technology (no compressor), hich makes it light and
quiet. It is perfect for small rooms. Poor ventilation causes musty odour and fungus in
ardrobes, larder, cabinet or storage room… etc. The mini dehumidifier eliminates this
problem by keeping them free of un anted moisture.
To avoid electric shock. Do not open. There are no user servicable parts inside.
Any repair ork must be done by qualified technician appointed by our distributors.
Specifications are subject to change for improvement ithout prior notice.
SPECIFICATIONS
Capacity: approximately 200-250 ml per day at 30°C, 80% RH
Cooling element: thermo-electric Peltier module
Fan: 80mmx80mm DC Brushless motor
Po er adapter: 12V DC 3Amp
Po er consumption: 36W
Removable ater tank: 800ml
Water Level Detector: Automatic s itch off ith Yello LED indicator hen ater tank is
full
Product dimension: 154mm (W) x 218 mm (H) x 130 mm (D)
Working environment: Over 15°C, over 40% RH
6/12
CONNECTION
1. After removing the packaging materials, there should be 2 items:
a) mini dehumidifier
b) AC/DC Po er adapter
2. Plug the DC po er jack of AC/DC po er adapter to the DC po er socket, then
connect the AC plug of the AC/DC po er adapter to the appropriate main socket.
3. Press the „On/Off” button to „On” position, the mini dehumidifier ill begin to
operate. The green LED ill be turned on. Listen and feel for the air blo ing from
dry air outlet.
4. To s itch off the unit, press „On/Off” button to „Off” position, the mini dehumidifier
ill be turned off.
REMOVABLE WATER TANK
When the ater tank is full, ith approximately 500ml of ater collected, the unit ill be
s itched of automatically and the „Yello ” LED ill be on.
To remove the ater tank, first s itch off the mini dehumidifier, press „On/Off” button to the
„Off” position. Then remove the ater tank from the unit and pour out to the toilet or
bathroom. Put the ater tank back into the unit. To continue dehumidifying, press the
„On/Off” button to „On” position again.
CLEANING
Before cleaning the unit, turn off the mini dehumidifier and unplug the AC plug from the
main socket first. Use a piece of soft cloth to clean the surface of the product or use a
brush to ipe the dust off the grills of the air inlet.
CAUTIONS
1. After having finished using the mini dehumidifier, the user should s itch the unit off
by pressing the „On/Off” button to „Off” position.
7/12

2. Avoid using the AC/DC po er adapter in et or damp place, and position it in areas
here the air ventilation is good.
3. Keep the front inlet grill and the top outlet free from air blocking materials such as
clothing, plastic bag or paper.
4. If the unit has been properly connected and no po er is flo ing, have the AC/DC
po er adapter and the dehumidifier unit checked by a qualified electrician.
5. Al ays keep the unit at an up-right position to avoid ater leakage.
Deklaracja CE
Malis B. Machoński sp. K. Declares that the Maltec Dehumidifier DH-900 device meets all
the requirements for LVD 2014/35 / EU, EC 2014/30 / EU refrigeration devices and meets
the follo ing standards:
62321-4:2013+AMD1:2017
62321-5:2013
62321-6:2015
62321-7-1:2015
62321-7-2:2017
62321-8:2017
EN 55014-1:2017
EN 55014-2:2015
EN 61000-3-2:2014
EN 61000-3-3:2013
Importer:
Malis B. Machoński sp. k.
ul. Zbożo a 2E, Wysogoto o
62-081 Przeźmiero o
.maltec.pl
8/12
Maltec Luftentfeuchter DH-900
Be ienungsanleitung
9/12
Geräteteile
1. Ein-/Ausschalter
2. Eingeschaltet - Grüne LED
3. Voller Tank - Rote LED
4. Lufteinlass
5. Wassertank
6. Trockenluftauslass
7. Buchse für die Spannungsversorgung
8. Gummipuffer
9. AC/DC-Adapter
10.Kabel
11. Netzstecker
12.Wasserverdrängungsöffnung
13. Wassertank
14.absperrbare Sicherheitseinrichtung
Arbeitsweise
Der Luftentfeuchter DH-900 arbeitet auf der Grundlage der Peltier-Technologie (er
ver endet keinen Kompressor), odurch er leicht und leise im Gebrauch ist, as ihn ideal
für kleine Räume macht. Unzureichende Belüftung in einem Raum führt zu muffigem
Geruch und fördert die Schimmelbildung. Ein Luftentfeuchter beseitigt diese Probleme,
indem er der Luft übermäßige Feuchtigkeit entzieht.
Um einen elektrischen Schlag zu vermeiden, sollten Sie das Gerät nicht selbst
zerlegen. Im Inneren befinden sich keine Komponenten, die Sie selbst ersetzen
können.
Jede Reparatur muss von einem qualifizierten Techniker oder von Ihrem Händler
durchgeführt erden.
Spezifikationen:
Entfeuchtung: ca. 200-250 ml/Tag bei 30 °C Umgebungstemperatur und 80 %
relativer Luftfeuchtigkeit
Kühlelement: thermoelektrisches Peltier-Modul
Lüfter: 80x80 mm DC bürstenloser Motor
Stromversorgung: 12V DC 3Amp
Stromverbrauch: 36W
Wassertank: 800ml
Wasserstandserkennung: Automatische Abschaltung bei Überschreiten des
Gefahrenpegels.
Abmessungen des Produkts: 154 x 218 x 130 mm
Arbeitsumfeld: Über 15°C, über 40% Luftfeuchtigkeit
10/12
Table of contents
Languages:
Other MALTEC Dehumidifier manuals


