Mangar Airflo Plus Installation guide

user instructions and warranty
freedom
through lightweight solutions
English
Nederlands
Français
Deutsch
Español
Italiano
Airflo Plus

Airo Plus
2
MI0323 issue 3
English
Intended Use
The Airo Plus by Mangar International, is a low
pressure air compressor, which has been designed
to inate the Mangar International ‘Camel’ and
‘ELK’ pneumatic lifting equipment through the
Mangar 4-Way pneumatic hand control. The 4-Way
hand control is supplied with the Camel and ELK.
Applied Parts (Accessories) for the Airo Plus:
Mangar ELK (Emergency lifting cushion)
Mangar Camel (Emergency lifting cushion)
Contents
Standard Package Contents Pg 3
Battery Status Indicator Pg 3
Battery Charging Pg 4
Connecting the Air Hose Pg 4
‘Auto’ Function Pg 5
4-Way Hand Control Pg 5
Cleaning & Storage Pg 6
Maintenance Pg 6
Trouble shooting guide Pg 7
Specications Pg 7
Symbols used on Airo Plus and Charger Pg 8
Symbols used on packaging Pg 9
Warranty Pg 9
English Pg 2
Deutsch S10
Français P 18
Nederlands
P 26
Italiano Pag 34
Español Pg 42
WARNINGS
• Be sure that you have read and understood
these instructions and those provided
with any other mangar international
product, before operating the equipment.
• Do not place the battery charger in a
bathroom or in a damp environment.
• Always disconnect from the battery charger
before cleaning.
• Use only the supplied battery charger.
• Not suitable for use in the presence
of ammable anaesthetic mixtures
with air, oxygen or nitrous oxide.
• Ensure that when in use, the Airo and its
connected hoses are laid out in such a way as
to avoid any risk of tripping or strangulation.
• Ensure that children and pets do not interfere
with the safe operation of the Airo and
inatable product.
• Keep the Airo and inatable product away
from sources of heat and any sharp surfaces.
• The Airo should only be used for it’s stated
purpose and should not be modied in any way.
This product and associated packaging does not
contain latex.
English

Airo Plus
3
freedom through lightweight solutions
MI0323 issue 3
Standard Package Contents - g. 1
1 x Airo Plus compressor tted with two
12v - 2.3Ah batteries (A)
1 x Battery charger (B)
1 x User instructions
English
Battery Status Indicator - g. 2
Before use, momentarily press the ‘Power’ button
(A) to check the battery charge state. If the battery
is fully charged, the battery status indicator light
(B) will show a steady Green light.
NOTE: If the battery pack has been removed and
reinserted, the indicator light will show Steady
Green for approximately 16 secs before showing
the true battery state as below.
Steady Green = Fully charged.
Flashing Green = Recharge soon.
Steady Red = Recharge immediately
(will not deate).
Flashing Red = Over temperature cut-out
(will not deate or inate).
Flashing Red/Green = Current overload cut-out.
(Leave for 3 seconds to
self reset).
The Airo Plus needs to be recharged when the
indicator light is ashing Green.
Fully charge overnight before using the Airo
Plus for the rst time and when new batteries
have been tted.
B
B
A
1
2
A

Airo Plus
4
MI0323 issue 3
English
A
B
Battery Charging - g. 3
The Airo Plus is tted with a quick release battery
pack. The batteries can either be re-charged whilst
in the Airo Plus or easily removed and re-charged
in the optional charging cradle.
• Fit the appropriate mains plug adaptor to the
battery charger (A).
• Plug the battery charger into a mains outlet
socket and connect the charger output lead
(B) to the Airo Plus charging socket (C).
• The battery status indicator light (D) will ash
green while the battery is charging and then
turn to a steady (non ashing) light when the
Airo Plus is ready for use.
NOTE: The charger is not capable of providing
sufcient power to charge the batteries while the
compressor is running.
To maintain battery condition, It is recommended
that the Airo Plus is left continuously on charge
when not in use. The batteries cannot be
overcharged using this charger.
WARNING: DO NOT recharge the batteries in a
bathroom or in a damp environment.
Unplug the charger from the mains power socket
to disconnect the charger from the mains power
supply.
Connecting the Air Hose - g. 4
Disconnect the Airo Plus from the battery charger
and place the Airo Plus in a safe and convenient
position.
Connect the air hose from the Mangar International
equipment to the air outlet socket (A). The connector
will ‘click’ into place when rmly pushed onto the
outlet. To release the hose, press the paddle down
on the connector (B).
C
3B
D
A
4

Airo Plus
5
freedom through lightweight solutions
MI0323 issue 3
English
‘Auto’ Function - g. 5
The ‘Auto’ function is designed for use with the
pneumatic 4-Way hand control - g. 6
To switch on, press and hold the ‘Power’ button
(A) until the light (B) comes on. The light will stay
on while the ‘Auto’ function is selected.
Momentarily press the ‘Power’ button to cancel the
‘Auto’ function. The battery status indicator light
will go out after approximately 5 minutes.
When in ‘Auto’ mode, the internal microprocessor
carries out a battery voltage check each time air
is required and if the voltage becomes too low,
the ‘Auto’ function will be cancelled automatically.
Turn the ‘Auto’ function off after use.
4-Way Hand Control - g. 6
• Connect the four hoses (A) from the 4-Way
Hand Control to the corresponding numbered
and coloured connectors on the Mangar
International product.
• Connect the hose (B) from the Hand Control
to the Airo Plus air outlet socket (C).
• Press and hold the ‘Power’ button until the light
comes on.
• Pressing any of the numbered buttons will
deliver air to the corresponding numbered
hose (follow the user instructions for the
Mangar International product that is to be
inated).
B
C
AB
A
A
6
5

Airo Plus
6
MI0323 issue 3
English
Maintenance - g. 7
At approximately 12 month intervals, inspect the air
lter located in the base of the Airo Plus (A), and if
necessary, t a new lter (a kit of replacement lters
is available through your supplier - part number:
CA0233).
Battery replacement: (part number: CA0311)
• Turn the Airo Plus upside down and remove
the battery pack by pulling the handle (B).
• Fit the replacement battery pack, ensuring
that it ‘clicks’ into place and is held by the four
catches (C).
When it becomes apparent that the Airo is
producing fewer than expected lifting cycles, the
battery is probably reaching the end of it’s working
life and should be replaced. A
B
C
7
Disposal
When the Airo has reached the end of it’s working life, remove the batteries for safe disposal in
accordance with local regulations, and dispose of the Airo at your local household waste recycling
centre (civic amenity site).
Cleaning
Unless contamination is suspected, periodic cleaning is all that is recommended. The Airo should be
cleaned/disinfected as follows:
• Unplug the Airo Plus from the battery charger. Clean the external surfaces using a non abrasive
damp cloth with warm water. Wipe dry thoroughly with a dry towel before reconnecting to the battery
charger. Do not allow moisture to enter any part of the compressor.
• Do not use solvent-based products.
Disinfecting
• Pre-clean using a damp cloth and then disnfect using a hard surface alcohol impregnated wipe.
Storage
• When not in use, store in a dry place together with these instructions. To maintain the batteries, when
being stored for long periods, put the Airo Plus on charge overnight every 3 months. NOTE: Ensure
that the batteries are fully charged before storing the Airo Plus for long periods.
The Airo Plus contains no other user serviceable parts. If a fault should develop or if you require assistance
in setting up using or maintaining the equipment, please contact our Customer Service Department on
Freephone 0800 2800 485. A service manual (MI0338) is available for service personnel.

Airo Plus
7
freedom through lightweight solutions
MI0323 issue 3
English
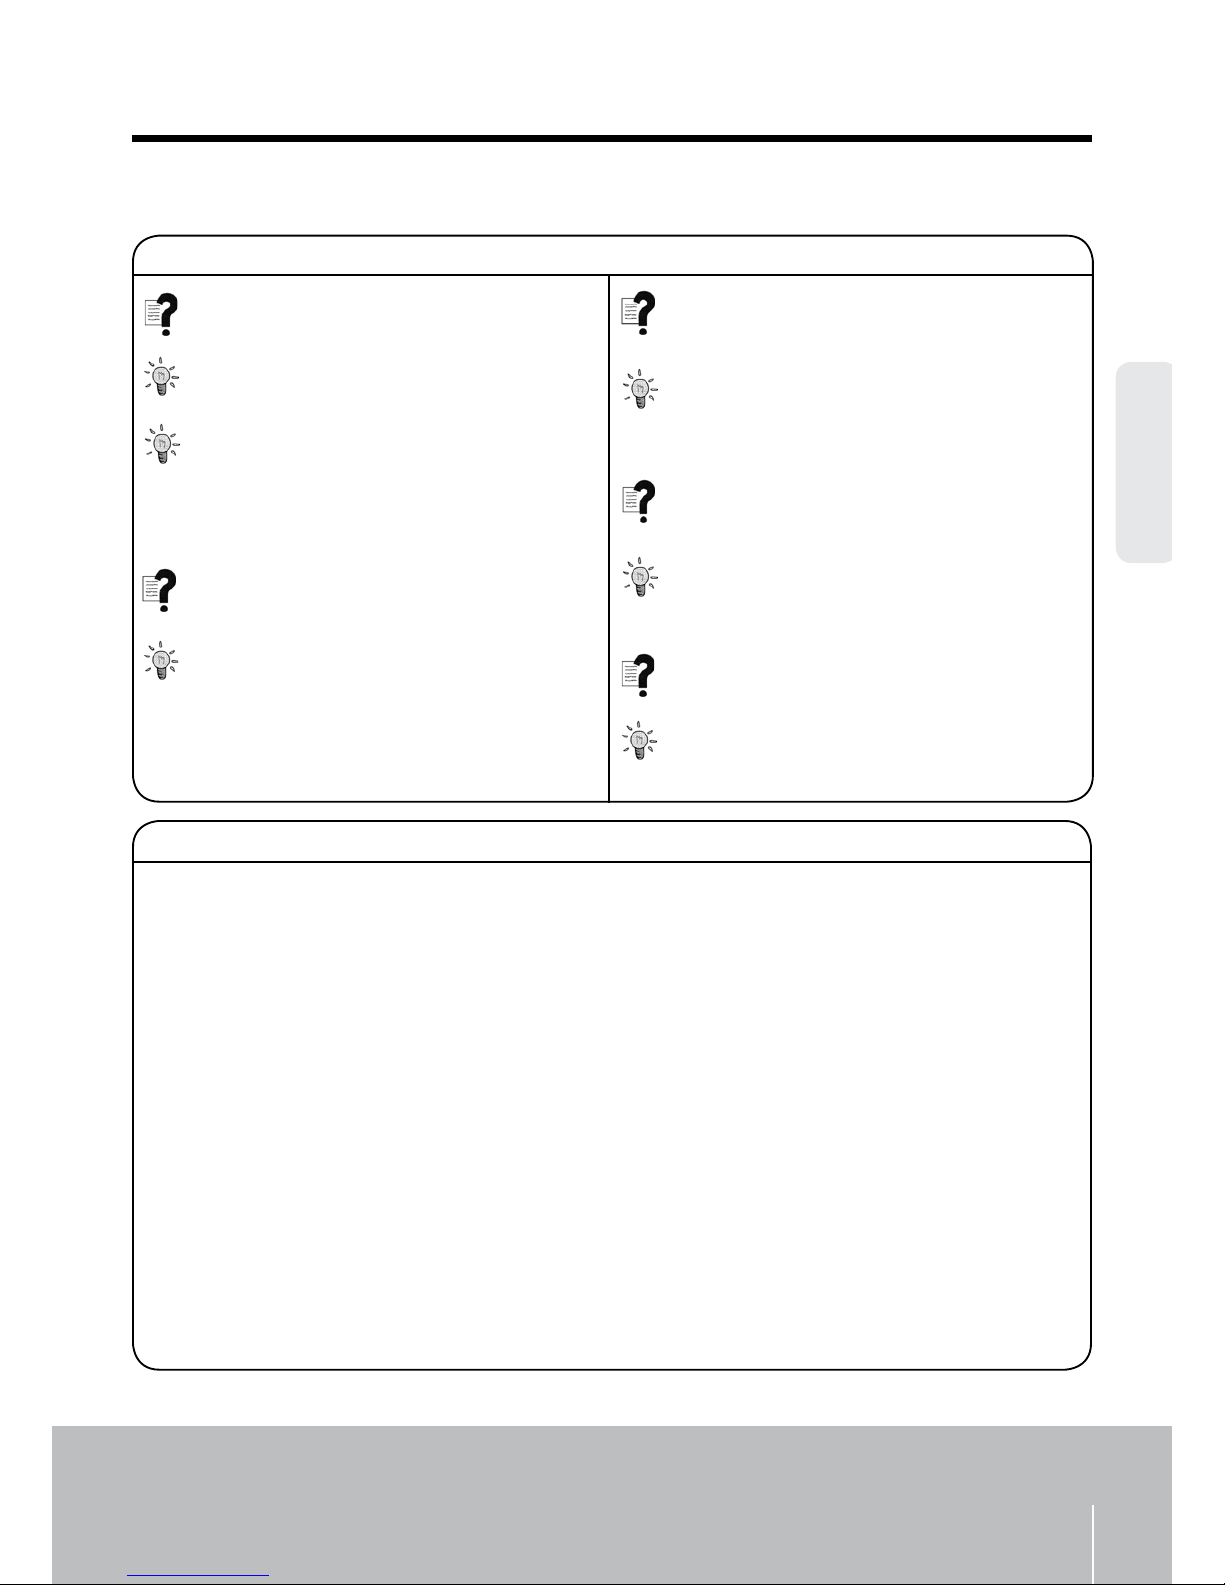
Trouble shooting guide
Compressor does not run when the 4 way
hand control buttons are pressed.
Ensure that the ‘Auto Function’ has been
selected.
Compressor causes electrical interference
with another piece of electrical equipment.
Move either the compressor or other item
further away from each other until the
interference stops.
Compressor keeps stopping when trying to
inate the lifting aid.
Check that there are no kinks in the air
hose.
Specications
Airo Plus
Weight: 5.7Kg (12½ lbs)
Output pressure: 0.35 bar (5 psi)
Batteries: 2 x 12v - 2.3Ah (Maintenance free Valve Regulated Sealed Lead Acid)
Battery Life: Approx 1000 charging cycles (2 - 5yrs Depending on usage)
Lifting performance (from full battery):
ELK - 3 lifts
Camel - 2 lifts
Environmental protection: IP51 (Protection against large dust deposits & vertical falling drops of water)
Type BF equipment
This equipment has been tested and meets the requirements of current EMC legislation
Charger: Model number - CA0362
Input: AC 100v - 230v, 50-60Hz, 0.3A
Output: DC 30v, 350mA
Double insulated Class II equipment
Check that there are no kinks in the air
hose.
This happens when the compressor’s internal
temperature cut-out has tripped. Leave the
Airo Plus for 60-90 minutes to cool.
Battery State Indicator light ashing ‘Red’.
This happens when the current overload
cut-out has tripped. Leave for 3 seconds to
self reset.
Battery State Indicator light ashing ‘Red/
Green’.
Airo Plus
8
MI0323 issue 3
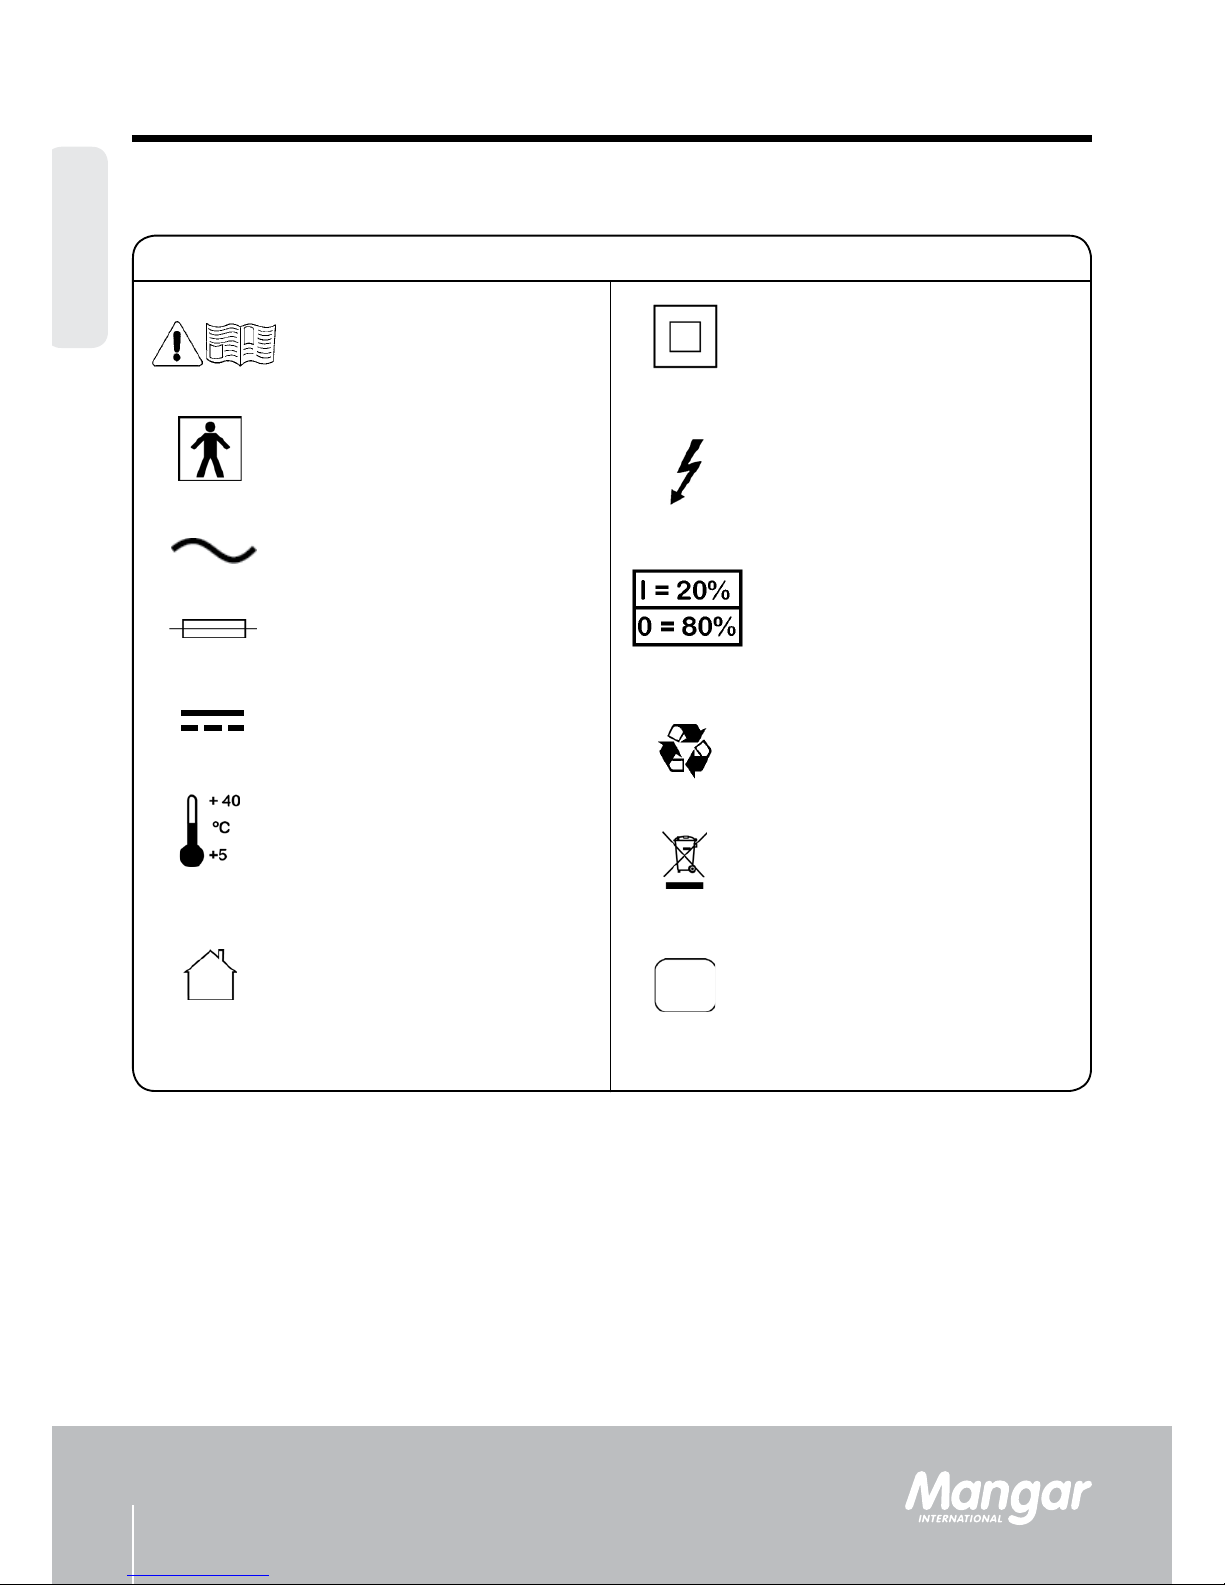
Symbols used on Airo Plus and Charger labels
English
Attention consult instructions
Type BF equipment (protection
against electric shock)
Alternating current (AC)
Fuse (with rating)
Max/Min operating environment
temperature
Class II Double Insulated equipment
Dangerous voltage
Direct current (DC)
Duty cycle
I = Operating time
O = Non operating time
(Max continuous operating time = 5
minutes)
Date of manufacture
For indoor use ony. Do Not connect
to mains power in a bathroom or
outdoors.
Recycle
Do not dispose of in household waste

Airo Plus
9
freedom through lightweight solutions
MI0323 issue 3
English
Symbols used on packaging
Keep packaging dry
Handle with care
Max/Min storage temperature
Net & gross weights
Stack no more than ve high
Recycle packaging
Do not dispose of in household waste
Airo Plus serial number: .............................
Date of purchase: .............................
Invoice/Delivery note number: .............................
Warranty
The guarantee is given against defects in material and workmanship and comprises piece, parts and
labour. The guarantee is not valid in the case of fair wear and tear, wilful damage, common neglect,
misuse or unauthorised alteration or repair by unqualied persons.
The following statements do not affect the consumer’s statutory rights. This product is sold on the
understanding that in the event of any defect of manufacture or material appearing within the warranty
period, the defect will be rectied free of charge providing that:
(a) Reasonable evidence is provided (e.g. purchase invoice, delivery note) that the claim is being made
within the warranty period.
(b) The defect is not attributable to accidental damage (either in transit or otherwise), misuse or
unauthorised repair.
Mangar International reserves the right to alter product specications and/or any of the information contained within this document without notice.
We strive to provide our customers with reliable and durable products of the highest quality.
In addition to our standard warranty, and for added peace of mind, our Customer Service Department
offers an Annual Service and Clean package.
To nd out more about this service please call our Customer Service Department on Freephone 0800
2800 485.
Max/Min humidity when transporting or
storage
Max/Min pressure when transporting or
storage
Max/Min temperature when transporting or
storage

Airo Plus
10
MI0323 issue 3
Deutsch
WARNUNG
• Bitte vergewissern sie sich, dass sie
sowohl die vorliegende als auch die
bedienungsanleitung für sonstige verwendete
produkte von mangar international vollständig
gelesen und verstanden haben, bevor
sie die pegehilsmittel in betrieb nehmen.
• Das Akkuladegerät niemals im Badezimmer
oder unter feuchten Umgebungsbedingungen
aufbewahren oder betreiben.
• Kompressor vor der Reinigung immer vom
Akkuladegerät entfernen.
• Die Akkus ausschliesslich mit dem
mitgelieferten Ladegerät auaden.
• Nicht geeignet zur gleichzeitigen Verwendung
mit entzündlichen Betäubungsmitteln, die
Luftgase, Sauerstoff oder Lachgas enthalten.
• Stellen Sie sicher, dass der Airo und seine
angeschlossenen Kabel bzw. Schläuche
beim Betrieb so aufgestellt/verlegt sind, dass
niemand darüber stolpern oder sich darin
verfangen kann.
• Stellen Sie sicher, dass Kinder und Haustiere
den sicheren Betrieb des Airo und des
aufblasbaren Produktes nicht gefährden.
• Halten Sie den Airo und das aufblasbare
Produkt von Wärmequellen und scharfkantigen
Gegenständen fern.
• Der Airo darf nur für seinen angegebenen
Zweck verwendet und es dürfen keine
Veränderungen an ihm vorgenommen werden.
Inhalt
Standard-Packungsinhalt S. 11
Batteriezustandsanzeige S. 11
Auaden der Akkus S. 12
Anschließen des Luftschlauchs S. 12
‘Auto’ - Funktion S. 13
4-Wege-Handsteuerung S. 13
Reinigung und Aufbewahrung S. 14
Wartung S. 14
Fehlerbehebung S. 15
Technische Daten S. 15
Symbole auf Airo Plus und Ladegerät S. 16
Symbole auf Verpackung S. 17
Garantie S. 17
English Pg 2
Deutsch S12
Français P 22
Nederlands
P 32
Italiano Pag 42
Español Pg 52
Dieses Produkt und dessen Verpackung sind
latexfrei.
Deutsch
Vorgesehener Gebrauch
Der Airo Plus von Mangar International ist ein
Niederdruck-Kompressor, der für den Einsatz
mit pneumatischen Hebevorrichtungen von
Mangar International entwickelt wurde und mit der
mitgelieferten 4-Wege-Handbedienung bedient
wird.
Angeschlossene Vorrichtungen (Zubehör) für
den Airo Plus:
Mangar ELK (Emergency lifting cushion)
Mangar Camel (Emergency lifting cushion)

Airo Plus
11
freedom through lightweight solutions
MI0323 issue 3
Standard-Packungsinhalt - Abb. 1
1 x Airo Plus Kompressor mit zwei 12 V - 2,3 Ah
Akkus (A)
1 x Akkuladegerät (B)
1 x Bedienungsanleitung
Deutsch
Batteriezustandsanzeige - Abb. 2
Drücken Sie vor Gebrauch kurz den „Einschalt“-
Knopf (A), um den Akkuladestatus zu prüfen.
Wenn der Akku vollkommen geladen ist, leuchtet
das Akkustatus-Anzeigelämpchen (B) dauerhaft
grün.
ANMERKUNG: Wenn der Akku entfernt und wieder
eingesetzt wurde, leuchtet das Anzeigelämpchen
ca. 16 Sekunden grün, bevor es den wirklichen
Akkustatus anzeigt, wie nachfolgend angegeben
.
Grün durchgehend = vollständig geladen.
Grün blinkend = baldiges Auaden erforderlich.
Rot durchgehend = unmittelbares Auaden
erforderlic (wird Luft nicht ablassen).
Rot blinkend = Übertemperaturabschaltung. (lässt
Luft nicht ab und pumpt nicht auf).
Rod/grün blinkend = Stromüberlastungsabschaltung.
Warten Sie 3 Sekunden, bis sich die Funktion selbst
zurückgesetzt hat.
Der Airo Plus muss aufgeladen werden, denn die
Kontrollleuchte grün blinkt.
Laden Sie die Batterie vor der ersten Verwendung
des Airo Plus über Nacht auf.
A
B
1
B
2
A

Airo Plus
12
MI0323 issue 3
Deutsch
Auaden der Akkus - Abb. 3
Der Airo Plus ist mit einem Wechselakku
ausgestattet. Die Batterien können entweder
im Airo Plus aufgeladen werden oder leicht
ausgebaut und im optionalen Ladegerät
aufgeladen werden.
• Bringen Sie den entsprechenden Netzstecker
- Adapter an das Ladegerät (A).
• Verbinden Sie das Batterieladegerät mit
einer Netzsteckdose und stecken Sie das
Ausgangskabel des Ladegerätes (B) in die
Ladebuchse des Airo Plus (C).
• Die Batteriestatuskontrollleuchte (D) blinkt
grün, wenn die Batterie aufgeladen wird,
und wechselt auf ein durchgehendes
(nicht blinkend) Licht, wenn der Airo Plus
betriebsbereit ist.
MERKE: Das Ladegerät ist nicht in der Lage die
Batterien voll zu laden während der Kompressor
in Betrieb ist.
Um den Zustand der Batterie aufrechtzuerhalten,
empfehlen wir, den Airo Plus permanent an das
Ladegerät anzuschließen, wenn dieser nicht
verwendet wird. Die Batterie kann durch dieses
Ladegerät nicht überladen werden.
WARNUNG: Die Akkus NIEMALS im Badezimmer
oder unter feuchten Umgebungsbedingungen
laden.
Ziehen Sie den Stecker des Ladegeräts aus
der Netzsteckdose, um das Ladegerät von der
Netzstromversorgung zu trennen.
Anschließen des Luftschlauchs - Abb. 4
Entfernen Sie den Airo Plus vom Ladegerät und
positionieren Sie ihn an einem günstigen, sicheren
Ort.
Verbinden Sie den Luftschlauch des zu füllenden
Mangar International Pegehilfsmittels mit dem
Luftaustritt (A). Der Anschluss rastet bei festem
Andrücken mit einem Klick sicher ein. Um den
Schlauch zu entfernen, drücken Sie den kleinen
Hebel in Richtung Verbindungsstück (B). A
B
C
3
D
4
B
A

Airo Plus
13
freedom through lightweight solutions
MI0323 issue 3
‘Auto’ - Funktion - Abb. 5
Die ‘Auto’- Funktion ist für die Verwendung mit den
pneumatischen 4-Wege-Handsteuerung - Abb. 6
Schalten Sie ein, indem Sie die Netzschalter (A)
gedrückt halten, bis das Lämpchen (B) aueuchtet.
Das Lämpchen bleibt an, solange die ’Auto’-Funktion
eingestellt ist.
Drücken Sie kurz den „Einschalt“-Knopf, um die
„Auto“-Funktion zu löschen. Das Akkustatus-
Anzeigelämpchen geht nach ca. 5 Minuten aus.
Im ‘Auto’- Modus führt der interne Mikroprozessor
immer dann, wenn Druckluftzufuhr benötigt wird,
eine Spannungsprüfung des Akkus durch. Ist die
Spannung zu niedrig, stellt sich die ‘Auto’-Funktion
automatisch ab. Schalten Sie die „Auto“-Funktion
nach Gebrauch ab.
4-Wege-Handsteuerung - Abb. 6
• Verbinden Sie die vier Schläuche (A) der
4-Wege Handsteuerung mit den entsprechend
nummerierten und farbkodierten Anschlüssen
des Mangar-International-Produkts.
• VerbindenSiedenSchlauch(B) der Handsteuerung
mit dem Luftaustritt des Airo Plus (C).
• Drücken Sie die Netzschalter gedrückt halten,
bis das Lämpchen aueuchtet.
• Drücken Sie die gewünschte nummerierte Taste,
und die Luftzufuhr durch den entsprechenden
Schlauch beginnt (bitte folgen Sie der
Bedienungsanleitung des Mangar-International-
Produkts, das verwendet wird).
Deutsch
B
C
AB
A
A
6
5

Airo Plus
14
MI0323 issue 3
Deutsch
Wartung - Abb. 7
Etwa alle 12 Monate sollte der Luftlter am Boden
des Airo Plus (A) überprüft und bei Bedarf ersetzt
werden. (Ersatzlter-Sätze sind über Ihren Händler
erhältlich, Artikelnr: CA0233).
Wechsel der Akkus (Artikelnr: CA0311)
• Stellen Sie den Airo auf den Kopf und entnehmen
Sie den Akkusatz, indem Sie am Hebel (B)
ziehen.
• Setzen Sie den Reserve-Akkusatz ein und stellen
Sie dabei sicher, dass er einrastet und durch die
vier Arretierungen (C) gehalten wird.
Wenn die Anzahl der Hubzyklen des Airo deutlich
unter den erwarteten Werten liegt, hat der Akku
eventuell das Ende seiner Lebensdauer erreicht
und muss ausgetauscht werden. A
B
C
7
Entsorgung
Wenn der Airo das Ende seiner Lebensdauer erreicht hat, muss er in Ihrem Recyclingzentrum für
Haushaltsmüll (Wertstoffhof) entsorgt werden.
Reinigung
Sofern kein Verdacht auf Verschmutzung besteht, wird nur eine regelmäßige Reinigung empfohlen. Der
Airo ist folgendermaßen zu reinigen/desinzieren:
• Nehmen Sie den Airo Plus vom Akkuladegerät. Reinigen Sie die Außenächen mit einem nicht
scheuernden, feuchten Tuch mit warmem Wasser. Sorgfältig mit einem trockenen Tuch trockenwischen,
bevor Sie das Gerät wieder an das Akkuladegerät anschließen. Achten Sie darauf, dass keine
Feuchtigkeit ins Innere des Kompressors gelangt.
• Keine lösungsmittelhaltigen Reiniger verwenden.
Desinfektion
• Vorher mit einem feuchten Tuch reinigen und dann mit einem Desinfektionstuch für harte Oberächen
desinzieren.
Aufbewahrung
• Wenn nicht in Gebrauch, sollte das Gerät an einem trockenen Ort gemeinsam mit der vorliegenden
Anleitung aufbewahrt werden. Sollte der Airo Plus längere Zeit nicht benutzt werden, laden Sie ihn alle 3
Monate über Nacht auf, um die Akkus instand zu halten.
Der Airo enthält keine anderen Teile, die vom Nutzer gewartet werden müssen. Sollte ein Mangel
auftreten oder wenn Sie Hilfe bei der Einstellung, Nutzung oder Wartung des Geräts benötigen, wenden
Sie sich bitte an Ihren Lieferanten.
Airo Plus
15
freedom through lightweight solutions
MI0323 issue 3
Deutsch
Fehlerbehebung
Kompressor läuft nicht, wenn die 4-Wege-
Handbedienung Tasten gedrückt werden.
Überprüfen Sie, ob die ‘Auto-Funktion’
eingestellt wurde.
Kompressor verursacht Störungen bei
einem anderen elektrischen Gerät.
Stellen Sie den Kompressor und das
andere Gerät so weit voneinander weg, bis
die Störung behoben ist.
Kompressor schaltet sich während des
Pumpvorgangs immer wieder ab.
Überprüfen Sie, ob der Luftschlauch frei von
Knicken ist.
Technische Daten
Airo Plus
Gewicht: 5.7Kg
Ausgangsdruck: 0.35 bar
Akkus: 2 x 12v - 2.3Ah (Wartungsfrei wartungsfreier verschlossener Bleiakkumulator)
Akkulebensdauer: Ca. 1000 Ladezyklen (2 – 5 Jahre, je nach Gebrauch)
Hubleistung (mit vollem Akku):
ELK - 3 Hebevorgänge; Camel - 2 Hebevorgänge
Umgebungsschutz: IP51 (Staubschutz und Schutz gegen Tropfwasser)
Gerättyp BF
Dieses Gerät wurde sicherheitstechnisch geprüft und entspricht den derzeit gültigen EMC-
Bestimmungen
Ladegerät: Modellnummer - CA0362
Eingang: AC 100v - 230v, 50-60Hz, 0.3A
Ausgang: 30v, 350mA
Doppelt isoliertes Gerät der Schutzklasse II
Überprüfen Sie, ob der Luftschlauch frei von
Knicken ist.
Dies geschieht, wenn die
Innentemperaturabschaltung des
Verdichters ausgelöst hat. Lassen Sie den
Airo Plus 60-90 Minuten abkühlen.
Dies geschieht, wenn die
Stromüberlastungsabschaltung ausgelöst
hat. Warten Sie 3 Sekunden, bis sich die
Funktion selbst zurückgesetzt hat.
Die Kontrollleuchte für den Batteriezustand
blinkt “rot”.
Die Kontrollleuchte für den Batteriezustand
blinkt “rot/grün”.

Airo Plus
16
MI0323 issue 3
Deutsch
Symbole auf Airo Plus und Ladegerät
Achtung, Bedienungsanleitung lesen
Typ-BF-Gerät (Schutz vor Stromschlag)
Wechselstrom (AC)
Sicherung (mit Nennleistung)
Max./min. Umgebungstemperatur
für Betrieb
Niemals in Badezimmern oder
Außenbereichen verwenden
Doppel isoliertes Gerät der
Sicherheitsklasse II
Gefährliche Spannung
Gleichstrom (DC)
Arbeitszyklus
I = Betriebsdauer
O = Nichtbetriebsdauer
Herstellungsdatum
Recyceln
Nicht in den Abfall geben

Airo Plus
17
freedom through lightweight solutions
MI0323 issue 3
Deutsch
Symbole auf Verpackung
Verpackung trocken halten
Vorsichtig handhaben
Max/Min Aufbewahrungstemperatur
Netto- und Gesamtgewicht
Nicht mehr als fünf Geräte aufeinander
stapeln
Verpackung recyceln
Nicht in den Abfall geben
Airo Plus Seriennr: .............................
Kaufdatum: .............................
Rechnungs-/Lieferschein-Nr: .............................
Garantie
Die Garantie gilt für Material- und Fabrikationsfehler und schließt das Gerät, Ersatzteile und Arbeitsstunden
mit ein. Von der Garantie ausgeschlossen sind gebrauchsbedingte normale Abnutzung, mutwillige
Beschädigung, allgemeine Fahrlässigkeit, unsachgemäßer Gebrauch sowie Modizierungen oder
Reparaturen durch nicht qualizierte Personen.
Die folgenden Bestimmungen schränken das Verbraucherrecht nicht ein. Dieses Produkt wird unter dem
Einverständnis verkauft, dass, sollte Innerhalb der Garantie Periode ein Material- oder Fabrikationsfehlers
auftreten, der Fehler kostenlos behoben wird, vorausgesetzt:
(a) es liegt ein akzeptabler Beleg (z. B. Rechnung, Lieferschein) vor, dass das Anspruch wird innerhalb
der Garantie Periode gemacht.
(b) der Fehler ist nicht auf Unfallschäden (durch Transport oder anderweitig entstanden), unsachgemäßen
Gebrauch oder nicht autorisierte Reparaturen zurückzuführen.
Mangar International behält sich das Recht vor, Produktspezikationen und/oder die Angaben im vorliegenden Dokument ohne vorherige
Ankündigung zu ändern.
Höchst-/Mindestfeuchte bei Transport oder
Lagerung
Höchst-/Mindestdruck bei Transport oder
Lagerung
Höchst-/Mindesttemperatur bei Transport
oder Lagerung
Airo Plus
18
MI0323 issue 3
Français
AVERTISSEMENTS
• Avant d’utiliser l’equipement, assurez-vous
d’avoir bien lu et compris ces instructions
et celles qui accompagnent tous les
autres produits mangar international.
• Nepasplacerlechargeurdebatteriedansune
salle de bains ou un environnement humide.
• Toujours se débrancher du chargeur de
batterie avant de nettoyer.
• N’utiliser que le chargeur de batterie
fourni.
• Ne doit pas être utilisé en présence de
mélanges d’anesthésiants inammables
et d’air, oxygène ou d’oxyde nitreux.
• Pendant le fonctionnement de l’Airo, il est
recommandé que l’appareil et les câbles
et/ou tuyaux qui y sont connectés soient
disposés de façon à éviter tout risque de
trébuchement ou de strangulation.
• Les animaux de compagnie et les enfants
ne doivent pas gêner le fonctionnement
en toute sécurité de l’Airo et du produit
gonable.
• Tenir l’Airo et le produit gonable à l’écart
des sources de chaleur et de toute surface
coupante.
• Seule l’utilisation prévue par le fabricant
peut être faite de l’Airo et il ne doit en
aucun cas être modié.
Sommaire
Contenu de l’ensemble standard P. 19
Voyant d’état de la batterie P. 19
Charge des batteries P. 20
Raccordement du exible pneumatique P. 20
La fonction “Auto” P. 21
Télécommande à 4 Boutons P. 21
Nettoyage et stockage P. 22
Maintenance P. 22
Guide de dépannage P. 23
Spécications P. 23
Symboles utilisés sur l’Airo Plus et le chargeur P. 24
Symboles utilisés sur l’emballage P. 25
Garantie P. 25
English Pg 2
Deutsch S12
Français P 22
Nederlands
P 32
Italiano Pag 42
Español Pg 52
Ceproduit etle conditionnementcorrespondant
ne contiennent pas de latex.
Français
Utilisation prévue
L’Airo Plus de Mangar International est un
compresseur basse pression conçu pour être utilisé
avec le matériel de levage Mangar International et
se contrôle au moyen d’une commande manuelle
4 - way incluse.
Pièces en contact avec le patient (accessoires)
de l’Airo Plus:
Mangar ELK (Emergency lifting cushion)
Mangar Camel (Emergency lifting cushion)

Airo Plus
19
freedom through lightweight solutions
MI0323 issue 3
Contenu de l’ensemble standard - g. 1
1 x Compresseur Airo Plus équipé de deux
batteries 12V – 2,3 Ah (A)
1 x Chargeur de batterie (B)
1 x Le mode d’emploi
Français
Voyant d’état de la batterie - g. 2
Avant utilisation, appuyer brièvement sur le bouton
d’alimentation (A) pour vérier l’état de charge de
la batterie. Si la batterie est entièrement chargée,
le voyant d’état de batterie (B) émet une lumière
verte xe.
NOTA : si le bloc batterie a été retiré puis remis en
place, le voyant émet une lumière verte pendant
environ 16 secondes avant d’indiquer l’état réel de
la batterie comme suit .
Vert xe = Chargé au maximum.
Vert clignotant = Recharge bientôt nécessaire.
Rouge xe = Recharge immédiate
(ne se dégonera pas).
Rouge clignotant = Disjonction température
excessive (ne se dégonera
pas ou ne gonera pas).
Rouge/Vert clignotant = une surcharge de courant
électrique. (Attendez 3 secondes
pour un réenclenchement
automatique).
Le Airo Plus doit être rechargé lorsque le voyant
clignote en vert.
Rechargez la batterie pendant la nuit avant
d’utiliser pour la première fois le compresseur
Airo Plus.
A
B
1
B
2
A

Airo Plus
20
MI0323 issue 3
Français
Charge des batteries - g. 3
l’Airo Plus est équipé d’un bloc batterie se détachant
rapidement. Les batteries peuvent être rechargées
lorsqu’elles sont dans l’Airo Plus ou elles peuvent
être facilement enlevées et rechargées dans le
berceau de charge en option.
• Attacher l’adapteur secteur nécessaire au
chargeur de piles (A).
• Branchez le chargeur de batterie dans une
prise électrique femelle et raccordez le cordon
de sortie du chargeur (B) à la prise femelle de
charge Airo Plus (C).
• Le voyant d’état de batterie (D) clignotera
en vert pendant la charge de batterie et sera
allumé en xe (non clignotant) lorsque le Airo
Plus est prêt à être utilisé.
NOTE : Le chargeur n’est pas capable de
fournir de l’énergie à la fois au compresseur en
chargement et au compresseur durant l’utilisation
du matériel.
Pour maintenir la charge de la batterie, on
recommande de laisser en permanence le Airo
Plus en charge lorsqu’il n’est pas utilisé. La batterie
ne risque pas d’être en surcharge lorsqu’on utilise
ce chargeur.
AVERTISSEMENT : NE PAS RECHARGER LES
BATTERIES dans une salle de bains ou dans un
environnement humide.
Débrancher le chargeur de la prise secteur pour le
déconnecter de l’alimentation secteur.
Raccordement du exible pneumatique - g. 4
Débrancher l’Airo Plus du chargeur de batterie et
placer l’Airo Plus dans un endroit sûr et pratique.
Raccorder le exible pneumatique de l’équipement
Mangar International à la prise de sortie d’air (A). Le
raccord s’enclenche en place lorsqu’on l’enfonce
fermement sur la sortie. Pour dégager le exible,
appuyer sur la languette du raccord (B).
A
B
C
3
D
4
B
A
Table of contents
Languages:
Other Mangar Air Compressor manuals


