Manhattan 130226 User manual

SATA QUICK
CLONE DOCK
QUICK INSTALL
GUIDE
M O D E L 13 0 226
MAN-130226-QIG-ML1-0311-02-0
ENGLISH
DEUTSCH
ESPAÑOL
FRANÇAIS
POLSKI
ITALIANO

2ENGLISH
SATA Quick Clone Dock • Quick Install Guide English
Thank you for purchasing the MANHATTAN® SATA Quick Clone Dock, Model 130226.
This guide presents the basic steps for using this device. For detailed operating and
cloning instructions and specications, refer to the user manual available at
www.manhattan-products.com.
Basic Setup & Offline Operation
1. Use the included power adapter to
connect the DC Input jack to an AC
power outlet.
2. Insert the source HDD in Bay A and
the target HDD in Bay B. CAUTION:
The capacity of the target HDD must
be greater than the source
HDD. Any data already on
the target HDD will be lost.
3. When the A and B LEDs
light, set Power to On.
4. Press the Clone button for 3
seconds. When the LED lights,
press the Clone button again. The
LEDs indicate progress (25-100%).
All the LEDs light when complete.
5. Turn the power o; remove the
drives.
USB Operation
The software on the included CD needs
to be installed to use the Dock with
your PC. NOTE: This is PC-based
software.
1. Use the included power adapter to
connect the DC Input jack of the Dock to an AC power outlet.
2. Use the included USB cable to connect the Dock to the computer.
3. Insert an HDD (2.5” or 3.5”) rmly into the Dock.
4. Toggle the Power switch to On and conrm that the Power LED lights.
5. Insert the CD and follow the on-screen instructions or refer to the user manual.
Top view: HDD bays
Front view: LED indicators
POWER ON/OFF USB DC INPUT
POWER DISK
MASTER 25% 50% 75% 100%
DISK
SLAVE
POWER DISK
MASTER 25% 50% 75% 100%
DISK
SLAVE
Bay A
(master/source)
Bay B
(slave/target)
Clone
button
Rear view: connections

DEUTSCH 3
SATA Quick Clone Dock • Kurzanleitung Deutsch
Vielen Dank für den Kauf des MANHATTAN® SATA Quick Clone Docks, Modell 130226.
Diese Kurzanleitung zeigt die grundlegenden Schritte zur Einrichtung und Inbetriebnahme
dieses Geräts. Für genauere Anweisungen nutzen Sie bitte das Handbuch, verfügbar auf
www.manhattan-products.com.
Grundeinstellungen & Betrieb ohne PC
1. Verwenden Sie das beiliegende
Netzteil, um die Strombuchse (DC) mit
einer Steckdose (AC) zu verbinden.
2. Stecken Sie die Quellfestplatte in
Schacht A und die Zielfestplatte in
Schacht B. ACHTUNG: Die Kapazität
der Zielfestplatte muss
größer sein als die der
Quellfestplatte. Alle
vorhandenen Daten
auf
der Zielfestplatte gehen
verloren.
3. Sobald die LEDs A und B
aueuchten, stellen Sie den
Netzschalter auf Ein.
4.
Halten Sie die Clone-Taste 3 Sek.
gedrückt.
Sobald die LED leuchtet,
drücken Sie die Clone-Taste erneut.
Die LEDs zeigen den
Fortschritt
(25-100%). Bei abgeschlossener
Übertragung leuchten alle LEDs.
5. Stellen Sie den Netzschalter auf Aus
und entfernen Sie die Laufwerke.
USB-Betrieb
Für die Nutzung des Docks mit Ihrem PC
muss die beiliegende Software installiert sein.
HINWEIS: Diese Software ist windowsbasiert.
1. Verwenden Sie das beiliegende Netzteil, um die Strombuchse (DC) mit einer
Steckdose (AC) zu verbinden.
2.
Schließen Sie das Dock über das beiliegende USB-Kabel an Ihren Computer an.
3. Stecken Sie eine Festplatte (2,5” oder 3,5”) fest in das Dock.
4. Stellen Sie den Netzschalter auf Ein und prüfen Sie, ob die Power-LED leuchtet.
5.
Legen Sie die CD ein, folgen Sie den Bildschirmanweisungen oder nutzen Sie das
Handbuch
.
Oberseite: Festplattenschächte
Vorderseite: LED-Anzeigen
POWER ON/OFF USB DC INPUT
POWER DISK
MASTER 25% 50% 75% 100%
DISK
SLAVE
POWER DISK
MASTER 25% 50% 75% 100%
DISK
SLAVE
Schacht A
(Master/Quelle)
Schacht B
(Slave/Ziel)
“Clone”-
Taste
Rückseite: Anschlüsse

4ESPAÑOL
Puerto Rápido para Clonar Discos SATA • Guía de Instalación Rápida Español
Gracias por comprar el Puerto rápido para clonar discos SATA MANHATTAN®, Modelo
130226. Esta guía presenta los pasos básicos para utilizar este dispositivo. Para el
funcionamiento e instrucciones detalladas clonación y especicaciones, consulte el
manual de usuario disponible en www.manhattan-products.com.
Configuración basica y operación
1. Utilice el adaptador de
alimentación incluido para
conectar el puerto DC a una toma
de corriente.
2. Inserte el HDD origen en la bahia
A y el HDD destino en la bahia B.
PRECAUCION: La capacidad
del HDD destino debe
mayor el HDD origen.
Cualquier dato existente en
el Disco Duro Destino se
perderá.
3. Cuando el LED A y B se iluminan el
sistema encendido.
4. Presione el boton clonar durante
3 segundos. Cuando el LED
enciende, presione el botón Clone
de nuevo. Los LEDS indican el
progreso (25-100%). Todos los
LED se iluminan cuando se haya
completado.
5. Apague el puerto y retire los HDD.
Operación USB
Es necesario instalar el software
incluido en el CD para utilizar el puerto rapido en su PC. NOTA: Este es software para
la PC.
1. Utilice el Adaptador de alimentación incluido para conectar el plug CC a una toma
de corriente de pared.
2. Use el cable USB para conectar Dock de la PC.
3. Inserte el HDD (2,5” o 3,5”) rmemente en el Dock.
4. Active el interruptor de encendido y conrme que los LED encienden.
5. Inserte el CD y siga las instrucciones que aparecen en pantalla o consulte el manual.
Vista superior: bahías para discos duros
Vista frontal: los indicadores LED
POWER ON/OFF USB DC INPUT
POWER DISK
MASTER 25% 50% 75% 100%
DISK
SLAVE
POWER DISK
MASTER 25% 50% 75% 100%
DISK
SLAVE
Bahia A
(Maestro/Origen)
Bahia B
(Esclavo/destino
Botón
Clone
Vista de atrás: las conexiones

FRAN
Ç
AIS
5
Station d’accueil Quick Clone SATA • Guide d’installation rapide Français
Merci d’avoir acheté la Station d’accueil Quick Clone SATA MANHATTAN®, modèle 130226.
Ce guide décrit les bases pour congurer et utiliser cet appareil. Pour des instructions et
spécications détaillées, veuillez lire le manuel de l’utilisateur, disponible sur
www.manhattan-products.com.
Configuration de base & emploi sans PC
1. Utilisez l’adaptateur secteur inclus an
de connecter la prise femelle CC à une
prise de courant CA.
2. Insérez le disque dur source dans la
fente A et le disque dur cible dans la
fente B. ATTENTION: La capacité du
disque
dur cible doit être
plus haute
que celle du
disque dur source. Toutes les
données sur le disque dur
cible seront perdues.
3. Quand les DEL A et B sont
allumées, activez le bouton
d’alimentation.
4. Pressez le bouton Clone 3 secondes.
Dès que la DEL s’allume, appuyez
sur le bouton à nouveau. Les DEL
indiquent le progrès (25-100%).
Quand le clonage est complet,
toutes les DEL sont allumées.
5. Désactivez le bouton d’alimentation
et sortez les lecteurs.
Emploi USB
Pour utiliser la station avec votre
ordinateur, le logiciel sur le CD inclus doit être installé.
NOTE: Ce logiciel ne supporte que
Windows.
1. Utilisez l’adaptateur secteur inclus an de connecter la prise femelle CC à une prise
de courant CA.
2. Utilisez le câble USB an de connecter la Station à l’ordinateur.
3. Insérez un disque dur (2,5” ou 3,5”) fermement dans la station.
4. Activez le bouton d’alimentation et conrmez que la conrmez que la DEL
d’alimentation est allumée.
5. Insérez le CD et suivez les instructions ou veuillez lire le manuel de l’utilisateur.
Vue de dessus: Fente de disque dur
Vue avant: indicateurs DEL
POWER ON/OFF USB DC INPUT
POWER DISK
MASTER 25% 50% 75% 100%
DISK
SLAVE
POWER DISK
MASTER 25% 50% 75% 100%
DISK
SLAVE
Fente A
(Master/source)
Fente B
(Slave/cible)
Bouton
Clone
Vue arrière: connexions

6
POLSKI
Stacja dokująca na dyski SATA • Instrukcja szybkiej instalacji Polski
Dziękujemy za zakup Stacji dokującej na dyski SATA MANHATTAN®, model 130226. Poniższa
instrukcja zawiera podstawowe informacje dotyczące instalacji urządzenia. Szczegółową
instrukcję oraz pełną specykację znajdą Państwo na stronie www.manhattan-products.com.
Tryb pracy bez podłączania do komputera – funkcja klonowania dysków
1. Podłącz adapter zasilania (w komplecie)
do stacji dokującej oraz gniazda
zasilania.
2. Umieść dysk źródłowy w kieszeni A
stacji dokującej. Dysk docelowy (na
który kopiowane będą dane z dysku
źródłowego) umieść w kieszeni B.
UWAGA: Pojemność dysku
docelowego musi być
większa od pojemności
dysku źródłowego. Wszystkie
dane na dysku docelowym
zostaną utracone.
3. Gdy zapalą się diody A i B, wciśnij
przycisk zasilania.
4. Wciśnij i przytrzymaj przez 3
sekundy przycisk klonowania. Gdy
zapali się dioda na wskaźniku
postępu kopiowania (25-100%),
wciśnij ponownie przycisk
klonowania.
5. Po zakończeniu klonowania dysków
(zapełnienie się wskaźnika postępu)
należy wyłączyć zasilanie, a
następnie wyjąć oba dyski twarde.
Tryb pracy z komputerem
Płyta CD zawiera oprogramowanie do klonowania dysków twardych z poziomu systemu
operacyjnego. UWAGA: Funkcja ta jest dostępna tylko dla platform Windows.
1. Podłącz adapter zasilania (w komplecie) do stacji dokującej oraz gniazda zasilania.
2. Podłącz stację dokującą do komputera za pomocą kabla USB.
3. Umieść dysk twardy (2,5” lub 3,5”) w kieszeni stacji dokującej.
4. Włącz zasilanie (przycisk w pozycji ON). Powinna zapalić się dioda zasilania.
5. Umieść płytę CD w napędzie CD/DVD-ROM i zainstaluj oprogramowanie do
klonowania dysków (tylko dla systemów Windows).
Widok z góry: kieszenie na dyski
(A i B) oraz przycisk klonowania
Panel przedni: wskaźniki
POWER ON/OFF USB DC INPUT
POWER DISK
MASTER 25% 50% 75% 100%
DISK
SLAVE
POWER DISK
MASTER 25% 50% 75% 100%
DISK
SLAVE
Dysk A
(master/źródłowy)
Dysk B
(slave/docelowy)
Przycisk
klonowania
Panel tylny: złącza

ITALIANO
7
SATA Quick Clone Dock • Guida rapida all’installazione Italiano
Grazie per aver scelto la Docking Station con duplicatore MANHATTAN®, Modello 130226.
Questa guida fornisce gli passaggi basilari per utilizzare la periferica. Per indicazioni
dettagliate sul funzionamento e la duplicazione e ulteriori speciche, far riferimento al
manuale d’istruzione disponibile su www.manhattan-products.com.
Settaggio basilare & Operazione non in linea
1. Utilizzare l’alimentatore incluso per
collegare il DC Input jack alla presa
di corrente AC.
2. Inserire la sorgente HDD nell’
alloggiamento A e l’ HDD di
destinazione nell’alloggiamento B.
ATTENZIONE: La capacità dell’ HDD
di destinazione deve essere
superiore a quella dell’ HDD
considerato sorgente. Tutti i
dati presenti sull’HDD di
destinazione verranno persi.
3. Quando i LED A e B si illuminano,
posizionare l‘interruttore su On.
4. Premere il tasto Clone per 3 secondi.
Quando il LED si illumina, premere il
tasto Clone di nuovo. I LED indicano
l’avanzamento (25-100%). Tutti I LED
si illuminano quando l’operazione è
stata completata.
5. Spegnere l’interruttore e rimuovere
i dischi.
Funzionamento USB
Il software sul CD incluso deve essere
installato per utilizzare la Docking Station
con il vostro computer. NOTA: Questo è un software basato sul PC.
1. Usare l’alimentatore incluso per collegare il jack DC alla presa elettrica.
2. Usare il cavo USB incluso per collegare la Docking Station al vostro computer.
3. Inserire un HDD (2.5” o 3.5”) saldamente all’interno della Docking Station.
4. Posizionare l’interruttore nello stato On e vericare che il LED di alimentazione sia
illuminato.
5. Inserire il CD e seguire le istruzioni che compaiono sullo schermo o fare riferimento al
manuale.
Vista dall’alto: HDD bays
Vista del frontale: indicatori LED
POWER ON/OFF USB DC INPUT
POWER DISK
MASTER 25% 50% 75% 100%
DISK
SLAVE
POWER DISK
MASTER 25% 50% 75% 100%
DISK
SLAVE
Alloggiamento A
(originale/sorgente)
Alloggiamento B
(copia/destinazione)
Tasto
Clone
Vista del retro: connessioni

8
WASTE ELECTRICAL & ELECTRONIC EQUIPMENT
Disposal of Electric and Electronic Equipment
(applicable in the European Union and other European countries with separate collection systems)
ENGLISH
This symbol on the product or its packaging indicates that this product shall not be treated as household waste.
Instead, it should be taken to an applicable collection point for the recycling of electrical and
electronic equipment. By ensuring this product is disposed of correctly, you will help prevent
potential negative consequences to the environment and human health, which could otherwise
be caused by inappropriate waste handling of this product. If your equipment contains easily
removable batteries or accumulators, dispose of these separately according to your local
requirements. The recycling of materials will help to conserve natural resources. For more
detailed information about recycling of this product, contact your local city oce, your household waste
disposal service or the shop where you purchased this product. In countries outside of the EU: If you wish
to discard this product, contact your local authorities and ask for the correct manner of disposal.
DEUTSCH
Dieses auf dem Produkt oder der Verpackung angebrachte Symbol zeigt an, dass dieses Produkt nicht mit
dem Hausmüll entsorgt werden darf. In Übereinstimmung mit der Richtlinie 2002/96/EG des Europäischen
Parlaments und des Rates über Elektro- und Elektronik-Altgeräte (WEEE) darf dieses Elektrogerät nicht
im normalen Hausmüll oder dem Gelben Sack entsorgt werden. Wenn Sie dieses Produkt entsorgen
möchten, bringen Sie es bitte zur Verkaufsstelle zurück oder zum Recycling-Sammelpunkt Ihrer Gemeinde.
ESPAÑOL
Este símbolo en el producto o su embalaje indica que el producto no debe tratarse como residuo doméstico.
De conformidad con la Directiva 2002/96/CE de la UE sobre residuos de aparatos eléctricos y electrónicos
(RAEE), este producto eléctrico no puede desecharse se con el resto de residuos no clasicados. Deshágase
de este producto devolviéndolo a su punto de venta o a un punto de recolección municipal para su
reciclaje.
FRANÇAIS
Ce symbole sur Ie produit ou son emballage signie que ce produit ne doit pas être traité comme un
déchet ménager. Conformément à la Directive 2002/96/EC sur les déchets d’équipements électriques
et électroniques (DEEE), ce produit électrique ne doit en aucun cas être mis au rebut sous forme de
déchet municipal non trié. Veuillez vous débarrasser de ce produit en Ie renvoyant à son point
de vente ou au point de ramassage local dans votre municipalité, à des ns de recyclage.
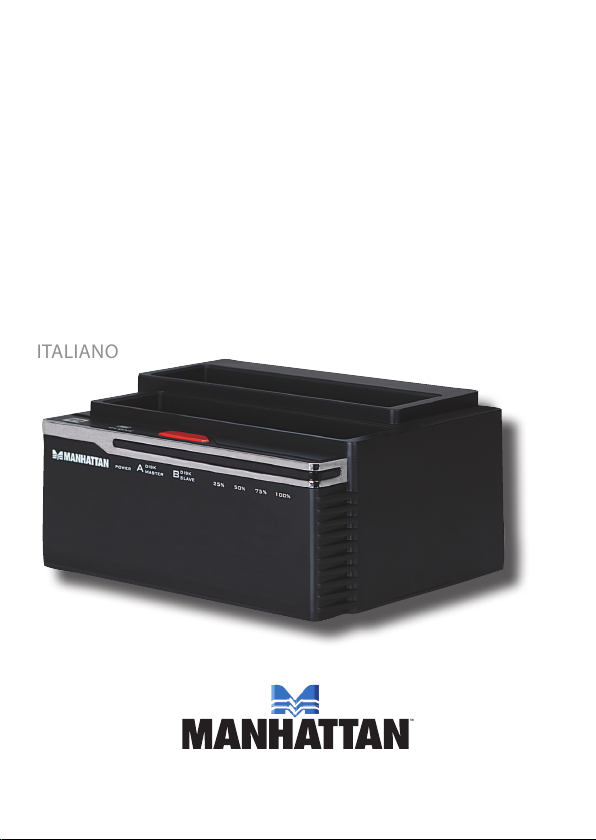
ITALIANO
Questo simbolo sui prodotto o sulla relativa confezione indica che il prodotto non va trattato come un riuto
domestico. In ottemperanza alla Direttiva UE 2002/96/EC sui riuti di apparecchiature elettriche ed
elettroniche (RAEE), questa prodotto elettrico non deve essere smaltito come riuto municipale misto. Si
prega di smaltire il prodotto riportandolo al punto vendita o al punto di raccolta municipale locale per un
opportuno riciclaggio.
POLSKI
Jeśli na produkcie lub jego opakowaniu umieszczono ten symbol, wówczas w czasie utylizacji nie wolno
wyrzucać tego produktu wraz z odpadami komunalnymi. Zgodnie z Dyrektywą Nr 2002/96/WE w sprawie
zużytego sprzętu elektrycznego i elektronicznego (WEEE), niniejszego produktu elektrycznego nie wolno
usuwać jako nie posortowanego odpadu komunalnego. Prosimy o usuniecie niniejszego produktu
poprzez jego zwrot do punktu zakupu lub oddanie do miejscowego komunalnego punktu zbiórki
odpadów przeznaczonych do recyklingu.

9
WARRANTY INFORMATION
ENGLISH —
For warranty information, go to www.manhattan-products.com/warranty.
DEUTSCH —
Garantieinformationen nden Sie unter www.manhattan-products.com/warranty.
ESPAÑOL —
Si desea obtener información sobre la garantía, visite
www.manhattan-products.com/warranty.
FRANÇAIS —
Pour consulter les informations sur la garantie, visitez
www.manhattan-products.com/warranty.
POLSKI —
Informacje dotyczące gwarancji znajdują się na stronie
www.manhattan-products.com/warranty.
ITALIANO —
Per informazioni sulla garanzia, accedere a www.manhattan-products.com/warranty.
EN MÉXICO: Póliza de Garantía MANHATTAN — Datos del importador y responsable ante el consumidor
IC Intracom México, S.A. de C.V. • Av. Interceptor Poniente # 73, Col. Parque Industrial La Joya, Cuautitlan
Izcalli, Estado de México, C.P. 54730, México. • Tel. (55)1500-4500
La presente garantía cubre los siguientes productos contra cualquier defecto de fabricación en sus
materiales y mano de obra.
A. Garantizamos los productos de limpieza, aire comprimido y consumibles, por 60 dias a partir de la fecha
de entrega, o por el tiempo en que se agote totalmente su contenido por su propia función de uso,
lo que suceda primero.
B. Garantizamos los productos con partes móviles por 3 años.
C. Garantizamos los demás productos por 5 años (productos sin partes móviles), bajo las siguientes
condiciones:
1. Todos los productos a que se reere esta garantía, ampara su cambio físico, sin ningún cargo para
el consumidor.
2. El comercializador no tiene talleres de servicio, debido a que los productos que se garantizan no
cuentan con reparaciones, ni refacciones, ya que su garantía es de cambio físico.
3. La garantía cubre exclusivamente aquellas partes, equipos o sub-ensambles que hayan sido instaladas
de fábrica y no incluye en ningún caso el equipo adicional o cualesquiera que hayan sido adicionados
al mismo por el usuario o distribuidor.
Para hacer efectiva esta garantía bastara con presentar el producto al distribuidor en el domicilio donde
fue adquirido o en el domicilio de IC Intracom México, S.A. de C.V., junto con los accesorios contenidos
en su empaque, acompañado de su póliza debidamente llenada y sellada por la casa vendedora
(indispensable el sello y fecha de compra) donde lo adquirió, o bien, la factura o ticket de
compra original donde se mencione claramente el modelo, numero de serie (cuando aplique) y
fecha de adquisición. Esta garantia no es vclida en los siguientes casos: Si el producto se hubiese
utilizado en condiciones distintas a las normales; si el producto no ha sido operado conforme a los
instructivos de uso; o si el producto ha sido alterado o tratado de ser reparado por el consumidor o
terceras personas.

10
R&TTE
ENGLISH
This device complies with the requirements of the R&TTE Directive 1999/5/EC.
DEUTSCH
Dieses Gerät enspricht der Direktive R&TTE Direktive 1999/5/EC.
ESPAÑOL
Este dispositivo cumple con los requerimientos de la Directiva R&TTE 1999/5/EC.
FRANÇAIS
Cet appareil satisfait aux exigences de la directive R&TTE 1999/5/CE.
POLSKI
Urządzenie spełnia wymagania dyrektywy R&TTE 1999/5/EC.
ITALIANO
Questo dispositivo è conforme alla Direttiva 1999/5/EC R&TTE.

11
MANHATTAN® oers a complete line of PC Components,
Peripherals, Cables and Accessories. Ask your local computer dealer for more information
or visit www.manhattan-products.com.
All products mentioned are trademarks or registered trademarks of their respective owners.
MANHATTAN® bietet ein vollständiges Sortiment an PC-Komponenten, Peripherie, Kabel
und Zubehör. Weitere Informationen erhalten Sie von Ihrem Händler oder auf
www.manhattan-products.com.
Alle genannten Produkt- oder Firmennamen sind eingetragene Marken oder Marken der
jeweiligen Firmen.
MANHATTAN® ofrece una línea completa Componentes para PC, Periféricos, Cables y
Accesorios. Consulte a su distribuidor local para más información ó visitenos
www.manhattan-products.com.
Todos los productos mencionados son marcas comerciales o marcas registradas de sus
respectivos propietarios.
MANHATTAN® ore un assortiment complet de composants de PC, des périphériques,
des câbles et des accessoires
www.manhattan-products.com.
Tous les produits mentionnés sont des marques commerciales ou des marques déposées
de leurs propriétaires respectifs.
MANHATTAN® to kompletna linia Komponentów PC, Peryferiów, Kabli oraz Akcesoriów.
Poproś lokalnego dealera o więcej informacji lub odwiedź stronę
www.manhattan-products.com.pl.
Wszystkie nazwy handlowe i towarów są nazwami i znakami towarowymi
zastrzeżonymi odpowiednich rm odnośnych właścicieli.
MANHATTAN® ore una linea completa di componenti per PC, periferiche, cavi e accessori.
Chiedi maggiori informazioni al tuo rivenditore di computer o visita il sito
www.manhattan-products.com.
Tutti i prodotti sopracitati sono marchi di fabbrica o marchi registrati depositati dai proprietari.

Copyright © MANHATTAN
Other manuals for 130226
1
Table of contents
Languages:
Other Manhattan Docking Station manuals

Manhattan
Manhattan 130226 User manual

Manhattan
Manhattan 130615 User manual

Manhattan
Manhattan 172905 User manual

Manhattan
Manhattan IMPORT DOCK User manual

Manhattan
Manhattan 451123 User manual

Manhattan
Manhattan 130578 User manual

Manhattan
Manhattan 130202 User manual

Manhattan
Manhattan 130660 User manual

Manhattan
Manhattan 151955 User manual

Manhattan
Manhattan 450096 User manual