Manhattan 176132 User manual

PCI
AnAlog
TV Tuner
CArd
user
MAnuAl
MODEL 176132
MAN-176132-UM-1206-03

ConTenTs
1. Introduction.......................................................................3
Package Contents.....................................................................................3
System Requirements...............................................................................3
2. Hardware Connections.....................................................4
3. Installation ........................................................................5
Driver Installation .....................................................................5
Software Installation.................................................................6
4. Operation ..........................................................................7
User Functions.........................................................................7
TV Setup................................................................................8
TV Recording & Playback........................................................ 11
FM Setup.............................................................................14
FM Recording & Playback.......................................................15
Remote Control .....................................................................15
5. Troubleshooting ..............................................................16
6. Specifications ..................................................................18
2
section page
CONTENTS

1. InTroduCTIon
Thank you for purchasing the MANHATTAN®PCI Analog TV Tuner Card,
Model 176132.
The PCI Analog Tuner Card brings analog television and FM radio to your
desktop computer, allowing you to schedule and record television and radio
programs directly onto hard drives for replay or transfer to CDs and portable
media devices.
Among the many quality features and convenient benefits you’ll enjoy with this
PCI Analog TV Tuner Card:
• ReceiveanalogTVandFMbroadcastsondesktopcomputers—enjoyup
to 200 TV channels
• Easilyscheduleanddirectlysaveprograms,snapshotsandcliprecordings
to a hard drive for replay or transfer to CD
• Time-shiftingreplaysfavoritescenes,skipsadvertisingandenablespause/
rewind/fastforwardcontrol
• Multi-ChannelPreviewdisplaysupto16channelssimultaneously
• IntelligentChannelSearch,customizablefavoritesandclosed-captioning
and TeleText service support
• PlugandPlay;Windowscompatible—tslow-proleorstandardform
factors
• LifetimeWarranty
PACkAge ConTenTs
• PCIAnalogTunerCard
•PAL-NTSCadapter
•AudiocableandFMantenna
•Remotecontrolreceiverandmultifunctioncables
•Low-prolebracket
•Remotecontrol(AAAbatteriesincluded)
•Usermanualandsoftware/driverCD
sysTeM requIreMenTs
•PentiumIII400MHzforTVviewing
•PentiumIII866MHzoraboveforrecordingortime-shifting
•128MBRAMand50MBfreeHDDspaceminimum
•AvailablePCIslotandATXpower
•Windows2000/XP/Vista/7
•DirectDraw-compatiblePCI/AGPgraphicscard,minimum8MBRAM
3
INTRODUCTION

2. hArdwAre ConneCTIons
Connecting to the PCI Analog Tuner Card
As shown, cables for the TV,
FM antenna and remote
control are each connected
to their respective ports.
The auxiliary port is available
for use as a multi-function
audio/videoinput/output
port.
Connecting to an Audio Card
Ifusinganaudiocard(shownat
right beneath the PCI Analog
TunerCard),notethatthecable
from the sound card line input
port(1)connectstotheaudio
line(2)ofthemulti-functioncable
(3),whichisshownconnected
to the auxiliary port of the tuner
card.
Connecting to a Video Card
If using a video card, the video source can
be connected using the multifunction cable
either directly to the composite connection
or indirectly to the S-video connection.
The audio cable connects to the
audioinputport;theaudio
output and sound card input
connect to a microphone.
4
HARDWARECONNECTIONS
Infrared (IR) Remote Port
Auxiliary
Port
FM Antenna Port
TV Port

3. InsTAllATIon
drIVer InsTAllATIon
1.Insertthesoftware/driverCDintheCDdrive.Thecomputer’s
operating system will automatically display the initial
installationprocedureprompt.Click“DriverInstall”(orrun
Driver\Setup.exe),thenclick“Next”asneededtocontinue
throughthewelcomescreentotheDirectXsetupscreen.
2. Read the license
agreement, select “I
accept the agreement”
and click “Next.”
3.Whenthe“Restart
Computer” screen
displays, click “Finish.”
4. If the “Hardware
Installation” screen
displays, click
“Continue Anyway.”
5. Select “Yes, I want to
restart my computer
now,” then click
“Finish.”
6.Openthecontrolpanel;clickon
“System,” then “System Properties,”
“Device Manager” and “Hardware”
toconrmthedriver(ashighlighted
atright)hasbeeninstalled.
5
INSTALLATION

sofTwAre InsTAllATIon
1.Click“SoftwareInstall”(orrunX800\Setup.exe),thenclickon“Next”as
neededtocontinuetothe“WindowsMediaTools”screen.
2. Click “Yes,” then “OK” to initiate the installation and complete the setup of
“WindowsMediaTools.”
3. Click “Yes,” then “OK” to initiate the installation and complete the setup of
“WindowsMediaFormat9.”
4. Click “Next” to continue.
5. If you wish to change
the recommended route
for installation, click
“Browse,”then“Next.”
6
INSTALLATION

6. Among the listed
components, select
those you wish to install,
then click “Next.”
7. Withtheprompt“Start
Copying Files,” click
“Next.”
8. Once the installation is
complete, select “Yes,
I want to restart my
computer now” and
click “Finish” to restart
the computer.
9.Checktoensurethatthesetwoiconsappear
on the desktop:
4. oPerATIon
user funCTIons
The user interface functions are defined below.
7
OPERATION
1. Record
2. Play
3. Pause
4. Stop
5. Reverse
6. Fast forward
7. Hue
8. Status window
9. Minimize
10. Full-screen window &
video desktop switch
11 . E x i t
12. Channel up
13. Channel down
14. TAB/Backto
previous channel
15. 10 channels
16. Numeric keys
17. Time-shift
18. Switchto/fromstereo
19. TeleText
20. Shift video source
21. Open recorded file
22. Search(Auto-scan)
23. Radio(switchtoFM)
24. 16-channel preview
25. Setup menu
26. Snapshot
27. Schedule recording
28. Mute
29. Volumedown
30. Volume up

TV seTuP
Clickthe“X800TVPro”icon(seeStep9inSoftwareInstallation),thenclick
“Setup” to select the basic settings that follow.
TV Channel Edit
Click on the Channel Edit tab to change the channel list so that favorites are easier to
ndandaccess.Beforeeditingthelist,selectyourcountryinthe“Region”window.
Click “Auto Scan” to automatically scan all the channels available in your area.
NOTE: The volume is muted during a channel scan.
To rename a channel:
1. Click on a channel to highlight it.
2. Right-click to enable the name change.
3. Enter the new name in the “Name” window.
4. Re-position the channel as desired using the “Up” and “Down” buttons.
To fine tune a channel:
1. Click on a channel to highlight it.
2. Slide the Fine Tune control left or right to adjust. NOTE: Normally, the
program automatically provides the best quality possible.
8
OPERATION
select your country Auto Scan

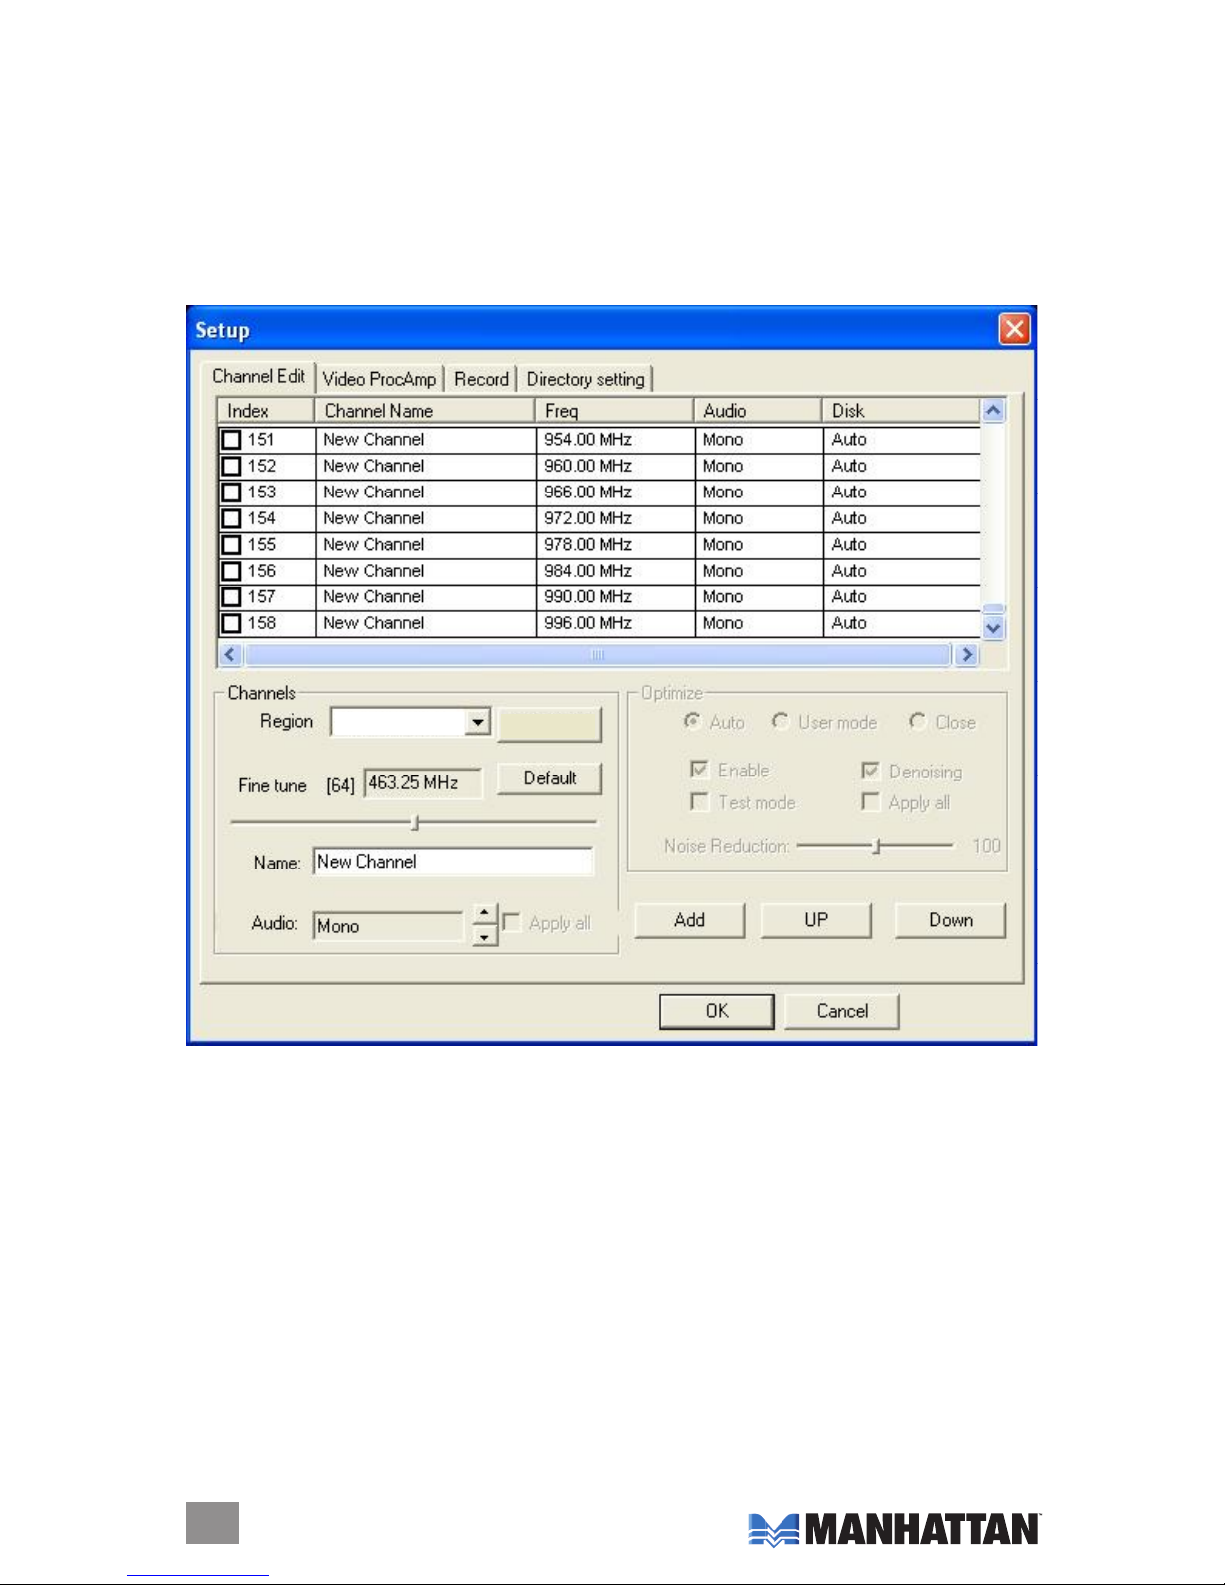
To activate or skip a channel:
1. Click on a channel to highlight it.
2.Clicktheboxinthe“Index”columntokeepthechannelontheactivelist;click
aboxwithacheckmark(therebyremovingthecheckmark)toskipthat
channel in the list.
To add a channel:
1. Click the “Add” button.
2. Enter a name and frequency.
3. Click “OK.”
To change the audio setting:
1. Click on a channel to highlight it.
2. Right-click to display four options: Mono, Stereo, Language single A and
LanguagedoubleB.ThedefaultsettingisMono.NOTE:Whenselecting
Stereo, check that the signal source is actually in stereo.
Color/Image Control
Click on the Video ProcAmp tab
toadjustthesettingsforBrightness,
Contrast, Hue, Saturation and
Sharpness. Simply click on the
slider control and move it left or
right to suit your preferences. Click
“Default” to return to the original
settings. NOTE: Should the TV
screen go blank or black during
any of these adjustments, click
“Default.”
TV Recording (Setup options only)
ClickontheRecordtabtoselectarecordingformat:DVD,VCD,SVCD,MPEG4,
AVI,WMV,MP3orWMA.
9
OPERATION
NOTE: TV standards and their
controlvarybycountry/region.
NTSC(NationalTelevision
SystemsCommittee):America,
Taiwan, Canada, Japan and
Central and South America.
PAL(PhaseAlterationLine):
Europe, China, Central Africa,
Australia and South Africa.
SECAM: France, Africa and
the Middle East.

Therecordingsizecanbefrom352x240to720x480(NTSC)or352x288
to720x576(PAL).Largeraudioandvideobitratesusemorediskspace,but
provide better audio and video quality. If space is limited, therefore, adjust the
recording setting as needed to save long programs with high-quality images.
Path Setting
Click on the Directory
Setting tab to save still
images or video files.
Then,tocheck/conrm
their path, click on the
adjacent“Browse”button.
Miscellaneous Right-
Click Options
Various other options and
alternative menu access
routes are available by
right-clicking, which
displays a pop-up menu
with the following
selections.
Always on top: Keeps the television display on top of any others that are active.
Display panel: Displays or hides the software control panel.
Full-screenmode:Enlargesthewindowtofull-screensize.Double-clickingonthe
screen returns the image to window mode.
TeleText: Supports the TeleText function.
Desktop mode: Displays the TV image on the computer desktop.
Video input: Presents three options: TV Tuner, Composite and S-video. The
default is TV Tuner.
Videostandard:ChangesthevideoformattoPAL/NTSC/SECAM.Thedefault
isPAL-BDGHI.
Color adjust: Adjusts the color and brightness.
Capture: Takes a single-frame snapshot. The default format saves the image as a
.bmp file.
Channel list: Lets you edit the channels. For details, see Channel Edit on Page 8.
Directory setting: Lets you select which directory to save recordings and images
to. For details, see Path Setting above.
About: Shows the program version and copyright information.
Exit: Exits the program.
10
OPERATION

11
TV reCordIng & PlAybACk
ThePCIAnalogTVTunerCardsupportsMPEG-1andMPEG-2formats.Torecord
whilewatchingaTVprogram,clickonthe“Record”button(seePage7).Tostop
recording, click on “Record” again. Name the file or default save. The status panel
willshowreal-timerecordinginformation(andwillshieldsomeinformation).
Recording File Space Requirements
Space required for recording depends on the format selected, as shown in the
examples below.
Schedule Recording
You can also set the program to record in advance, specifying the channel to
record;thetimeofdayandthedayoftheweektobeginrecording;andthe
recordingdurationperiod.Click“ScheduleRecording”(seePage7)todisplaythe
“Schedule” screen, which
features the following
options buttons.
New: Lets you add a new
Schedule Recording
task.
Modify: Lets you make
changes to the selected
task.
Delete: Lets you delete the
selected task.
OK: Activates the status of all the Schedule Recording tasks that have been
entered.
OPERATION
Format Resolution Video bit rate Audio bit rate Disk space
NTSCDVD 720x480 6 Mbps 224Kbps 2.6GB/hr
NTSCSVCD 480x480 2.42 Mbps 224Kbps 1GB/hr
NTSCVCD 320x240 1.15 Mbps 224Kbps 600MB/hr
PALDVD 720x576 6 Mbps 224Kbps 2.6GB/hr
PALSVCD 480x576 2.42 Mbps 224Kbps 1GB/hr
PALVCD 352x288 1.15 Mbps 224Kbps 600MB/hr
AVI 352 x 288 224 Kbps
MPEG-4 352x288 224Kbps
WMV 352x288 1.2 Mbps 224 Kbps About650MB/hr
MP3 224 Kbps
WMA 224Kbps

WiththeAddTaskscreendisplayed,youhavethefollowingoptions.
Task name: Asks that you enter an identifying name for the recording.
Mode:Letsyouselect“Record”or“WatchOnly.”
Videoinput:GivesyoutheoptionofTVTuner,CompositeorS-Video.
Channel: Lets you select the channel you wish to watch or record.
Durationtime:Letsyouenterthelengthofthetask.(Minimumis2minutes;
defaultis30minutes.)
Click “Next” to display the Record Format screen. Choose DVD, VCD, SVCD,
MPEG4,AVI,WMV,MP3orWMA(see“Recording[setuponly]onPage9
forasimilarscreendisplay).
Click “Next” to display the
Time Setting screen, which
presents these options.
Only once: Limits the task
to a one-time recording.
Every week: Repeatedly
records each week as
scheduled.
Every day:
Repeatedly
records each day as
scheduled.
NOTE: Time of day is a
24-hour(vs.12-hour)format.
Whennished,click“Next”toactivatetheScheduleRecordingsettingsand
display the After Task Completed screen. This presents three courses of action
once the recording task is complete.
Auto Shutdown: Turns off the power to the PC after recording.
Exit Application: Exits the program, but doesn’t shut down the computer.
Stay On: Keeps the software active and lets you continue watching TV.
Click “Next” to display the Finish screen, then click “Finish.”
NOTE: If the operating system displays
the prompt shown at right, there is a
conflict between two or more time
settings. Click “OK,” then revise one or
more of the time settings and follow the
preceding prompts to the Finish screen.
Video Playback
Toplayarecordedle,clickonthe“Openrecordedle”button(seePage7)to
accessthele(inwhicheverfolderitwassavedto).Double-clickontheleor
highlightitandclick“Open.”Whiletheleplays,thecontrolpanelwilldisplay
time information and the status of associated playback functions.
12
OPERATION

13
Snapshot
To capture a
picture while
watching TV
(andsaveitas
a.bmple),
clickonthe“Snapshot”button(seePage7).Savetheimagewhenprompted,
and double-click on the image to perform edits. If you don’t wish to save the
image, click on “Delete.”
TV Channel Preview
Complete the channel scan before previewing.
Mostchannelpreview/selection
functions are controlled with standard keys and buttons.
To view the next or previous channel on the menu list while watching TV: Click
ontheChannelUp/ChannelDownbuttons.
To view a specific channel: Enter the channel number using the numeric keys.
Toreturntothepreviouschannel:Clickonthe“TAB”button.
To preview 16 channels simultaneously: Click on the “16” button. To select one
of these 16 channels for viewing, click on the channel image.
Time-Shifting
Time-shiftletsyouskipcommercials(notautomatically,however),pauseand
replaywhilewatchingreal-timeTV—withoutinterruptinganyongoingrecording
—bytemporarilysavingthe“live”videotoyourharddiskforaspeciedperiod
of time.
In Time-shift, you are recording to and playing back from the same video file
or buffer. You can play back from various locations in that buffer. As with
video playback, you can pause, fast-forward and rewind. A major difference,
however,isthatX800softwareissimultaneouslyrecordingreal-timetelevision
while playing back from the buffer.
NOTE: Time-shift can use a significant amount of disk space. There is greater
CPUutilizationduringTime-shiftbecauseyouaresimultaneouslyrecordingand
playing recorded videos. At full DVD quality, Time-shift can require up to a
1.7-GHzCPU.
Clickonthe“Time-shift”buttontoactiveit(seePage7).Atimemonitoringbar
will appear, informing you how much of the Time-shift buffer is in use. You can
also use your mouse to drag the Time Control Shuttle to jump to a specific time.
ToexitTime-shift,clickonthe“Stop”button(seePage7).
TeleText
Clickingonthe“TeleText”button(seePage7)letsyoureceiveTeleTextTVifthe
signal of the selected channel is supported by TeleText TV.
OPERATION

fM seTuP
You can use the FM application
to listen to FM radio and
recorditasWMA,MP3
andWAVlestobe
stored on your hard drive.
Click on the “Radio”
button(seePage7)to
display the FM interface
controlpanel(shownat
right),whichdepictsthe
options and functions.
Click on the “Setup menu” button to select and adjust settings.
FM Channel Edit
The controls on this screen allow the station menu list to be modified.
Torenameachannel:Click/highlightthechannelinthemenuwindow;right-
clickandenterthenewname;clickthe“Update”buttontoapplythechange.
Tochangethepositionofachannelwithinthemenulist:Click/highlightthe
channel and click on the “Up” or “Down” buttons to re-position it.
Todeleteachannel:Click/highlightthechannelandclickthe“Delete”button.
To insert a channel: Click on the “Insert” button to display
the “Insert Channel” window. Enter a channel name
and frequency, then click “OK” to add the channel to
the menu.
Tonetuneachannel:Click/highlightthechannel;
movetheslidercontroltotheoptimalposition;click
on “Update” to apply. NOTE:Ifthenew/adjustedpositionisnotgood,the
channel will revert to the default setting. Normally, the program locks on the
best frequency so that fine tuning is not necessary.
To automatically scan all channels available in your area: Click on the “Auto-
scan” button. The program automatically selects and sorts usable broadcast
stations,whichcanthenbeeditedandprioritized.Clickonthesamebutton
to stop scanning.
14
OPERATION
1. Exit FM
2. Minimize
3. FM copyright info
4. Volume indicator
5. Record
6. Mute
7. Auto-scan
8. Setup menu
9. SwitchtoTV
10. Numeric channel
keys
11. Return to previous
channel
12. Open recorded file
13. Recorded file
controls(lefttoright):
Play;Pause/Stop;
Stop/Playnext
14. Status windows
15. Channel up
16. Channel down

FM Record Setting
Theadditionalcontrolsonthisscreenallowtherecordingformats(MP3or
WMA,asshowninthe“RecordFormat”window)andsettingstobemodied.
As with previously mentioned settings, changes in this section can be made by
clickingontheup/downarrowsorbyhighlightingentriesandinputtingnew
information.Also,asmentionedintheTVRecordingsection(seePage12),
a prompt may appear indicating a “Record list plan time conflict.” If so, click
“OK” and make any changes necessary to resolve the problem.
fM reCordIng & PlAybACk
Whenrecordingandduringplayback,theFMcontrolpanel(seePage14)
displays real-time recording information in the status windows. NOTE:Before
using any of the channel-related functions, perform a channel auto-scan.
To record: Click on the “Record” button. You can name the file at this point or
save it only as a default. Click on the “Record” button again to stop recording.
Toplayanaudiole:Clickonthe“Openrecordedles”button(seePage14)
anddouble-clickontheleyouwanttoplay(orhighlightitandclick“Open”).
To fast-forward, reverse, advance the channel selection up or down the menu
list, select a specific channel and return to the previous channel: Click on the
control panel keys or buttons as indicated on Page 14. NOTE: The “Page
Up” and “Page Down” keys on keyboard let you move up and down the
channelmenulistquickly(theremotecontrolprovidesthesamefunctions).
To view information about the FM software: Click on the “FM copyright” button
(seePage14).
reMoTe ConTrol
15
OPERATION
1. Input source: TV,
Composite &
S-Video
2.Softwareon/off
3. Numeric channel keys
4. Return to previous
channel
5.Single/double/triple
digit
6.Channelup/down;
Volumeup/down;
Mute
7.Brightnessup
8.Brightnessdown
9.StereoorMono
10. TeleText
11.Recordgroup(leftto
right;toptobottom):
•Record/Stop
•Play
•Pause
•Stop
•Fastforward
•Reverse
•Auto-scan
•Snapshot
•Setupmenu
•Full-screenwindow
& video desktop
switch
•Radio(switchtoFM)
•On/off

5. TroubleshooTIng
Problem: The on-screen image is incomplete.
Solution: Confirm that the system meets the minimum requirements for proper
operation and upgrade as necessary.
Solution: CheckthattheVGAcardsupportsDirectShowand,ifneeded,
install the latest driver.
Problem: The driver won’t install.
Solution: Check that “PCI 88x Video Capture” is the software listed on the
“Hardware Installation” screen as shown in the “Driver Installation”
section, Page 5.
Solution: MakesurethatDirectX9.0c—whichisontheCDbundledwiththe
software—hasbeeninstalled.
Problem:Thescreenisblack(noimageisvisible).
Solution: Restart the application software.
Solution: ReinstalltheX800devicedriver.
Problem: The color and sound aren’t right when watching TV.
Solution: Confirm that the correct country is selected on the TV “Setup” screen.
Solution: ReinstalltheX800devicedriver.
Problem: There is no sound at all.
Solution: Check the audio cable connections.
Solution: Check to see if the Line-in on the sound card is set to “Mute.”
Problem: The quality of the TV image is poor.
Solution: Check the audio cable connections.
Solution: Check the signal quality. An amplifier may be needed.
Problem:ThereareframesmissingduringTVplaybackandthesynchronization
is not right between the audio and the video.
Solution: Confirm that the system meets the minimum requirements for proper
operation.Ifitdoes,checkthesounddriveorinstallaWDMdriver
program for the sound card.
Problem: Editing recorded files is not possible.
Solution: Make sure the editing software being used is either Ulead, Arcsoft,
Intervideo or Cyberlink.
Problem: There is audible noise during playback of recorded files.
Solution: The Line-in volume may have been too high during recording. Try
re-recording at a lower volume levell.
Solution: Replacethesoundcardwithoneofhigherquality.(Somelow-cost
soundcardshavedifcultywithrecording.)
16
TROUBLESHOOTING

Problem: The video capture hardware can’t be located.
Solution: If this occurs when the program is started, the driver didn’t install
properly. Re-install the driver.
Problem: The remote control doesn’t work.
Solution: Check that the batteries were installed correctly and don’t need
replacing.
Solution: Confirm that the infrared receiver is facing the right direction and
isn’t too far away from the sender.
17
TROUBLESHOOTING

6. sPeCIfICATIons
STANDARDS
systems
INTERFACE
GENERAL
formats
TUNER
CONNECTIONS
PHYSICAL
18
SPECIFICATIONS

SYSTEM REQUIREMENTS
19

www.manhattan-products.com
Copyright © MANHATTAN
All products mentioned are trademarks or registered trademarks of their respective owners.
MANHATTAN®offers a complete line of PC Components,
Peripherals, Cables and Accessories. Ask your local computer dealer for more
information or visit us online at
Table of contents
Other Manhattan TV Tuner manuals
Popular TV Tuner manuals by other brands

Inverto
Inverto Multibox IDL 400s Quick installation guide

Genius
Genius VideoWonder DVB-T Service manual

Pioneer
Pioneer GEX-1550TV owner's manual

PCTV Systems
PCTV Systems nanoStick T2 290e quick start guide

Ascent Communication Technology
Ascent Communication Technology IRD1516 Quick reference guide

Diamond Multimedia
Diamond Multimedia XtremeTV PVR 550 Features