Manson Engineering Industrial SDC–5203 User manual
SDC – 5203
3A Digital Car Power Adaptor
User Manual
Introduction
This digital adapter uses Micro-Processor Control to protect your Car Battery from over-discharge. The
3Amp.dc output voltage is digitally selected and displayed to avoid second guessing.
The 5V standard USB power output can be used at the same with the 3A DC output. The LCD shows car
battery voltage, selected output voltage and load current. It is suitable for truck, car in use with all Portables,
such as PSP, DVD player, I-Pod, MP3, cell phones and etc.
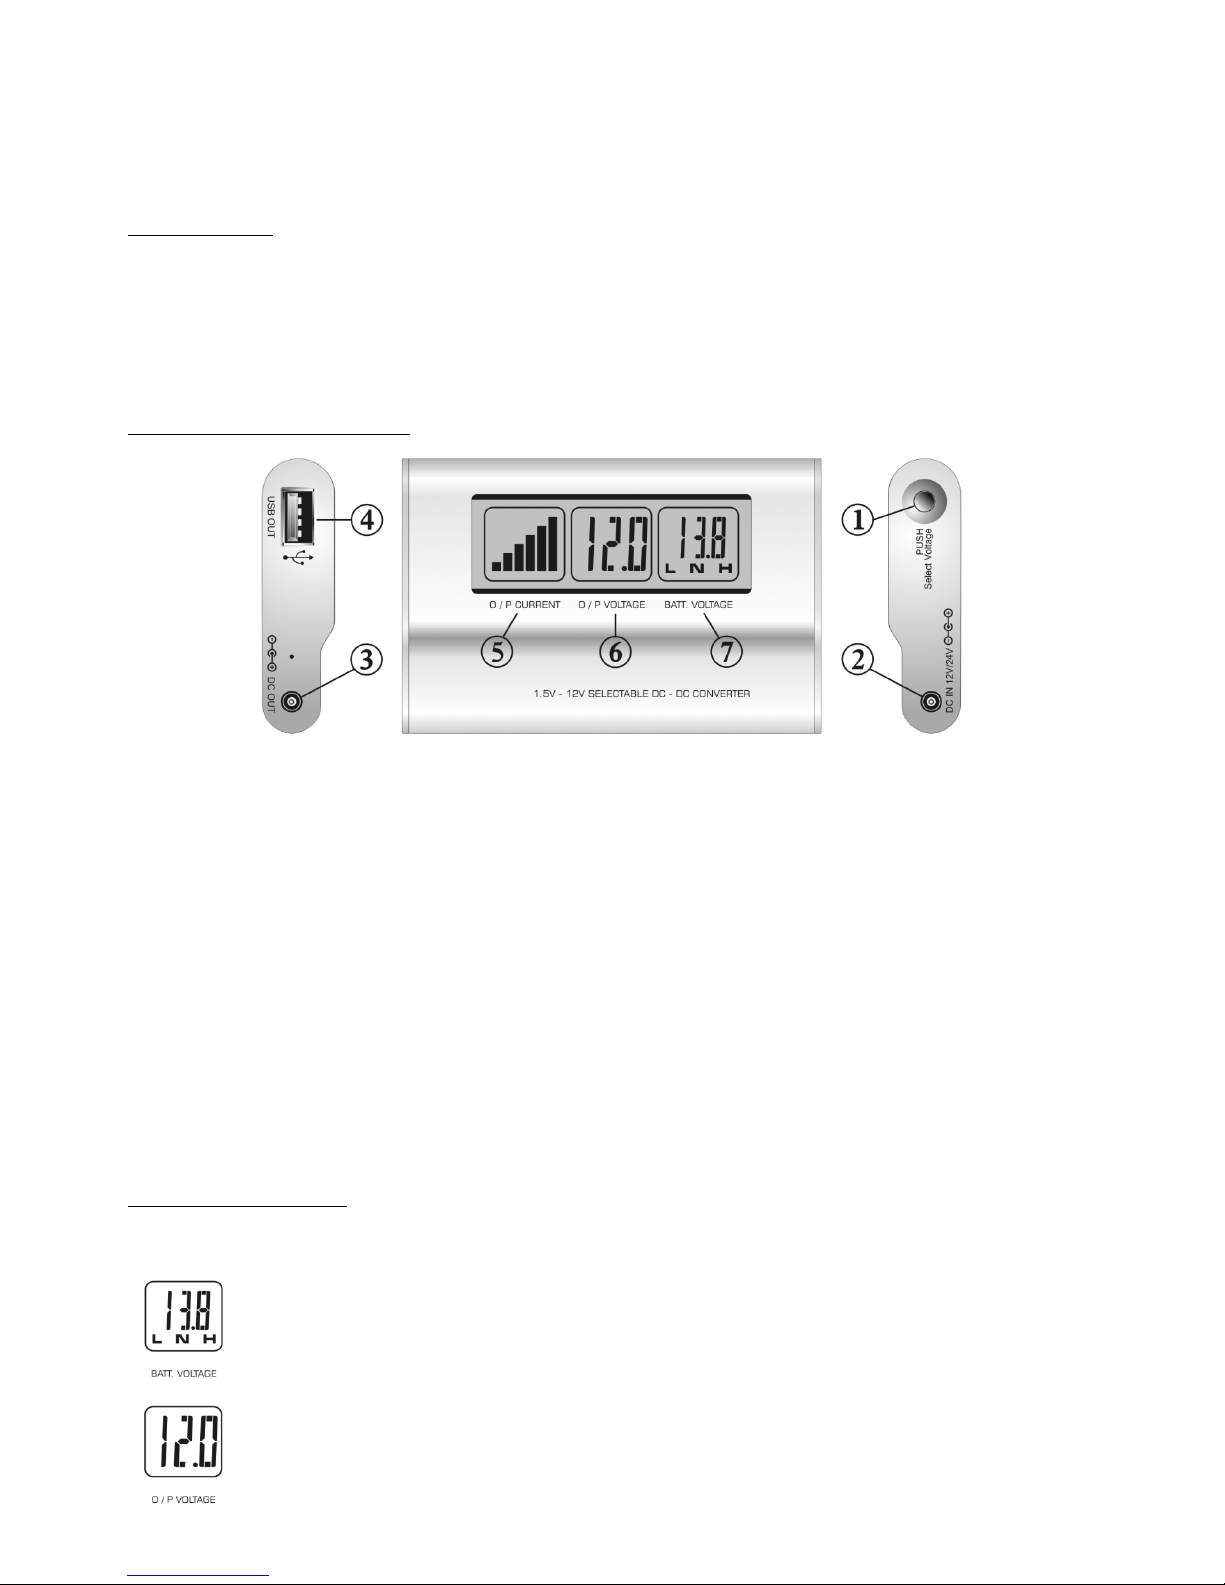
Controls and Indications
1. Preset Button
To preset voltage of DC ouput eand backlight of LCD.
2. DC Input Socket
For connection to Car cigarette socket with accessory A.
3. DC Output Socket
3 Amp output with selectable : 1.5 / 3 / 4.5 / 5 / 6 / 7.5 / 9 / *12V
*12V output selection can only be used for 24V system as in Truck. ( See B7 Remarks )
4. USB Output Socket
Standard USB DC power 5V, 500 to 600mA.
To charge or to power portables and cell phones.
5. “O/P CURRENT” LCD
Shows current level used by plugged in devices at e.
Each bar is 0.5Amp, full load is 3Amp with 6 bars.
6. “O/P VOLTAGE” LCD
Shows selectedvoltage of DC output of e.
7. “BATT. VOLTAGE” LCD
Indications of LCD
Battery voltage display shows car battery voltage levels
12V system 24V system
L= Low less than 11.5V less than 23.0V
N=Normal 11.5 ~ 13.0V 23.0 ~ 26.0V
H=High greater than 13.0V greater than 26.0V
This middle LCD window shows selected output voltage
This left LCD window shows current level used by plugged in devices at e.
Each bar is 0.5Amp so full load output current is 3Amp with 6 bars.
Operation Procedures
A. Powering up the Adapter
1. Insert the accessory A connector cable to DC in dand to your car cigarette socket when your car electric
power is on.
2. The LCD should light up if not, check connections at both cigarette plug and adapter are secured and car
electric power has been turned on.
B. Presetting the 3 Amp DC OUT evoltage
1. Press and hold the Preset Button cfor about 3 seconds, then release it.
2. The value of O/P VOLTAGE hflashes in the middle window, and ready for selection.
3. One quick press (click) of the button will move to the next preset voltage.
The cyclic moving order is 1.5V-> 3V->4.5V->5V->6V->7.5V->9V->12V.
4. Stop pressing at the desired setting, and wait for about 5 seconds until the flashing stops.
5. The preset output voltage is confirmed when flashing stops and is shown in the middle window display.
6. This preset voltage is then fixed even after Adapter is powered off.
Remarks:
7. The 12V Output selection is only for 24V battery system, it does not work in 12V battery system.
When 12V output preset is selected in a 12V battery system, the middle window of LCD will keep on
flashing and there is no output voltage at 3A connector socket.
WARNING !!!
Ensure you connect up “DC OUT” with the correct polarity
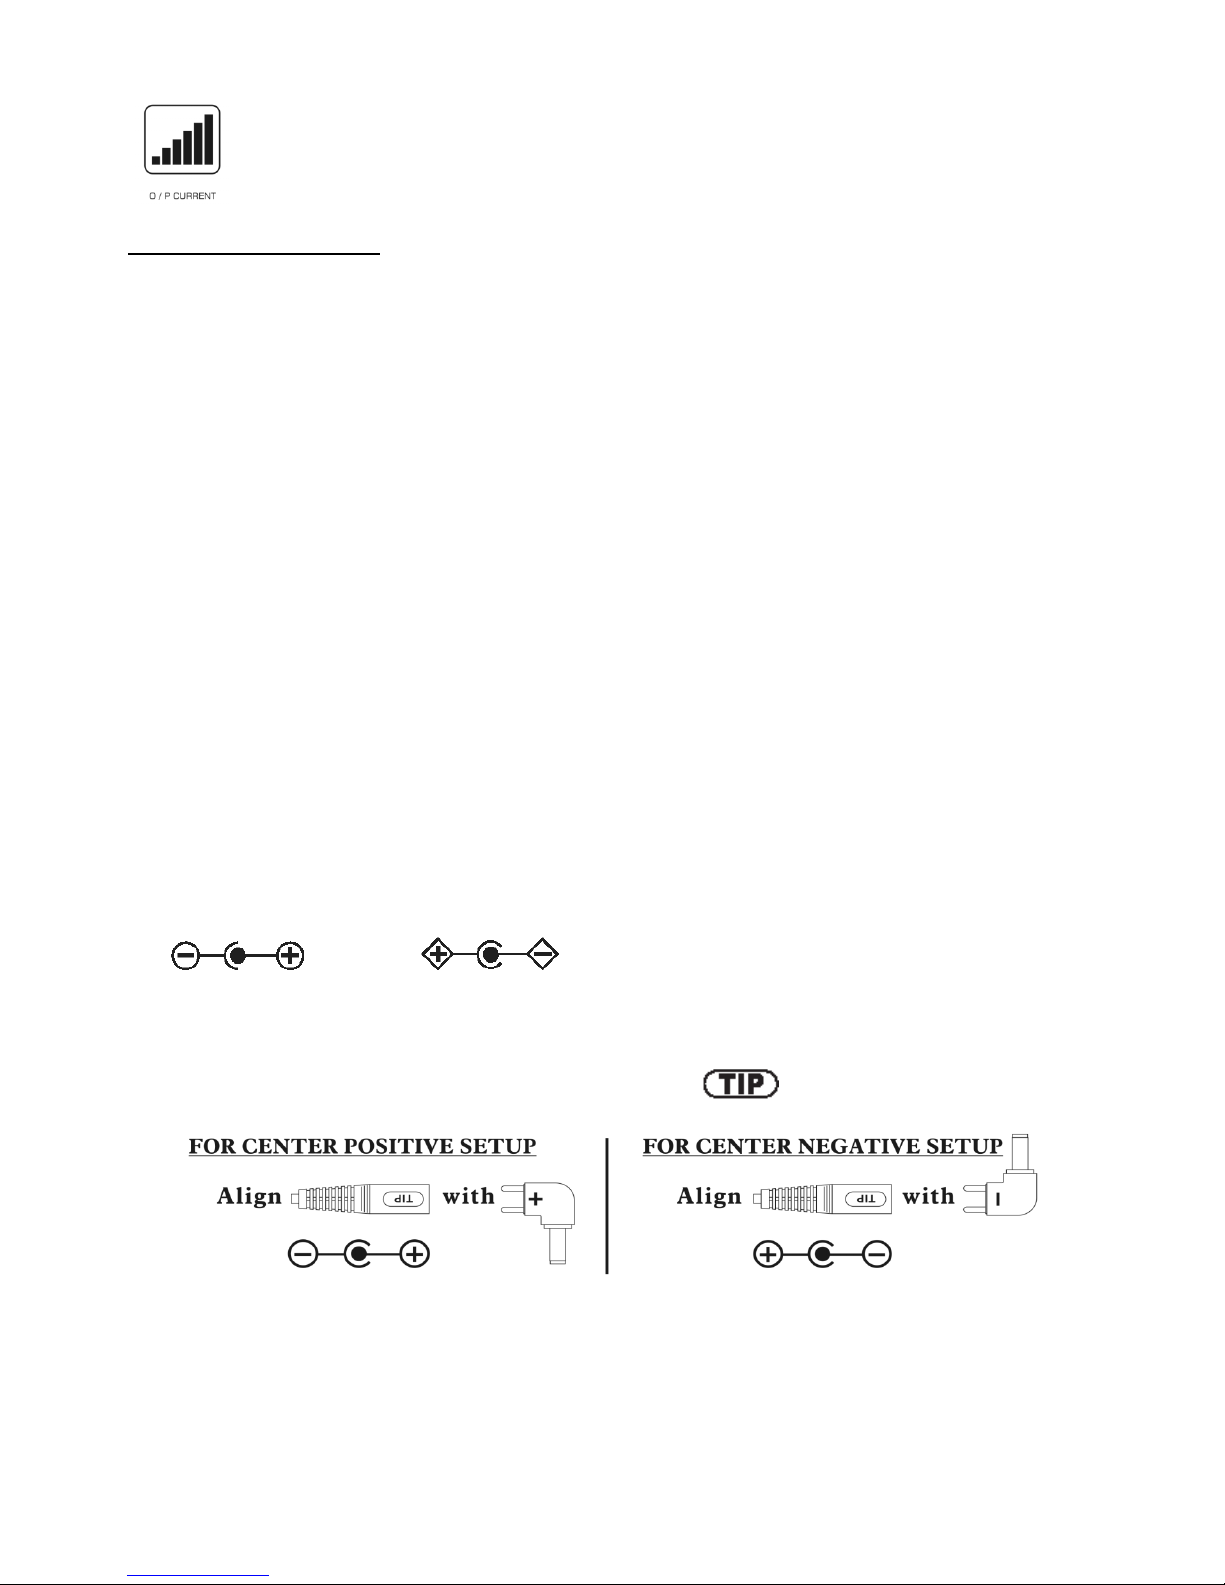
C. Preparation for plugging in your portables.
1. Finding out whether your portable is center POSITIVE or center NEGATIVE.
Most portables have the following markings on or near the Input Socket showing voltage and polarity.
When the center is linked to a + sign, it is then center POSITIVE
When the center is linked to a - sign, it is then center NEGATIVE
2. Setting the chosen polarity for the output plug.
- There is only one engraved marking on the cable socket it is
- But each of the supplied output plugs has two engraved markings, + and – sign just above pins.
3. Double check for polarity and voltage of your portable and adapter setting.
INCORRECT OUTPUT VOLTAGE , POLARITY MAY DAMAGE YOUR PORTABLE
1. DO NOT use this connector if you are not sure of the polarity or voltage of portable.
2. DO NOT use this adapter for portable that consumes more than 3000mA.
3. DO NOT use this adapter while starting the vehicle.
4. DO NOT cover this adapter or put it near any heat source .

(A)
(B)
D. Connecting the Portables
Before connecting to your portable double check on :
1. The output voltage as display in the middle window of LCD matches your portable’s voltage.
2. Make sure the polarity of is correct.
3. Any mis-match of the above 2 important points will or may damage your portable.
E. Using the USB power output f
The USB output is made to the USB power standard of 5VDC and 0.6A .
You can power up or charge your portables such as I-Pod , MP3 which have USB power connectors for getting
dc power from PC (Personal Computer).
Select from the accessory C the correct phone charge plug to charge your cell phone.
REMARKS:
NOT ALL THE CELL PHONE CAN BE CHARGED BY THE USB.
NEW MODELS REQUIRE HIGHER VOLTAGE THAN THE 5V USB .
F. Changing the Backlight Color of LCD
1. First disconnect power to adapter by removing either the cigarette plug or DC-IN d
2. Press and hold the preset button cand at the same time reconnect power to adapter.
3. When the LCD is lit up again, release the preset button c.
4. Then quick press on the Preset Button will change the backlight color.
5. When desired color is found, disconnect power to adapter as in 1.
The last appeared color will be the newly selected backlight color.
Included Accessories:
(A) Dc input cable (1.5M) with cigarette plug.
(B) Dc output cable (1.5M) with 7 pieces of common plugs (polarity reversible)
(C) One spare 5Amp fuse for cigarette plug.
Safeguarding your battery
This unique function protects your car battery from over-discharged by current draining portables.
You will not be left stranded with a flat battery.
The Micro-Processor keeps on checking the battery voltage and charge state of your car (12V system) or
your truck (24V system).
When it detects your battery drops to a critically low level, the LCD backlight first changes to flashing red
and warning buzzer will sound and all outputs (3A DC output and USB) are cut off.
Protections
A. Short circuit & overload protections
When the DC output or the USB is shorted circuited or draws more than the maximum current the current
limiting protection will be activated to limit the output current hence the adapter.
B. Over voltage (output) Protection and Buzzer Warning
This is to protect voltage sensitive expensive portables from high DC output voltage.
When the actual output voltage is about 1volt higher than the preset value for DC output d
The LCD backlight will turn Red and buzzer alarm is on, followed by cut off of both main output and USB
output.
C. Thermal fuse protection
There is a 5Amp thermal fuse in the cigarette plug for over current at the input.

Trouble Shooting
1. LCD is not ON
POSSIBLE CAUSES:
A. No DC power from the Cigarette Lighter socket. Check with the cigarette lighter if it works.
B. Cigarette Lighter Socket may be loose.
C. Contact metal strips are not in contact with socket.
Check Spring Action of metal strip and turn plug slowly until LCD turns On.
D. Cigarette Plug Fuse burnt off, replace the 5Amp fuse.
Hold the top metal sleeve and turn the plastic body anti-clockwise to get to the fuse.
2. LCD is On, but connected portable is not working.
POSSIBLE CAUSES:
A. Check portable has been turned on.
B. Check voltage and polarity settings.
C. Check connection to the portable is secure.
3. Selected 12V has no output and middle LCD window keep on flashing
This output setting of 12V cannot be used for 12V battery.
Specifications:
Input DC voltage range : 11 to 32V
Output regulated DC voltage selection : 1.5/ 3 /4.5/5/ 6/ 7.5/9/ 12V* dc
*12Voutput can only be used for 24V battery system, it will not work in 12V battery system.
Micro-processor control of battery protection, digital selection and monitoring of output voltage, and load
current.
LCD with selectable back light , continuous monitoring and displaying of selected output voltage, battery
voltage and load current.
Dual outputs:
Continuous maximum DC output current 3000 mA
Continuous maximum current from USB port: 600 mA.
Both the DC output and USB port can operate at the same time giving a total current of 3600mA.
Applications
DVD player, iPod#, SONY PSP#, All portables with USB link cable for charge or power, all Portable Multi-
media players with 3A max. load, GPS, handheld telecom with max. 3A load.
# iPod and SONY PSP are registered trade marks of corresponding corporations.
Rev. 1.6 01/2007
7673-5203-0581
Table of contents
Other Manson Engineering Industrial Automobile Accessories manuals

Manson Engineering Industrial
Manson Engineering Industrial SBC-5926 User manual

Manson Engineering Industrial
Manson Engineering Industrial SDC-6203 User manual

Manson Engineering Industrial
Manson Engineering Industrial SBC-6104 User manual

Manson Engineering Industrial
Manson Engineering Industrial SBC-5925 Installation manual
Popular Automobile Accessories manuals by other brands


ULTIMATE SPEED
ULTIMATE SPEED 279746 Assembly and Safety Advice

SSV Works
SSV Works DF-F65 manual

ULTIMATE SPEED
ULTIMATE SPEED CARBON Assembly and Safety Advice

Witter
Witter F174 Fitting instructions

WeatherTech
WeatherTech No-Drill installation instructions

TAUBENREUTHER
TAUBENREUTHER 1-336050 Installation instruction