manuals.online logo
Brands
  1. Home
  2. •
  3. Brands
  4. •
  5. Marcum Technologies
  6. •
  7. Control Unit
  8. •
  9. Marcum Technologies RT-9 User manual

Marcum Technologies RT-9 User manual

QUICK START GUIDE
Marcum has a long tradition of being on the forefront of technology. While
some fear change, we welcome it, as do our loyal customers and they
continually contact us in eager anticipation of the next big thing.
New features require new technology, and New Features + New
Technologies = a more complex interface. It’s true - there is a little more to
the RT-9 that just turning it on. And while operating this system is
somewhat more intricate than the basic models out there, don’t let that
stop you from taking advantage of the advanced features. Once you get a
feel for the “flow” of the menu you’ll wonder how you have gotten by
without it! The amazing touch screen allows for many more adjustments
and configurations than what is possible on other units, and all who have
used the RT-9 agree that the additional few minutes of learning the
features are well worth it for what the RT-9 has to oer.
The RT-9 features built-in GPS mapping with Sonar and Underwater
Camera Options. This quick start guide will get you started using your RT-9
right away, but be sure to check out the complete user manual.
Assembly
Remove the RT-9 tablet from the box, note where the ports are located on
the back. The RAM mount assembly must be screwed to the shuttle and
the cradle.
Battery
The RT-9 has an internal lithium battery that will power the tablet for about
2 hours. This battery is charged through the external 12 volt 9 amp battery
by the pogo pins on the cradle. It is important that you start out each day
with a fully charged external battery, and make sure that the tablet is
seated in the cradle properly (charging the external battery during
operation is not recommended).
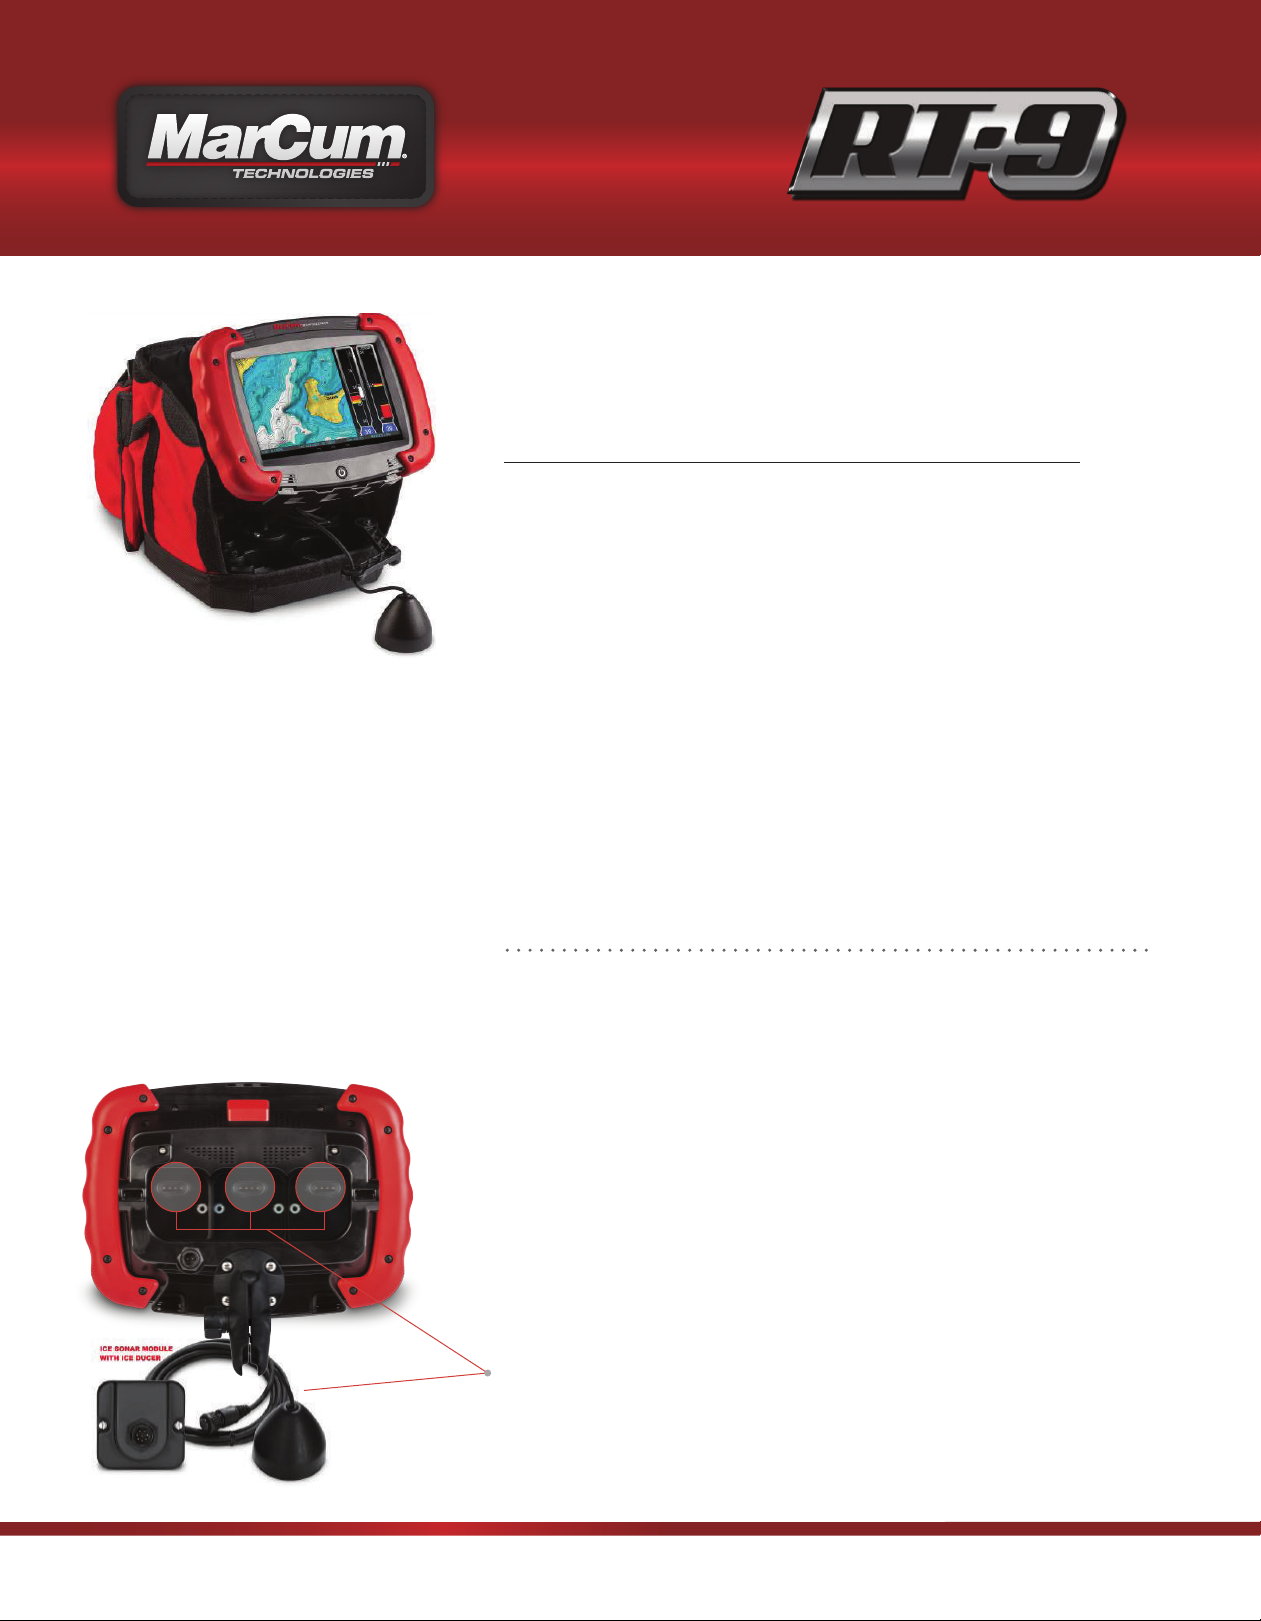
Ports/Modules
On the back of the tablet there are 3 ports where the Sonar or Camera
Modules can be attached. You must have a Sonar or Camera Module in
order to have Sonar or Camera functions.
HIGHLIGHTS
•Built in GPS, Navionics compatible
•Optional MarCum Sonar
•Optional camera
•Digital recording
•Share your videos to social media
•Browse the internet through Wi-Fi
•Download games, music, books or
videos for when the fish aren’t
biting
•Modular additions allow the use of
multiple ducers or cameras
RT-9 QUICK START GUIDE
Power on
Press the power
button, when the Start
screen comes on,
slide the lock button
to open the Home
Screen.
RT-9 App
Once at the Home
Screen, press the
RT-9 App button to
open the RT-9. The
RT-9 will appear with
Panels 1 and 2 open.
Both panels will be
blank.
Panels
The RT-9 screen is
divided into panels,
and depending on
your preferences you
can have 1, 2 , or 3
panels open. The
panel number does
not correlate to a port
number—for example,
a module plugged into Port 1 may be displayed on Panel 1, 2,
or 3. It is possible to have the Sonar signal displayed on top
of the map or the camera feed.
Mapping/Navionics
The first time you use
the GPS, it may take
up to 10 minutes to
lock in a signal. As
soon as the RT-9 App
is opened, the
process of locking in
the satellites has
begun. You must be outdoors to locate the satellites. The
RT-9 comes with a basic map installed, but for maximum
performance it is suggested that mapping chip be installed.
The MarCum RT-9 is compatible with Navionics Map Chips
for more information on features and compatibility please.
SONAR
Arguably the most
important of all, the
Sonar on the RT-9 is
unmatched on the ice
or o. You must have a
sonar module in place,
and the ducer
connected to have
sonar functions. You can use any of the ports, but for
simplicity put it in the middle [#2] Port at first. With the Sonar
Module in Port 2, display it on panel 2 by first pressing the
“2” located at the bottom of the screen. Now a window will
open, select Sonar. Another window will open, and you may
now select which type of Sonar Display you want [Graph,
Vertical, etc.]. Choose one, and this will now be running on
Panel 2. To adjust the Sonar settings, press “Settings” in the
upper left corner, then select “Sonar”. You will now be able
to adjust all of the Sonar settings, like sensitivity, range,
interference rejection, etc.
Camera
The camera module is
sold separately, but
using one will
complete the RT-9
“Trifecta” - now you
can have GPS
mapping, sonar, and
camera all in one unit.
You can even display all three at once! Remember to have
whichever port you have the camera module plugged
open. To adjust the camera settings, first select “Settings” in
the upper right corner, and then select camera. You can
make recordings at any time by simply pressing the red
“Record” button in the upper right corner of the display.
Top compartment
This compartment is opened by sliding the latches inward. This is where SD cards for mapping or recording are inserted.
This is also where the ports for USB, Video Out, and headphones are located. The two small buttons are volume control.
When the compartment is closed, slide the latches outward to secure the latch.
RT-9 QUICK START GUIDE
FCC AND COMPLIANCE
PER FCC 15.19(a)(3) AND (a)(4), THIS DEVICE COMPLIES WITH PART 15 OF THE FCC RULES. OPERATION IS SUBJECT TO THE
FOLLOWING TWO CONDITIONS: (1) THIS DEVICE MAY NOT CAUSE HARMFUL INTERFERENCE, AND (2) THIS DEVICE MUST
ACCEPT ANY INTERFERENCE RECEIVED, INCLUDING INTERFERENCE THAT MAY CAUSE UNDESIRED OPERATION.
The MarCum RT-9 has been tested and found to comply with the limits for a Class B digital device, pursuant to Part 15 of the
FCC rules. These limits are designed to provide reasonable protection against harmful interference in a residential installation.
This equipment generates, uses, and can radiate radio frequency energy and, if not installed and used in accordance with the
instructions, may cause harmful interference to radio communications.
INDUSTRY CANADA COMPLIANCE
PER RSS-GEN, SECTION 8.4, THIS DEVICE COMPLIES WITH INDUSTRY CANADA'S LICENSE-EXEMPT RSSs. OPERATION IS
SUBJECT TO THE FOLLOWING TWO CONDITIONS: (1) THIS DEVICE MAY NOT CAUSE INTERFERENCE, AND (2) THIS DEVICE
MUST ACCEPT ANY INTERFERENCE, INCLUDING INTERFERENCE THAT MAY CAUSE UNDESIRED OPERATION OF THE DEVICE.
NOTE: ELECTRONIC TECHNOLOGIES, LLC. IS NOT RESPONSIBLE FOR ANY CHANGES OR MODIFICATIONS NOT
EXPRESSLY APPROVED BY ELECTRONIC TECHNOLOGIES, LLC. IN WRITING. SUCH UNAPPROVED MODIFICATIONS COULD
VOID THE USER’S AUTHORITY TO OPERATE THE EQUIPMENT.
There is no guarantee that interference will not occur in a particular installation. If this equipment does cause harmful
interference to radio or television reception, which can be determined by turning the equipment o and on, the user is
encouraged to try to correct the interference by one or more of the following measures:
• Reorient or relocate the RT-9.
• Increase the separation between the RT-9 and receiver.
• Consult the dealer or an experienced radio/TV technician for help.
SD CARD SLOTS
USB PORT
HDMI PORT
VOLUME
HEADPHONES
Discover various marine fish finder in our online store.

Other manuals for RT-9

1

Popular Control Unit manuals by other brands

DeZurik WILLAMETTE VBL-2600 Instruction

DeZurik

DeZurik WILLAMETTE VBL-2600 Instruction

Texas Instruments TAS2559 user guide

Texas Instruments

Texas Instruments TAS2559 user guide

APsmart RSD-D Quick installation guide

APsmart

APsmart RSD-D Quick installation guide

Flight Systems 56-0679-00 Product information

Flight Systems

Flight Systems 56-0679-00 Product information

Nice WA20/A Instructions and warnings for installation and use

Nice

Nice WA20/A Instructions and warnings for installation and use

Stahl 9440/15 Series operating instructions

Stahl

Stahl 9440/15 Series operating instructions

ViewSonic VB-PEN-007 user guide

ViewSonic

ViewSonic VB-PEN-007 user guide

Bardiani Valvole BBZS5 Instruction, use and maintenance manual

Bardiani Valvole

Bardiani Valvole BBZS5 Instruction, use and maintenance manual

Dungs MB-ZR B07 Series instructions

Dungs

Dungs MB-ZR B07 Series instructions

Viessmann VITOTRONIC 100 operating instructions

Viessmann

Viessmann VITOTRONIC 100 operating instructions

Texas Instruments AFE79 Series Programming & user guide

Texas Instruments

Texas Instruments AFE79 Series Programming & user guide

Pilz PNOZ mc1p operating instructions

Pilz

Pilz PNOZ mc1p operating instructions

DoorHan CV01 manual

DoorHan

DoorHan CV01 manual

Reliable EX manual

Reliable

Reliable EX manual

Elkron IO500 quick start guide

Elkron

Elkron IO500 quick start guide

TechNexion XORE-WIZARD-IMX8M-MINI quick start guide

TechNexion

TechNexion XORE-WIZARD-IMX8M-MINI quick start guide

Toro P220G Series Installation and operating instructions

Toro

Toro P220G Series Installation and operating instructions

UTC Fire and Security interlogix TT3010 Installation & operation instructions

UTC Fire and Security

UTC Fire and Security interlogix TT3010 Installation & operation instructions

manuals.online logo
manuals.online logoBrands
  • About & Mission
  • Contact us
  • Privacy Policy
  • Terms and Conditions

Copyright 2025 Manuals.Online. All Rights Reserved.