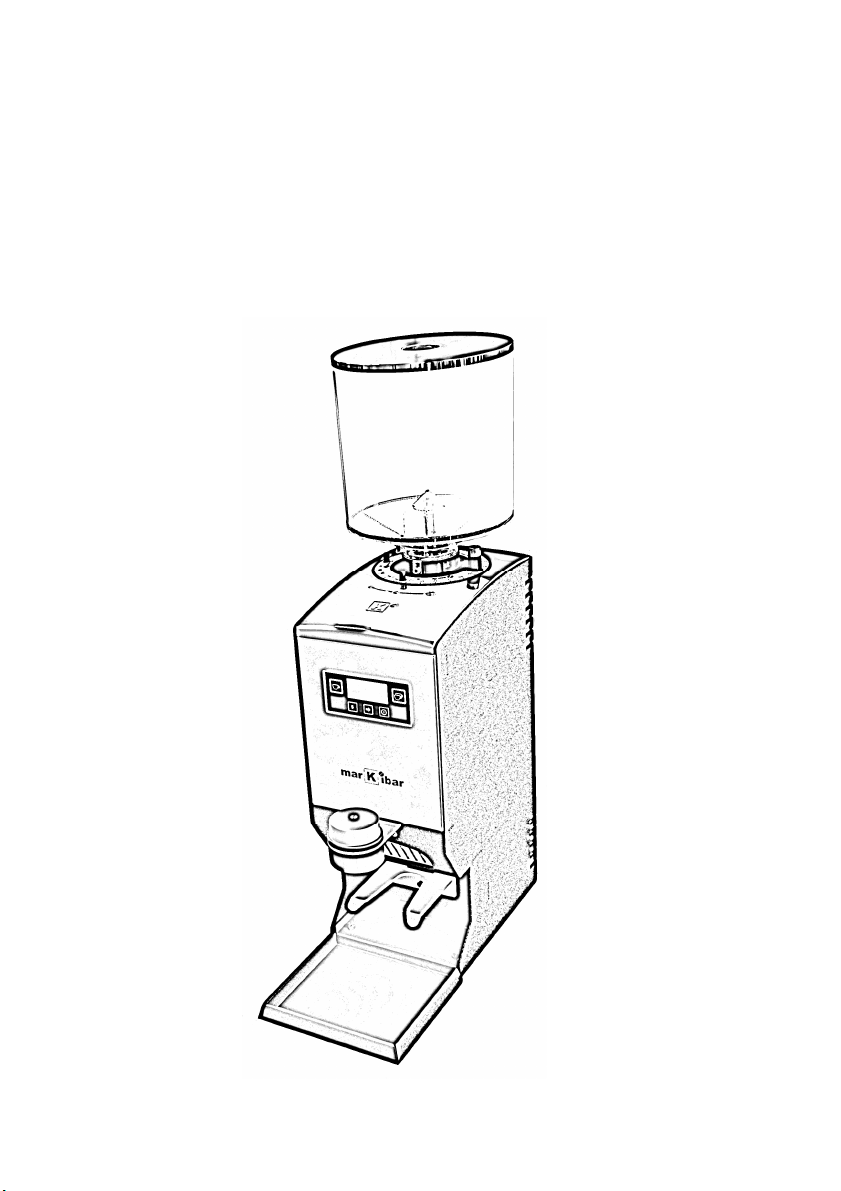
Markibar QUIMBOA User manual

INSTRUCTION
INSTRUCTIONINSTRUCTION
INSTRUCTION
MANUAL
MANUALMANUAL
MANUAL
QUIMBOA COFFEE GRINDER
QUIMBOA COFFEE GRINDERQUIMBOA COFFEE GRINDER
QUIMBOA COFFEE GRINDER

automaticgrinders

automaticgrinders
~ 1 ~
Dear customer:
The QUIMBOA automatic coffee grinder is a completely automatic
professional espresso coffee grinder that provides you with ust the right
amount of freshly ground coffee quickly and conveniently for the perfect
cup of coffee.
This product has been designed using the latest technology and
based on more than 20 years of experience in the espresso coffee
market. The result is a high-quality product with multiple features that
we hope will more than meet your needs.
Be sure to read and follow the instructions and suggestions found in
this manual to fully and safely benefit from the features of this product.
In the case of a malfunction, contact the manufacturer or the store
where you bought the grinder.
Markibar reserves the right to add any future improvements it
deems appropriate as the result of the company's continuing research.

automaticgrinders
~ 2 ~
TABLE OF CONTENTS
1.- Safety instructions.
2.- Technical information.
3.- Description.
4.- Safety features of the grinder.
5.- Installation and set up.
6.- Display.
7.- Problem solving.
8.- Cleaning.
9.- Maintenance.
10.- Declaration of conformity.
11.- Warranty conditions.
12.- Appendix I. Filter-holder identification.

automaticgrinders
~ 3 ~
1.- Safety instructions.
Please read and pay close attention to the following safety
instructions. The failure to follow these instructions may result in a
malfunction or damage to the machine.
1.1- Symbols.
1.1-1.
Safety instructions.
Risk of an accident if this note is not followed.
1.1-2. General instructions.
The machine may be damaged or proper operation is no
longer guaranteed if this instruction is not followed.
1.2- Safety instructions.
-
When unpacking the machine, check to see that the
voltage of your electrical system matches that shown by
the manufacturer on the rating label. Never use the
machine in wet or damp areas.
-
The plastic bags used for packing may pose a safety
hazard. Keep them out of the reach of children.
-Unplug the equipment before performing any
maintenance or cleaning tasks.
-
Never operate the grinder if the electrical cord is in poor
condition. Periodically inspect the electrical cord, the plug,
etc. for any possible damage.
-Any repair should be performed by Authorized Service
Technicians.
-
For best results, the maximum operating cycle should not
exceed 5 seconds of grinding and 10 seconds of

automaticgrinders
~ 4 ~
stoppage. After 30 minutes of continuous operation, allow
the motor to cool before using it again.
-
Do no modify or alter the machine in any way. The
Manufacturer assumes no responsibility for damage
caused by the failure to follow these instructions.
-
Children do not appreciate the danger involved with using
electrical equipment. For this reason, they should never
be allowed to operate electrical equipment such as this
grinder without proper supervision.
-Do not insert ob ects in the ventilation slots on the
grinder.
-
The grinder must be installed indoors, away from areas
where it may be splashed with water, sprayed with water
from cleaning operations, etc.
-
Never submerge the grinder in water or operate it with
wet hands.
1.3- Using the grinder.
This machine is designed exclusively to grind coffee
beans. Do not use it to grind other products or ob ects.
NEVER put GROUND COFFEE in the HOPPER.
1.4- Operator requirements.
This machine requires no special knowledge for its use.
Simply read and understand the instructions found in this
manual and follow the recommendations.

automaticgrinders
~ 5 ~
2.- Technical information.
HARA TERISTI S
DATA
VOLTAGE / FREQUENCY
230 V 50 Hz
RATED POWER
525 W
ROTATION
1350 rpm
OVERLOAD FUSE 10 A, Type T
Maximum permitted operating time
34 % on, 66% off
HEIGHT H
648 mm
WIDTH W1/W2
164 mm / 180 mm Ø Bean hopper.
DEPTH L
380 mm
WEIGHT
15 kg
BEAN HOPPER CAPACITY
1.5 kg
GRINDING BURRS
Ø64
PRODUCTION KG/HOUR
6 kg

automaticgrinders
~ 6 ~
3.- Description.
1.- Bean hopper
2.- Hopper closing device.
3.- Grinding level lock.
4.- Grinding level setting lever.
5.- Press tamp.
6.- Filter-holder.
7.- Coffee grounds tray.
8.- Fuse.
9.- Keypad and display.
10.- Filter-holder rest.
A.- Display.
B.- 1 Cup button.
C.- 2 Cup button.
D.- Intro button.
E.- On/Off button.
F.- Advance button.

automaticgrinders
~ 7 ~
4.- Safety devices.
The grinder motor is protected by a thermal safety device that cuts
off the electricity to the motor if it becomes overheated. This device is
automatically reset when the machine cools.
The user cannot perform any operation on this device. If the device
is repeatedly activated, please consult our Technical Assistance Service,
as the motor may be damaged.
5.- Installation and set up.
Each grinder is factory tested with coffee beans to make sure that it
works properly. For this reason, you may find ground coffee in the
grinder's mechanisms.
5.1.- Grinder location.
Place the grinder on a solid, dry surface next to the coffee machine.
Never operate the grinder in wet or damp places.

automaticgrinders
~ 8 ~
5.2. - Installation and set up.
Open the clamp which sets the bean hopper, and place it as shown
in the picture.
For compliance with safety requirements, tighten slightly with a tool
the screw that holds the hopper in place. See picture.
Insert the coffee grounds tray as shown in the illustration.
The grinder has two Press tamps, Ø55 (bottom side) and Ø50
(upper side). Attach on the bottom the Press tamp that best matches
the Filter-holder of your coffee machine

automaticgrinders
~ 9 ~
To connect the grinder to the power supply, do the following:
-
The grinder's electrical connection must be properly protected by
current limiting circuit breakers, a differential switch and a ground
connection, according to current safety regulations.
-Make sure that the voltage and frequency of your establishment match
those indicated on the grinder's rating plate.
-Plug the grinder into the electrical socket. The display will show the
message
1 c
1 c1 c
1 c ”.
-
Open the hopper lid and pour the coffee beans into the hopper. NEVER
put GROUND COFFEE in the hopper.
-Make sure that the hopper closing device (Pos. 2) is open.
-
Select the desired coffee dose, pressing the corresponding button:
-Buttons B and C allow you to select one or two cups.
-The display will show the selected dose
1 c
1 c1 c
1 c ”
or
2 c
2 c2 c
2 c ”.
-Insert the filter-holder from your coffee machine in the filter-holder rest
(Pos. 10) as far as it will go.
-
The corresponding dose is deposited in the filter-holder.
-Compact this dose using the press tamp (Pos. 5) to level off the ground
coffee before placing it in your coffee machine.
-
The grinder automatically grinds the corresponding dose.
-
Use the ON / OFF button (Pos. E) to turn on and off the grinder. In the
Off position, the grinder remains in stand-by mode.

automaticgrinders
~ 10 ~
5.3.- Basic settings.
5.3.1.- Grinding fineness setting.
The grinder is ad usted in the factory to be used with espresso
coffee. It simply needs a bit of fine tuning to adapt it to the
characteristics of the coffee used in your establishment. Grind enough
coffee to fill your filter-holder
with what you consider to be a
normal dose and brew a cup of
coffee with your coffee
machine. If the result is
unsatisfactory, modify the
grinding level as follows:
-
Pull the grinding level lock (Pos. 3) up with one hand and turn
the grinding level lever (Pos. 4) with the other. Turn it
clockwise for finer ground coffee and counterclockwise for
coarser coffee.
-Release the lock to set the grinding position.
-Brew more coffee for additional tests, repeating the steps
above until achieving optimal results in the cup.

automaticgrinders
~ 11 ~
5.3.2.- offee dosage setting.
The grinder is set at the
factory for a grinding time of 2
seconds for 1 cup of coffee and
3.5 seconds for 2 cups of coffee.
If the dose obtained is not what
you want in your coffee
machine, modify the dose as follows:
-
Press the 1 cup button (Pos. B) for 1.5 seconds until
d c1
d c1d c1
d c1”
appears on screen. Release the button and the current dose will
appear on screen.
-Press the advance button (Pos. F) until reaching the desired
value.
-Press the 1 cup button again to confirm the new dose.
-Perform the same operation with the 2 cup button.
5.3.3.- Filter-holder detection system setting.
The grinder has several systems for selecting 1- or 2-cup doses,
which may be programmed by your Technical Assistance Service:
-
Key selection, 1 Cup: When the filter-holder is inserted, it
receives the dose for 1 cup of coffee. To obtain a dose for 2
cups of coffee, press the 2c button before inserting the filter-
holder. (Factory programmed setting.)

automaticgrinders
~ 12 ~
-
Key selection, 2 Cups: Without pressing any button the filter-
holder receives the dose for 2 cups of coffee. Press the 1c
button before inserting the filter-holder for the single dose.
-Key selection, last service. Without pressing any key the filter-
holder receives the same dose as in the last service.
-Dose selection by pressing filter-holder single or double click:
o
Press filter-holder once (single click): One cup of
coffee.
o
Press filter-holder, release and press again (double
click): Two cups of coffee.
-
Automatic filter-holder identification (Only for the QUIMBOA
CLASS A model). This patented system automatically detects 1-
cup or 2-cup filter-holders.
-
For the system to work, a tag or identifier must be fixed to the
2-cup filter-holder: the grinder distinguishes between a filter-
holder with this tag (and provides the dose for two cups of
coffee) and filter-holder without tag (for which it provides the
dose for one cups of coffee), with no need for any action on
the part of the operator. (See Appendix I).

automaticgrinders
~ 13 ~
-6.- ounter.
The QUIMBOA grinder has a display system that will show the
number of coffees (both 1-cup and 2-cup) that have been prepared so
far at any time. To use this function, proceed as follows:
-Press the Programming button (Intro. [Enter] Pos. D). The
message “cont” (counter) will be shown on the display.
-After 1.5 seconds, you will see this message “ n 1
n 1n 1
n 1
c
cc
c.”,
meaning the number of 1-cup coffees prepared.
-
The number of coffees is then displayed in a series of display
screens, for example; 43,500 coffees will be shown in the
following manner:
oThe first display shows the units: “ .500
.500.500
.500
”.
oThe second display shows the thousands: “ 0.043.
0.043.0.043.
0.043. ”
-Pressing the button again, the message “ n 2
n 2n 2
n 2
c
cc
c.” will be
shown, and again, the units and thousands of 2-cup coffees
prepared will be displayed successively.

automaticgrinders
~ 14 ~
7.- Problem solving.
PROBLEM
CAUSE
SOLUTION
The grinder is off.
Display is off.
The differential switch or
current limiting circuit
breaker has been tripped.
Reset the installation's
protective device.
The electrical cord is not
connected.
Plug the electrical cord into
the socket.
Blown fuse in the
equipment.
Check the fuse and replace if
necessary.
The grinder is connected
but it doesn't turn, so it
doesn't grind.
Grinding level too fine.
Set a coarser grinding level.
Grind some coffee and
gradually return to the
desired level.
A foreign ob ect prevents the
machine from grinding.
Proceed as in the previous
section. Contact the Technical
Assistance Service if the
device does not turn freely.
The grinder does not
start. Display is on.
Overheating due to
excessive motor use.
Wait for the device to cool
down and for the thermal
protective device to be
automatically reset.
The grinder starts and
turns, but does not make
coffee.
The bean hopper is ammed
or the inlet hopper is closed.
Check both the inlet hopper
and the bean hopper.
The device grinds very
slowly.
The grinding burrs are worn
out.
Replace the burrs.
In case of other anomalies or continuous malfunction contact TAS (Technical
Assistance Service).

automaticgrinders
~ 15 ~
8.- leaning.
Before proceeding to clean any grinder parts, disconnect
from the power supply by unplugging the electrical cord from
the back of the grinder.
8.1.- leaning the bean hopper.
Close the inlet hopper
and loosen the screw that
attaches the hopper to the
grinder (See the illustration)
until the hopper is released.
Remove the hopper
from the grinder, empty
any remaining coffee and
clean it with soap and a cloth soaked in water to remove the residual
oils from the coffee beans. Carefully dry and attach the hopper back
onto the grinder, reinserting the screw that holds it in place.
8.1.- Outer cleaning of the grinder.
Clean with a damp cloth. Do not use detergents, abrasive products,
alcohols or solvents. Use a brush to remove the coffee from the
recessed areas.
Do not clean the device by spraying it with water.

automaticgrinders
~ 16 ~
9.- Maintenance.
In order to ensure the operating efficiency and correct
performance of this grinder, it is essential to follow the
manufacturer's instructions and to make sure that any
maintenance work is performed by qualified personnel.
A schedule of periodic technical inspections is recommended to
ensure the proper performance of this machine. In particular, the
grinding burrs must be periodically checked (at least once a year) and
replaced if worn out; otherwise, the ground coffee will not have the
desired quality.

automaticgrinders
~ 17 ~
10.- E Declaration of onformity.
THE UNDERSIGNED:
MARKIBAR INNOVACION S.L.L.
Pol. Ind. Noain-Esquiroz. c/G n.24
31191 ESQUIROZ (Navarra) SPAIN
HEREBY DECLARES UNDER HIS/HER OWN RESPONSIBILITY AS THE
MANUFACTURER THAT THE PRODUCT:
AG2 GRINDER
THE SUBJECT OF THIS DECLARATION, COMPLIES WITH DIRECTIVES:
Electrical safety:
UNE-EN 60335-1
UNE-EN 60335-2-64
Electromagnetic compatibility:
UNE-EN 55014; UNE-EN 55014-1
UNE-EN 61000-3-2
UNE-EN 61000-3-3
UNE-EN 55014-2
THIS DECLARATION IS ISSUED IN COMPLIANCE WITH COUNCIL DIRECTIVE
93/68/CEE OF 22 JULY 1993, WHICH AMENDS DIRECTIVES: 73/23/CEE
(ELECTRICAL MATERIAL DESIGNED FOR USE WITHIN CERTAIN VOLTAGE
LIMITS), AND 89/336/CEE (ELECTROMAGNETIC COMPATIBILITY). THE
PRODUCT ALSO COMPLIES WITH EUROPEAN DIRECTIVES 2002/95/CE (RoHS)
and 2002/96/CE (WEEE).
JOSE ANGEL MARKOTEGI GOÑI
Legal representative.

automaticgrinders
~ 18 ~
11.- Warranty conditions
-This grinder has a 1-year warranty period, valid from the
date of purchase.
-
The Warranty covers any defects due to the
malfunctioning of original materials or defective
assembly. Equipment will be repaired or replaced free of
charge, except for transport or shipping costs. For parts
to be shipped under warranty, faulty parts must be
previously sent to our workshop using a prepaid shipping
method, along with a copy of this warranty certificate
which includes the machine's serial number. The
customer is responsible for shipping charges. Parts must
be carefully packaged to avoid damage during the
shipping.
-Only authorized personnel may access inside grinder
parts.
-
This warranty does not cover any damage due to:
inappropriate use, inadequate maintenance, the lack of
maintenance, the use of the device for any purpose other
than that for which it is intended, improper installation,
incorrect voltage, falls or normal wear and tear.
-For warranty maintenance, only original replacement
parts may be used.
Table of contents
Other Markibar Coffee Grinder manuals
Popular Coffee Grinder manuals by other brands

Fiorenzato
Fiorenzato F4 ECO BY JOHN instruction manual

Black & Decker
Black & Decker BXCG151E Instructions for use

Gevi
Gevi GECGI140-U quick start guide

Wolfgang Puck
Wolfgang Puck SWPBMG100 Use and care

Breville
Breville Smart Grinder Pro BCG820 Instruction booklet

DIP Grinders
DIP Grinders DKS-65 Operation and maintenance manual