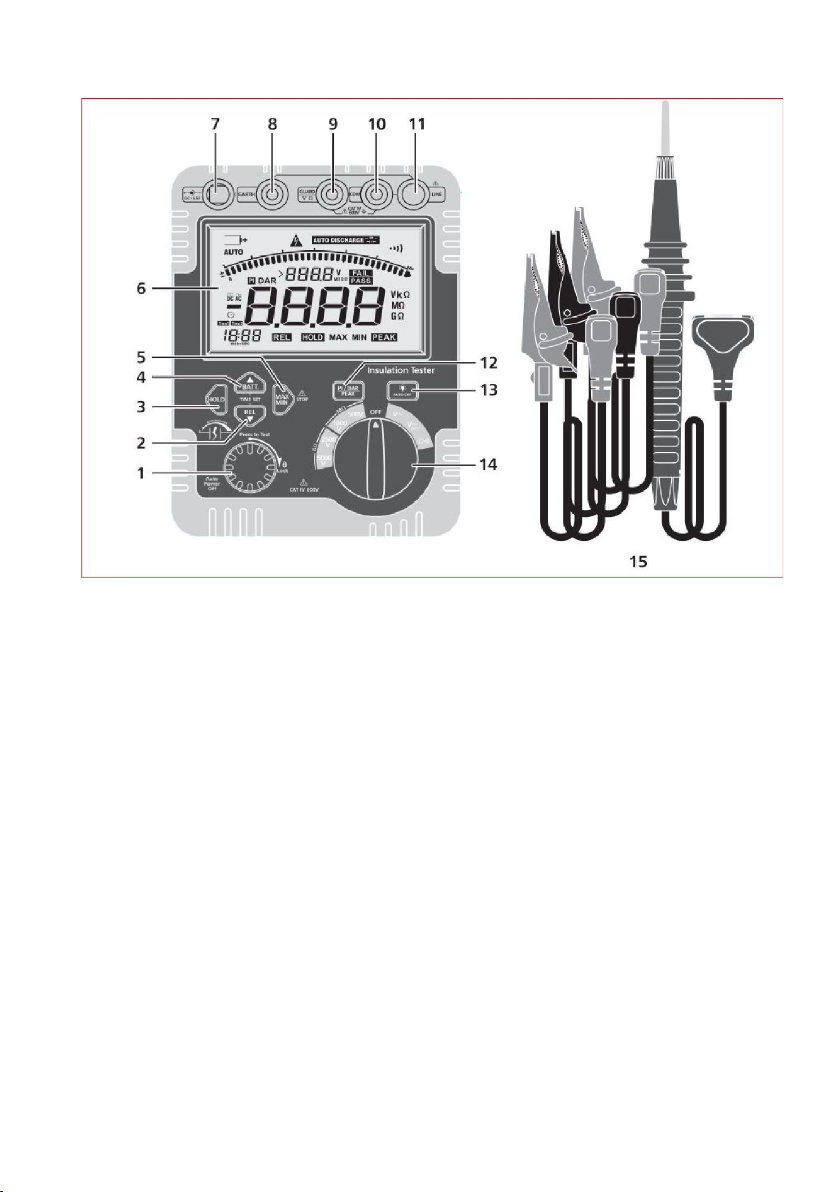
MarMonix MIR-505 User manual

HIGH VOLTAGE INSULATION TESTER
Product Code: MIR-505
USER MANUAL
WWW.MARMONIX.CO
HIGH VOLTAGE INSULATION TESTER

Contents
1. Introduction
2. Safety Information
3. Features
4. Specifications
5. General specifications
6. Accessories
7. The Insulation Resistance Tester Structure
8. Measurement Operation
A. Measuring Voltage
B. Internal power source Measurement
C. Low Resistance Measurement & Continuity Check
D. Measuring Insulation Resistance
9. Auto-discharge function
10. Principal of Insulation Resistance Measurement
A. Continuous Insulation Resistance Measurement
B. Timer Insulation Resistance Measurement
C. Polarization Index /Dielectric Absorption Ratios
11. PI Standard
12. DAR Standard
13. Use of Guard Terminal
14. Push buttons Operation
15. Auto Power Off
16. Replacing the Battery
17. The Use of Power adaptor
18. Maintenance
19. General Service

1. Introduction
The high voltage insulation resistance tester is a handheld instrument designed
primarily to make AC/DC voltage, resistance, and Continuity test / insulation
resistance measurement.
2. Safety Information
This Insulation resistance tester complies with the standards IEC61010 safety
measurement requirement:
In pollution degree 2, overvoltage category (CAT IV 600V) and double insulation.
Overvoltage Category I
Equipment of Overvoltage Category I is equipment for connection to circuits in
which measures are taken to limit the transient overvoltages to an appropriate
low level.
Note: Examples include protected electronic circuits.
Overvoltage Category II
Equipment of Overvoltage Category II is energy-consuming equipment to be
supplied from the fixed installation.
Note: Examples include household, office, and laboratory appliances.
Overvoltage Category III
Equipment of Overvoltage Category III is equipment in fixed installations.
Note:Examples include switches in the fixed installation and some equipment for
industrial use with permanent connection to the fixed installation.
Overvoltage Category IV
Equipment of Overvoltage Category IV is for use at the origin of the installation.
Note: Examples include electricity meters and primary over-current protection
equipment.
Use the Meter only as specified in this operating manual, otherwise the
protection provided by Meter may be impaired.
Danger
Identifies conditions and actions that pose hazard(s) to the user.
Warning
Identifies avoiding electric shock.

Caution
Identifies conditions and actions that may damage the Insulation resistance tester
and carrying out accurate measurement.
Operating Caution
Identifies conditions that user needs to take extra care during operating the
Insulation resistance tester.
Danger
Use of instrument in a manner not specified by the manufacture may impair
safety features/ protection provided by the equipment. Read the following safety
information carefully before using or servicing the instrument.
Do not apply more than 600V.
Do not use the Insulation resistance tester around explosive gas, vapor or dust.
Do not use the Insulation resistance tester in a wet environment.
When using the test leads, keep your fingers away from the lead contacts. Keep
your fingers behind the finger guards on the leads.
Do not use the Insulation Resistance tester with ant parts or cover removed.
When carrying out insulation measurement, do not come in contact with the
circuit test.
Warning
Do not use the Insulation resistance tester if it is damaged or metal part is
exposed. Look for cracks or missing plastic.
Be careful when working above 30V rms. Such voltages pose a shock hazard.
Discharge all loading of circuit under test after measuring high voltage.
Do not change battery when the Insulation resistance tester is in wet
environment.
Place test leads in proper input terminals. Make sure all the test leads are
firmly connected to the Insulation resistance tester’s input terminals.
Make sure the insulation resistance tester is turned off when opening the
battery compartment.
Caution
When performing resistance tests, remove all power from the circuit to be
measured and discharge all the power.
When servicing the insulation resistance tester, use only the same model
number or identical electrical specifications of test leads and power adaptor.

Do not use the Insulation resistance tester if the battery indicator shows a
battery empty.
Do not use or store the Insulation resistance tester in an
environment of high
temperature, humidity, explosive, inflammable or strong magnetic field. The
performance of Insulation resistance tester may deteriorate after dampened.
Soft cloth and mild detergent should be used to clean the surface of the
Insulation
resistance tester when servicing. No abrasive or solvent should be used
to clean the surface of the Insulation resistance tester from corrosion, damage
and accident.
Dry the Insulation resistance tester before storing if it is wet.
Be sure to set range
selector switch to “OFF” position after use and remove
test leads. When the instrument will not be in use for a long period, place it in
storage after removing the batteries.
Symbols
Risk of electric shock
Equipment protected by double or reinforced insul
ation
DC measurement
AC measurement
Grounding
See manual
Empty of built-in battery
Conforms to standards of European Union
Do not use the Insulation resistance tester if the battery indicator shows a
environment of high
temperature, humidity, explosive, inflammable or strong magnetic field. The
performance of Insulation resistance tester may deteriorate after dampened.
Soft cloth and mild detergent should be used to clean the surface of the
resistance tester when servicing. No abrasive or solvent should be used
to clean the surface of the Insulation resistance tester from corrosion, damage
selector switch to “OFF” position after use and remove
test leads. When the instrument will not be in use for a long period, place it in
ation

3. Features
The Tester is a microcomputer controlled, High Voltage Insulation Resistance
Tester with 4-range for measuring insulation resistance and AC/DC Voltage,
Resistance/ Continuity test.
Designed to following safety standards:
IEC 61010-1 (CAT IV 600V Pollution degree 2)
IEC 61010-031 (Requirements for hand-held probes)
Insulation test range: 0.1MὨ to 6kὨ
With auto-discharge function & voltage output warning function.
When insulation resistance like a capacitive load is measured, electric charges
stored in capacitive circuits are automatically discharge after measuring.
Discharge can be checked with live voltage graph.
Backlight levels selector function to facilitate working at dimly illuminated
location or at nighttime work.
Live circuit warning symbols plus audible warning.
Live circuit detection prevents insulation test if voltage >30V is detected for
added user protection
With auto-power off function and battery check.
With Timer measurement function
Automatically performs a measurement at the set time.
With polarization index measurement (PI)
The polarization index can be measured by the automatic measurement function
of the ratio of resistance in 1 min. and 10 min. two point time and automatic
(Pass/Fail).
With Dielectric absorption ratio measurement (DAR)
The dielectric absorption ratio measured by the automatic measurement function
of the ratio of resistance in 30sec. and 1min. two point time and automatic
(Pass/Fail).
Auto ranging with large 6000 counts LCD display with bargraph.
MAX/MIN, PEAK, Relative value & Data hold functions for DC/AC voltage
measurements.
Power source 1.5V x 8 (LR14/R14) Batteries.

4. Specification
Insulation Resistance Measurement
Rated Voltage 500V 1000V 2500V 5000V
Measuring
Range
(Auto-Ranging)
0.005 to
6.000MὨ
0.005 to
6.000MὨ
0.05 to
60.00MὨ 0.05 to 60.00MὨ
6.01 to
60.00MὨ
6.01 to
60.00MὨ
60.1 to
600.0MὨ 60.1 to 600.0MὨ
60.1 to
600.0MὨ
60.1 to
600.0MὨ
0.61 to
6.00GὨ 0.61 to 6.00GὨ
0.61 to
6.00GὨ
0.61 to
6.00GὨ 6.1 to 60.0GὨ 6.1 to 60.0GὨ
Open Circuit
Voltage
DC 500V
+20%,-0%
DC 1000V
+20% ,-0%
DC 2500V
+20%,-0%
DC 5000V
+20%,-0%
Rated Current
1 to 1.2mA
(at 0.5MὨ
load)
1 to 1.2mA
(at 1MὨ
load)
1 to 1.2mA
(at 2.5MὨ
load)
1 to 1.2mA
(at 5MὨ load,
Recommended
use of Power
Adaptor)
Short-Circuit
Current Approx. 1mA
Accuracy
±2.5%reading±15digits (at 0.005 to 600.0M
Ὠ)
±3%reading±15digits (at 0.61 to 6.00G
Ὠ)
±4%reading±15digits (at 6.1 to 60.0GὨ)
Voltage
Monitor Range
5 to 6000VDC (Resolution 1V); Accuracy: ±1.5%reading±5 digits
Note: This monitor is used to check whether electric charge
stored on the equipment under test is discharged or not.
Measured voltage value displayed on the LCD is a reference
value. Please be noted that the indicated value, when external
AC or DC Voltage is applied to the instrument is not the correct
value, is display ">30V".

Low Resistance measurement & Continuity Check
Range Resolution Accuracy
Resistance
(Auto-
Ranging)
0.12 to 600.0Ὠ 0.1Ὠ 1.5%reading±10digits
601 to 6.00kὨ 0.001kὨ ±1.5%reading±15digits
Continuity Buzzer: ≤50Ὠ
Short Circuit Current:≥200mA
Open Circuit Test Voltage:≥4.5V
DC/AC Voltage Measurement
Range Resolution Accuracy
DC Voltage
0.5 to
600.0V 0.1V ±1.0%reading±digits
AC Voltage
(40 to 400Hz)
0.5 to
600.0V
0.1V
1.0%reading±5digits (40 to 60Hz)
±2.5%reading±10digits (61 to 400Hz)

5. General Specifications
Applicable standards: IEC 1010 CAT IV 600V overvoltage and double insulation
standard
Display: 6000 counts LCD display with bargraph
Sampling rate: 2.5 readings per second
Over range indicator: “OL” displayed
Fuse: 500mA/600V (Ø6X32mm) ceramic 3AG Fast blow
Zero adjust Automatic
Auto power off: Power off function operates automatically after a switch
remains for
20min (current consumption approx.50uA).
Low battery indicator: Low battery symbol displayed when battery voltage is low
Environment Installation: Category II, Pollution Degree 2, Altitude up to 2000 meters,
Indoor
Use only
Power source: 8 x 1.5V(R14) batteries
Operating conditions: 0 to 40˚C(32 to 104˚F);<80%RH
Storage conditions: -10 to 60˚C(14 to 140˚F);<80%RH
Dimensions: 198(L) x 148(W) x 86(D)mm
Weight: 1438g
6. Accessories
Item
Description Qty
1 User Manual 1 piece
2 One plug test lead to one alligator clip (Black color) 1 piece
3 One plug test lead to one alligator clip (Green color) 1 piece
4 One plug test lead to one alligator clip (Red color) 1 piece
5 Two plug test lead to one alligator clip (Red color) 1 piece
6 1.5V Battery (LR14) 1 piece
7 Carry case 1 piece
8 Power adaptor (input voltage 110V to 230V, 50/60Hz, 75mA,
output DC13.5V,1.0A) (Optionally, available at extra cost)
1 piece

7. The Insulation Resistance Tester Structure
1. Insulation Resistance Test/ Lock button
2. Relative & Time-down button
3. Data Hold button
4. Internet Battery Check & Time-up button
5. MAX/MIN & Insulation resistance test emergency stop button
6. LCD display
7. DC 13.5V Power adapter Input Terminal
8. EARTH: High resistance measurement input
9. V/Ὠ input terminal & GUARD: Grounding protection input terminal
10. COM & High voltage line shielding input terminal
11. LINE:500V to 5000V High voltage output terminal
12. PI/DAR, Peak Voltage measurement & Time Clear button
13. Back-light Levels button
14. Function switch
15. Test leads

LCD Display
Symbols
Meaning
Battery life indicator
Indicator for
Auto ranging measurement
Indicator high voltage output or
>30V DC/AC Voltage
Indicator for DC voltage
Indicator for AC voltage
Indicator for automatically discharged
Indicates for Continuity buzzer
Indicates for negative
reading
Timer symbols
Unit symbols
Indicator for polarization index
Dielectric absorption ratio
Check feature fail or pass
Analogue bar graph
LCD display reading
Measurement Inputs
Terminal Description
Insulation resistance measurement
LINE
500V, 1000V, 2500V, 5000V range Insulation resistance measurement high
voltage line output (LINE+COM:two plugs red lead to one alligator clip)
COM
Return terminal for all measurements (LINE+COM:two plugs red test lead to
one alligator clip)
GUARD
Grounding protection input terminal (one plug black test led to one alligator
clip)
EARTH Insulation resistance measurement input terminal
ACV/DCV/Low resistance measurements & continuity check
V/Ὠ Input for voltage, Low resistance measurements & continuity check
COM Return terminal for all measurements

Push buttons
Button
Switch Position(Power-
on) Function
HOLD Any switch position The hold function freezes the reading in the display
Backlight
Turns the backlight on, makes it brighter, and turns
it off or auto-off
Insulation resistance measurement
TEST/LOCK
500V,1000V,2500V,5000V
Insulation resistance Range
Press and hold to test or lock to Insulation
resistance measurement
Time-up
Set timer time range up, This is a function to
conduct a test automatically at any set time.
Time-
down
Set timer time range down, This is a function to
conduct a test automatically at any set time.
PI
Polarization index measurement & press 2sec.
Clear timer function
DAR
Dielectric absorption ratio measurement & press
two sec. clear timer function
STOP
Emergency stop Insulation resistance
measurement and high voltage output.
ACV/DCV measurements
MAX/MIN ACV/DCV Range MAX/MIN record
PEAK PEAK-MAX/PEAK-MIN capture
REL Relative measurement
BATT. DCV Range
Check the meter Internal power source (batteries)
condition
Low resistance measurements & continuity check
HOLD Ὠ The hold function freezes the reading on the display

8. Measurement Operation
Preparation
Battery voltage checking
Scope of the range switch to any location outside OFF
When LCD indicates the battery sign, the accuracy could not be guaranteed if the
battery voltage is below the minimum operating voltage. Please replace it with a new
battery.
Please connect test leads correctly.
DANGER
After pressing TEST button under insulation measurement, the wire will generate high
voltage.
To avoid electric shock, do not touch it.
A. Measuring Voltage
DANGER
To avoid electric shock, please do not test if voltage to ground AC/DC is over 600V,
even if the line voltage is below 600V.
Under voltage measurement, please not that the metal part of wire to avoid short
circuit may lead to electric shock.
Do not test when the battery cover opened.
AC/DC Voltage Measurement
1. Set the rotary switch to the ACV or DCV.
2. Connect the red test lead to VὨ terminal and the black to COM terminal.
3. Connect the test leads to the circuit under test.
4. Read the voltage value on the LCD. When measuring DC voltage, if the red test lead is
negative voltage, “-“symbol will show on the display.

B. Internal Power Source Measurement
1. Disconnect the test leads.
2. Set the switch to DCV.
3. Press BATT button.
4. Read the voltage value on the LCD. After 5sec, it
will auto-off or press BATT button to turn off the
battery voltage function.
C. Low Resistance Measurement & continuity Check
Warning
Do not run this test unless ACV/DCV=0. Do not use this mode to check diodes.
1. Set the Rotary switch to the Ὠ
Position.
2. Connect the red test lead to the VὨ terminal and the black lead to the COM terminal.
3. Connect the tips of the test leads to the circuit under test.
4. Read the resistance value on the display. When the resistance of a circuit is less than
50Ὠ, the audible tone will sound.

D.Measuring Insulation Resistance
Danger
Make sure to check with a high voltage detector that there is no electrical charge exists
on the circuit under test.
Be sure to put on a pair of insulated gloves for high voltage.
Be extremely careful not to get electric shock during insulation resistance
measurement and “PRESS TO TEST” button is being pressed as high voltage is present on
the tip of test leads and on the circuit under test continuously.
Do not make measurement with the battery cover removed.
Do not make measurement when thunder rumbling.
Be sure to connect the earth CORD (black) to the Earth terminal of the circuit under
test.
Caution
When the live circuit warning is indicated “>30V”
or the warning buzzer sounds and LCD display flash
“ ” measurement cannot be
made even if “PRESS TO TEST” button is pressed.
To check the insulation of electric equipment's or electric circuits, measure their
insulation resistance with the instrument.
Be sure to check the voltage which can be applied to the equipment under test before
making a measurement.
Note:
Insulation resistance value of the equipment under test may not be stable, and the
indication may be unstable.
Beep sound may be heard during insulation resistance measurement. But it is not a
malfunction.
It takes time to measure capacitive load.
At insulation resistance measurement, positive (+) voltage is
outputted from the Earth terminal and negative (-) voltage is
outputted from the Line terminal.
Connect the earth cord to the Earth (ground) terminal. It is
recommended to connect the positive (+) pole to the earth
side when measuring insulation resistance against the ground or when a part of the
equipment under test is earthed. Which this connection, smaller measured value can be
obtained comparing with other way round.

Check the voltage which can be applied to the circuit under test, and set the ranges
switch to the desired insulation resistance range.
Connect the Earth cord (black) to the Earth terminal of the circuit under test.
Put the tip of the line probe (red) to the circuit under test. Then press the “PRESS TO
TEST” button. The buzzer sounds intermittently during measurement.
The measured value will be displayed on the LCD, and it is automatically “HOLD”
displayed after measurement.
This instrument has an auto-discharge function. With the test leads connected to the
circuit under test, release the “PRESS TO TEST” button to discharge capacitance in the
circuit after test, LCD display flash “ “. Check that the indication
on the voltage monitor is “O V”
At any output voltage, when the tested resistance is less than 10MὨ, the testing time
cannot exceed 10 seconds continuously.
Danger
Do not touch the circuit under test immediately after testing. Capacitance stored in the
circuit may cause electric shock.
Leave test leads connected to the circuit and never touch the circuit until the discharge
is complete.
9. Auto-discharge function ( )
This is a function to release capacitance stored in the circuit under test automatically
after testing.
Discharge condition LCD display flash “ “and can be checked with a
live voltage monitor is “OV”. This function will be release in 2sec or more after removing
test leads before discharge is complete. Set the range switch to “OFF”, and remove test
leads from the instrument.
10. Principal of Insulation Resistance Measurement
Resistance value can be obtained by applying certainhigh
Voltage to the resistance (insulation resistance) and
Measuring the flowing current.
A. Continuous Insulation Resistance Measurement
Caution
the high voltage symbol ( ) along with a voltage monitor
display of >30V warns if voltage over 30V AC or DC is present. High voltage
inhibits the test. Insulation tests should only be performed on de-energized
circuits.

Pressing and turning the “PRESS TO TEST” button clickwise to perform a
continuous measurement finsulation resistance. Then the button is locked, and
continuous measurement can be performed.
After testing, turn the button counterclockwise to initial position, beeper is on
and automatically “HOLD” reading displayed approximately 10 seconds.
DANGER
Be extremely careful not to get electric shock as high voltage on the tip of test
leads continuously.
B. Timer Insulation Resistance Measurement
This is a function to conduct a test automatically at any set time (from 1min. to 15
min.).
Caution
The high voltage symbol ( ) along with a voltage monitor
display of >30V warns if voltage over 30V AC or DC is present. A high voltage
inhibits the test. Insulation tests should only be performed on
de-energized circuits.
1. Press time-up button to set any time from 1min. to 15min.
2. Press time-down button to set any time from 15min to 1 min.
3. Pressing and hold turning the “PRESS TO SET” button
clockwise to perform a timer measurement of insulation
resistance. Then the button is locked, and timer measurement
can be performed.
4. After testing, turn the button counterclockwise to the initial position, beeper is
on and automatically “HOLD” reading displayed approximately 10 second.
C. Polarization Index and Dielectric Absorption Ratios Measurement (cannot set)
Caution
The high voltage symbol ( ) along with a voltage monitor display
of >30V warns if voltage over 30V AC or DC is present. High voltage inhibits the
test. Insulation tests should only be performed on de-energized circuits.
. Polarization Index (PI) is the ratio of the 10-minute insulation resistance to the 1
minute insulation resistance.
Polarization index= resistance value measured after 10 min (Time2)/ resistance
value measured after 1in (Time1)
. Dielectric absorption ratio (DAR) is the ratio of the 1-minute insulation
resistance to the 30 second insulation resistance.
Dielectric Absorption Ratio=resistance value measured after 1min(Time2)/
resistance value measured after 30sec. (Time1)

1. Press PI/DAR to select PI or DAR Measurement.
2. LCD display PI & Time1/Time2 or DAR & Time1/Time2
3. Press and turn the “PRESS TO TEST” button clockwise to
perform a timer measurement. Then the button is locked, and
timer measurement can be performed.
4. After testing, turn the button counterclockwise to the initial
position, beeper is on, when PI/DAR>4 a monitor display “PASS”. When PI/DAR<1
a monitor display “FAIL” and automatically “HOLD” reading displayed
approximately 10 seconds.
NOTES:(The following for reference only)
According to the standard IEEE 43-2000 with respect to the motor and related
equipment for trouble shooting, it will be for the insulation resistance testing of the
DAR or PI, to check the pollution or damp insulation properties. The instrument needs
to be maintenance if the reading cannot meet the minimum acceptable resistance.
Different level of insulation materials has different temperature characteristics and
polarization index (the following table: minimum acceptable polarization index value
for different level).
Minimum acceptable polarization index value
Insulation Level Index value
A 1.5
B 2.0
F 2.0
H 2.0

11. PI Standard
PI value
2~4 (typically3)
1~1.5
1
1.0 or
less
Tested
material
status
Considered as
good insulation
(older types)
Not acceptable
(older types)
(very high
insulation
resistance)
Modern type of
(good) insulation
systems
Fail
Example: If the reading of B-class insulation material is 100MὨ in 1 minute, 110MὨ in
10 minutes, polarization index is 1.1 (110MὨ/100MὨ=1.1). as the insulating material
contains too much water or seriously polluted, the polarization index is below the
minimum acceptable value, you need to repair or replace parts.
12. DAR Standard
DAR value
1.6 or more
1.25 ~ 1.6
<1.25 or less
Tested material status
Excellent
PASS
Fail
13. Use of Guard Terminal
When measuring a cable, leakage current flowing on the surface of cable jacket and
the current flowing inside the insulator are mixed and may cause error in value. In
order to prevent such error, wind a conductive wire around the point where leakage
current flows, then connect it to the Guard terminal as shown in below figure. It is to
move out the surface leakage resistance of the cable insulation measure only the
volume resistance of insulator. Make sure to use the Guard cord supplied with this
instrument to connect the instrument to Guard terminal.

14. Push buttons Operation
Data Hold Button (Perform any measurement as described in the operating
instructions)
The hold function freezes the reading on the display. Press the HOLD key momentarily
to activate or to exit the hold function.
Peak Hold Button (only for AC/DC voltage measurement, in MAX/MIN mode)
The Peak Hold Button function captures the peak AC/DC Voltage 0.5V~600V. the
meter can capture peaks as fast as 10~100 millisecond in duration.
1. Press Peak button, the display icon “PEAK” will appear.
2. Press MAX/MIN and “MIN” will appear the display icon “MIN& PEAK” will appear.
The LCD will display and hold the maximum reading and update only when a new
“MAX” occurs.
3. Press MAX/MIN and “MIN” will appear the display icon “MIN& PEAK” will appear.
The LCD will display and hold the minimum reading and update only when a new
“MIN” occurs.
4. Press MAX/MIN and a “MAX MIN PEAK” will appear. The meter will display the
present reading, but will continue to update and store the max and min readings.
5. To exit MAX/MIN-PEAK mode press and hold MAX/MIN for 2 seconds or presses
PEAK.
MAX/MIN Button (Only for AC/DC voltage measurement)
1. Press MAX/MIN to activate the MAX/MIN recording mode. The display icon “MAX”
will appear. The LCD will display and hold the maximum reading and update only
when a new “MAX” occurs.
2. Press MAX/MIN and “MIN” will appear. The display icon “MIN” will appear. The
meter will display and hold the minimum reading and update only when a new “MIN”
occurs.
3. Press MAX/MIN and “MAX MIN” will appear. The meter will display the present
reading, but will continue to update and store the max and min readings.
4. To exit MAX/MIN mode press and hold MAX/MIN for 2 seconds.
Relative Button (Only AC/DC voltage measurement)
The relative measurement features allows you to make measurements relative to a
stored reference value.
A reference voltage, current, etc. can be stored and measurements made in
comparison to that value.
The displayed value is the difference between the reference value and the measured
value.
Table of contents