Martin Sellier DYNAVET MasterPlus Pro User manual

GB Train your do with MasterPlus®PRO ..................................................................................................................................................................................4
FR Eduquer son chien avec MasterPlus®PRO ...................................................................................................................................................................9
NL Train uw hond met MasterPlus®PRO ...............................................................................................................................................................................15
DErziehen Sie Ihren Hund mit MasterPlus®PRO ...................................................................................................................................................21
IEducare il propio cane con MasterPlus®PRO .......................................................................................................................................................27
E Educar a su perro con MasterPlus®PRO .....................................................................................................................................................................33
PEducar o seu cão com MasterPlus®PRO ....................................................................................................................................................................39
DK Opdra din hund med MasterPlus®PRO ......................................................................................................................................................................45
NBruksanvisnin for MasterPlus®PRO ..............................................................................................................................................................................51
FIN Kouluta koirasi MasterPlus®PRO laitteella ..............................................................................................................................................................57
STräna din hund med MasterPlus®PRO ...........................................................................................................................................................................62
GR
Εκπαιδεύοντας τον σκύλο σας µε το
MasterPlus®PRO ..........................................................................................................................................68
034247/02

Description of the unit
A- Spray nozzle
B- Filling valve
C- Battery cover
D- White background to help check the fill level
Descriptif du boitier
A - Buse d’émission (à placer vers le haut)
B - Valve de remplissage
C - Porte de pile
D - Fond blanc pour vérification du niveau de remplissage
Beschrijving van de band
A - Spray opening (moet naar boven gericht zijn)
B - Vul opening/klepje
C - Batterij deksel
D - Witte achtergrond als hulp voor controle vloeistofniveau
Am Gehäuse finden Sie
A - Eine Spraydüse (nach oben zu richten)
B - Ein Füllventil
C - Einen Batterieverschluss
D - Einen weissen Boden zur Nachfüllkontrolle
Descrittivo del dispositivo
A - Condotto d’emissione (da disporre verso l’alto)
B - Valvola di ricarica
C - Porta pila
D - Fondo più chiaro per verificare il livello di riempimento raggiunto
Descripción del aparato
A - Boquilla de emisión (colocar en posición hacia arriba)
B - Válvula de llenado
C - Tapa de la pila
D - Fondo blanco para verificación del nivel de llenado
A
B
D
C
Fig 1
Fig 2
Fig 3
Fig 4
Fig 5
GB
FR
NL
D
I
E
P
DK
N
FIN
S
GR

Descritivo do conteúdo da caixa
A - Bico de emissão
B - Válvula de enchimento
C - Tampa do compartimento da pilha
D - Fundo translúcido para permitir verificar o nível de enchimento
Beskrivelse af boksen
A - Forstøver (vendes opad)
B - Påfyldningsventil
C - Batterilåg
D - Hvid baggrund til kontrol af væskeniveau
Beskrivelse av mottakerboksen
A - En dyse (hvor væsken kommer ut)
B - En ventil (hvor væsken fylles på)
C - Et batterideksel (som skjuler batteriet)
D - Et hvitt felt (som viser væskenivået)
Kuvaus laitteesta
A - Suihke venttiili
B - Täyttöaukko
C - Paristo aukko
D - Valkoinen osa josta voidaan tarkistaa nestemäärä
Beskrivning av behållaren
A - Spray ventil (placeras uppåt)
B - Påfyllningsnippel
C - Batterilucka
D - Vit vägg så att vätskenivån syns
Περιγραφή της µονάδας
A -
Α. ΣτVµιο του σπρέϊ
B - Bαλβίδα γεµ›σµατος
Γ - Κάλλυµα µπαταρίας
∆ - Ασπρο φVντο γιανασας βοηθάει να ελέγχετε την στάθµη
P
DK
N
FIN
S
GR
1
2
3
4
5

IMPORTANT: if you want to get
the best possible results from MasterPlus®
PRO, it is essential that you understand
the technical issues that are explained
in this brochure.
So, before beginning any training of
your pet, it is essential you read the
following instructions.
The MasterPlus®PRO Dog Training kit
includes:
1- Spray collar
2- Collar strap
3- Remote control
(batteries included)
4- Battery for the collar
5- Refill canister
6- Training guide and user instructions
7- Case for transport
8- Token to help open the battery cover
9 - Strap for the remote control
10- Guarantee.
CONTENTS
I - Training your dog with
MasterPlus®PRO
1. What are the advantages of MasterPlus®
PRO training?
2. What is a disruptive stimulus?
3. Tips to help you use MasterPlus®PRO
4. How to use MasterPlus®PRO?
5. Why should you want to change your
dog’s behaviour?
6. Canine training guide
II - User Instructions
1. etting started with the spray collar
2. Operating the spray collar
III - Maintenance
IV - Hints and trou leshoots
V - Technical specifications
I - Training
your dog with
MasterPlus®PRO
1 - What are the
advantages of training
with MasterPlus®PRO?
Dogs are often better behaved when their
owners are close at hand because then
they are under "direct" control. If they
behave badly, punishment is immediate
and inevitable.
When you are far away from a dog, he
is in a stronger position because you have
no way of controlling him.
A remote controlled device solves many
of these distance-related problems.
As it can be triggered without the owner
seeming to be involved or angry, such a
device can be used to
interrupt bad behaviours by distracting
the dog and capturing his attention.
It allows you to play a positive, ‘fun” role
(calling him to play a game, running away
from him, etc.) rather than a negative one.
In brief: A remote controlled device allows
you to act upon your dog’s behaviour,
however far away he is (within its range
limit).
Before MasterPlus®PRO:
training with punishment
In the world of dog training, the word
“punishment” has a very precise meaning
and, in order to be effective, a punitive
stimulus must be:
• Unpleasant for the animal (i.e. induce
pain or fear)
• Consistently applied every time and as
soon as the animal performs the
behaviour to be discouraged, or straight
after
These rules are difficult to obey, but if they
are not applied fully, the training
programme will be fundamentally flawed.
Serious distress and associated behavioural
problems will occur if the dog is punished
in the wrong context or with poor
timing.
With MasterPlus®PRO: Training
without punishment
The MasterPlus®PRO does not deliver a
punishing stimulus; rather it is a disruptive
stimulus. Disruptive stimuli do not give
rise to the same emotional and practical
problems as punitive stimuli.
2 - What is a disruptive
stimulus?
Dogs perform complex behaviours like
hunting in a sequence or chain of
events. The whole sequence can be stopped
if a disruptive stimulus, like the gas release
of MasterPlus®PRO surprises the dog. It
will make him pause and concentrate,
giving you the chance to redirect him
towards a more desirable activity.
The surprise effect produced by the cold
spray of the MasterPlus®PRO collar
stimulates all of the senses of touch, sight
and hearing. Repeated sessions give rapid
results.
3 - Tips to help you use
MasterPlus®PRO
The MasterPlus®PRO is intended to
complement or enhance your role as pack
leader, but it cannot be a substitute for
your authority. Rather, it is a complementary
tool to a range of intelligent, reward-centred
training techniques. For instance, as soon
as the behaviour to be discouraged occurs,
you should give a verbal command (e.g.
“Stop”, “Quiet”, “No”, “Heel”, etc.). This
command should be given clearly in a firm
tone, without signs of anger.
• If the command is not obeyed, trigger
the collar immediately so that the dog
comes to associate your command with
the interruption that follows.
• If the behaviour to be discouraged is
one that only occurs when your dog
believes you are absent (e.g. stealing,
eating things, digging holes or running
away), find a hiding place and trigger
the collar without verbal warning or
command as soon as the misbehaviour
begins. The dog will then learn that there
are things that are forbidden, even when
you are not present.
GB
- 4-

MasterPlus®PRO does not work by magic!
It distracts the animal but the actual training
is up to you.
4. How to use
MasterPlus®PRO?
For the best results, follow these
guidelines:
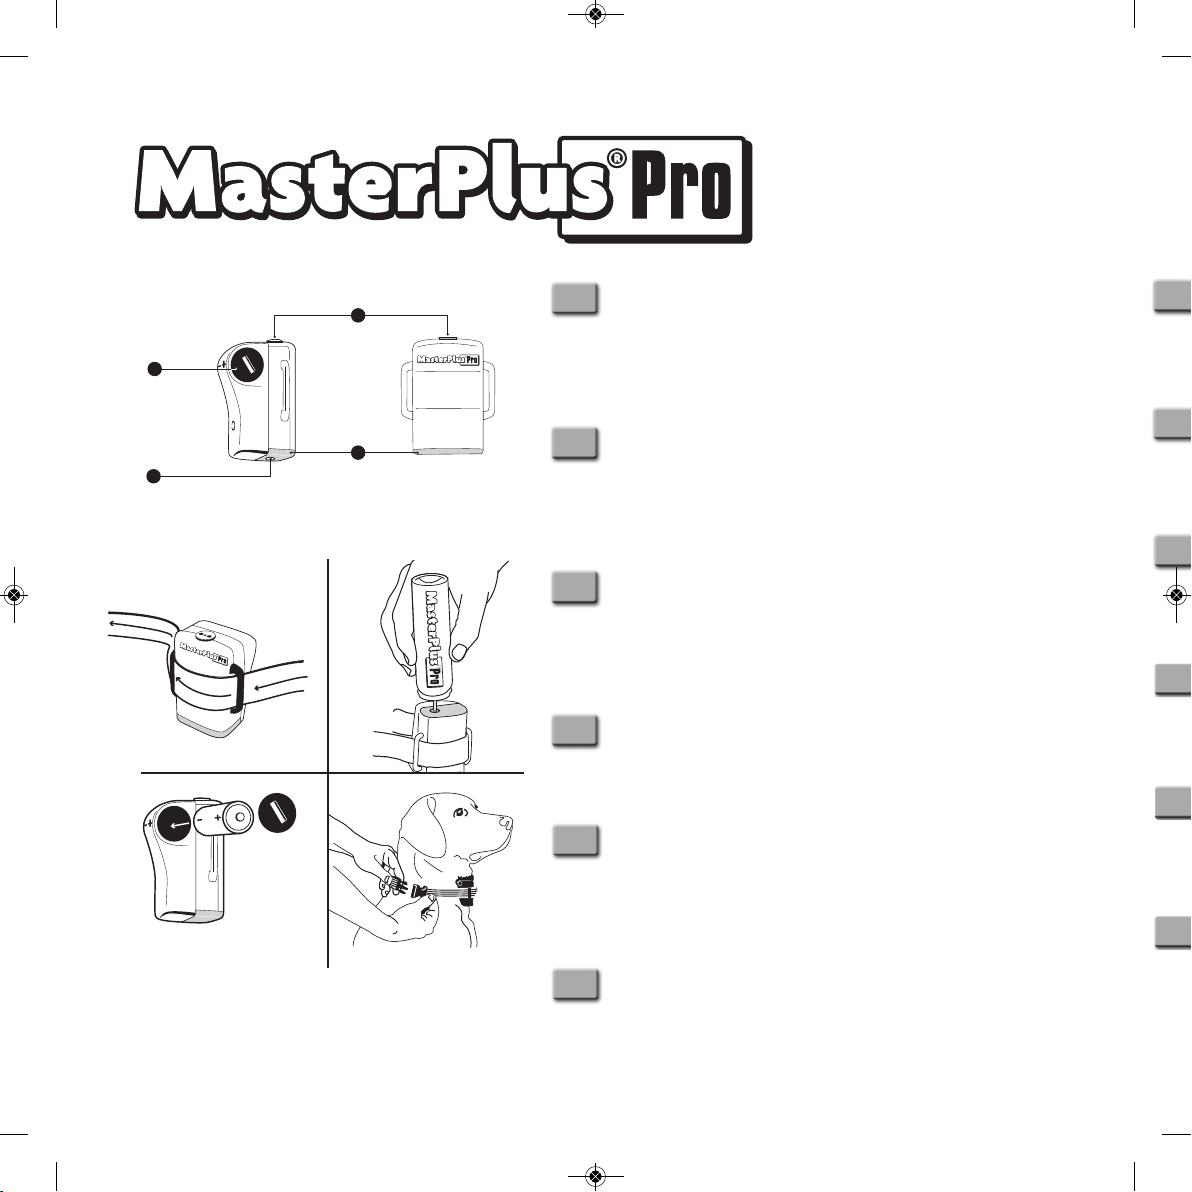
1- Let the dog get used to wearing the
collar without the battery for a few days
(a week), so that it becomes a part of
his usual environment.
2- During training, make sure the collar
is ready to work at all times.
3- If the dog is not already wearing the
MasterPlus®PRO collar, put it on at least
20 minutes before the exercise
session, so that he does not associate
the collar with the walk or the
exercise.
4- Whilst training your dog, have one or
two daily sessions of no longer than
30 minutes each, so that neither you
nor the dog becomes stale. For
retraining, you can either organise
sessions during which the behaviour
to be discouraged is specifically
“provoked”, or you can wait
for the misbehaviour to occur
spontaneously. In either case, the
collar must be ready for use at all times.
Surprise and reward
5- The collar has different settings of spray.
Use these variations to surprise your
dog, so he does not get used to them.
However, if the dog is difficult to distract,
use a stronger or longer stimulus.
6- Using the “tone” button
- The tone can be used as a pre-signal:
when your dog is about to commit a
discouraged behaviour, press the tone
button immediately followed by one of
the two spray buttons, this way the dog
will quickly associate the sound with
the spray. After a few sessions, he will
react to the TONE button without your
having to use the spray as well. Indeed,
the dog will understand that if he doesn’t
change his bad behaviour as a result
of the tone, he will be sprayed.
- Just as the tone can be used as a signal
for impending punishment, so can it also
become a rewarding signal. Of course
you need to decide in advance which
role you want to assign to the signal:
as a warning that the animal is about
to be punished by a spray, alternatively
as a signal that the dog has performed
the correct behaviour.
To train the reward association, follow
the same principles that are now
well-established in the world of clicker
training. This is to offer a treat, and at
the moment he takes it, activate the signal
on button number 1. Repeat five or more
times, offering food from your hand.
Now move back and toss the treat
towards your dog, each time pressing
the signal button as he picks up the treat.
After 20-50 such pairings of the signal
with the treat, your dog will reliably
associate the signal with reward.
You can now apply this learned
association by linking your dog's
obedience to easy commands such as
to "sit" or "down" by sounding the tone,
and again offering a titbit. Later you
can use more difficult or problematic
obedience commands such as "come"
(which from time to time dogs ignore).
When you have gained your dog's
attention and he is running towards you,
sound the signal as he is moving closer
towards you. Repeat two or three times
as he makes the journey in your direction.
You now have a device that can
provide pleasure to match the punishment
of the gas.
7- When you trigger the spray, try to ensure
that the dog does not see you holding
the remote control. It is better he forms
the impression that the burst of
spray comes “out of the blue”.
Otherwise, he could think that he has
to behave only when you are there.
You can achieve this by keeping the
remote control in a jacket pocket, looking
away from the dog and ignoring him
when you trigger it. Do not always adopt
the same pose, because dogs are very
sensitive to body language and will soon
be able to predict when you are about
to press the button! The dog should
not know that you are activating the
collar.
8- Activate the spray as soon as you see
the dog beginning the chain or
sequence of misbehaviour. The earlier
you act, the easier it will be to distract
the dog and interrupt the chain.
It is difficult to stop a train running
at full speed! When your dog pauses,
get his attention straight away by calling
and enthusiastically encouraging him
to play with you. Your demeanour should
suggest fun, so produce special toys
that you have brought along as a play-
reward. Play with him for a few minutes
and then go back to the area where
he is prone to misbehave.
9- If the stimulus was not strong enough
to completely distract your dog,
increase it to the maximum setting,
and distract him with another game.
Improve your dog’s behaviour:
10- As your dog’s behaviour improves, you
should take him to places where he is
more and more prone to misbehave.
This way, you will be able to control him
in the worst situations, and to go
anywhere with him.
5 - Why should you want
to change your dog’s
behaviour ?
Rather than punishing your dog, a
disruptive stimulus distracts him for the
moment and makes him receptive to a
new, alternative activity. However, unless
you take full advantage of this brief moment
to put him back on the right path, he may
go back to his previous misbehaviour. In
other words, dogs learn not to misbehave
if there is a desirable alternative available.
This alternative is generally a behaviour
desired by the master. To encourage him,
you will have to reward this good
behaviour frequently. There are several
ways of rewarding a dog.
Enthusiastic congratulations or games are
the best, but it may be necessary, especially
with a young puppy, to combine them with
treats and physical attention. If the choice
of food rewards has been made, it is advised
to give them out after the rewarded action
progressively so that your “authority” does
not become totally dependent on them.
In any case, do not forget: if the reward
is given immediately after the action, your
dog will establish the relation between
his behaviour and your encouraging. If it
is given out much later, he could be led
to believe that you are rewarding him for
the next thing he does.
6 - Canine training guide
1- Basic training
The reinforcement of basic commands
(“Heel”, “Sit”, “Down”, etc.) can be
undertaken using MasterPlus®PRO from
the age of 4 months. If your puppy is the
right size, he can become accustomed
to wearing the MasterPlus®PRO collar in
a short space of time. This will allow you
to interrupt him whenever he is in the
- 5-
GB

process of making a mistake and point
him in the right direction, rather than your
having to keep punishing him. In this way,
your companion will learn to obey you in
a co-operative spirit rather than as a result
of fear.
Cleanliness
A normal puppy learns the basics of
cleanliness very quickly if he is trained
properly.
Keep an eye on your puppy after meals
and waking up when he will be on the
lookout for somewhere to answer the call
of nature.
When he starts to look around and sniff
at the ground or even squat down inside
the house, immediately trigger the collar.
Take him straight out and put him wherever
you want him to defecate and urinate. ive
him time to reconcentrate and then
enthusiastically congratulate him once he
has finished in the right spot. The first few
times, you can give him a treat while
congratulating him. This strategy should
avoid any problems but, if they persist,
consult your veterinarian.
Heel
Your puppy is discovering the world around
him. Any moving object or new smell
attracts his attention and sometimes when
you call him he ignores you because he
finds what he is doing more interesting;
perhaps he is so absorbed that he does
not even hear you. MasterPlus®PRO can
be used to distract him so that he pays
attention to you. Immediately after
pressing the button, provide something
that will attract him; crouch down, call
him cheerfully, open your arms and, most
importantly, give him an enthusiastic cuddle
to reward him for coming back because,
otherwise, he might think that you
tricked him. Always remember to let him
go quickly so that coming back to heel
is a pleasure rather than a trap.
Walking to heel
Training a dog to walk at heel works in
the same way as that for coming to heel
but requires more concentration on the
part of the dog and it is therefore
recommended not to undertake it within
the first few months.
During the training, MasterPlus®PRO can
be used to reattract the attention of the
dog whenever he is distracted by
anything e.g. every time he sees a bird.
The safest strategy is to start the training
with a leather or synthetic leash of about
1 metre in length or an adjustable leash
locked in position. Thus your dog will learn
that it is easier for him to walk along close
to your leg than to go wandering off.
Congratulate him verbally or by petting
when he walks by your side as he is
supposed to. Whenever he goes beyond
your knee, give him a firm verbal “No” and,
at the same time, give the leash a brief
twitch. The leash should be slack when
the dog is behaving well and should be
allowed to slacken immediately following
the twitch. Once the dog has begun to walk
at heel, his education can be reinforced
with MasterPlus®PRO. The spray should
be set off if the command “No” is not obeyed
i.e. if the dog pretends not to have heard
it. This affords more flexibility than does
using a leash and as soon as you are away
from traffic you can let him run around
with other dogs.
Do not jump
What is more irritating than a dog who
jumps all over people to greet them? If
this is to be avoided, prevention is easier
than cure and puppies have to be
taught when very young that there are
other ways of welcoming humans.
Ask friends to come in and as soon as
the puppy takes to his rear paws,
trigger the collar and tell him to sit. When
he is obedient, ask your friends to
congratulate the dog.
If you need to retrain your dog i.e. get rid
of an already established bad habit, proceed
in the same way but training may take
longer.
2 - Particular problems:
retraining adult dogs
Not to stray off property
or into traffic
MasterPlus®PRO provides the ideal
stimulus to stop him.
Using MasterPlus®PRO you can even create
boundaries for your dog such as not to
leave the kerb or stray onto the vegetable
garden.
Do not chase
Chasing vehicles, joggers, cats or wildlife
is dangerous and should be interrupted
the moment a dog begins to run. This type
of training requires good instincts and
reflexes in you the owner and, if possible,
the collaboration of friends driving cars,
bikes or jogging. If the bad behaviour can
be provoked by stooges, the training will
be achieved more quickly.
Preventing aggressive behaviour
Dogs act aggressively to defend
their territory, status, food or their favourite
companion. In such cases, MasterPlus®PRO
can be an essential re-educative tool, but
cannot be relied upon to stop a dog known
to be dangerously aggressive. It is
essential that advice be sought from your
veterinarian or from a suitably qualified
training professional before a treatment
strategy with the MasterPlus®PRO begins.
Under veterinary supervision, MasterPlus®
PRO has been tested in the treatment of
dogs that have attacked other dogs in public
places. In combination with a course of
drugs, it worked well in 90% of cases within
5 weeks whereas traditional behavioural
therapy with the same drugs was only
effective in 20% of cases.
Do not pick things up,
do not steal
Some dogs want to pick up and trophy
objects and edibles. This can be
discouraged by setting off the collar at
the moment he starts to sniff the object,
even before he picks it up.
A study was recently carried
out to measure the efficacy of MasterPlus®
PRO in training dogs to ignore pieces of
potentially dangerous bait. After 5 weeks
with two training sessions per week, 90%
of the dogs ate less than 15% of the bait
and 80% ate none. The traditional
method consists of throwing a metal chain
down close to the dog in order to interrupt
him but this method was only effective
in 20% of cases with respect to eating
less than 15% of the bait and in 0% of
cases if the criterion was complete
inhibition.
Do not dig, Do not chew
MasterPlus®PRO can also be used to
interrupt a dog that is chewing furniture
or digging up the garden. However, always
offer him an alternative like a bone to gnaw
on or an indestructible toy to chew.
3 - What are the limitations of the
device?
No dog training method or product
can be a 100% effective cure-all.
Those which claim to be should be regarded
with scepticism rather than enthusiasm.
MasterPlus®PRO has been scientifically
validated by experts in animal behaviour.
They have shown that most failures in
- 6-
GB

training of dogs with MasterPlus®PRO occur
for two reasons:
1. Poor timing:
particularly the collar being set off too late
e.g. when the dog has already made contact
with the cyclist he is chasing. Fortunately,
disruptive stimuli like the MasterPlus®PRO
spray do not harm the dog, even when
they are used inappropriately.
2. Habituation:
e.g. when the MasterPlus®PRO is set off
repeatedly, in the wrong context. This
diminishes the surprise effect of the gas
release.
It is best to be able to know your dog’s
signals, so that you can interrupt bad
behaviour at the moment it occurs.
It is also advisable not to tackle all your
dog’s misbehaviours at the same time.
Rather, concentrate on one at a time, the
worst first.
II - User instructions
1- Getting started
with the spray collar
Before using MasterPlus®PRO
our dog should not see you preparing
the MasterPlus®PRO for action, otherwise
he will become collar-cued. Exclude your
dog when practising with the collar and
remote control, when filling the spray
reservoir and when changing the battery.
1- Securing the strap
(see figure 2)
- Secure the strap around the MasterPlus®
PRO by sliding it through the two lugs.
- Place the loop on the strap
- Slot the end of the strap in the black
buckle to form a collar
- Adjust the collar around your dog’s neck.
It should be possible to run your finger
between the dog’s neck and the strap.
- If you wish, cut the extra length of strap
with scissors and burn the cut edge to
prevent it from fraying.
- Push the rest of the strap through the
loop.
Caution: do not do this while the dog is
wearing the collar or his hair might catch
fire!
2- Filling up the reservoir
(see figure 3)
- Place the unit upside down on a flat,
solid surface. The white part (with the
filling valve) must be uppermost and
facing you.
- Direct the refill so that the metal tip is
pointing downwards.
- Insert the tip into the filling valve (same
operation as for filling a lighter) while
maintaining the device
- Press canister firmly downwards for 10
seconds
- Release pressure
- Do this again for 10 seconds. This
operation must be repeated until the tank
is full.
- Check the level in the tank by tipping
the unit. The liquid level can be seen
against light.
Caution: never fill the device while the
dog is wearing it as this will frighten the
dog and could damage the filling valve.
3- Inserting the battery
(see figure 4)
- Unscrew the battery cover, using the
token. Slide the battery into the slot, “-
“ (negative end first). The “+” (positive
end) should then be against the battery
cover (facing outwards).
- Screw the cover back on, using the token
and applying slight pressure on the
battery.
- For easy use of the collar, it is advised
to keep the token carefully by slipping
it onto the remote control strap.
4- Using the collar
- Switch the device on by putting the red
strip of the remote close to the one on
the collar for 4 to 5 seconds. A single
tone will then be emitted. If nothing
happens, it is possible that the strip may
not be positioned exactly over the
magnetic switch. Do not hesitate to try
a wider contact surface around the two
red strips until your hear the tone.
- Code the collar by pressing one of the
3 buttons shortly until you hear 3 short
successive tones.
- Your collar is now exclusively synchronized
with the remote used for its coding and
ready for use.
To switch the device off, put the
red strip of the remote close to the one
on the collar until you hear
2 successive tones. Do not hesitate to try
a wider contact surface around the two
red strips until your hear the
2 tones. The collar will memorise
the code. If you switch it back on, it is
ready for use immediately. Switching it
off will save attery power. However
in order to optimise attery life, it is
advised to remove the attery in case
of prolonged inactivity.
Note: The collar-receiver will not remember
the code if the battery is removed for more
than 15 seconds. To re-synchronize the
collar again, just follow the above steps
5- Fitting the collar
(see figure 5)
- Secure the strap around the dog’s neck,
the nozzle directed upwards towards the
nose.
- Tighten the collar gently, leaving space
for two fingers between your dog’s neck
and the MasterPlus®PRO: the spray must
be directed forward, towards his neck.
- For dogs with long hair, the collar should
be lengthened so that the spray nozzle
is clear of the coat! Alternatively the hair
could be trimmed.
2 - Operating
the spray collar
The transmitter has three buttons:
- button gives a tone
- button 1 gives a short pulse of spray,
- button 3 gives a long spray
Important: never perform setting-up or
checking operations with the device either
on the dog or even in his presence, because
he may make an association between the
spray, remote control and you.
Saving the battery
If your remote control training collar (couple
remote control and receiver) isn’t activated
during more than 18 hours, it stops itself
to save the batteries. To switch your device
on, you have to put the red strip of the
remote close to the one on the collar for
4 or 5 seconds. A single tone will then
be emitted. When you use the device for
a long time, we recommend you to put
one time per hour on the bip button, to
maintain the device on.
III - Maintenance
- Changing the batteries on the remote
control
If the display light flashes, the batteries
are weak.
Batteries should be changed as follows:
- unscrew the battery cover
- insert 2 new batteries with the correct
orientation: markings on the bottom of
the cover indicate the correct polarity
- 7-
GB

for the two CR2032 batteries.
- Screw the cover back on
- Make sure there is a distance
of at least one metre between
the receiver and the remote
control whenever you activate MasterPlus®
PRO, for testing the equipment or during
training.
- Never try to repair the equipment yourself.
This will invalidate the guarantee and may
make repair by the manufacturer more
difficult. If the collar is not working, contact
our technical department.
- Only ever use odourless DYNAVET
refills for the spray collar. Use the specified
batteries: lithium 6 V battery for the
receiver and 2 CR2032 batteries for the
remote control.
- Do not expose the spray collar or refill
aerosols to temperatures above 45°C.
In particular, do not leave by sunny
windows or inside cars.
- MasterPlus®PRO receiver is waterproof.
For cleaning, wipe it carefully using a damp
cloth and a non-abrasive soap.
If you have any problems with respect to
the functioning of MasterPlus®PRO, contact
our technical department.
IV - Hints and
Troubleshoots
Problem 1: The spray collar does not trigger
when you press one of the buttons on the
remote control. Check the following
points:
- Is the battery still active?
Change the battery. Replace with a lithium
6V battery.
Batteries for MasterPlus®PRO are best
bought from the same source that you
purchased the collar.
- Do your remote control batteries need
changing ?
If the red display light is flashing on its
own (i.e. while pressing any of the buttons),
the batteries are exhausted and need
changing. You will need two CR2032
batteries that you can buy from the same
source that you purchased the collar.
- Is there spray left in the collar
reservoir?
You can easily check the level of the
reservoir through the transparent casing.
Use a new DYNAVET refill.
Refill the spray collar according to the
instructions given in the “Filling the
reservoir” section. Refills can be bought
from the same professional that sold you
the collar.
- Have you synchronised the collar?
For this, please follow the instructions in
section 4 Using the collar.
Problem 2:When I am refilling the spray
collar, it leaks from the filler valve
Whenever the reservoir is being refilled,
some loss of aerosol is normal, even if
the refilling operation is being carried out
correctly. However, such losses should only
be brief. Make sure that the receiver is
on a flat surface, that the refill is vertical
and that you are pushing down hard
enough. Above all, never perform the
operation with the collar on the dog.
Problem 3:The range of my MasterPlus®
PRO has decreased.
- The MasterPlus®PRO remote control
works by emitting radio waves which
can be blocked or absorbed by hills, fog,
trees, iron and concrete. They can also
be disrupted by interference from
other transmitters using the same
frequency.
- Therefore, try to avoid such potential
sources of disturbance when measuring
the range of the MasterPlus®PRO.
- Check batteries regularly on both the
remote control and spray collar: range
problems are usually due to weak
batteries
If you have any problems with your
MasterPlus®PRO, contact our Technical
Department.
Information can be found on the
guarantee card.
V - Technical
speci ications
MasterPlus®PRO
Spray collar
Weight: 72 g empty, 86 g
Hereby, DYNA VET, declares that the MasterPlus
PRO device is in compliance with the essential
requirements and other relevant provisions of
Directive 1999/5/EC
The statement of compliance is available in the
appendix reference 034253
Note relating to recycling:
This collar must not be disposed of with other
waste: it is subject to selective collection
with a view to its reclamation or recycling.
CAUTION !
Risk of explosion if battery is replaced by an incorrect
type. Dispose of used batteries according to the
instructions.
GB
- 8-
Table of contents
Other Martin Sellier Pet Care Product manuals
Popular Pet Care Product manuals by other brands

elive
elive EP50W instruction manual

JBL
JBL ProTerra TempSet Heat manual

SportDOG
SportDOG 1275 operating guide

Dogtra
Dogtra 2000 series owner's manual

Backyard Cat Enclosures
Backyard Cat Enclosures Claws Cabin Assembly instructions

Unleashed
Unleashed Wireless Leash Guidance Trainer Series Operator's manual