Marvoto Muscle & Fat Z2 Pro User manual

Muscle & Fat | Z2 Pro

Contents
1
Packing List 3
Product Introduction 4
Appearance Introduction 6
Power-on/Power-off 7
APP Installation 8
Device Connection 9
Selecting Measuring Objects 13
Selecting Measuring Parts 14
Fat Measurement - Manual Measurement 15
Fat Measurement - Intelligently Automatic Reading and Measurement 29
Muscle Measurement 32
Image Interpretation 38
Image Depth Setting 42
Image Grayscale Setting 43
Share 44
Device Upgrade 45
FAQ 47
Specifications Table 53
After-sales Service and Support 54

List of Packing Content
Z2 Pro host USB Type-C Cable
Quick Operation Guide
Quick Operation Guide and
Warranty Card
3

Product Introduction
Muscle & Fat Z2 Pro is an intelligent device that can quickly measure the thickness
of subcutaneous fat and muscle in multiple parts of the human body based on the
ultrasonic principle. It can help obese group, fitness group, women pursuing beauty,
diabetic group and other people to monitor the changes of subcutaneous fat
thickness and muscle thickness for a long time.
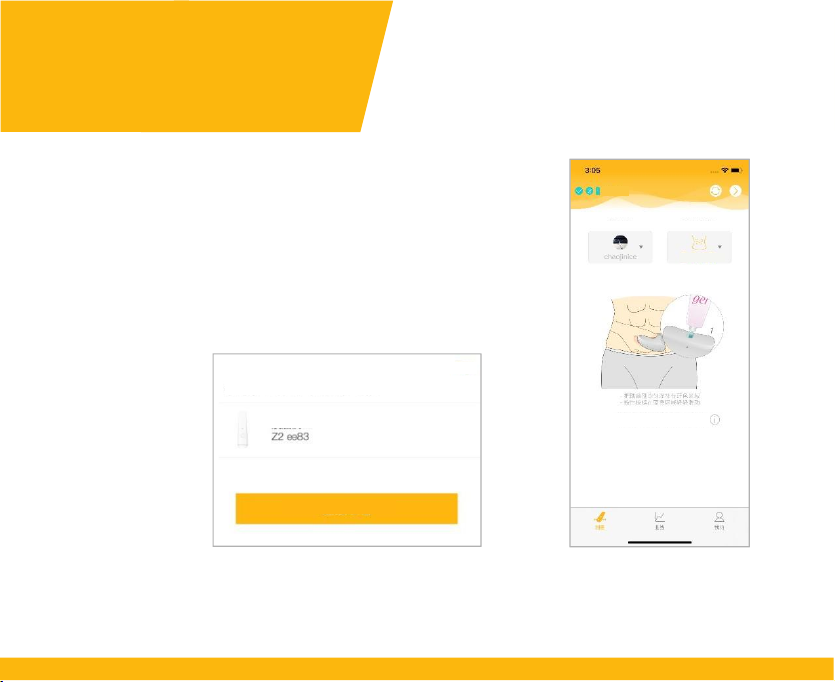
Muscle & Fat Z2 Pro consists of device and mobile application software
(hereinafter referred to as APP). The device is used to transmit and receive
ultrasonic signals, output the ultrasonic image data of the subcutaneous tissues after
signal transformation and a series of signal processing operation, and transmit the
image data to APP through Bluetooth. APP software is used to identify the fat
thickness from the ultrasonic image, analyze and automatically determine and
output the fat thickness value.
4

Function Table
5
Item NO. Z2 Pro
Fat measurement parts
Manual measurement:
abdomen, waist, upper arm, thigh, calf, general
Intelligently automatic reading:
waist, upper arm, thigh, calf, general
Muscle measurement parts
rectus abdominis, biceps brachii, rectus femoris,
musculus gastrocnemius
Member management
A maximum of 1,000 people can be added
Parameter setting
Scanning depth setting, image grayscale setting;

Appearance Introduction
Type C USB port
Logo
Power button
Ultrasonic sensor
Measuring button
Indicator
6

Power-on/Power-off
Power-on: Short press the power button to power on.
Power-off: Long press the power button for 2 seconds
to power on
Blue indicator
slowly flashes
Wait for Bluetooth connection
Blue indicator is
normally on
Bluetooth connected successfully
(the device is available to use)
Blue indicator
quickly flashes
The device is upgrading
Green indicator is
normally on
USB is charging (in off state)
Green indicator
flashes
In wireless charging (in off state)
Indicator is off
Fully charged
* After turn-on, the device will
automatically shut down if it is not
connected within 10 minutes.
* Whether the product has wireless
charging function, please refer to
the actual purchase configuration.
7
Table 2 Description of Indicator Status

APP Installation
Scan the QR code below to download and install Muscle & Fat APP.
After installation, follow the instructions to register and log in.
Muscle & Fat APP is available for iOS and Android smart phones and tablets.
Muscle & Fat
8
APP QR code

Device Connection
For new users, please follow the steps to connect the
device:
1) Turn on the Bluetooth function of the mobile phone;
2) Power on the Z2 Pro device;
3) Enter the APP home page and wait to search for
devices;
4) Select the device from the device list that is displayed
and then connect it.
Home page display after
device connection
List of searched devices
9
Cancel
A device is found, do you want to connect it?
Muscle & Fat Z2 Pro
Connect the device
Connected
Measuring object Measuring part
Abdomen | Fat
Press the button to start measuring

After the device is connected, APP will perform functional configuration according to
the device model (as described in Table 1).
Android APP supports both Z1 (wired) and Z2 Pro (Bluetooth) devices. New users need
to set the device type first:
10
Please select your device type:
Fat thickness Z1 (wired)
Fat thickness Z2 Pro (Bluetooth)
* Please select accordingly, then we will adjust to the operating
interface.
* You can modify on the interface “My” at any time.
Save

Switch to connect other Z2 Pro device:
1) Power on another Z2 Pro device;
2) Click the icon “ ” at the upper right corner of the home page to
actively search for devices;
3) Select a new Z2 Pro device to connect in the list of searched devices.
11
Multiple devices are found, please
select a device to connect:
Muscle & Fat Z2 Pro
Connect the device
Cancel
Muscle & Fat Z2 Pro

Connect Z2 Pro device on another mobile phone:
1) Turn off the “Bluetooth” function on the operation panel of the control center
on the current mobile phone;
2) Turn on the “Bluetooth” function of another mobile phone;
3) Enter the homepage of APP and wait for automatic search of Z2 Pro device;
4) Select a device for connection from the list of searched devices.
Operation panel of control center on iphone
(For Android phones, please refer to Operation)
12
Screen Mirror
Not play

Click the menu “User” on the home page to open member switching list, and you
can switch the measuring object, add a new member or switch to Visitor
Measurement.
* After the measuring object is switched, the curve chart on the home page will be switched under this member.
* Measured data in visitor mode will not be saved to the history and curve chart.
13
Selecting Measuring Objects
Switch Measuring Object
Visitor Measurement
Add Members

Selecting Measuring Parts
Click the menu “Measuring Parts” on the home page and select the function and
part to be measured in the pop-up panel.
Fat measurement: measure subcutaneous fat thickness; currently, five measuring
parts are supported: waist, abdomen, arm, thigh and calf.
Muscle measurement: measure muscle thickness; currently, four measuring parts
are supported: rectus abdominis, biceps brachii, rectus femoris and musculus
gastrocnemius.
* As mentioned above, there is no “abdomen” function in the intelligent fat reading measurement, and
“general” function only provides images but does not provide measurement; there is “abdomen” function
in the professionally manual measurement, and “general” function can measure and save the measurement
results.
* In visitor mode, select “Gender” before selecting the measuring part.
14

Fat Measurement -
Manual Measurement
Measurement Principle
The structure of skin and subcutaneous tissues
from top to bottom is: epidermis → dermis →
fat layer → muscle layer → other tissues
(visceral fat/ skeleton/internal organs, etc.).
The outer layer of the muscle is covered with
thick fascia, which separates the fat from the
muscle. Muscle & Fat Z2 Pro first collects the
ultrasonic image of the subcutaneous tissue,
then identifies the boundary between the fat
layer and the muscle layer through intelligent
recognition algorithm (intelligently automatic
reading measurement) or subjective judgment
of the operator (professionally manual
measurement), and calculates the distance
from the epidermis to the outer fascia of the
muscle to obtain the thickness of the
subcutaneous fat.
15
Ultrasound gel
Epidermis
Dermis
Fat layer
Muscle layer

Measuring Methods and Steps
As described later.
Extrude the coupling agent with the size of
pistachio on the ultrasonic sensor, and
slide back and forth in the measuring area
to make the coupling agent evenly spread;
Place the device at the starting point and
keep it perpendicular to the skin, hold
down the measurement button and slide
gently on the skin at a constant speed, and
keep the ultrasonic sensor fit with the skin.
After image collection, click “Enter
Measurement” to adjust the ruler to
measure, and save the result.
Step 1: Determine the measuring
part
Step 2: Apply the coupling agent
Step 3: Slide against the skin
Step 4: Adjust the ruler to measure
16

Measuring Part - Waist
Waist measuring position:
− Standing posture
− Find the midpoint from the navel to the waist (point C as shown
in the figure), the area from 2cm next to point B as the starting
point to point A is the measurable area.
17

Measuring Part - Abdomen
Abdomen measuring position:
− Standing posture
− Slide to the right in the rectus abdominis area above the navel, with the
left rectus abdominis as the starting point;
− The bow shape on the image is the rectus abdominis, and the
subcutaneous fat layer is above the rectus abdominis;
18

Measuring Part - Upper Arm
Arm measuring position:
− Keep your upper arm level and forearm vertical;
− Find the midpoint between elbow and armpit (point B shown in the figure). Point B
is the starting point, and the area from point B to point A is the measurable area.
Tips:
Compared with the waist, the subcutaneous fascia of the arm is more and more complicated.
If it is found that there are more fascia directly under the arm, which interferes with the
measurement, it can be moved to the inner or outer side of the arm, and then slide it towards
the armpit. Users with soft meat may have difficulty controlling the sliding force, so you
can try a few times to measure correctly.
19

Measuring Part - Thigh
Thigh measuring position:
− Standing posture
− Find the midpoint between the iliac crest
and the upper edge of the knee (point B as
shown in the figure). The area 3cm above
and below point B is the measurement area;
slide from top to bottom;
Tips:
If there is more fascial interference at point B, move
a little to the lateral or medial side of the thigh.
20
Table of contents
Popular Personal Care Product manuals by other brands

Philips
Philips DreamStation Go Basic setup

Otto Bock
Otto Bock L.A.S.A.R.-Posture 743L100-230/110 Instructions for use

Prorelax
Prorelax DELUXE 52248 Operating instruction

AngelSounds
AngelSounds JPD-100S manual

Kelley West
Kelley West Microderm 360 Instruction booklet

Philips
Philips AVENT SCH401 user manual

miseno
miseno MM3030LED27K user guide

Nova
Nova PA-1034 user guide

Drive DeVilbiss Healthcare
Drive DeVilbiss Healthcare COMFORT TOUCH RTL2017CTN manual

Somogyi Elektronic
Somogyi Elektronic Home HG TR 01 instruction manual

Honeywell
Honeywell HomMed Genesis DM Quick setup guide

VIVESS
VIVESS WLB9001SW user manual