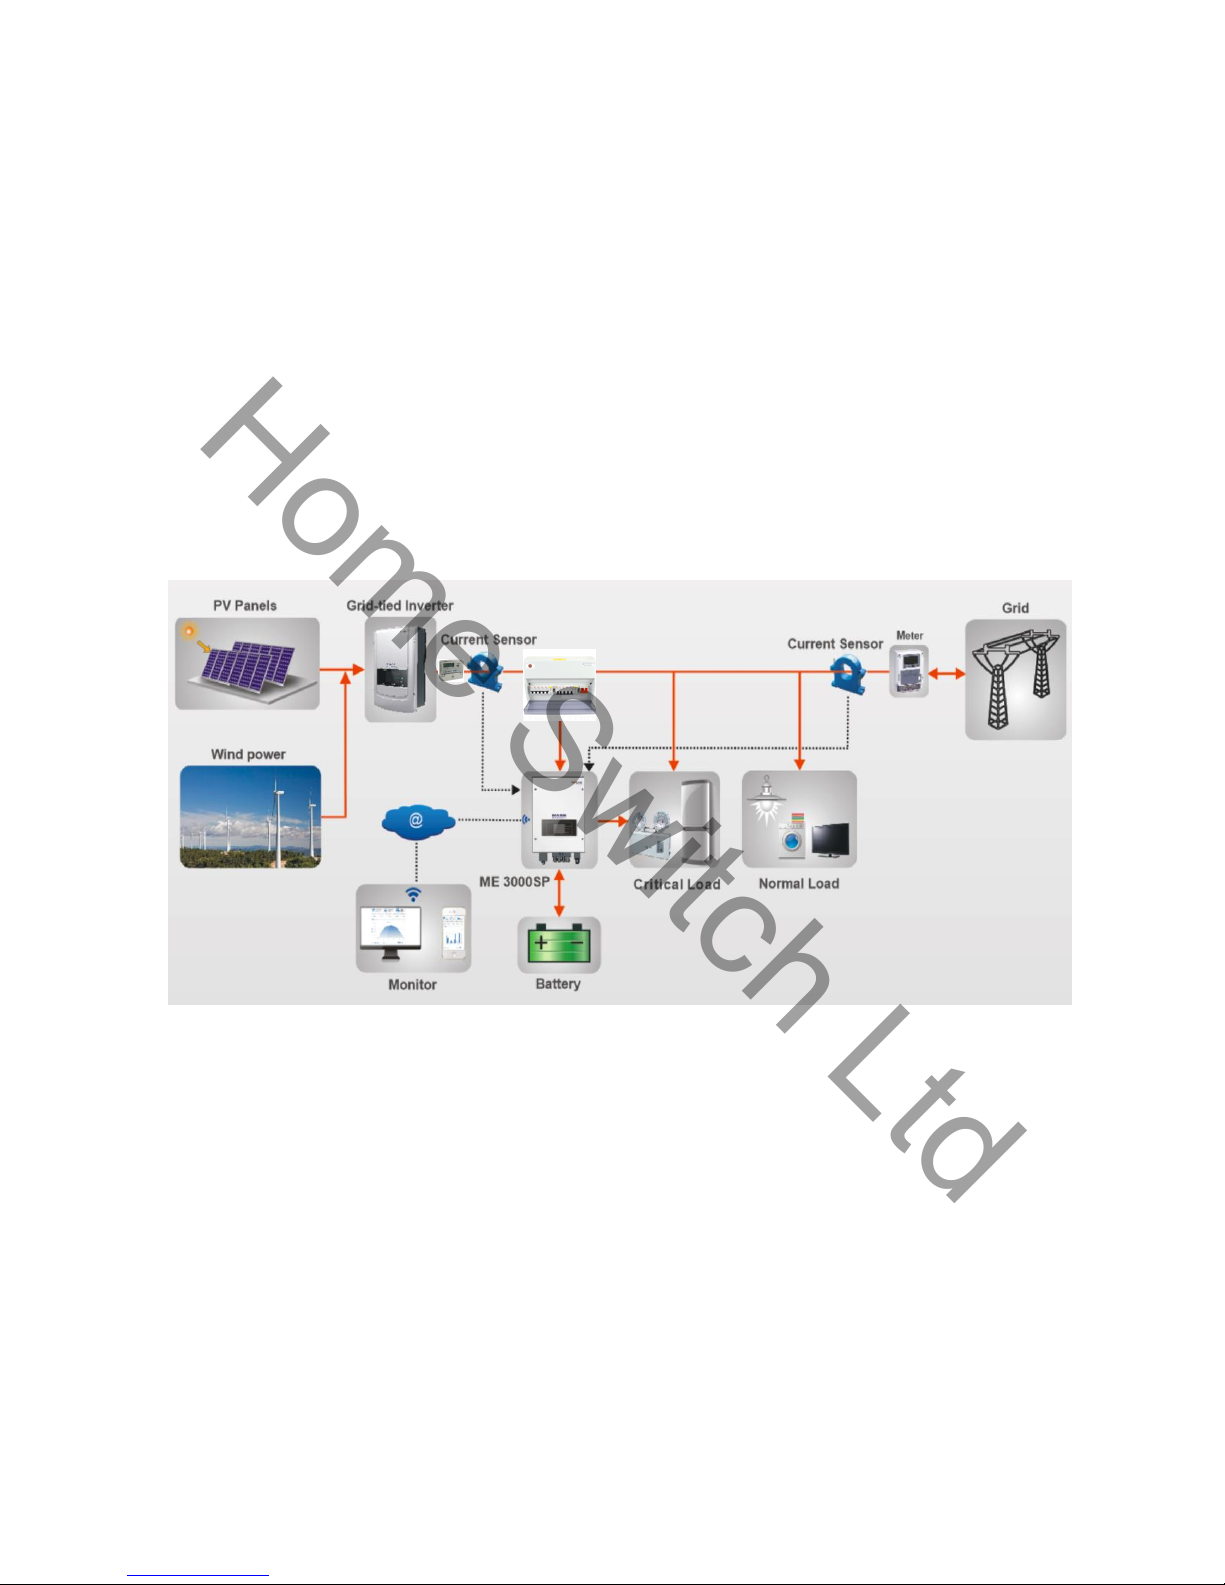
Mass Energy ME 3000SP User manual

Energy Storage Inverter
User Manual
(ME 3000SP)
2016-12-8
V8.0
730-000034-1
Home Switch Ltd
Home Switch Ltd
34 Bracken Bank Crescent | Keighley
West Yorkshire | BD22 7AX

1
Contents
1.Equipment Introduction ................................................................................................................................................. 2
2.Equipment Safety Notes ................................................................................................................................................. 2
2.1 Safety Signs........................................................................................................................................................... 2
2.2 Safety Notes.......................................................................................................................................................... 3
2.3 Battery Installation and Maintenance Notes........................................................................................................ 4
3.Installation ...................................................................................................................................................................... 5
3.1 Product Overview ................................................................................................................................................. 5
3.2 Packing List ........................................................................................................................................................... 5
3.3 Installation Environment ...................................................................................................................................... 6
3.4 Installation Tools................................................................................................................................................... 6
3.4 Installation Position .............................................................................................................................................. 8
3.5 Mount ME 3000SP................................................................................................................................................ 8
4.Electrical Connection....................................................................................................................................................10
4.1 Battery Connection.............................................................................................................................................13
4.2 CT / RS485 / NTC connection.............................................................................................................................. 14
4.3 Grid & Load Connection .....................................................................................................................................20
5.Indicators and Keys....................................................................................................................................................... 22
6.Operation...................................................................................................................................................................... 23
6.1 Double Check......................................................................................................................................................17
6.2 First Time Setup.................................................................................................................................................. 17
6.3 Commissioning ...................................................................................................................................................19
6.4 Main interface .................................................................................................................................................... 20
7.Technical Data............................................................................................................................................................... 32
8.Troubleshooting............................................................................................................................................................33
Home Switch Ltd
Home Switch Ltd
34 Bracken Bank Crescent | Keighley
West Yorkshire | BD22 7AX

2
1. Equipment Introduction
ME-3000SP is mainly applied and developed for the renewable energy generation system compatible with lead-
acid batteries and lithium batteries. It can help to achieve the optimal of battery power automatically. ME 3000SP
can control the off-grid, on-grid and the bi-directional flow of electric power, work under the auto / manual mode
and time-of-use (TOU) price mode, automatically switch to the off-grid and on-grid work mode and manage the
battery charge / discharge, etc. Also, the inverter has the intelligent on-grid discharge function by setting and can
adjust its discharge power according to the change of the load power, avoid the feed of redundant power into the
power grid and help the user to make the maximum benefit. This storage inverter can choose DC bus occasion in
connection with the PV system and also be used as a pure off-grid inverter if there is no PV system. The equipment
is equipped with an LCD display panel and keyboard, high-quality Human Machine Interface and is stable, safe and
reliable. The monitoring software has the fault history recording function for later-stage maintenance.
Fig. 1 ME 3000SP Storage System Solution
2. Equipment Safety Notes
Before the inverter is used, please read all instructions, warning signs and this manual. The inverter strictly
meets safety rules of design and testing. During the installation, operation and maintenance, operators should abide
by safety regulations. Improper operation may cause an electric shock or damage the equipment and properties.
2.1 Safety Signs
Consumer Unit
CT Clamp Goes
Around The Main
Incoming AC Cable
Home Switch Ltd
Home Switch Ltd
34 Bracken Bank Crescent | Keighley
West Yorkshire | BD22 7AX

3
2.2 Safety Notes
Electrical installation and maintenance must be carried out by competent electricians according to national
connection rules.
This inverter must only be installed by qualified technical personnel, and only those who have appropriate
accreditation, as required by the local authority having jurisdiction.
The battery chamber should keep a certain distance with the ME 3000SP and protected well to prevent from
the collision.
It is forbidden to place explosives and combustibles, e.g. gasoline, kerosene, oil, slab, cotton and rag, around
the ME 3000SP.
An electric shock must be avoided and the battery input and AC output of the inverter shall be stopped for at
least 5min. before its installation or maintenance.
The temperature of some parts of the inverter may exceed 60℃. The inverter must be powered off, and
allowed to cool before working on in order to avoid scalding during the maintenance.
Children should not go near the inverter.
Please do not open the outer cover of the inverter without permission, except for the wire connections. If
someone touches or changes its components without permission, he might be injured and even damage the
inverter.
Static power may damage electronic elements. An appropriate method should be adopted for preventing from
such damage; otherwise, the inverter might be damage and the warranty will be invalid.
If the Equipment is damaged because it is not operated according to the operation method of the specified
manufacturer, the warranty will be invalid.
To completely isolate the inverter: firstly shut down the DC switch and then disconnect the battery and the AC
Home Switch Ltd
Home Switch Ltd
34 Bracken Bank Crescent | Keighley
West Yorkshire | BD22 7AX

4
terminal.
The ME 3000SP shall be isolated completely before being maintained. The inverter must not be maintained in
other modes!
It is forbidden to disconnect the battery terminal and AC terminal when the ME 3000SP is running normally.
2.3 Battery Installation and Maintenance Notes
The battery has been charged before being delivered and shall be prevented from short circuit in the
transportation and installation process.
The battery shall be placed in a well-ventilated space. Do not install the battery in airtight or badly ventilated
spaces or equipment. Otherwise, the equipment might crack.
Do not place the battery in high-temperature situations, direct sunshine or in front of a furnace or fire.
Otherwise, the battery might leak and fire or crack.
The connection cable shall not be extended from the provided cables to avoid too much voltage drop.
Before switching on the batteries, check the connection are correct according to the manual, check the total
voltage and anode and cathode of the battery system to ensure the correct installation.
If you want to store the batteries without using them, they should be disconnected from the Charger, and kept
in a cool, dry and ventilated environment.
Please be noted that it is not necessary to provide the reservation information with the following exact measures:
Battery maintenance operators shall have the know-how and technical skill for the maintenance of the battery;
When the battery is changed, the battery bank of the same model, firmware and quantity shall be changed;
Warning: Do not dispose of scrap batteries with fire. Otherwise, the batteries might explore.
Warning: Do not dismantle or damage the battery. Its electrolyte might be toxic and damage your skin and
eyes.
Warning: The battery may cause an electric shock or short circuit. Please take the following measures for the
battery work:
a) Take off your watch, ring or other metal objects.
b) Only use tools with insulated handles.
c) Wear rubber gloves and shoes.
d) Do not put tools and metals above the battery.
e) Switch off the charge power supply before the battery terminal is disconnected.
f) Check if the battery is connected to the ground. If so unconsciously, disconnect the battery from the ground.
Any part that touches the ground battery may suffer an electric shock. Disconnect the battery from the ground
during installation and maintenance, so as to reduce the possibility of such a shock (applicable to the
equipment and remote power supply without power circuits connected to the ground).
Home Switch Ltd
Home Switch Ltd
34 Bracken Bank Crescent | Keighley
West Yorkshire | BD22 7AX

5
3. Installation
3.1 Product Overview
The inverter is fully checked before being packed and delivered. It is forbidden to put it upside down position during
delivery.
Please check the product package and internal components carefully before installation, e.g. housing, display and DC
connection terminals.
Fig. 2 ME 3000SP Overview
3.2 Packing List
Before installation, please inspect the unit. Be sure that nothing inside the package is damaged. You should have
received the following items inside of package:
Mounting Bracket×1
AC terminal×6
M5 screw×2
Battery terminal×2
Home Switch Ltd
Home Switch Ltd
34 Bracken Bank Crescent | Keighley
West Yorkshire | BD22 7AX

6
M6 flat washer×8
Expansion Bolts×8
Terminal cap×4
CT terminal×2
Current Transformer× 2
User Manual×1
Warranty card×1
Quality Certificate×1
Fig. 3 Accessories of ME 3000SP
3.3 Installation Environment
Clean and tidy indoors, convenient for installation and in a dry position
Ambient temperature scope:-25℃~60℃
Relative humidity:0~100%(non-condensed)
The ME 3000SP shall be installed in the place with an independent air inlet and outlet channels.
There is neither flammable nor explosive materials in the area.
The ME 3000SP shall be connected to the power grid with an over-voltage of CATIII and CAT II.
The maximum work altitude is 2000m.
Please consult our engineers about detailed requirements for installation.
3.4 Installation Tools
PLEASE NOTE THAT IN ADDITION TO THE LIST BELOW YOU WILL REQUIRE RJ45
CONNECTOR AND CRIMPERS AS WELL AS ADDITIONAL LENGTH OF DATA CABLE
(SUFFICIENT FOR CT CLAMP EXTENSION DISTANCES).
PLEASE CHECK THAT YOU HAVE AN AC ISOLATOR ON SITE ALSO.
The following tools shall be prepared before installation:
Home Switch Ltd
Home Switch Ltd
34 Bracken Bank Crescent | Keighley
West Yorkshire | BD22 7AX

7
No.
Tool
Model
Function
1
Hammer drill
Recommend drill dia.6mm
Used to drill holes on the wall
2
Screwdriver
wiring
3
Wire stripper
Strip wire
4
4mm Allen Key
Turn the screw to connect rear panel
with inverter
5
Crimping tools
Used to crimp power cables
6
Multi-meter
Used to check grounding
7
Marker pen
Used to mark signs
8
Measuring tape
Used to measure distances
9
Level
Used to ensure that the rear panel is
properly installed
10
ESD gloves
Operators wear
Home Switch Ltd
Home Switch Ltd
34 Bracken Bank Crescent | Keighley
West Yorkshire | BD22 7AX

8
11
Safety goggles
Operators wear
12
Anti-dust respirator
Operators wear
3.5 Installation Position
ME 3000SP should be vertically mounted (to ensure fast heat dissipation), please choose a position without direct
sunlight / snow accumulation to install ME 3000SP.
Fig. 4 Installation Position of ME 3000SP
3.6 Mount ME 3000SP
Step 1: Put the mounting bracket properly on the wall, mark these 8 drill holes using a marker pen. Drill 8 holes (drill
bit 6mm) on the wall.
Step 2: Insert the expansion screw vertically into the whole, note the insertion depth. (Not too shallow or too deep)
Step 3: Fix the mounting bracket on the wall using bolts & flat washers.
Home Switch Ltd
Home Switch Ltd
34 Bracken Bank Crescent | Keighley
West Yorkshire | BD22 7AX

9
Step 4: Put ME 3000SP on the mounting bracket.
Step 5: Earth ME 3000SP using the grounding hole on the heat sink.
Step 6: OPTIONAL: you can lock ME 3000SP
Home Switch Ltd
Home Switch Ltd
34 Bracken Bank Crescent | Keighley
West Yorkshire | BD22 7AX

10
4. Electrical Connection
Be aware of electric shock and chemical hazards!
Before connecting the battery, ensure the cable connectors have the correct polarity. Reversed polarity will
damage the inverter!
Before connecting to battery, please install a separate DC breaker (100A) between inverter and battery. This will
ensure the inverter can be securely disconnected during maintenance.
Before connecting to Grid, please install a separate AC breaker (25A) between inverter and grid.
It is very important for system safety and efficient operation to use appropriate cable for electrical connection.
Battery connection: cable of AWG8 or AWG6.
Grid & Load connection: cable of AWG12.
Make sure N wire is connected to PE wire when ME3000SP is working in EPS (Emergency Power Supply) mode.
Fig. 5 Wiring Schematic of Single Phase System
Home Switch Ltd
Home Switch Ltd
34 Bracken Bank Crescent | Keighley
West Yorkshire | BD22 7AX

11
4.0 Battery Set Up
Please make certain you have read the manual for the Pylon Batteries. Full information is available from
http://www.stealthenergy.co.uk/stealth-tile-system/stealthenergytm-growatt-inverter/so-far-solar/index.shtml
The ME3000SP can be used with 1, 2, 3 or 4 Pylon US2000B batteries.
THE ME3000SP SYSTEM IS ONLY COMPATIBLE WITH PYLON
Us2000B BATERIES WHICH HAVE B63 FIRMWARE
OTHER FIRMWARES ARE NOT COMPATIBLE – CONTACT YOUR SUPPLIER
IF UNSURE.
Batteries are supplied with or without mounting brackets. If you are not using the specific mounting
brackets please ensure there is airflow between the batteries if you stack them.
Short Power Lead Connections
The US2000b Pylon batteries are supplied with short black and white power connections for connecting
more than one battery together. If you only have a single battery you will not need them. Please see figure
6 & 7. To make certain you connect the batteries as shown in the diagram.
Short Data Cable Connections
The US2000b Pylon batteries are supplied with a short black and data cable connection for connecting
more than one battery together. If you only have a single battery you will not need them. Please see figure
6 & 7. to make certain you connect the batteries as shown in the diagram.
Home Switch Ltd
Home Switch Ltd
34 Bracken Bank Crescent | Keighley
West Yorkshire | BD22 7AX

12
Fig.6 Short Power Lead Connections and Data Cable Fig.7 Linking Of Batteries
Long Power Cable connection
If you have a single or multiple batteries, once connected your bank of battery power needs to be
connected to the SoFar Me3000SP unit. This cable is 2m long – which is the maximum distance possible
between the battery bank and the SoFar Me3000SP unit. Connect the long power leads to the GRID
positive and negative on the SoFar Me3000SP unit, and to the relevant positive and negative connections
On the battery as shown in figure 8.
Fig 8. Long Power Cable Connection to ME3000SP
Home Switch Ltd
Home Switch Ltd
34 Bracken Bank Crescent | Keighley
West Yorkshire | BD22 7AX

13
Dip Switches
The Dip switches do not have an impact on the performance of the system. Under operation with the
SoFar Me3000SP unit they have no functionality. For simplicity you can set them as in the image below
Fig 10. Dip Switches
4.1 Battery Connection
Ensure you have made connection of the power leads correctly when using single or
multiple batteries. See Fig 11.
Home Switch Ltd
Home Switch Ltd
34 Bracken Bank Crescent | Keighley
West Yorkshire | BD22 7AX

14
Fig. 11 Battery connection (Test battery wires polarity before connection)
Step 1: Loosen 4 screws (A) using a screwdriver (fig. 6);
Step 2: Remove the waterproof cover (B), loosen the cable gland (C), and then remove the stopper (G);
Step 3: Route the battery wires (F) through the cable gland, then connect battery wires using OT terminal (E);
Step 4: Fasten the waterproof cover using 4 screws.
Ensure you have followed the image below for setting up the communication
between Batteries. See Fig 12.
Fig 12. Communication Set Up
4.2 CT / RS485 / NTC connection
Home Switch Ltd
Home Switch Ltd
34 Bracken Bank Crescent | Keighley
West Yorkshire | BD22 7AX

15
Schematic Diagram (ME 3000SP: energy storage add-on to existing renewable system)
CT Connections
There are 2 CT clamps which need to be connected. One is around the AC supply coming into the property, and the
other is around the AC feed from your renewable source to the fuse-board.
If you are installing close to the fuse-board then you may only need a short extension. If you need a longer run, as
you are locating the unit further away, you will need a longer extension.
Use Data cable to make this extension as this will ensure no interference from other devices when running longer
distances. Follow the chart below to see how to group the cables, and the image in figure 8 in order to make the
extension and to fit the sensor on the cable facing the correct direction.
Home Switch Ltd
Home Switch Ltd
34 Bracken Bank Crescent | Keighley
West Yorkshire | BD22 7AX

16
PV CT Clamp Insert AC CT Clamp Insert
Home Switch Ltd
Home Switch Ltd
34 Bracken Bank Crescent | Keighley
West Yorkshire | BD22 7AX

17
Fig 13. CAT 5 CT Extension Connection
Fig 14. Plastic Cover Connectors Fig 15. CT Clamp
CT wire Extension cable (network cable) ME 3000SP
Red Orange / white orange / brown / white brown CT+
Black Green / white green / blue / white blue CT-
Grid in connection with Fig 13.
Connecting the CT clamps to the ME 3000SP
CT clamps are connected using Data cable. Use the grid above (Fig 13.) to extend the length of data cable required.
Once you have the correct extension – attach the CT Fitting to the cable in order to connect the CT clamp to the ME
3000SP unit See Fig 14.
GRID
LOAD
Home Switch Ltd
Home Switch Ltd
34 Bracken Bank Crescent | Keighley
West Yorkshire | BD22 7AX

18
Fig 14. CAT 5 to ME3000SP CT Connector
Below Images Show Location for CT Connector See Fig 15.
Fig 15. Location for CT Connector
Step 1: Use network cable & terminal cap to extend the CT clamps to the necessary distance.
Step 2: Remove the cover as shown in Figure 9.Pass the cables through the cover BEFORE connecting to the
GREEN Terminals.
Step 3: Remove the waterproof cover (part B), loosen the cable gland (part C), then remove the stopper (part G)
Step 4: Route CT cable through the cable gland, connect CT cable to CT terminal, then insert CT terminal into
corresponding ports. (Form 1)
Home Switch Ltd
Home Switch Ltd
34 Bracken Bank Crescent | Keighley
West Yorkshire | BD22 7AX

20
Step 5: it is ONLY necessary to connect NTC for lead acid batteries:
Fig. 17 NTC connection
Step 6: fasten the waterproof cover using 4 screws.
4.2 Grid Connection
For most of the customers, please ONLY connect the GRID port.
Please leave LOAD port unconnected unless you are installing the critical load
As shown below Fig 18.
Fig 18. Grid & Load
Home Switch Ltd
Home Switch Ltd
34 Bracken Bank Crescent | Keighley
West Yorkshire | BD22 7AX
Other manuals for ME 3000SP
1
Table of contents
Other Mass Energy Inverter manuals
Popular Inverter manuals by other brands

SolaX Power
SolaX Power X3-PRO G2 Series Quick installation guide

Omron
Omron SX-F instruction manual

Cutting Edge
Cutting Edge SOLAR TRAILER Assembly and operation manual

Mitsubishi
Mitsubishi FR-A7NC instruction manual

Krigsvoll
Krigsvoll GeBe POWERMAN 1000is manual

Generac Power Systems
Generac Power Systems 006180-0 owner's manual