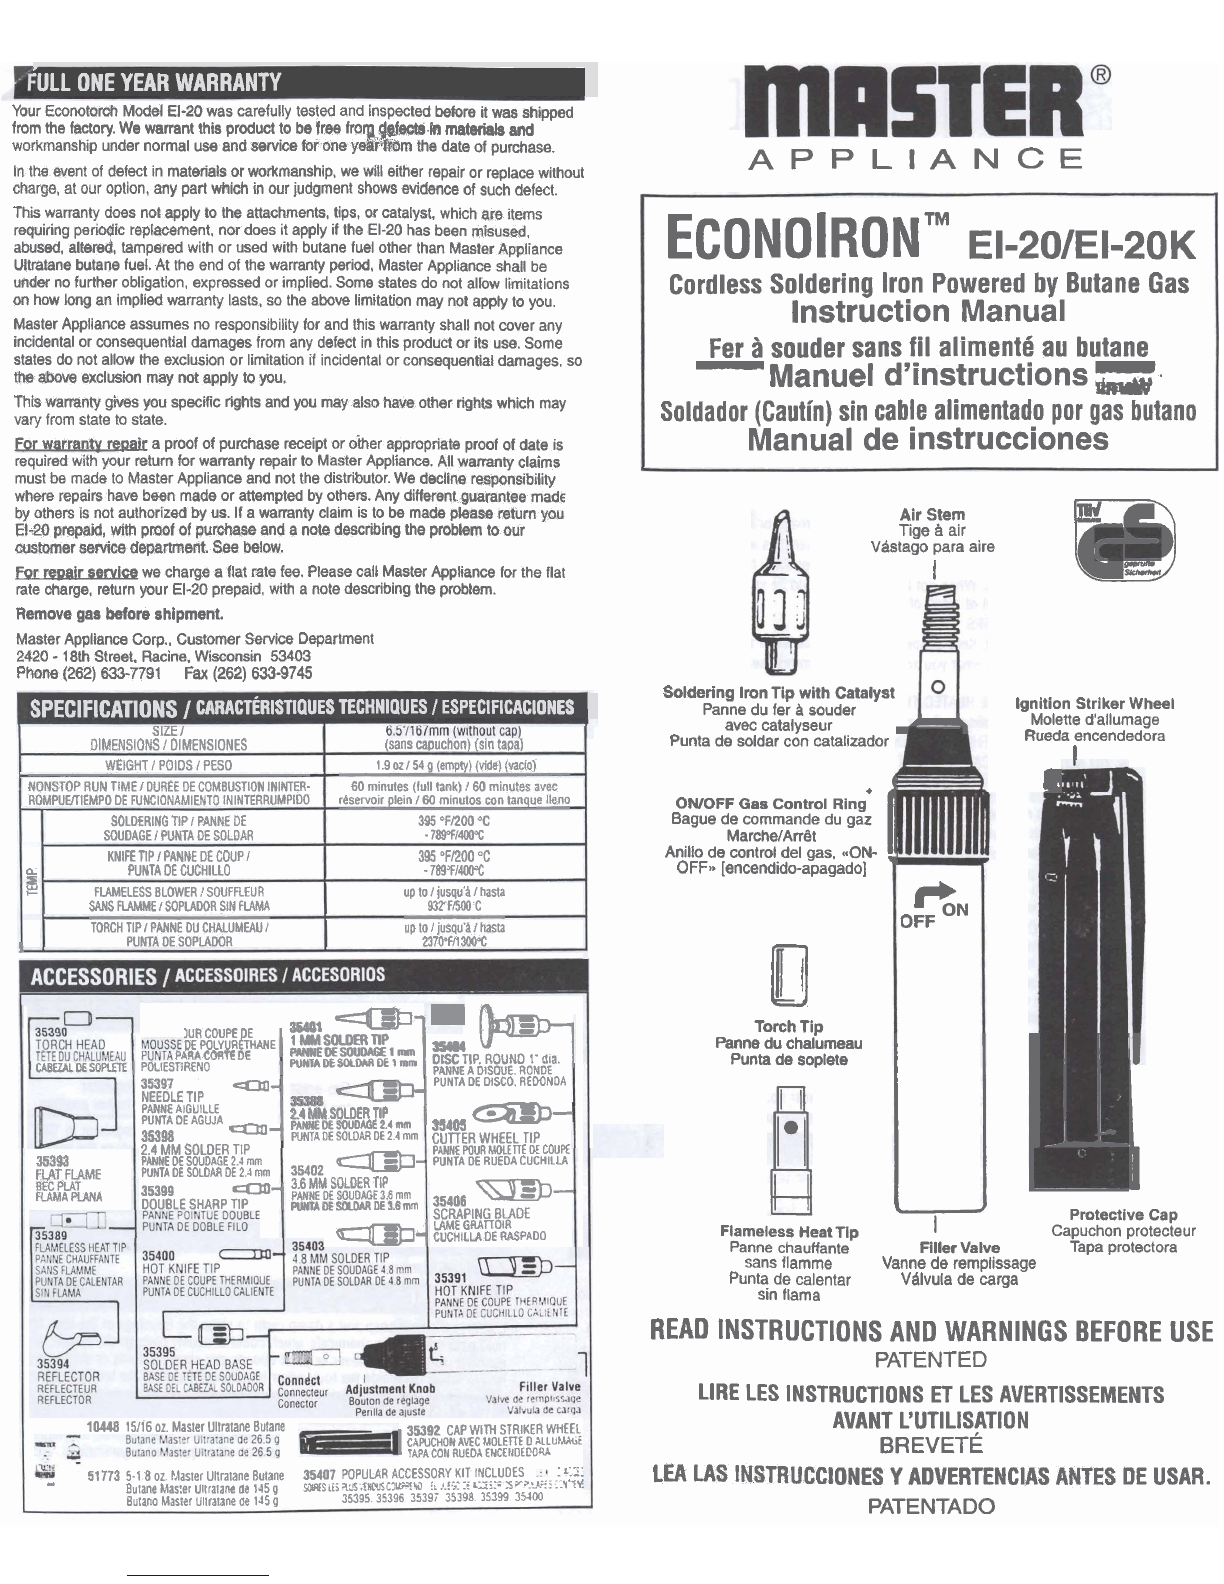
manuals.online logo
Brands
  1. Home
  2. •
  3. Brands
  4. •
  5. Master Appliance
  6. •
  7. Soldering Gun
  8. •
  9. Master Appliance ECONOIRON EI-20 User manual

Master Appliance ECONOIRON EI-20 User manual

b
:ULL ONE YEAR WARRANTY
1
SPECIFICATIONS
/
CARACTERISTI~UES
TECHNIQUES
I
ESPEClFlCAClONES
(
ECONOIRON"
EI-201~1-~OK
Cordless Soldering lron Powered
by
Butane Gas
Instruction Manual
Fer
a
souder sans fil alimente au butane
-
Manuel d'instructions
,.
Soldador (Cautin) sin cable alimentado por gas butano
Manual de instrucciones
SIZE
I
(sanscapuchon)(slntapa)
I
.9
oz
154
0
(emp$)
(wde)
(WQ)
60
mmutes (lulltank)
160
minutes
avec
rbservo~rpleln
160
rnlnutoscon tanque Ibo
395
"FRO0
OC
-
789414W"C
395
0~~200
"c
-
789714W"C
up
ta
I
lusqu'b
I
hada
93;rF/5M)
C
up
to
I
lusqul
l
hMta
237Wl30QT.
DIMENSIONS
I
DIMENSIDNES
WEIGHT
I
POIDS
I
PESO
NONSTOP
RUN
TIME
I
DUeE
DE
COMBUSTION
ININTER-
ROMPWIEMPO
DE
NNCIONAMIENTOININTERRUMPIDO
Your Econotorch ModelEl-20was carefullytested and inspectedbefore
it
was shipped
from the factory. We warrant thisproductto
be
free fro fects
in
materialsand
workmanship under normal
111.
andservicefor
one
y&%m
the date of purchase.
In
the event of defect In materialsor workmanship, we wit1 either repair or replacewithout
APPLIANCE
charge, at our option, any partwhich
in
our judgment shows evidence of such defect.
This
warranty does notapply to the attachments, tips, or catalyst, which are ~tms
requiringperiodicreplacement, nor does 11apply if the El-20has been misused,
abused, altered, tampered with or usedw~thbutane fuelother than MasterAppliance
UItratanebutane fuel. At the end of the warranty period.Master Appl~anceshall be
under no further obligation,expressedor ~mplied.Some states do not allow limltatlons
on
how longan implledwarranty lasts, so the above limitationmay not apply to you.
MasterAppliance assumes
no
responsibilityfor and thts warranty shallnot cwer any
incidentalor consequentialdamages from any defect inthis productor its use. Some
states
do
not allow the exclus~onor
limitation
d
inc~dentalor consequentialdamages,so
the
mve
exclusion may notapply
to
you.
Thls warranty gives you specific rights andyou may also
have
other rightswhich may
vary from state
to
state.
For
warrantv
wg&
a proofof purchasereceiptor other appropriateproof of date IS
requiredwith your returnfor warranty repairto Master Appliance. All wamtyclaims
must be made to MasterApplianceand not the distributor.We decline responsibility
where repairs
have
been madeor attemptedby others. Any differentguarantee made
by othersIS not authorizedby us. If a warranty clam IS to be made pbsreturnyou Air Stem
El-20
prepaid, with proofof purchaseanda notedescribingthe problem
to
our Tige
B
air
customer sefvicedepartment. See below. Vlstago paraaire
For
we chargea flat rate fee. PleasecallMaster Appliance for the flat
rate charge, returnyour €1-20 prepa~d,wcth a notedescribingthe problem.
I
Removegas beforeahlpment.
a
Master Appliance Corp., Customer Service Department
2420
-
18th
Street. Racine,
Wisconsin
53403
Phone (262)
633-7791 Fa
(262)
633-9745
Soldering lronTip with Catalyst
Panne du fer
a
souder IgnitionStriker Wheel
avec catalyseur Moletted'allumage
Puntade soldar con catalizador Ruedaencendedora
I
OWOFF
Gas
Control Ring
+
I
m
Baguedecornmandedugaz
MarcheIArret
Anlllo de controldel gas.
'<ON-
35404
--
-
-
w
w
Lw
RRwE
~~~~~\~:~~~I
mm
35404
ww
'ORE
pUNTA
DL
SOLDM
DE
1
mm
Tlp.k
WBMLESWCETE
POLlESnRENO
PANNE
A
DISOUE
ROMDE
35397
a-
PUNTA
DE
DISCO
REWNDA
NEEDLE TIP
PANNE
AlGUlLLE
PUNTA
DE
AGUJA
2.4
MM
SOLDER
TIP
PANE
DE
SOUD~E
2
4
mm
35405
m-
35998
--
PUNTAOE
SOLOAR
OE
2
4
mm
CUllER
WHEEL
TIP
2.4
MM SOLDER
TIP
PW
WUR
MOCETTE
OL
CWE
3634
PANM
DE
SOUDAGE
2
4
mm
35402
--
PUNTA
DE
RUEDA
CUCHILLA
:#T&~ME
PUMA
DE
SOLDAR
DE
2
4
mm
3
6
MM
SOLDER
TIP
FUMA
FLW
~~~~LE
SHARP
TF-
PAM%
DE
SOUDAGE
3.6
mm
WNTA
DE
SOLOAR
DE
3
6
mm
35Q08
---
SCRAPING BLADE
--
%~If~$06PAD0
1044E
15/16
oz
Master Ullralane Butam
I
35392
CAP
WITH
STRIKER
WHEEL
CAFiJCHONAEC
MOLEnf
D
XlbfMbr
TAPA
CON
RUEDA
ENCINOECW
51773
5.1
8
02
tAasler
~ijralane
Butane
35407
WPULAR
ACCESSORY
KIT
W3JJDES
:'.>-
-
B~~~~
,.,as:e,
UlrralaM
as
145
g
WR~SL[SSS
.?nrsCW;TW
i~
*!Z:i
z;i::
Xr'?-kc::.
Y"i'4
aulano
Masier
ullrarane
w
145g
35395
35396 3539; 35398 35399 354W
B
K
i
OFF].
[encendido-apagado]
0
TorchTip
Panne duchalumeau
Puntade soplete
SOLDERING
TIP
I
PANNE
DE
SOUDAGE
I
PUMA
DE
SOLDAR
KNIFE
n~
I
PANNE
DE
COUP
I
PUNTA
DE
CUCHILLO
FLAMELESS
BLOWER
!
SOUFREUR
SANS
RAMME
I
SOPLAWR
SIN
WMAA
TORCH
TIP
l
PANNE
DU
CHALUMEAU
I
PUNTA
OE
SDPLAODR
a.
OFF
i
I
,
Protective
I
Cap
Flameless HeatTip Capuchon protecteur
Pannechauffante FillerValve Tapa protectora
sans flamme Vanne de remplissage
Puntade calentar Vllvula de carga
sln flama
READ INSTRUCTIONS AND WARNINGS BEFORE USE
PATENTED
LIRE LES INSTRUCTIONS
ET
LES AVERTISSEMENTS
AVANT L'UTILISATION
BREVETE
LEA LAS INSTRUCCIONES
Y
ADVERTENCIASANTES
DE
USAR.
PATENTADO
Fig
1
w
Warnings:
1.1 Soldering Ironcontains
flainmabte
g@ (Butane) unLrpressure-use With care.
1.2 Do MOT expeto heatabove t50"C (t120DF)and avoidprolongedexposureto the sun.
1.3 Do NOT punctureor incinerate.
1.4 Excessivegas flow, flamingor catalyst pulsing redmay occur
vffwn
the
regulatoris
incorrectlyadjusted, i.e.. set high. Itisessential,therefore, to keep ironaway from
face and body when igniting.
1.5
Do NOT refill,ignite or use near flame, heater, furnace or combustiblematerials.
1.6
KEEPWORK AREA CLEAN. Clutteredareas and benches invite injuries.
1.7 KEEP CHILDRENAWAY.
All
visitorsshould be keptaway from work area.
1.8 STORE IDLETOOLS.
When
flat in use, tools shouldhe stored indry, and high or
locked-up placesout of rmch of children.
1.9
USE SAFETY GLASSES.
1.10 DON'T OVERREACH. Keep proper footing and balance'atalltimes.
,
1.1
1 STAY ALERT. Watch what you are doing. Use commonsense. Do not operate tool
when you are tired.
1.12 DO NOT TOUGH THE HEATED TIP OR BARREL OF THE SOLDERlNGIRON.
1.13
DO NOT leaveoperatinge?
Rot
soldering ironunalsended.
1.14 ALWAYS
BE
SURE THESOWERING IRON IS COOL BEFORE STORING IT.
1.15 DO NOT REPLACE CAP WmfOUT
WITGHJNGOFF AND WSURJNGTIP HAS COOLED. Do ensure flames are
extinwished before
ning
down.
Ifflame does not self extinguishwithin 30seconds
anew
lip
isrequlreP
1,16
Do
UI
Iranina ventdated
%a.
1.17
Do
WTattemot to feadtust or reoair.
tttis
oroductisnot user serviceable.
tMR#4lM&
ThB
prbduct, when usedtor soldkngand slmilar applicalions, produces
eM& lurownto the Stateof Californiato cause cancer and birthdefects
or
other
repredwtive
Nrm.
WARMNG:
Tho
Departmentof Transportation Hazardous MaterialRegulationsforbii
w~drageof butaneor other flammablegas productson passengeraircraft.
DO
not pack
tht
ttSm
ar
any
other flammable gas item, inany checkedor carry-on baggage.
Cont8fmflammable gas under pressure. Do not use near sparks or open flame.
I@
aOt
ptrnaltte
or lnclnerate container or store at temperatures above
120"
F.
Lep
aat
Pf
rcssch
of
children.
1.
Make sure the gas control ring
IS
In'OFF position.
2. Hold refillcontalnerabove unit and press the container nozzle into gas refiller valve. (Fig 1)
3. Complete fill takes about 10 seconds: then allow a few minutes for gas to stabilize.
I
LIGHTING
o
1.
Push up. then turn the gas control ringclockwise to releasea small amount of gas
(hissrngsound) through the burner. (Fig
2)
2. Use the lighter ~ncap (or lighter) to Igniteat the tip exhaust ports (or torch). (Fig 3
&
4)
I
ADJUSTMENT
1.
Temperature can be controtledby the gas controlring between low and high.
..
Adjust the torch of flame to approx.
l/2
inch (12mm) length. Don'tmake the flame too
long, itw~llonly
waste
gas.
..
Adjust the ternp8raturefer soldering
(Also
hot knife
&
polyfoamcutter) to approx
1R
Posit~on.do not set the temperaturetoo highon work that will cause the tip's catalyst
to burn.
1.
When finlshed1~~~~
,..,
,-
YYc..,v.
I.lly
VII..Y.
..
.l-....--
."
.,,,
LIYI.
,,v~IIIYII
YllY
allow the tip (Torch) to cool before changing tips or storing.
Fig
6
2. Remove brass burner assembly and squirt 2 8hots of butwintoorificeto
clear
any debris
3. ReassemUeunit.
1.
Make surethe solder head and burnerare not hot.
2.
Removethe burner
head
from
the
connector and Fenscminthe solder
head
withthe
connector
and
thenscrew in(snug
fit)
any
smalltlp (See Opllonal Accessories) you
needfuryour job. (Fig
5)
3.
Refnowe
tlle
solder head
from
the conneotor, and screw inthe burnerhead, with
eolmmr
your
tool
can
nowbe used
as
at~rch.
(FQ
6)
I
TIPS ON USING YOUR SOLDERING IRON
I
1. Select the propersolder for your application. Mostsolderssoldtoday have the flux
insidetheir cores. When makina electric or electronicconnectionsalways use rosincore
solder. For mechanicaljoining where the surfaces can be washed after Gldering acid core
solder can be used. Common nonplumbingsolder isan alloy of tin and lead. A "60-40"
solder is60% tin and 40% lead. General purposesoldersrangefrom 40-60 to 60-40.
63-37 solder has the lowest melting temperatureand higheststrength. The diameter of
the solder wire should generally matchthe slze of the componentsto be joined.
2.
Be
sure
the
surfaces to
be
joined are clean. Remove any oil or grease. Surfaces can be
thoroughlycleaned by usingabrasives such as emery cloth, steel wool or byscraping
or filing. The flux inthe solder will removethe oxide layers which could prevent good
bonding.
NOTE: New unitsare shipped untinned. Remove plating at end of tip beforetinning.
3. BE SURE THE TIP OF THE SOl.DERlNGIRON IS CLEAN AND,WELL TINNED (COATED
WITH SOLDER). The solder on the
ti0
of the ironw~llmeltraoldlvand create a
conductive
path for thehktto;&$ the work$ece. A small additional'ambunt of solder may be
added to the tip while it is incontactwith the workpieceto ensure good heat conduction.
4. Ifpossibleconnect the workpieces mechanically, or positionthem as rigidlyas possible.
5. Allow the soldering ironto heat sufficiently:
1
minute minimumto about
3
minutesfor
optimumoperating temperature.
6. Apply the heatedtip of the soldering iron directly to the work. Heat the work surfaces
sufficientlvfor the solder to melton them. Aoolv the solderto the work surface directlv.
Do notjuit meltthe solder on the tip of the iroriallowingitto fall onto the work. This
'
will cause poor bonding betweenthe solder and the surfaces to be joined. Remove the
ironquicklyafter the solderflows on the work surfaces.
PROBLEM PROBABLE CAUSE CORRECTIONS
Does not ~gn~te LorviNo gas Ref~llwlth butane gas
Gas pressure Rotate the regulator
too hlgh or lovi to lower or h~gherposltlon
Excessive
gas flow Sen~ngtoo hlgh Adjust the regulator to
'OFF'
pos~t~on
or Catalyst pulsing gradually reduce the gas volume
red to black
TIP does not heat up Used up catalyst Replace w~thnew t~p
SAFETY STAND
Put unit on stand when not in use.
I
Use
only
the
mlldsoap and
a
damp
cloth
toclean
the
housings
ol
Ute
tool.
Many house-
hold cleanersOORtain chemicals which couldseriousiv damaoe
the
olastlc. Also do not use
--.~~
gasoline, turpentine. tacquer or paintthinner, dry cleaningfldds or bimilar products. Never
letany liquidget insidethe tool: never immerseany part of the tool intoa liquid.
1
IMPORTANT
I
To assure productSAFETY and RELIABILIN, repairs,maintenance, and adjustments
should be performedby Service Centers or other qualified organlzatlons. This tool contains
I
CLEANING ORIFICE
For peak performancecleaning the orlfice
periodically
is recommended.
I
1. Turn ofl gas control. Make sure unit
IS
cool.
no customer serviceablecomponents.

This manual suits for next models

1

Other Master Appliance Soldering Gun manuals

Master Appliance ECONOIRON EI-20 User manual

Master Appliance

Master Appliance ECONOIRON EI-20 User manual

Master Appliance MICROPRO BT-30 User manual

Master Appliance

Master Appliance MICROPRO BT-30 User manual

Popular Soldering Gun manuals by other brands

Edsyn SOLDAVAC VA175 Instructional manual

Edsyn

Edsyn SOLDAVAC VA175 Instructional manual

Metcal PS-900 Operation & User’s Guide

Metcal

Metcal PS-900 Operation & User’s Guide

Laser 3410 Instruction

Laser

Laser 3410 Instruction

Weller SI 120 operating instructions

Weller

Weller SI 120 operating instructions

Draper SI400 instructions

Draper

Draper SI400 instructions

jbc CDEB Series instruction manual

jbc

jbc CDEB Series instruction manual

jbc BT quick guide

jbc

jbc BT quick guide

Spike xg classic SGS-2000 series Operation manual

Spike

Spike xg classic SGS-2000 series Operation manual

jbc RA 5150 instruction manual

jbc

jbc RA 5150 instruction manual

Hakko Electronics 853 Replacing

Hakko Electronics

Hakko Electronics 853 Replacing

Zhongdi ZD-931 Operation instructions

Zhongdi

Zhongdi ZD-931 Operation instructions

Weller wd 2 operating instructions

Weller

Weller wd 2 operating instructions

Trotec PSIS 10-230V Original instructions

Trotec

Trotec PSIS 10-230V Original instructions

Fahrenheit 28523 user manual

Fahrenheit

Fahrenheit 28523 user manual

Hakko Electronics 942 instruction manual

Hakko Electronics

Hakko Electronics 942 instruction manual

Micron T 2443 operating instructions

Micron

Micron T 2443 operating instructions

jbc NANE instruction manual

jbc

jbc NANE instruction manual

Weller w series operating instructions

Weller

Weller w series operating instructions

manuals.online logo
manuals.online logoBrands
  • About & Mission
  • Contact us
  • Privacy Policy
  • Terms and Conditions

Copyright 2025 Manuals.Online. All Rights Reserved.