Master Appliance ProHeat PH-1400WK User manual

Master Appliance Corp.
2420 18th St.
Racine, WI 53403
USA
Tel: 1-800-558-9413 (toll free in the U.S.A. and Canada)
Tel: 262-633-7791 (all other Countries)
Fax: 262-633-9745
Email: [email protected]
www.masterappliance.com
MASTER
PROHEAT
®
Plastic Welding Kit
Welding Plastics with the
MASTER P
RO
H
EAT
®
Model PH-1400WK
Professional Quality Electronic Heat Gun
Plastic Welding Kit
P/N 58053 REV A © 2010 Master Appliance Corp.
35297
ABS Welding Rod
(Pkg. of 16)
Round, 1/8” Dia. x 9” Long, Natural,
for welding ABS plastics
35298
PP Welding Rod
(Pkg. of 16)
Round, 1/8” Dia. x 9” Long, Natural,
for welding PP plastics
35299
PVC Welding Rod
(Pkg of 16)
Round, 1/8” Dia. x 9” Long, Grey,
for welding PP plastics
35300
LDPE Welding Rod
(Pkg of 16)
Round, 1/8” Dia. x 9” Long, Natural,
for welding LDPE plastics
35301
HDPE Welding Rod
(Pkg. of 16)
Round, 1/8” Dia. x 9” Long, Black,
for welding HDPE plastics
MASTER PLASTIC WELDING ROD REORDER INFORMATION
MSDS Sheets available upon request.
Warning: These products contain chemicals known to the State of California to cause
cancer and birth defects or other reproductive harm.
Users should independently evaluate the suitability of the product for their application.

PLASTIC WELDING
Basic requirements for plastic welding. TIME, TEMPERATURE & PRESSURE
Most plastics used today are thermoplastics, which are generally suitable for
repair by welding.
Four basic rules for plastic welding are suggested:
1. Weld with like material.
Only like materials can be welded, i.e. PP with PP.
2. Correct temperature. The plastic should be pre-heated. Select the right
temperature matched to the material being repaired.
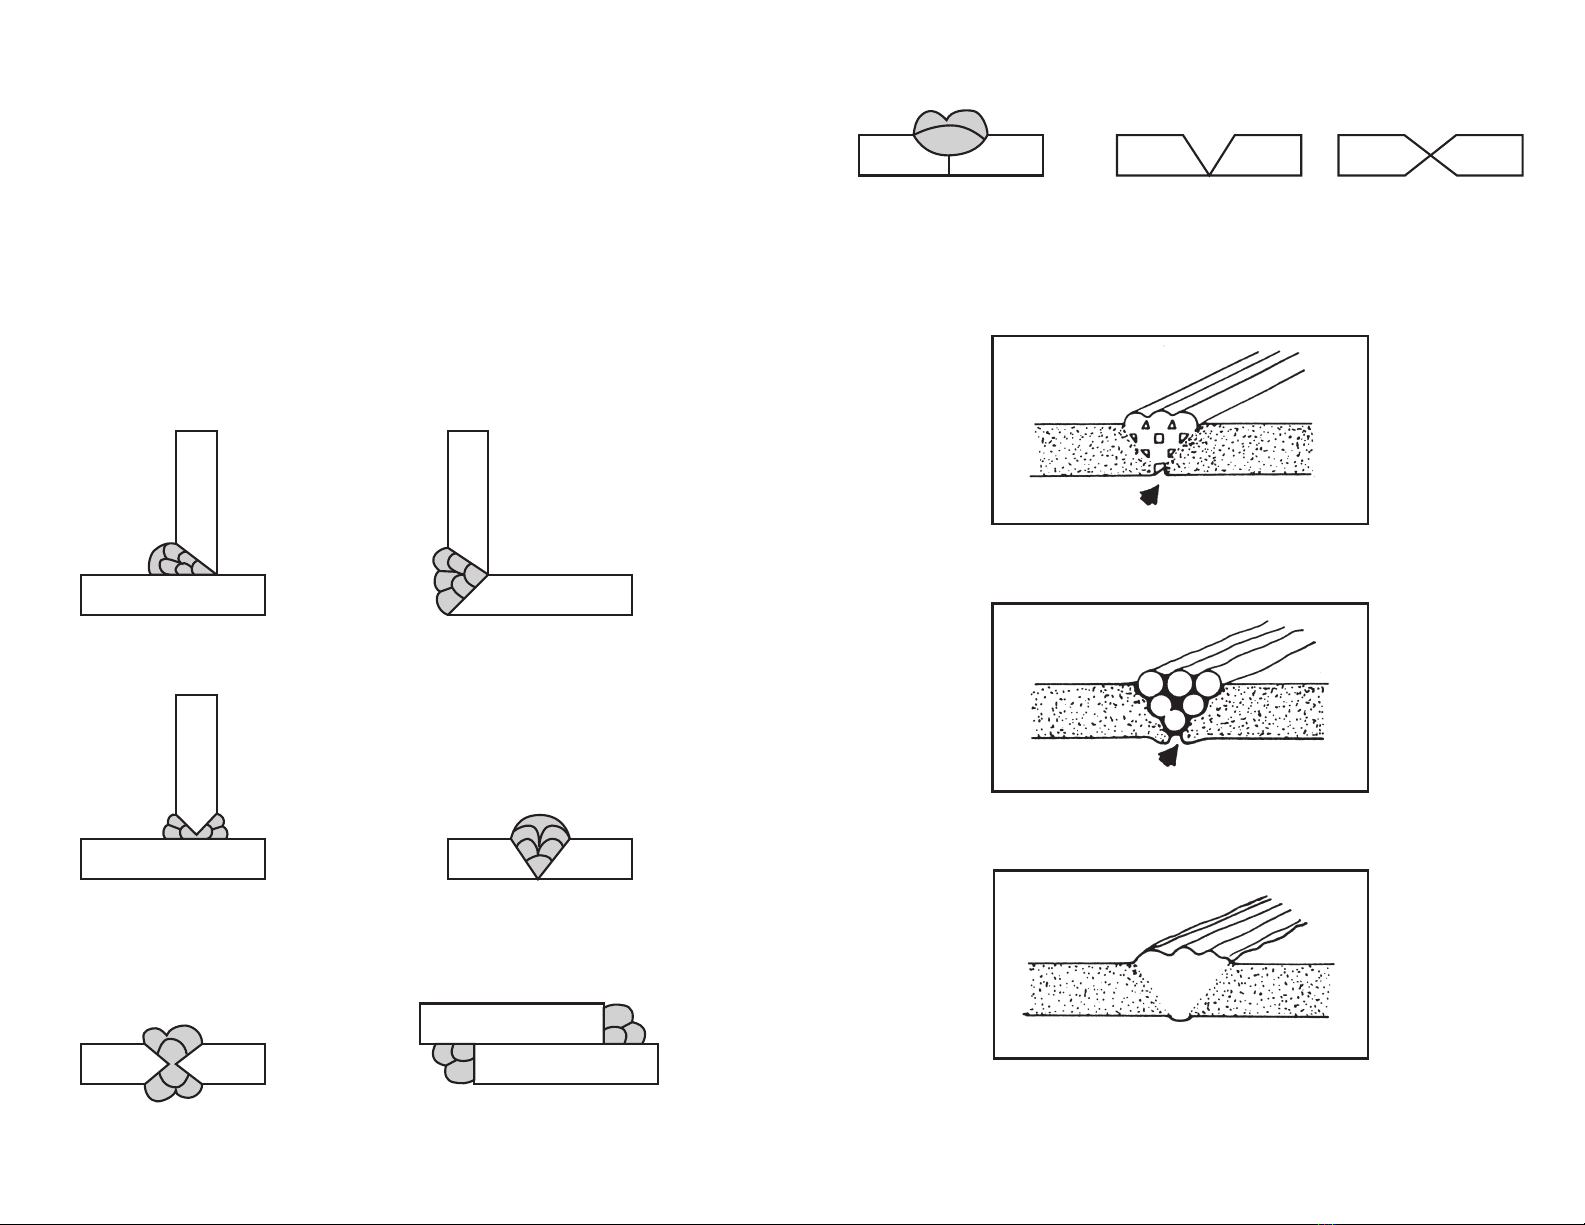
3. Even pressure.
When welding with rods, the pressure is applied by
pressing on the welding rod. For overlap welding of films and tarpaulins, the
necessary pressure is applied with the help of the optional pressure roller.
4. Constant welding speed. To achieve a good weld, an even working
speed should be maintained. When welding plastics with the Master
Proheat, the following three variables are critical to achieve a good weld.
TIME, TEMPERATURE & PRESSURE
• Time. If you move the heat tool too fast or too slow, the quality of the weld
will be compromised. Maintain constant speed during the welding process.
• Temperature. Set the welding temperature for the plastic that you are
welding. Adjust the temperature and airflow to obtain the best setting
combination for the plastic you are working with. Locking-in the setting
enables you to maintain the set temperature throughout the welding pro-
cess. The Master Proheat Model PH-1400 has the ability to tightly control
and lock-in the temperature through an on-board electronically controlled
temperature and air speed system. See the heat gun instruction manual
on how to lock-in settings.
• Pressure. Pressure is applied by pushing down on the welding rod while
welding or, if butt welding, on the two edges that are being overlap welded
together. Master Appliance Corp. manufactures precise welding tips that
help the welder apply equal pressure throughout the welding process.
Thermoplastic welding temperatures.
There are different types of plastic so it is important to identify the type you are
working on in order to make sure that the proper welding rod is used. Thermo-
plastics can be formed with heat and retain their shape after cooling and can be
easily welded. Thermosets (Duroplastics and Elastomers) cannot be welded.
Duroplastics are hardened with heat and their shape cannot be changed with
heat. Elastomers (rubber) can be formed with heat but cannot be welded.
MASTER
PROHEAT
®
Plastic Welding Kit
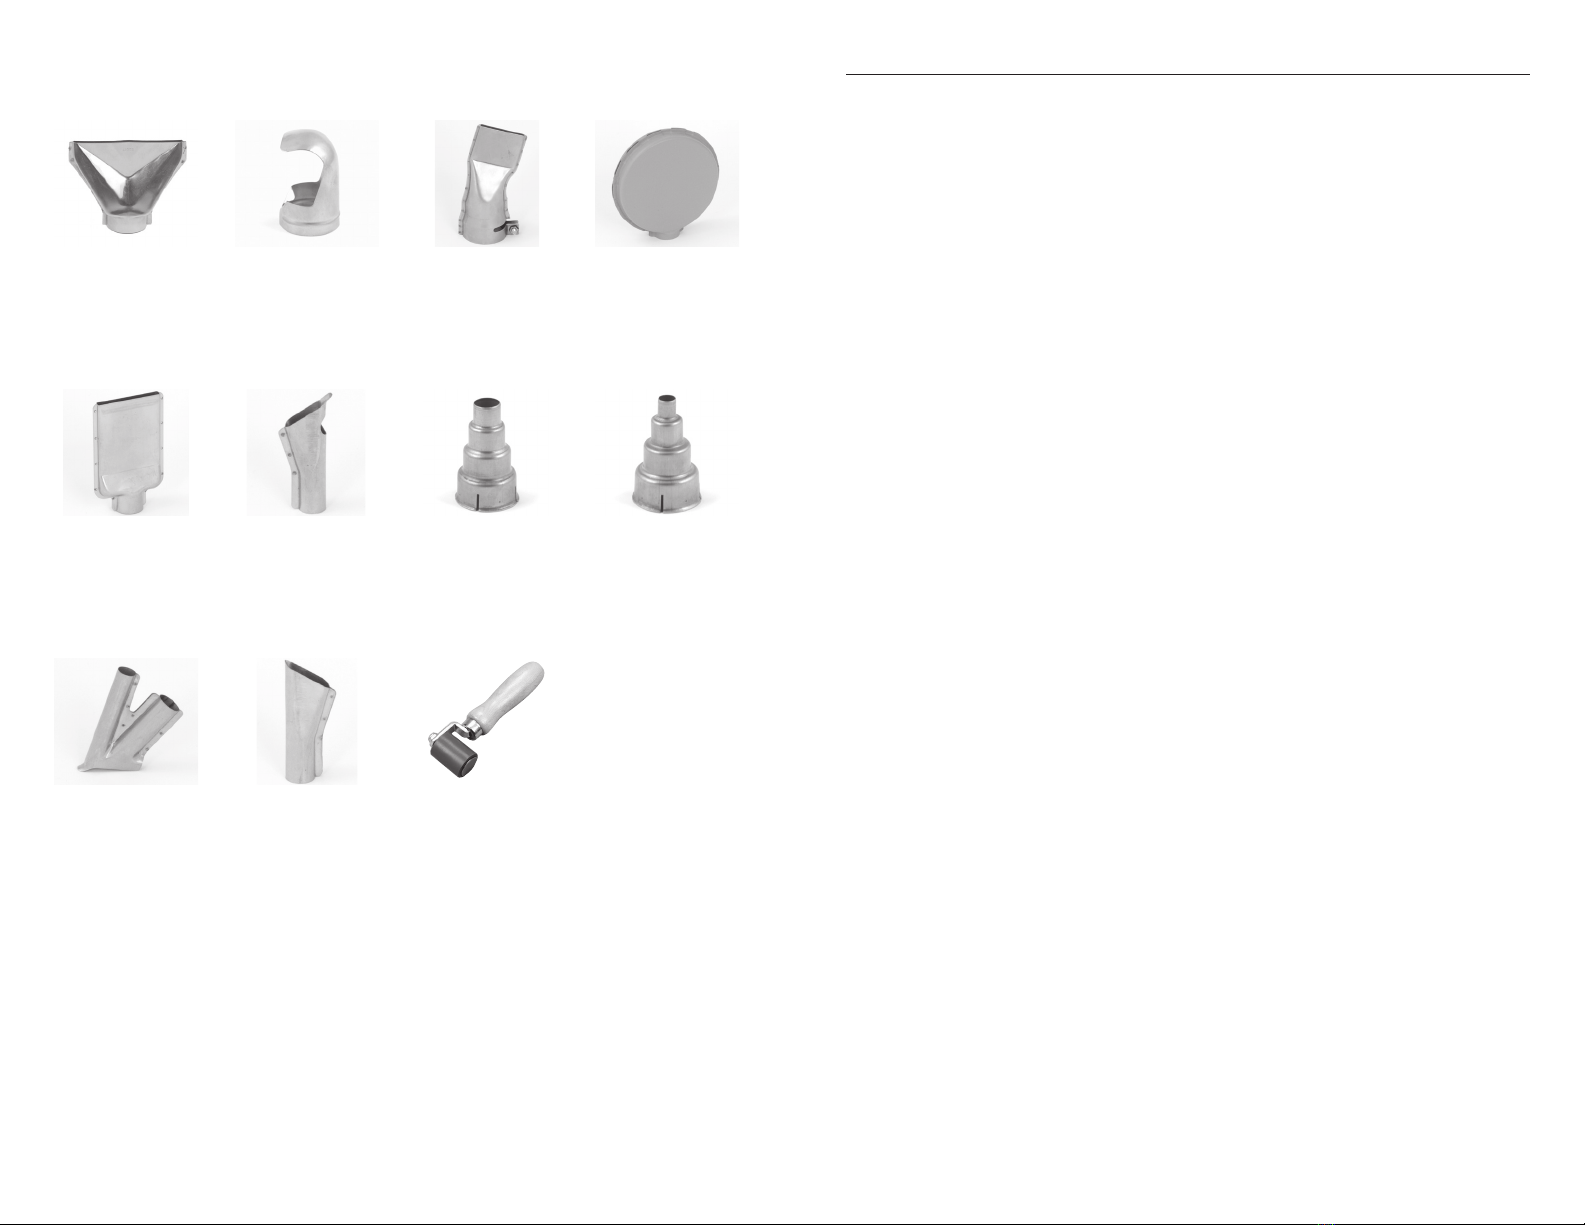
Each Welding Kit Includes:
PH-1400
• Dial-in LCD display of temperature and airflow settings
• Dial-in temperatures in 10 increments 130 F to 1,000 F
• Dial-in airflow from 4 to 16 CFM (113 to 453 l/min)
• Control system prevents overheating when using specialty attachments
• Temperature & airflow lock-in feature
• Assembled in USA
• One Compact, Lightweight,
Easy to Use, Master
Proheat® Model PH-1400
Heat Gun
• 5 Starter Welding Rod
Assortment
• 6 qty– 1/8” Dia., 9” Long,
Round PVC Welding Rod
• 6 qty– 1/8” Dia., 9” Long,
Round PP Welding Rod
• 6 qty– 1/8” Dia., 9” Long,
Round ABS Welding Rod
• 6 qty– 1/8” Dia., 9” Long,
Round HDPE Welding Rod
• 6 qty– 1/8” Dia., 9” Long,
Round LDPE Welding Rod
• Speed Welding Tip
• For welding rod up to
6mm dia.
• Slit nozzle
• To melt plastic welding rod
• 3/8” Reducer
• To adapt welding tips to
• 5/8” Reducer
• To provide concentrated
airflow
• 1 ¼” Shrink Attachment
• Reflects air around shrink
tubing or pipe
• Plastic Welding & Proheat
Instruction Manuals
• Informative How to Use
Instructions
• Heavy Duty Storage &
Carrying Case
• Safely & conveniently stores
Kit contents
PH-1400WK

Material Working Temperature
Polyethylene (PE) 550°F 288°C
Polypropylene (PP) 575°F 302°C
Acrylonitrile Butadiene Styne (ABS) 500°F 260°C
Polyvinyl Chloride (PVC) 525°F 274°C
Polyurethane (TPUR) 575°F 302°C
High Density Polyethylene (HDPE) 575°F 300°C
Low Density Polyethylene (LDPE) 520°F 270°C
Testing the weld rod: Temperature setting is correct when the rod becomes
soft and tacky. If the rod starts to liquefy the temperature setting is too hot.
Welding Temperatures: Heat gun temperature settings are important to
welding results. Over heated or under heated welds will result in poor weld
joints and should be avoided.
Practice. The user should practice on a piece of scrap material prior to start-
ing on the repair project. Heat gun temperatures may vary from the working
temperature of the plastic type. Welding plastics takes patience and repetition
to become proficient.
Plastic Welding
Remove the damaged item from cold and windy conditions.
Pre-clean the damaged area with warm soapy water and dry off.
Align parts to be joined by positioning as needed for welding. You may need
to clamp parts.
Install the appropriate welding tip on your Master Proheat Heat Gun. Preheat
the heat gun for approximately 1 minute to desired temperature before
starting the welding process. Use extreme caution. Please read and
understand the instruction manual before use of this tool.
Weld rod should have a clean end to start welding. Trim cut any weld rod with
a used or deformed end. You should also cut the rod to the length of the weld
joint to minimize any weak spot in the weld joint.
Once the heat tool is at the proper temperature, place the heated weld tip
on the surface of the plastic part you need to weld. When the surface of the
plastic part begins to melt, feed your plastic welding rod into the preheated
welding attachment and feed your rod in a steady motion moving your appli-
cator tip along the repair joint. Do not pull on the rod. Let the rod melt into the
joint as you move steadily along the weld joint.
Watch the area where the rod meets the plastic part. You should see a small
MASTER WELDING TIPS
35016
3” (75 mm) Spreader
Spreads air evenly over
wide areas
35017
1 1/4” Shrink attachment
Reflects air around
surface’s such as tubing
or pipe
35266
1 1/2” 40mm Angle Slit
Nozzle
Lap welds roofing
materials
35267
3” (75mm) Teflon Coated
Butt Welding Heat Disc
For butt welding
PVC pipes
35268
1 1/2” (40mm) Lap
Welding Slit Nozzle
For lap welding PVC
Sheeting
35271
Plastic Welding Rod Slit
Nozzle
Use to melt plastic welding
rod, Use w/ 3/8” reducer
35293
5/8” (14 mm) Reducer
Concentrates air flow
35294
3/8” (9 mm) Reducer
Concentrates air flow. Also
used with weld tips
35295
Speed Welding Tip w/
7mm intake
For welding rod up 6mm,
Use with 3/8” reducer
35296
3/4” (20 mm) Lap Weld-
ing Nozzle
For lap welding plastic
materials, Use with 3/8”
reducer
35291
Seam Roller with ball
bearings
For lap welding,
edging tape and
roofing applications

puddle of melted plastic flowing in front of the weld rod. This will confirm that
you have the proper heat setting and speed. If the surface of the piece being
welded starts to burn, pull the heat tool at a faster pace to avoid overheating.
At the end of the weld joint cut the rod off with knife or side cutter. Allow the
weld joint to cool to room temperature before testing the strength of weld.
Depending on the thickness of the rod and/or the base material, more than
one pass may be necessary.
Weld Types:
Below are examples of various types of Welds. Many of the welds are similar
in nature to metal welds and use some of the same welding techniques.
Many times surface materials are grooved to allow easy filling with
welding rod.
No bond, rods not completely fused
(weld can be pulled apart)
Proper weld (rods fused)
Burned weld and material charred,
rods not completely fused (weak weld)
Types of Welds Continued:
Inside Corner Welds Outside Corner Welds
Fillets and Corner Welds Single “V” Butt Welds
Double “V” Butt Welds Overlap Fillet Welds
Edge Welds Butt Welds, note V groove preparation
Proper and Improper Weld Illustrations:
Inside Corner Welds Outside Corner Welds
Fillets and Corner Welds Single “V” Butt Welds
Double “V” Butt Welds Overlap Fillet Welds
Edge Welds Butt Welds, note V groove preparation
Users should independently evaluate the suitability of the product for their
application.
Other Master Appliance Welding System manuals
Popular Welding System manuals by other brands

Lincoln Electric
Lincoln Electric INVERTEC IM526-B Operator's manual

Kemppi
Kemppi Promig 300 Operation instructions

CEA
CEA DIGITECH 400 PULSED Operator's manual

Lincoln Electric
Lincoln Electric COMMANDER SVM145-B Service manual

Linde
Linde Ryval 400 aXe instruction manual

Lincoln Electric
Lincoln Electric 12447 Operator's manual

Miller
Miller Thunderbolt 225 owner's manual

Miller Electric
Miller Electric Millermatic 250 owner's manual

EWM
EWM Mira 301 KGE-M2.20 operating instructions

Harbor Freight Tools
Harbor Freight Tools TITANIUM TIG200 owner's manual

Paton
Paton Feeder-15-2 Data sheet and operating manual

Miller
Miller Trailblazer 302 Diesel owner's manual