Mastervac 054-7548-8 User manual

headline bars
continuation tabs
notes
warnings
model no. 054-7548-8
CORDLESS HANDHELD
VACUUM KIT WITH 4
ACCESSORIES
IMPORTANT:
Read and understand this instruction manual thoroughly
before using the product.
INSTRUCTION
MANUAL

headline bars
continuation tabs
notes
warnings

headline bars
continuation tabs
notes
warnings
3
TABLE OF CONTENTS
Technical Specifications 4
Safety Guidelines 5
Key Parts Diagram 10
Operating Instructions 11
Maintenance 14
Troubleshooting 15
Parts List 16
Warranty 18
NOTE:
If any parts are missing or damaged, or if you have any questions,
please call our toll-free helpline at 1-800-689-9928.
SAVE THESE INSTRUCTIONS
• This manual contains important safety and operating instructions. Read all
instructions and follow them when using this product.
TABLE OF CONTENTS

headline bars
continuation tabs
notes
warnings
model no. 054-7548-8 | contact us 1-800-689-9928
4
TECHNICAL SPECIFICATIONS
Rated Voltage 20V max*
Run time (using 1.5 Ah Li-ion battery
(054-3124-0)) 11 min
Weight (without accessory) 2 lb (0.9 kg)
Batteries 1.5 Ah Li-ion (054-3124-0; sold separately)
3.0 Ah Li-ion (054-3125-8; sold separately)
*Maximum battery voltage without workload; with workload nominal voltage is 18V.

headline bars
continuation tabs
notes
warnings
5
SAFETY GUIDELINES
WARNING!
Safety symbols in this instruction manual are used to flag possible dangers. The safety
symbols and their explanations require your full understanding. The safety warnings do not,
by themselves, eliminate any danger, nor are they substitutes for proper accident prevention
measures.
WARNING!
This Safety Alert Symbol indicates caution, warning, or danger. Failure to obey a safety
warning can result in serious injury to yourself or others. To reduce the risk of injury, fire, or
electric shock, always follow the safety precautions.
KNOW YOUR TOOL
To operate this tool, carefully read this instruction manual and all labels affixed to the cordless handheld
vacuum before using. Keep this manual available for future reference.
IMPORTANT
This tool should only be serviced by a qualified service technician. For more information, call the toll-
free helpline at 1-800-689-9928.
READ ALL INSTRUCTIONS THOROUGHLY
SAVE THESE INSTRUCTIONS
GENERAL POWER TOOL SAFETY WARNINGS
WARNING!
Read all safety warnings and instructions. Failure to follow the warnings and instructions
may result in electric shock, fire and/or serious injury
SAVE ALL WARNINGS AND INSTRUCTIONS FOR FUTURE REFERENCE.
The term “power tool” in the warnings refers to your mains-operated (corded) power tool or battery-
operated (cordless) power tool.
WORK AREA SAFETY
• Keep the work area clean and well lit. Cluttered or dark areas invite
accident
s.
• Do not operate power tools in explosive atmospheres, such as in the presence of
flammable liquids, gases or dust. Power tools create sparks, which may ignite the dust or
fumes.
• Keep children and bystanders away while operating a power tool. Distractions can cause you
to lose control.
SAFETY GUIDELINES

headline bars
continuation tabs
notes
warnings
6
model no. 054-7548-8 | contact us 1-800-689-9928
ELECTRICAL SAFETY
• Power tool plugs must match the outlet. Never modify the plug in any way. Do not use any
adaptor plugs with earthed (grounded) power tools. Unmodified plugs and matching outlets
will reduce risk of electric shock.
• Avoid body contact with earthed or grounded surfaces, such as pipes, radiators, ranges and
refrigerators. There is an increased risk of electric shock if your body is earthed or grounded.
• Do not expose power tools to rain or wet conditions. Water entering a power tool will increase
the risk of electric shock.
• Do not abuse the cord. Never use the cord for carrying, pulling or unplugging the power
tool. Keep cord away from heat, oil, sharp edges or moving parts. Damaged or entangled
cords increase the risk of electric shock.
• When operating a power tool outdoors, use an extension cord suitable for outdoor use. Use
of a cord suitable for outdoor use reduces the risk of electric shock.
• If operating a power tool in a damp location is unavoidable, use a ground-fault circuit
interrupter (GFCI) protected supply. Use of a GFCI reduces the risk of electric shock.
PERSONAL SAFETY
• Stay alert, watch what you are doing, and use common sense when operating a power
tool. Do not use a power tool while you are tired or under the influence of drugs, alcohol or
medication. A moment of inattention while operating power tools may result in serious personal
injury.
• Use personal protective equipment. Always wear eye protection.
Protective equipment
such
as a dust mask, non-skid safety shoes, a hard hat, or hearing protection used for appropriate
conditions will reduce personal injuries.
• Prevent unintentional starting. Ensure the switch is in the off-position before connecting
to the power source and/or battery pack, or picking up or carrying the tool. Carrying power
tools with your finger on the switch or energising power tools that have the switch on invites
accidents.
• Remove any adjusting key or wrench before turning the power tool on. A wrench or a key left
attached to a rotating part of the power tool may result in personal injury.
• Do not overreach. Keep proper footing and balance at all times. This enables better control of
the power tool in unexpected situations.
• Dress properly. Do not wear loose clothing or jewellery. Keep your hair, clothing and gloves
away from moving parts. Loose clothes, jewellery or long hair can be caught in moving parts.
• If devices are provided for the connection of dust extraction and collection facilities, ensure
that these are connected and properly used. Use of these devices can reduce dust-related
hazards.
POWER TOOL USE AND CARE
• Do not force the power tool. Use the correct power tool for your application. The correct
power tool will do the job better and more safely at the rate for which it was designed.
SAFETY GUIDELINES

headline bars
continuation tabs
notes
warnings
7
• Do not use the power tool if the switch does not turn it on and off. Any power tool that cannot
be controlled with the switch is dangerous and must be repaired.
• Disconnect the plug from the power source and/or the battery pack from the power tool
before making any adjustments, changing accessories, or storing the tool. Such preventive
safety measures reduce the risk of starting the power tool accidentally.
• Store idle power tools out of the reach of children and do not allow persons unfamiliar with
the power tool or these instructions to operate the power tool. Power tools are dangerous in
the hands of untrained users.
• Maintain power tools. Check for misalignment or binding of moving parts, breakage of
parts and any other condition that may affect the power tool’s operation. If damaged, have
the power tool repaired before use. Many accidents are caused by poorly maintained power
tools.
• Keep cutting tools sharp and clean. Properly maintained cutting tools with sharp cutting edges
are less likely to bind and are easier to control.
• Use the power tool, accessories, tool bits, etc. in accordance with these instructions, taking
into account the working conditions and the work to be performed. Use of the power tool for
operations different from those intended could result in a hazardous situation.
BATTERY TOOL USE AND CARE
• Use only the charger specified by the manufacturer to recharge. A charger that is suitable for
one type of battery pack may create a risk of fire when used with another battery pack.
• Use power tools only with specifically designated battery packs. Use of any other battery
packs may create a risk of injury and fire.
• When battery pack is not in use, keep it away from other metal objects, like paper clips,
coins, keys, nails, screws or other small metal objects, that can make a connection from
one terminal to another. Shorting the battery terminals together may cause burns or a fire.
• Under abusive conditions, liquid may be ejected from the battery; avoid contact. If contact
accidentally occurs, flush with water. If liquid contacts eyes, additionally seek medical help.
Liquid ejected from the battery may cause irritation or burns.
SERVICE
• Have your power tool serviced by a qualified repair person using only identical replacement
parts. This will ensure that the safety of the power tool is maintained.
SAFETY GUIDELINES FOR CORDLESS HANDHELD VACUUM
• Hold the power tools by the insulated gripping surfaces when performing an operation
where the tool may contact hidden wiring or its own cord. Contact with a “live” wire may
make exposed metal parts of the power tool “live” and could give the operator an electric shock.
SAFETY GUIDELINES

headline bars
continuation tabs
notes
warnings
8
model no. 054-7548-8 | contact us 1-800-689-9928
• To reduce the risk of electric shock or damage to the charger and battery, use only the
batteries and charger listed. Read the manuals of the charger and battery before using.
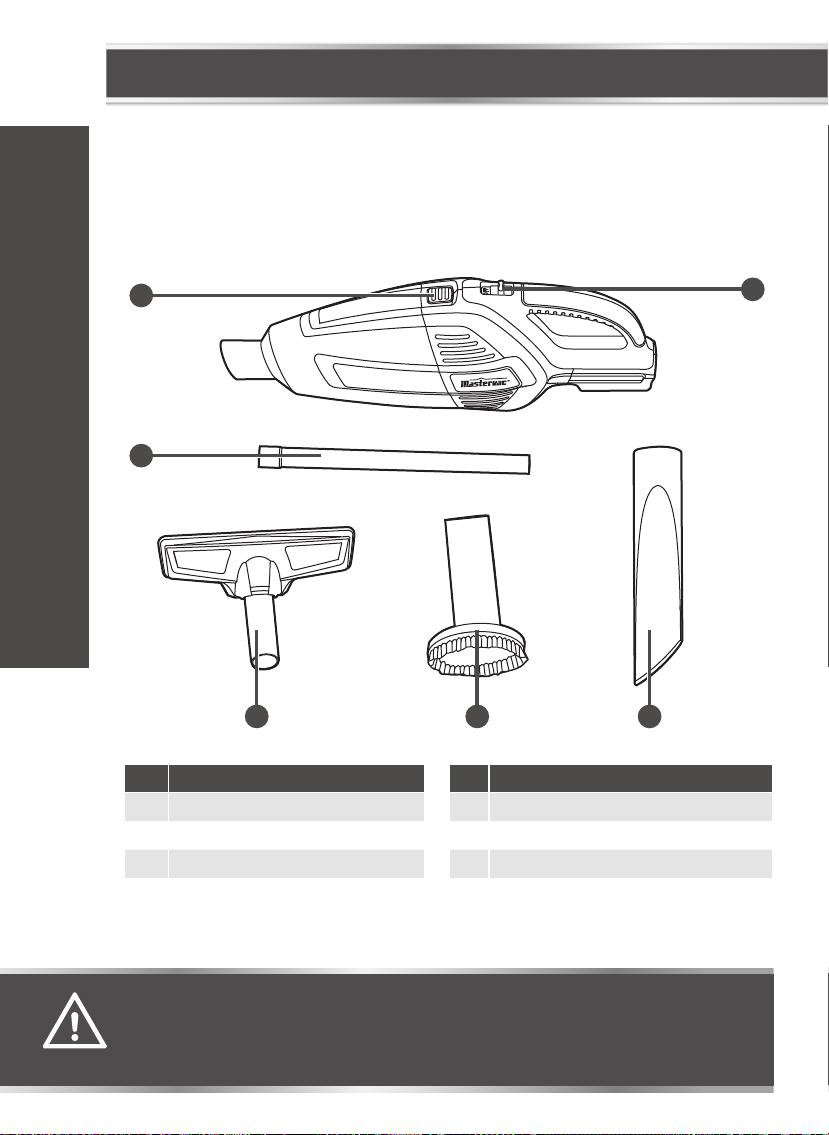
BATTERY PACK CHARGER
054-3124-0; 054-3125-8 054-3126-6
• This vacuum is intended for household use only. Do not use outdoors or on wet surfaces.
• Do not allow children to operate the handheld vacuum as a toy. Close attention is necessary
when used near children.
• Use only as described in this manual. Use only the manufacturer’s recommended attachments.
• Do not charge or use the unit outdoors. Do not use the charger with a damaged cord or plug.
If the handheld vacuum is not working properly, has been dropped, damaged, left outdoors or
dropped in water, call the toll-free helpline at 1-800-689-9928.
• Do not pull or carry by the cord, use the cord as a handle, close a door on the cord, or pull
the cord around sharp edges or corners. Do not run the appliance over the cord. Keep the cord
away from heated surfaces.
• Do not unplug by pulling on the cord. To unplug, grasp the plug, not the cord.
• Do not handle the plug or vacuum with wet hands. Electric shock may occur.
• Do not put any objects into ventilation openings. Do not use with any opening blocked. Keep
free of dust, lint, hair, and anything that may reduce air flow.
• Keep hair, loose clothing, fingers, and all parts of the body away from openings and moving parts.
• Use extra care when cleaning on stairs.
• NEVER vacuum hot, burning, smoking or smelting materials such as hot coals, cigarette
butts, matches, hot ashes, etc. Fire could result.
• Do not vacuum liquid or wet materials. The penetration of liquid may increase the risk of fire.
• Do not use to pick up flammable or combustible liquids, such as gasoline, or use in areas
where they may be present.
• Do not use without the dust canister, filter and filter seal in place.
• Do not use to pick up hand objects such as nails, screws, coins, etc. Damage or injury could result.
• Do not incinerate the appliance even if it is severely damaged. The battery can explode in a fire.
• Prevent unintentional starting. Ensure the switch is in the off-position before connecting to the
battery pack, or picking up or carrying the appliance. Carrying the appliance with your finger on
the switch or energising an appliance that has the switch on invites accidents.
• Disconnect the battery pack from the appliance before making any adjustments, changing
accessories, or storing the appliance. Such preventive safety measures reduce the risk of
starting the appliance accidentally.
• When the battery pack is not in use, keep it away from other metal objects, like paper clips,
coins, keys, nails, screws or other small metal objects, that can make a connection from
one terminal to another. Shorting the battery terminals together may cause burns or fire.
SAFETY GUIDELINES

headline bars
continuation tabs
notes
warnings
9
• Under abusive conditions, liquid may be ejected from the battery; avoid contact. If contact
accidentally occurs, flush with water. If liquid contacts eyes, additionally seek medical help. Liquid
ejected from the battery may cause irritation or burns.
• Do not use a battery pack or appliance that is damaged or modified. Damaged or modified
batteries may exhibit unpredictable behaviour resulting in fire, explosion or risk of injury.
• Do not expose a battery pack or appliance to fire or excessive temperature. Exposure to fire
or temperature above 100℃may cause explosion.
• Follow all charger and battery pack instructions and do not charge the battery pack
or appliance outside of the temperature range specified in the instructions. Charging
improperly or at temperatures outside of the specified range may damage the battery and
increase the risk of fire.
• Have servicing performed by a qualified repair person using only identical replacement
parts. This will ensure that the safety of the product is maintained.
• Do not modify or attempt to repair the appliance or the battery pack except as indicated in
the instructions for use and care.
• Your tool is equipped with a dust canister; empty it frequently; after completion of
vacuuming and before storing. Be extremely careful of dust disposal; materials in fine particle
form may be explosive. Do not throw dust on an open fire. Combustion from mixture of varnishes,
a spark, polyurethane, canister, water with dust particles can occur if there is a static discharge, a
spark introduced in the canister, or excessive heat.
• The label on your tool may include the following symbols. The symbols and their
definitions are as follows:
V ..................... Volts
A ..................... Amperes
Hz ................... Hertz
W .................... Watts
min ................. Minutes
................. Alternating current
............. Direct current
n0................... No-load speed
............... Class II Construction
…/min ........... Revolutions or reciprocation per minute
............... Grounding terminal
BPM ............... Beats per minute
.............. WARNING – To reduce the risk of injury, the user must read the instruction manual.
.............. WARNING – To reduce the risk of injury, always wear eye protection.
.............. WARNING – To reduce the risk of injury, always wear ear protection.
SAFETY GUIDELINES

headline bars
continuation tabs
notes
warnings
model no. 054-7548-8 | contact us 1-800-689-9928
10
PACKAGE CONTENTS:
Cordless handheld vacuum, extension tube, crevice nozzle, brush nozzle, floor nozzle and instruction
manual.
KEY PARTS DIAGRAM
1
3
4 5 6
2
No. Description No. Description
1 Dust-canister release button 4 Floor nozzle
2 On/off Switch 5 Brush nozzle
3 Extension tube 6 Crevice nozzle
KEY PARTS DIAGRAM
WARNING!
• Remove the cordless handheld vacuum from the package and examine it carefully. Do not discard the carton or any
packaging material until all parts have been examined.
• If any part of the vacuum is missing or damaged, do not use or plug in the tool until the part has been repaired or replaced.
Failure to heed this warning could result in serious injury.
FPO

headline bars
continuation tabs
notes
warnings
11
ASSEMBLY INSTRUCTIONS
TO ATTACH BATTERY PACK
(fig 1)
1. Align the raised portion on the battery pack with
the groove on the bottom of the tool, then slide the
battery pack into the body of the tool.
2. Make sure that the battery pack latches securely.
TO DETACH BATTERY PACK
(fig 1)
Depress the battery-release button, located on the
front of the battery pack.
INSTALLING AND REMOVING NOZZLES
(fig 2)
To install, firmly insert one of the nozzles completely
into the intake port on the dust canister. To remove,
simply pull the nozzle out of the dust canister.
INSTALLING AND REMOVING THE
EXTENSION TUBE
(fig 3)
To install, firmly insert the extension tube completely
into the intake port on the dust canister, then insert
one of the nozzles into the tube.
To remove, simply pull the extension tube out of the
dust canister.
OPERATING INSTRUCTIONS
fig 1 Latch
Detach
Attach
fig 2
fig 3

headline bars
continuation tabs
notes
warnings
12
model no. 054-7548-8 | contact us 1-800-689-9928
OPERATING INSTRUCTIONS
OPERATION INSTRUCTIONS SWITCHING
ON AND OFF
(fig 4)
To turn the vacuum on, push the on/off switch
forward.
To turn the vacuum off, push the on/off switch
backward.
CLEANING THE DUST CANISTER
(
fig 5
&
fig 6
)
To maintain optimal performance of the vacuum,
clean the dust canister after each use.
1. Press the release button and remove the dust
canister from the motor housing. Remove the filter
assembly from the dust canister.
2. Shake/tap out the dust canister over a suitable
waste bin. If required, clean the dust canister with
a moist cloth. If required, clean the filter assembly
(refer to CLEANING THE FILTER ASSEMBLY).
3. Reinsert the dust canister into the motor housing,
applying light pressure until the dust canister can be
heard to engage.
fig 4 Forward
Backward
fig 5 Release
button
Motor
housing
Dust
canister
fig 6 Filter
assembly

headline bars
continuation tabs
notes
warnings
13
OPERATING INSTRUCTIONS
CLEANING THE FILTER ASSEMBLY
(
fig 7
&
fig 8
)
1. Remove the filter assembly from the dust canister:
refer to CLEANING THE DUST CANISTER.
2. Remove the filter cover from the filter seal.
3. Remove the fabric filter along with its filter basket
and brush the fabric filter with a soft brush. If
necessary, you can wet clean the fabric f
ilter
.
4. Remove the fabric filter from the filter basket and
wash both parts under running water.
5. Squeeze the water out of the fabric filter and allow
the fabric filter and filter basket to dry fully, in
order to avoid the formation of mould.
6. Reassembly is carried out in reverse order.
fig 7 Filter seal
Filter cover
Remove
fig 8 Fabric filter
Filter basket
Filter cover
WARNING!
• Make sure the filter assembly is dry when attaching. The penetration of liquid may increase the risk of fire.
FPO

headline bars
continuation tabs
notes
warnings
model no. 054-7548-8 | contact us 1-800-689-9928
14
MAINTENANCE
Before each use:
•
Inspect the cordless handheld vacuum, the switch, and the accessories for damage.
•
Check for damaged, missing, or worn parts.
•
Check for loose screws, misalignment or binding of moving parts, or any other condition that may affect the
operation.
•
If abnormal vibration or noise occurs, turn the tool off immediately, and have the problem corrected before
further use.
MAINTENANCE
WARNING!
• To avoid accidents, always disconnect the tool from the battery pack before cleaning or performing any maintenance. The tool
may be cleaned most effectively with compressed dry air. Always wear safety goggles when cleaning tools with compressed
air.
• Do not let brake fluids, gasoline, petroleum-based products, penetrating oil, etc. come into contact with plastic parts. These
substances contain chemicals that can damage, weaken, or destroy plastic.
• When servicing, use only identical replacement parts. The use of any other parts may create a hazard or cause damage to
the product.
• Use only accessories that are recommended for this tool. Accessories that may be suitable for one tool may become
hazardous when used with another tool.
• To ensure safety and reliability, all repairs should be performed by a qualified service technician. Maintain tools with care.
Keep cutting tools sharp and clean. Properly maintained tools with sharp cutting edges are less likely to bind, and are easier
to control.
FPO

headline bars
continuation tabs
notes
warnings
15
TROUBLESHOOTING
Problem Possible causes Solutions
The vacuum does not start. The battery is depleted. Charge the battery pack.
The vacuum is not powerful. Dust in the dust canister and lter. Clean the dust canister and lter.
If the problem remains unsolved after performing the checks described above, call the toll-free helpline
at 1-800-689-9928.
TROUBLESHOOTING

headline bars
continuation tabs
notes
warnings
headline bars
continuation tabs
notes
warnings
model no. 054-7548-8 | contact us 1-800-689-9928
16
EXPLODED VIEW
3
1
4
5
7
8
1 0
1 1
1 2
1 4
1 3
6
1 5
1 9
2 0
2 6 2 7 2 8 2 9
1 8
2 1
2 2
2 3
2 4
2 5
9
1 7
1 6
2
PARTS LIST

headline bars
continuation tabs
notes
warnings
17
headline bars
continuation tabs
notes
warnings
No. Part No. Description No. Part No. Description
1 0547548801 Screw 16 0547548816 Battery Right Enclosure
2 0547548802 Right Enclosure 17 0547548817 Battery Left Enclosure
3 0547548803 Dust Canister Shift
Assembly 18 0547548818 Left Enclosure
4 0547548804 Filter Basket 19 0547548819 Switch Cover
5 0547548805 Fabric Filter 20 0547548820 Air Outlet Sponge
6 0547548806 Filter Cover 21 0547548821 Screw and Plain Washer
Assembly
7 0547548807 Hexagon Nut 22 0547548822 Air Inlet Ring
8 0547548808 Gasket 1 23 0547548823 Dust Canister Knob
9 0547548809 Fan 24 0547548824 Dust Canister Knob
Spring
10 0547548810 Fan Connector 25 0547548825 Dust Canister
11 0547548811 Motor Rubber Ring 26 0547548826 Extension Tube
12 0547548812 Motor 27 0547548827 Crevice Nozzle
13 0547548813 Motor Rubber Ring 2 28 0547548828 Brush Nozzle
14 0547548814 Switch 29 0547548829 Floor Nozzle
15 0547548815 Battery Clamp
If any parts are missing or damaged, or if you have any questions, please call the toll-free helpline
at 1-800-689-9928.
PARTS LIST

headline bars
continuation tabs
notes
warnings
headline bars
continuation tabs
notes
warnings
model no. 054-7548-8 | contact us 1-800-689-9928
18
This product is guaranteed for a period of 3 years from the date of original retail purchase
against defects in workmanship and materials, except for the following components:
a) Component A: Batteries, chargers and carrying case, which are guaranteed for a period of 2 years
from the date of original retail purchase against defects in workmanship and materials;
b) Component B: Accessories, which are guaranteed for a period of 1 year from the date of original
retail purchase against defects in workmanship and materials.
Subject to the conditions and limitations described below, this product, if returned to us with proof
of purchase within the stated warranty period and if covered under this warranty, will be repaired or
replaced (with the same model, or one of equal value or specification), at our option. We will bear the
cost of any repair or replacement and any costs of labour relating thereto.
These warranties are subject to the following conditions and limitations:
a) a bill of sale verifying the purchase and purchase date must be provided;
b) this warranty will not apply to any product or part thereof which is worn or broken or which has
become inoperative due to abuse, misuse, accidental damage, neglect or lack of proper installation,
operation or maintenance (as outlined in the applicable owner’s manual or operating instructions) or
which is being used for industrial, professional, commercial or rental purposes;
c) this warranty will not apply to normal wear and tear or to expendable parts or accessories that
may be supplied with the product that are expected to become inoperative or unusable after a
reasonable period of use;
d) this warranty will not apply to routine maintenance and consumable items such as, but not limited
to, fuel, lubricants, vacuum bags, blades, belts, sandpaper, bits, fluids, tune-ups or adjustments;
e) this warranty will not apply where damage is caused by repairs made or attempted by others (i.e.
persons not authorized by the manufacturer);
f) this warranty will not apply to any product that was sold to the original purchaser as a
reconditioned or refurbished product (unless otherwise specified in writing);
g) this warranty will not apply to any product or part thereof if any part from another manufacturer
is installed therein or any repairs or alterations have been made or attempted by unauthorized
persons;
WARRANTY

headline bars
continuation tabs
notes
warnings
19
headline bars
continuation tabs
notes
warnings
h) this warranty will not apply to normal deterioration of the exterior finish, such as, but not limited
to, scratches, dents, paint chips, or to any corrosion or discolouring by heat, abrasive and chemical
cleaners; and
i) this warranty will not apply to component parts sold by and identified as the product of another
company, which shall be covered under the product manufacturer’s warranty, if any.
Additional Limitations
This warranty applies only to the original purchaser and may not be transferred. Neither the retailer nor
the manufacturer shall be liable for any other expense, loss or damage, including, without limitation,
any indirect, incidental, consequential or exemplary damages arising in connection with the sale, use or
inability to use this product.
Notice to Consumer
This warranty gives you specific legal rights, and you may have other rights, which may vary from
province to province. The provisions contained in this warranty are not intended to limit, modify, take
away from, disclaim or exclude any statutory warranties set forth in any applicable provincial or federal
legislation.
Made in China
Imported by
Trileaf Distribution Trifeuil Toronto, Canada M4S 2B8
WARRANTY

Table of contents
Other Mastervac Vacuum Cleaner manuals
Popular Vacuum Cleaner manuals by other brands

DS Produkte
DS Produkte PC-P005C instruction manual

Samsung
Samsung Vacuum cleaner operating instructions

rotowash
rotowash R20 instruction manual

Ringler
Ringler RI 750 W3E Translation of the original operating manual

NORAUTO
NORAUTO CYLINDER Safety information

Panasonic
Panasonic MCV225 - COMMERCIAL VACUUM Service manual