AmazonBasics B07SG47LWK User manual

B07SG47LWK, B07SG48G4S,
B07SG47LWR, B07SG48DKX
2in1 Cordless Rechargeable Vacuum Cleaner P5, Handheld
Aspirateur Manuel Sans Fil Rechargeable 2en1 P5
2-in-1-Akku-Staubsauger P5, Handgerät
Aspirapolvere Ricaricabile Senza Fili 2 in 1 P5, Portatile
Aspirador de Mano P5 Recargable Inalámbrico 2 en 1
2-In-1 Oplaadbare Accustofzuiger P5, Handbediend

English .................................................... 3
Français ................................................ 21
Deutsch................................................. 39
Italiano.................................................. 57
Español................................................. 75
Nederlands............................................ 93

3
Contents:
Before getting started, ensure the package contains the following components:
Ax1
Bx1
Cx1 Gx1
Dx1
Hx1
Ex1
Fx1
Ix1
Jx3
Kx3
For B07SG47LWK and B07SG48G4S
only
Welcome Guide •English

4
Product overview
featur
1Air outlet cover 11 Battery(H)
2Air outlet filter 12 Battery status indicator
3Base nozzle 13 Hard floor mode indicator
4Power supply contacts 14 MAX power indicator
5Dust cup lever 15 Carpet mode indicator
6Dust cup 16 Carpet/hard floor mode button
7Bottom lid 17 MAX button
8Power trigger 18 Fabric filter
9Charging port 19 Foam filter
10 Battery release button 20 Filter cover
6
18
19
20
8
10
11
4
5
7
3
2
1
12
13
14
16
17
15
9

5
AMain unit 21 Unlock button
BExtension pipe 22 Working light [only floor nozzle(C)]
CMotorized floor nozzle 23 Brush roll
D2-in-1 upholstery tool
ECrevice tool
GMotorized plush nozzle
A
21
21
22
B
CG
ED
23

6
AMain unit
D2-in-1 upholstery tool
ECrevice tool
FWall mount
ICharger
IMPORTANT SAFEGUARDS
Read these instructions carefully and retain them for
future use. If this product is passed to a third party, then
these instructions must be included.
When using electrical appliances, basic safety precautions
should always be followed to reduce the risk of fire, electric
shock, and/or injury to persons including the following:
• This appliance can be used by children aged from 8 years
and above and persons with reduced physical, sensory or
mental capabilities or lack of experience and knowledge if
they have been given supervision or instruction concerning
use of the appliance in a safe way and understand the
hazards involved. Children shall not play with the appliance.
Cleaning and user maintenance shall not be made by children
without supervision.
A
E
D
F
I

7
• The appliance is only to be used with the power supply unit
provided with the appliance.
• The battery must be removed from the product before
cleaning or maintaining the appliance.
• The appliance must be disconnected from the supply mains
when removing the battery.
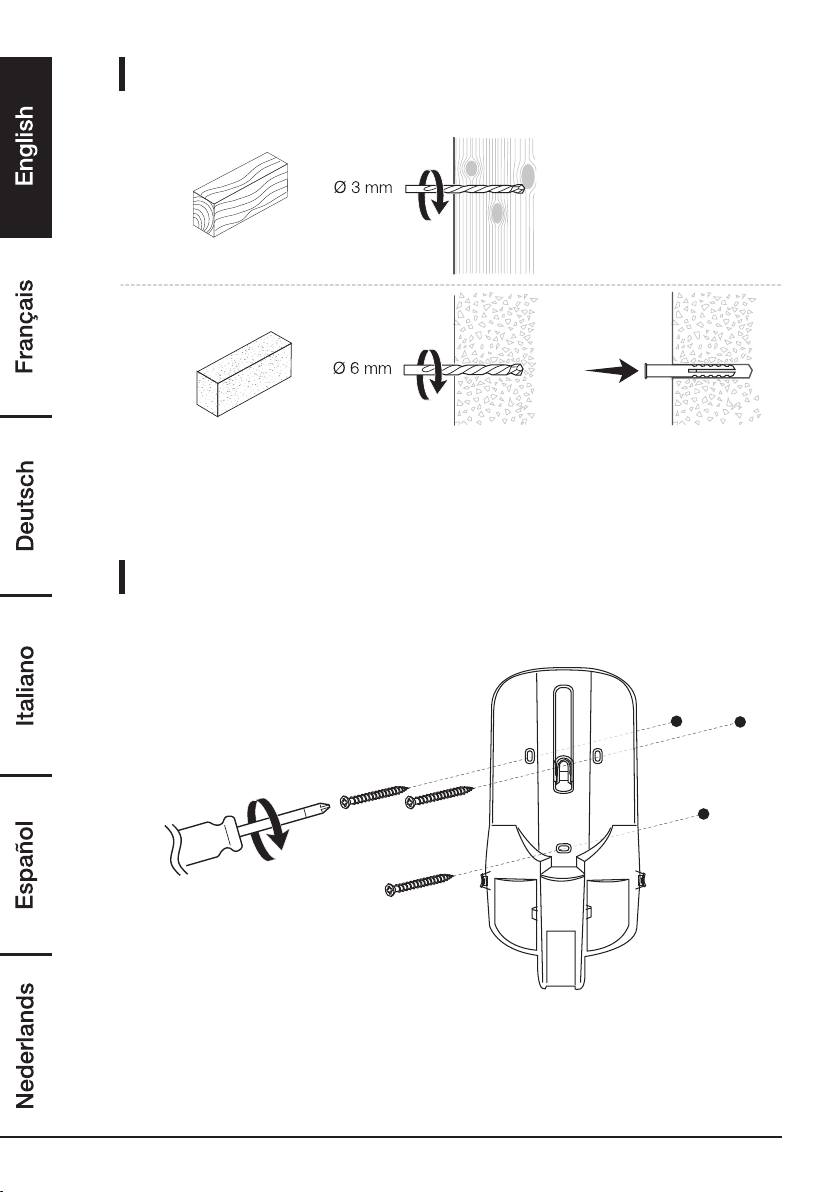
• The wall mount must be fixed to a wooden or masonry/
concrete wall using provided fasteners(hardware). The
fixing point must be capable of supporting the weight
of the product. For cavity walls or plasterboard use
fasteners(hardware) that are available at your local store.
• When drilling holes, make sure that you do not damage any
electrical cables or water pipes behind the wall. Use voltage/
metal detector if in doubt.
• Check and tighten the screw connections regularly.
• Never use the vacuum cleaner without the filter installed. This
could damage the motor and shorten the life of the product.
• Never suck up water (or any other liquids).
• The brush roll in the floor nozzle rotates at high speed. This
poses various dangers to people, animals and objects:
– Never use the floor nozzles on people, animals or plants.
Keep body parts and clothing away from the brush roll and
the opening of the floor nozzle.
– Switch off the appliance before attaching, removing and
cleaning the floor nozzle.
– Do not run over cables, wires, etc., as these can get
entangled in the rotating brush roll and could be damaged.
– Do not use the floor nozzle on sensitive surfaces.
– Observe the cleaning and care instructions of the floor
manufacturer.
WARNING Risk of fire! Do not pick up hot, glowing or
burning ash.

8
Charger Warnings
WARNING Risk of explosion! Do not recharge
non-rechargeable batteries.
• Use provided charger (model MC2508A-B or MC2508A-V)
only with this product.
Battery Warnings
• Keep batteries out of the reach of children.
• Do not dispose of batteries in fire.
• Do not leave the battery charging for a prolonged period of
time when the product is not in use.
• Do not charge overnight.
• If the battery appears to be bulging or shows other
undesirable phenomena(e.g. excess noise), stop using the
product immediately and contact customer services.
• Do not drop or impact the battery.
• Do not cover while charging. Charge in a well-ventilated
environment.
• Charge the battery once every 3 months to avoid shortening
its life.
• Lithium batteries produce heat when charging and
discharging. If the product becomes too hot to touch, switch
it off and unplug it immediately.
• If the battery leaks avoid contact with skin and eyes. Rinse
affected areas immediately with plenty of clean water, then
consult a doctor.
• The battery must be removed from the product
before it is scrapped.
• The battery is to be disposed of safely.
Intended Use
• This product is intended for cordless vacuum cleaning of household areas with
normal level of dirt. It is suitable for hard floors, carpets, furniture and similar
surfaces.

9
• This product is intended for household use only. It is not intended for commercial
use.
• This product is intended to be used in dry indoor areas only.
• No liability will be accepted for damages resulting from improper use or non-
compliance with these instructions.
Before First Use
• Check for transport damages.
• Before connecting the product to the power supply, check that the power supply
voltage and current rating corresponds with the power supply details shown on
the product rating label.
DANGER Risk of suffocation! Keep any packaging materials away from
children – these materials are a potential source of danger, e.g.
suffocation.
Mounting the wall mount
Step 1:
NOTICE The wall mount(F) should be mounted at a height which allows
resting the product with the extension pipe(B) and floor nozzle(C)
attached(approx. 90 cm).
The wall mount should be mounted in the proximity to a socket
outlet.
≈ 90 cm

10
Step 2:
Step 3:

11
Battery and charging
Charging
• Slide the battery(H) into the battery slot until it locks.
• Connect the charger(I) to the charging port(9).
• Connect the charger(I) to the socket outlet.
• The battery status indicator(12) shows the charging status:
Battery status indicator Status Charging level
1 LED flashing Charging Low
2 LEDs on/flashing Charging Medium
3 LEDs on/flashing Charging High
All LEDs off Charging finished Fully charged
• When the battery(H) is fully charged, disconnect the charger (I) from the charging
port(9) and then from the socket outlet.
NOTICE While charging, the product cannot be switched on.
Installing/removing the battery
• To remove: Push both battery release buttons(10) and pull out the battery(H)
backwards.
• To install: Slide the battery(H) into battery slot until it locks.
12
3

12
Accessories
NOTICE For quick and easy cleaning,
the product can also be used
without any accessories.
Accessory Function
Extension pipe(B) For
• floor cleaning
• hard-to-reach areas
Assemble the extension pipe between base
nozzle (3) and the desired nozzle (C), (D), (E)
or (G).
Motorized floor nozzle(C) For
• carpets
• stairs
Press the carpet/hard floor button(16) to
switch to carpet mode. The carpet mode
indicator (15) lights up.
NOTICE This nozzle has a swivel
feature that allows for
easy maneuvering around
furniture.

13
Accessory Function
2-in-1 upholstery tool(D)
Brush out
For
• blinds
• vents
• delicate surfaces
Press the button in the middle in the nozzle
and extend the brush.
2-in-1 upholstery tool(D)
Brush in
For
• blinds
• vents
• upholstered surfaces
Press the button in the middle in the nozzle
and hide the brush.
Crevice tool(E)
For
• hard-to-reach areas
• corners
• baseboard edges
• dryer vents
• chairs
• sofas
Motorized plush nozzle(G)
(only for model B07SG47LWK and
B07SG48G4S)
For hard floors
Press the carpet/hard floor button (16) to
switch to hard floor mode. The hard floor
mode indicator (13) lights up.

14
Attaching accessories
NOTICE All accessories can be connected directly to the base nozzle(3) of
the main unit(A) or to the extension pipe(B)
Detaching accessories
Press the unlock button (21) and remove the accessory.
Operation
Switching on/off
Press the power trigger(8) to switch on. Press again to switch off.
Checking battery level
When the product is on, the battery status indicator(12) shows the battery level:
Battery status indicator Battery level
3 LEDs on High
2 LEDs on Medium
1 LED on Low
Activating maximum power mode
• To switch maximum power on/off, press the MAX button (17).
• When the maximum power is activated, the MAX power indicator (14) lights up.
Carpet mode/hard floor mode
NOTICE This function operates only when the motorized floor nozzle(C) or
motorized plush nozzle(G) is attached. In the carpet mode, the
rotation speed of the brush roll(23) is increased.
• To switch between carpet mode/hard floor mode, press the carpet/hard floor
button(16).
• The corresponding mode indicator (13 or 15) lights up.

15
Emptying the dust cup
There are two ways to empty the dust cup(6).
A:
• Hold the product over a bin.
• Press the dust cup lever(5) to release the bottom lid(7) and empty the debris.
B:
• Hold the dust cup (6) and twist until the arrow lines up with the ‘unlock’
marking.
• Once emptied, reattach dust cup(6) by lining up the arrow and the
‘unlock’ marking.
• Twist the dust cup (6) until the arrow lines up with the ‘locked’ marking.
Cleaning and Maintenance
WARNING Risk of electric shock! To prevent electric shock, unplug and/or
remove the battery(H) before cleaning.
WARNING Risk of electric shock! During cleaning, do not immerse the
electrical parts of the product in water or other liquids. Never hold
the product under running water.
NOTICE Clean and maintain the parts regularly to ensure the proper and
efficient operation.
Cleaning
• To clean, wipe with a soft, slightly moist cloth.
• Dry the product after cleaning.
• Never use corrosive detergents, wire brushes, abrasive scourers, metal or sharp
utensils to clean the product.
BA

16
Dust cup filter maintenance
• Twist the dust cup(6) and remove.
• Twist the filter cover(20) and remove.
• Remove the fabric filter(18).
• Separate foam filter(19) from fabric filter(18) by pulling them apart.
• Rinse and dry thoroughly.
24h
• Once completely dry: Reassemble in reverse order.
Air outlet filter maintenance
NOTICE Clean the filter at least every 6 months.
• Twist the air outlet cover(1) and remove.
• Remove the air outlet filter(2).
• Shake to remove dust.
• Rinse the filter and dry thoroughly.
Flat
24h
• Once completely dry: Reassemble in reverse order.
NOTICE Do not clean the filters(2, 18, 19) in a washing machine or dry them
by using a hair dryer.

17
Motorized floor nozzle maintenance
1. Place the motorized floor nozzle(C) upside down. Use scissors or knife to cut
strings and threads.
1. 2.
2. If debris cannot be removed easily, remove retainer clip to remove the brush
roll(23).
3. Remove the brush roll (23) and clean debris.
3.
4.
4. To reassemble:
– Align one end of the brush roll(23) with the floor nozzle gear.
– Press the other end into the slot.
– Hook retainer clip under the tab and press down.
Motorized plush nozzle maintenance (only for B07SG47LWK and B07SG48G4S )
1. Place the motorized floor nozzle(G) upside down. Use fingers to remove clog or
debris. Do not use scissors or knife to cut strings and threads. If debris cannot be
removed easily, remove retainer clip to remove the brush roll(23).
1. 2.
2. Remove the retainer clip by using a flathead screwdriver or a coin and remove the
brush roll (23).
Retainer clip
Retainer clip

18
3. If necessary, rinse the brush roll (23) under the tap. Roll it in a towel to absorb
water. Dry thoroughly before reassembling.
24h
3. 4.
4. To reassemble:
– Align one end of the brush roll(23) with the floor nozzle gear.
– Press the other end into the slot.
– Hook retainer clip under the tab and press down.
– Turn the screw to the ‘lock’ position.
Troubleshooting
Problem Solution
The product does not
switch on.
• Battery (H) is discharged. Charge the battery.
• See detailed “thermal cut-off” instructions above.
The product suddenly shuts
off.
This product incorporates a built-in thermostat that
protects the product in case of motor overheating.
• Check the product for a possible source of
overheating such as a full dust cup(6), blocked
extension pipe(B) or clogged filters(2, 18, 19).
If you find those conditions, fix them and wait at
least 30 minutes before attempting to use the
product.
• After 30 minutes, press the power trigger(8).
Insufficient suction power. • Press the MAX button (17) to activate maximum
suction power.
• Empty the dust cup (6) and clean or change the
filters(2, 18, 19).
• Remove clogs that restrict the airflow.
Short running time. • Charge the battery (H) for 4 hours before use.
Brush roll does not rotate. • Check the brush roll (23) for debris and clean it.
Dismantling for Maintenance
1. Hose, extension tube, dust bag, exhaust grid, filter and all accessories can be
disassembled or detached without any tools.
2. Front cover, cable winder, switch, power suction control and on/off button can be
disassembled by using a screwdriver.
3. PCB, power cord and motor compartment could be accessed by removing 7
screws on the main unit (6 screws on the bottom and 1 beneath the handle cover
on right lower lateral).
4. Motor unit can be accessed by loosening the screws on the motor compartment.

19
Disposal
The Waste Electrical and Electronic Equipment(WEEE) Directive aims to
minimise the impact of electrical and electronic goods on the environment,
by increasing re-use and recycling and by reducing the amount of WEEE
going to landfill. The symbol on this product or its packaging signifies
that this product must be disposed separately from ordinary household
wastes at its end of life. Be aware that this is your responsibility to dispose
of electronic equipment at recycling centers in order to conserve natural
resources. Each country should have its collection centers for electrical and
electronic equipment recycling. For information about your recycling drop
off area, please contact your related electrical and electronic equipment
waste management authority, your local city office, or your house hold waste
disposal service.
Battery Disposal
Do not dispose of used batteries with your household waste. Take them to an
appropriate disposal/collection site.
Specifications
Motor unit
Rated voltage: 21.6 V
Rated power: 220 W
Dust cup capacity: 0.4 l
Suction power: 15 kPa
Net weight (with assembled
extension pipe and floor nozzle): approx. 2.4 kg
Dimensions (with assembled
extension pipe and floor nozzle): approx. 250 x 210 x 1110cm
Noise level: ≤84 dBA
Charger (model MC2508A-V for Europe or MC2508A-B for UK)
Charger input: 100-240V~, 50/60Hz
Charger output: 25-29 V , 800 mA
Protection class: Class II /
Cable length: approx 1.8 metres

20
Battery(model BP21625A)
Battery type: 21.6 V, Li-Ion, 2500 mAh
Operation time (approx): Normal power: 30 minutes
Max. power: 16 minutes
Charging time: 3.5 - 4.5 hours
Battery(model BP21620D)
Battery type: 21.6 V, Li-Ion, 2000 mAh
Operation time (approx): Normal power: 25 minutes
Max. power: 13 minutes
Charging time: 3 - 4 hours
Feedback and Help
Love it? Hate it? Let us know with a customer review.
AmazonBasics is committed to delivering customer-driven products that live up to
your high standards. We encourage you to write a review sharing your experiences
with the product.
amazon.co.uk/review/review‑your‑purchases#
amazon.co.uk/gp/help/customer/contact‑us
This manual suits for next models
3
Table of contents
Languages:
Other AmazonBasics Vacuum Cleaner manuals

AmazonBasics
AmazonBasics B071VNC8M4 User manual

AmazonBasics
AmazonBasics B071VNCNLF Operating and safety instructions

AmazonBasics
AmazonBasics B07SG47NS3 User manual

AmazonBasics
AmazonBasics B0716T5FW2 User manual

AmazonBasics
AmazonBasics B07D43B982 User manual

AmazonBasics
AmazonBasics B07C3N686Y Installation and operating manual

AmazonBasics
AmazonBasics B071VNCNLF User manual

AmazonBasics
AmazonBasics B07C3N686Y User manual

AmazonBasics
AmazonBasics B07D44DMN7 User manual

AmazonBasics
AmazonBasics B071VNCNLD User manual