Matrix Impact2 User manual


iii
CONTENTS
Congratulations!..........................................................1
A. INTRODUCTION..........................................................2
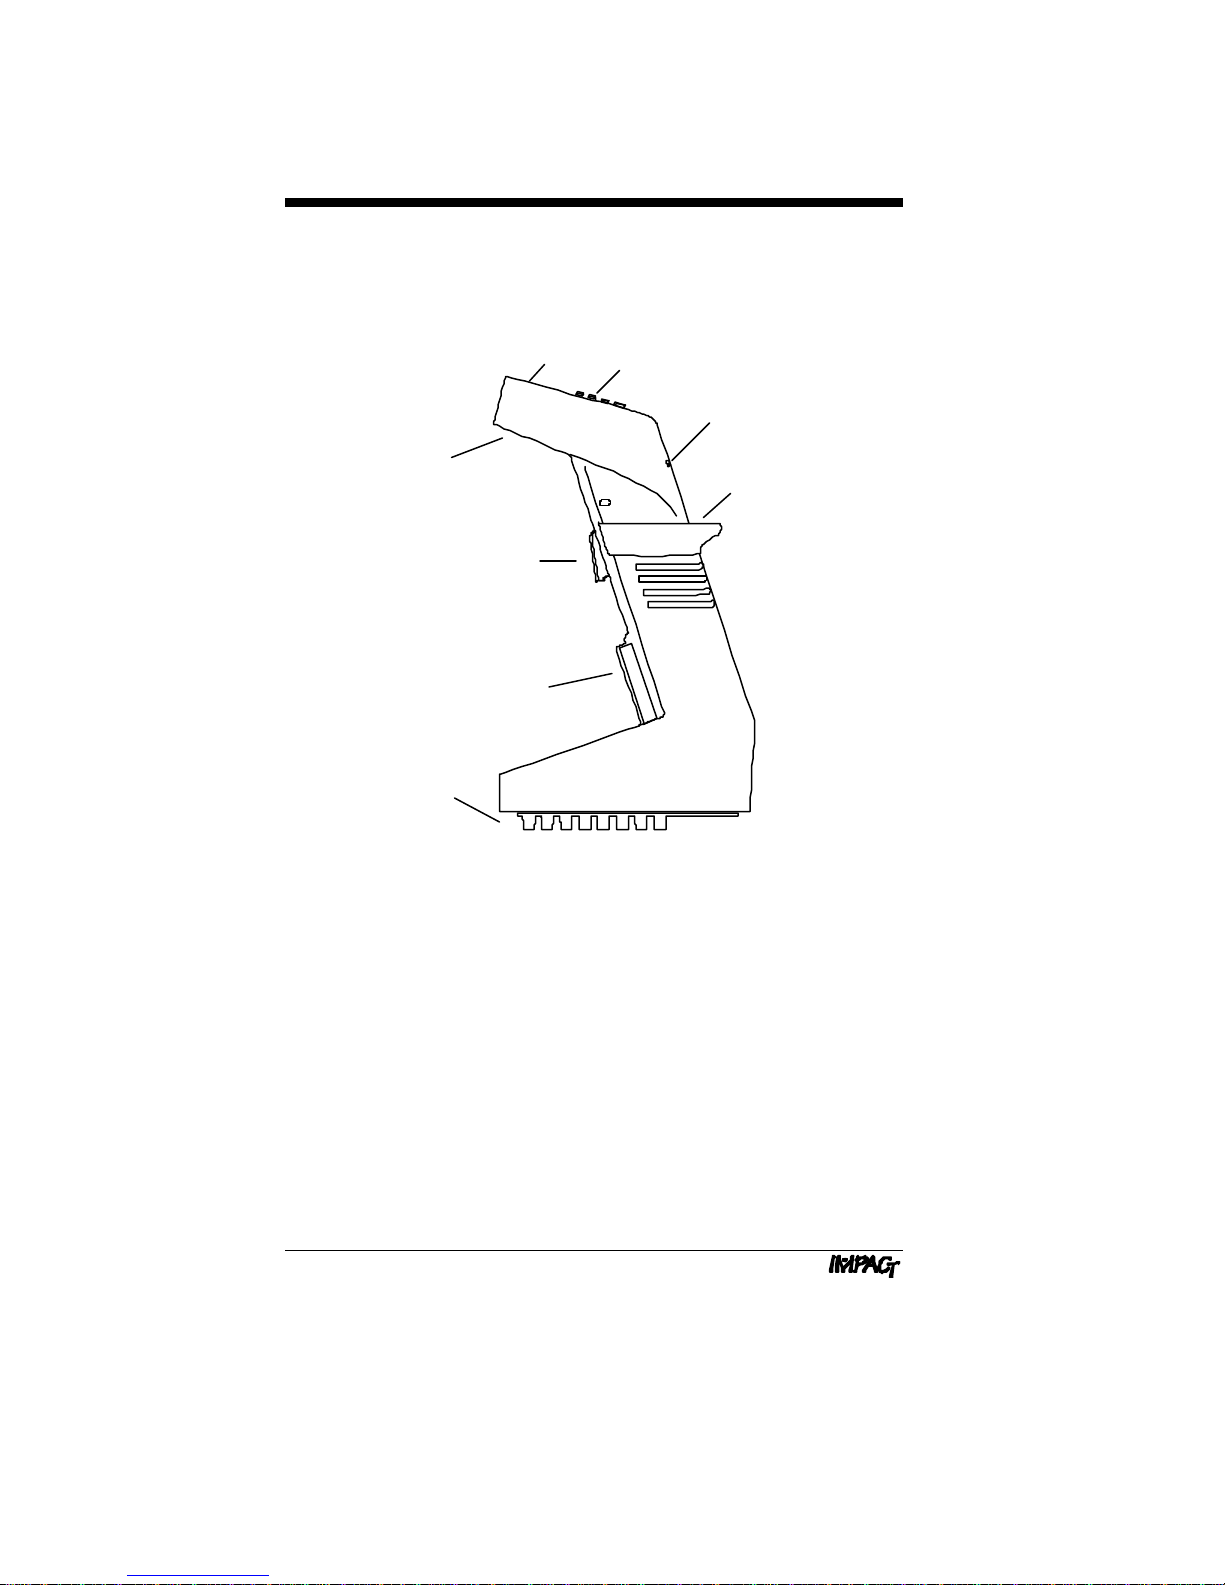
B. PIPETTOR OVERVIEW................................................4
B.1 General Description..............................................4
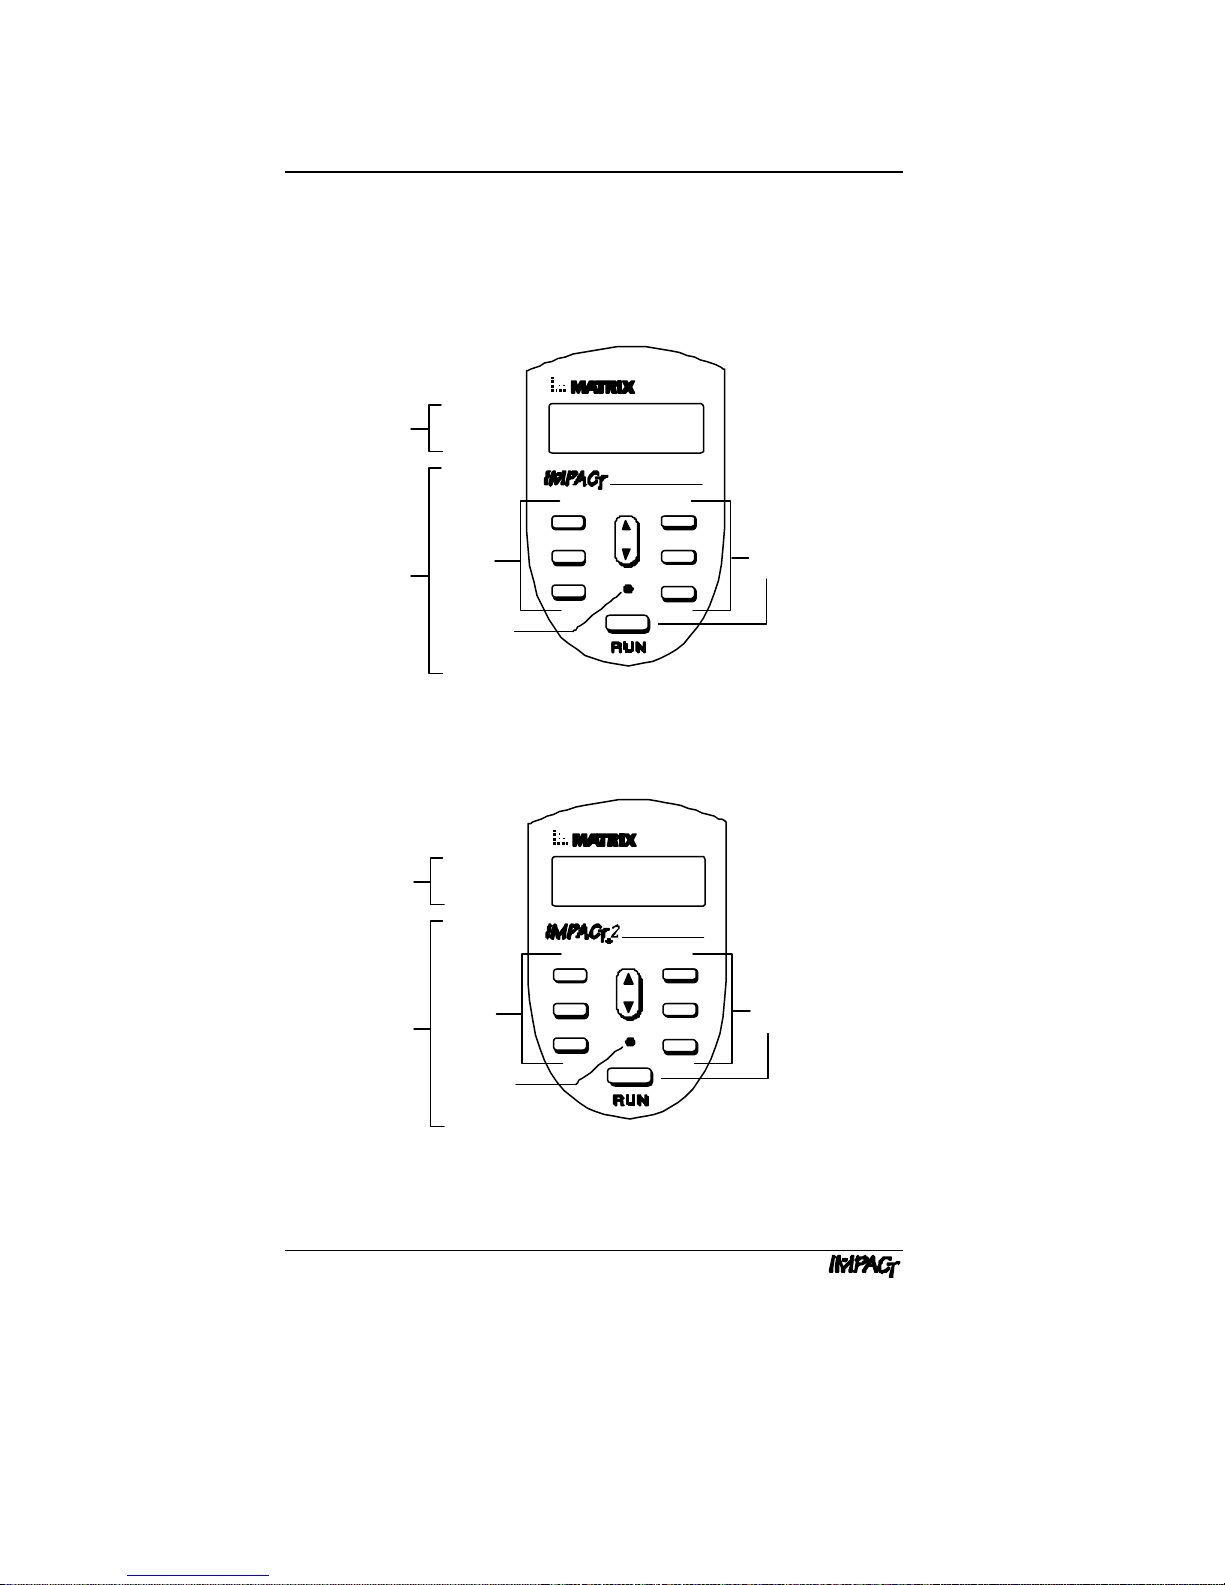
B.2 Keypad................................................................6
B.3 Display..............................................................12
B.4 Specifications ....................................................13
B.5 Hazards and Precautions ....................................14
C. PROGRAMMING AND OPERATION ...........................15
C.1 Programming the IMPACT...................................15
C.2 Programming the IMPACT2.................................19
C.2.1 Program Selection....................................19
C.2.2 Program Recall........................................19
C.2.3 Scratch Pad Mode (Program 0) .................20
C.2.4 Pipetting Speed Adjustment......................20
C.3 Reviewing the Program........................................21
C.4 Programming Examples......................................22
C.4.1 Sample Transfers .....................................22
C.4.2 Incremental Pipetting................................22
C.4.3 Serial Dilutions.........................................23
C.4.4 Simple Dilutions.......................................23
C.5 Operating Procedures .........................................24
D. CALIBRATION ..........................................................26
D.1 Calibrating the IMPACT.......................................27
D.1.1 Volume Measurement...............................27
D.1.2 Pipettor Calibration...................................28
D.2 Calibrating the IMPACT2.....................................30
D.2.1 “EASY” CAL Mode...................................30
D.2.2 “CALC” Mode...........................................31
D.3 CALVIEW..........................................................31
D.4 CALRESET........................................................31
D.5 Recommendations for Accurate Pipetting .............32

CONTENTS (cont’d)
iv
E. TROUBLESHOOTING AND MAINTENANCE................33
E.1 Troubleshooting..................................................33
E.2 Maintenance......................................................35
E.2.1 Pipettor Disassembly ...............................36
E.2.2 Pipettor Cleaning and Autoclaving..............39
E.2.3 Pipettor Reassembly................................40
E.3 Recharging Batteries ..........................................42
E.4 Replacing Batteries ............................................44
F. APPENDICES............................................................48
F.1 Additional Pipetting Examples .............................48
F.1.1 Sample Transfers .....................................48
F.1.2 Incremental Pipetting................................49
F.1.3 Serial Dilutions.........................................49
F.1.4 Simple Dilutions .......................................50
F.2 Chemical Compatibility........................................50
F.3 Customer Service...............................................51
F.3.1 Warranty .................................................51
F.3.2 Customer Service.....................................51
G. IMPACT2STORED PROGRAMS WORKSHEET ................53

1
Congratulations!
You have purchased the state-of-the-art in precision pipetting. The
IMPACT®is the first cordless electronic pipettor that "understands"
the myriad of liquid handling protocols typically performed in
today's laboratory.
Ergonomically designed and balanced to reduce fatigue, the
IMPACT functions so intuitively, that you may need no more than a
quick survey of this manual to use it.
The IMPACT allows you to accomplish your liquid pipetting tasks
quickly, accurately, and with less risk of developing repetitive
motion related injuries that are typical with manual pipettor use.
Laboratory results will become more standardized, while less time
is expended on tedious bench procedures.
Delivering power, precision, and performance.
is the latest word in liquid handling technology.
Before You Begin
Before using the IMPACT or IMPACT2, verify the contents of your
package. The package should contain the following items:
1IMPACT or IMPACT2Pipettor
1Operator's Manual
2Rechargeable Batteries
1AC Power Transformer
1Warranty Card
1Accuracy/Precision Data Sheet
1Coupon for Free Calibration Service
If you are missing any items, contact your Matrix Technologies
representative.
Note: Batteries must be installed and recharged before using the
IMPACT. Refer to the following sections in this manual:
nSection E.3, Installing/Replacing Batteries
nSection E.4, Recharging Batteries

2
A. INTRODUCTION
The IMPACT is lightweight and cordless. It provides the
convenience of a manual pipettor, with the programming
capabilities of an electronic pipettor. It runs on rechargeable
batteries and can be used while recharging. The pipettor also has
an automatic shutoff feature to extend battery life.
The IMPACT uses a "paced dispense" feature that performs repeat
pipetting steps while the trigger is depressed.
The IMPACT uses integrated circuit technology to store its
programming information. It will hold up to 40 steps in a program.
The program information is retained in memory, even if the
batteries are fully discharged or removed.
The IMPACT2is the second generation of the IMPACT pipettor
family. It is capable of performing all of the same pipetting
protocols available with the IMPACT, plus a few NEW features. The
expanded capabilities include:
§Expanded memory for storing up to five pipetting programs.
Each program can hold a maximum of 40 steps.
§“Scratch Pad” programming mode which allows for fast and
simple program changes that are not stored into memory.
§Enhanced speed control which offers slower aspirating and
dispensing of viscous liquids. Excellent for Gel loading!
§“EASY” CAL which simplifies in-lab calibration verification by
using distilled water.

INTRODUCTION
3
The IMPACT and IMPACT2are available in 8-channel and
12-channel formats (see Figure A). An expandable version of the
8-channel format is also available for pipetting samples from test
tubes in a rack. It comes in several models to handle fluid volumes
from 0.5 µl to 1250 µl. The handles are color-coded for easy
identification of different model types (IMPACT vs. IMPACT2) and
different volume ranges. See Section B.4, Specifications.
8-Channel 12-Channel 8-Channel
Expandable
Figure A: IMPACT Configurations

4
B. PIPETTOR OVERVIEW
B.1 General Description
Keypad
Display
Battery
Case
Pipetting Trigger
Ejector Trigger
Color-coded
Ring
Transformer
Connector
Tip Fittings
Figure B.1: Description of Components
Keypad. The keypad contains the operation keys that are used
in programming the pipetting sequence and volumes. See Section
B.2, Keypad.
Display. The display is an LCD screen that shows the pipetting
operation (fill, dispense, mix, or purge) and fluid volume for each
step in the pipetting program. See Section B.3, Display.

PIPETTOR OVERVIEW
5
Battery Case. The battery case contains two rechargeable nickel
cadmium batteries. Batteries are charged for 12–14 hours. When
fully charged, the pipettor can perform up to 1200 cycles at full
stroke. Battery life is extended with automatic shutoff after 10
minutes of inactivity. See Section E.3, Installing/
Replacing Batteries.
Pipetting Trigger. The pipetting trigger initiates the pipetting
program. It is pressed when the "Run" or "Purge" command
appears in the display. A single pipetting step is performed by a
quick press and release of the trigger. Repeat pipetting (paced
dispense) is performed by pressing and holding the trigger.
Note: At the end of a paced dispense, the pipet tips should be
removed from the fluid before releasing the trigger, to prevent
aspiration of fluid.
Ejector Trigger. The ejector trigger is pressed to eject the pipet
tips from the pipettor.
Tip Fittings. The tip fittings form an airtight seal with the pipet
tips to ensure accuracy while pipetting.
Note: To extend instrument life, Matrix Technologies has
equipped all IMPACT and IMPACT2pipettors with chemically-
resistant (PEEK) tip fittings. This material allows for pipetting of
acidic solutions without damage to the tip fittings.
Color-coded Ring. The flanged ring around the pipettor handle is
color-coded to identify the pipetting volume of the handle. See
Section B.4, Specifications.
Transformer Connector. The transformer connector receives the
plug from the power transformer for recharging the batteries. The
pipettor can be used while it is recharging.

PIPETTOR OVERVIEW
6
B.2 Keypad
The keypad contains the operation keys, program keys, and the
special function key.
Display
Operation
Keys
Keypad
Special
Function
Key
Program
Keys
Enter
Fill On Off/
Vol
Purge
Prog
Mix
Disp
Figure B.2a: IMPACT Keypad
Display
Operation
Keys
Keypad
Special
Function
Key
Program
Keys
Enter
Fill On Off/
Vol
Purge
Prog
Mix
Disp
Figure B.2b: IMPACT2Keypad

PIPETTOR OVERVIEW
7
Operation Keys:
[On/Off] The On/Off key turns the pipettor on or off. When the
pipettor is turned on, it emits a beep tone, flashes
"ZERO" on the display, then automatically resets the
pistons to zero position. After zeroing, the display
shows the first step of the program in the RUN mode.
Note: If the pipettor is being programmed for the first
time, the first step will be the fill operation, with the
default fill volume. See Section C.1, Program-ming
the IMPACT, for the default settings.
[Speed] The Speed key controls the rate at which the liquid is
aspirated or dispensed. The speed setting can be
changed by repeatedly pressing the Speed key.*
For the IMPACT, three speed settings are available:
Speed Setting Display
SLOW SF
MEDIUM SF
FAST SF
For the IMPACT2, five speed settings are available:
Speed Setting Display
SLOW S
MEDIUM SLOW S
MEDIUM S
MEDIUM FAST S
FAST SF
The IMPACT2also features independent speed
adjustment. Speed settings can be changed within a
stored program or during the execution of a program
(see Section C.2.4, Pipetting Speed Adjustment).
*NOTE: IMPACT2speed settings are changed
through the Special Function key (see Special
Function key section on page 11) or by using the
volume key (see Section C.2.4, Pipetting Speed
Adjustment).

PIPETTOR OVERVIEW
8
The current speed setting is always shown at the
bottom of the display. These settings can be selected
and changed at any time before a program step is
performed.
[Prog]
IMPACT2
only
The Program key on the IMPACT2enables you to
store up to five separate programs in memory for
future recall. Each program can hold up to 40 steps.
Programs are stored in reserved program location
numbers 1 –5. Program “0” is used as a “scratch
pad” where temporary programs can be written, run,
and overwritten easily. Program “0” is considered to
be an “open” program (see Section C.2, Program-
ming the IMPACT2).
[Purge] The Purge key enters a purge prompt anytime during
a pipetting operation to abort the program. By
pressing the Purge key, then pressing the trigger,
you can dispense any remaining liquid from the pipet
tips and return to the beginning of the program.
The Purge key is also used to enter the purge step
into a program.
Note: If there is insufficient liquid for a final dispense
step, the pipettor emits a beep tone and auto-
matically displays the purge prompt.
RUN The RUN mode performs the operation that is
displayed, such as fill, dispense, mix, or purge.
When "Run" appears in the display, you can activate
the RUN mode by pressing the trigger. At the end of a
pipetting sequence, the pipettor emits a triple beep
tone and returns to the beginning of the program. The
pipettor remains in RUN mode until you program a
new pipetting sequence.

PIPETTOR OVERVIEW
9
Program Keys:
[Fill]
[Disp]
[Mix]
The Fill, Dispense, and Mix keys program the
pipetting operations. By pressing one of these keys,
you can enter the programming mode of the IMPACT.
The "Run" prompt disappears from the display and
the appropriate operation appears with a flashing
"Vol" prompt. Fill, dispense, or mix volumes can be
programmed by pressing the Volume key. Also, the
number of mix cycles can be programmed by
pressing the Mix key twice.
Automatic blowout. At the end of a final dispense
step, the pipettor automatically expels any remaining
liquid from the pipet tips with a short burst of air
(blowout). The pistons then reverse direction and
return to zero position.
Note: If you press and hold in the trigger during the
final dispense step, the pipettor performs the
automatic blowout and holds its position until you
release the trigger. This delay allows you sufficient
time to remove the tips from the liquid to prevent
aspiration of liquid, as the pistons return to zero
position.
s
t
Vol
IMPACT2
only
The Volume key controls the quantity of liquid to be
aspirated or dispensed. The volume can be entered
when the "Vol" prompt appears.
Pipetting volume can be incremented quickly by
continuously depressing the Volume key. Short,
quick, depressions of the Volume key will increase or
decrease the volume by its smallest increment.
Longer depressions of the Volume key will increase
or decrease the volume in larger increments. Three
levels of volume increments are available to achieve
the desired volume (see Table C.1, Default Program-
ming Volumes).
The Volume key can also be used to change
pipetting speeds within a stored program or during
the execution of a program (see Section C.2.4,
Pipetting Speed Adjustment).

PIPETTOR OVERVIEW
10
[Enter] The Enter key stores the program in memory. After
each step is programmed, the Enter key is pressed
once to accept the step. After the final step is
programmed, the Enter key is pressed twice to
denote the end of the program. The pipettor verifies
the end of the program with a triple beep tone.
Special Function Key:
The Special Function key is the small hole below the Volume key.
It can be activated with a pipet tip. By repeatedly pressing the
Special Function key, you can display four functions: Beep Tone
(TONE), Paced Dispense Speed (PACE), Calibration (CAL), and
Pipetting Speed—IMPACT2 only (SPd). To exit the Special
Function key at any time, press the Enter key.
TONE
The beep tone signals the completion of one or more
steps, or signals a warning:
nSingle beep tone: end of pipetting step; insufficient
dispense volume, purge required.
nDouble beep tone: operation or program key is not
active in current mode; illegal programming step
attempted. See Section E.1, Troubleshooting.
nTriple beep tone: end of pipetting sequence;
end of programming sequence.
The single beep tone, signaling the end of a pipetting
step, can be turned ON or OFF. All other beep tones
cannot be turned off. Press the Special Function key
once to display "TONE" and its current setting. To
change the setting, press the Volume key. If the beep
tone is turned ON, the beep tone symbol " " appears
at the bottom of the display.
Note: For paced dispensing, the beep tone should
be turned on, to prepare you for each dispense step.
PACE
The pace controls the speed of repeat pipetting
(paced dispensing), FAST or SLOW. Press the
Special Function key twice to display "PACE" and its
current setting. To change the setting, press the
Volume key.

PIPETTOR OVERVIEW
11
Paced Dispense. When you use the paced
dispense feature, the pipettor dispenses the
programmed volume at the specified pace (fast or
slow). Immediately after each dispense step, the
pipettor emits a single beep tone (if beep tone is on)
to prepare you for the next dispense step. See
Section C.5, Operating Procedures.
CAL The calibration of the pipettor is factory set for
distilled water at room temperature. If you are
pipetting fluids with significantly different specific
gravities or temperatures, use this setting to
recalibrate the pipettor. See Section D, Calibration.
SPd
IMPACT2
only
Once in the special function mode, adjust the
pipetting speed by pressing the Volume key. Five
speed settings are available:
Speed Setting Display
SLOW S
MEDIUM SLOW S
MEDIUM S
MEDIUM FAST S
FAST SF
The current speed setting is always shown at the
bottom of the display. These settings can be selected
and changed at any time before a program step is
performed.

PIPETTOR OVERVIEW
12
B.3 Display
The pipettor display is a dynamic LCD screen. It displays the
current operation, volume prompt (if you are entering a program),
pipetting volume, low battery indicator (appears if battery charge is
low), beep tone symbol (if the beep tone is on), pipetting speed,
and program number (IMPACT2only).
Pipetting Operations
Volume Prompt Pipetting Volume
Low Battery Indicator
Beep Tone Speed Setting Purge Prompt
Figure B.3a: IMPACT Display
Pipetting Operations
Volume Prompt Pipetting Volume
Low Battery Indicator
Speed Setting Purge Prompt
Beep Tone
Program No.
Figure B.3b: IMPACT2Display

PIPETTOR OVERVIEW
13
B.4 Specifications
Pipettor Type
Model Handle Color
IMPACT White
IMPACT2Gray
Handle Specifications
Handle
Size Handle Type Volume
Range Color
Ring Accuracy*
(±) Precision**
(±)
12.50 µl
12-channel 0.50-12.50
µl Red
2.5%/0.15 µl
2.0%/0.15
µl
125.0 µl
12-channel 2.0-125.0 µl
Yellow
2.0%/1.0 µl
1.2%/0.8 µl
250.0 µl
12-channel 5.0-250.0 µl
Blue 2.0%/1.5 µl
0.8%/1.2 µl
850 µl 12-channel 15-850 µl Orange
1.5%/4.0 µl
0.6%/2.5 µl
12.50 µl
8-channel 0.50-12.50
µl Red
2.5%/0.15 µl
2.0%/0.15
µl
125.0 µl
8-channel 2.0-125.0 µl
Yellow
2.0%/1.0 µl
1.0%/0.6 µl
250.0 µl
8-channel 5.0-250.0 µl
Blue 2.0%/1.5 µl
0.7%/1.0 µl
1250 µl
8-channel 15-1250 µl
Green
1.5%/6.0 µl
0.6%/3.0 µl
Note: For Accuracy and Precision, values shown are expressed
as a percent (%) deviation or microliter (µl) value. When applied to
desired volume, the greater of the two values will always apply.
*Both values represent the deviation from the mean.
**Percentage values are expressed as the coefficient of variation.
Microliter values are expressed as the standard deviation.
Available Power Sources
Catalog No. Country Power Source
6096 England 240 V, 50 Hz
6097 Japan 100 V, 50 Hz

PIPETTOR OVERVIEW
14
6098 USA 120 V, 60 Hz
6099 Europe 230 V, 50 Hz

PIPETTOR OVERVIEW
15
B.5 Hazards and Precautions
There are no known hazards associated with the IMPACT when it
is operated in accordance with the instructions in this manual.
However, you should be aware of situations that can result in
serious injury.
Note: Do not perform troubleshooting procedures on the internal
components unless instructed by Matrix Technologies service
personnel.
WARNING! Ensure that the power transformer is connected to a
power receptacle that provides voltage and current specified by
Matrix Technologies. Use of an incompatible power receptacle can
cause shock and fire hazard.
CAUTION! Use only the power transformer supplied by Matrix
Technologies. Use of an incompatible power transformer can
damage the pipettor.
CAUTION! Always turn off the power and unplug the power
transformer before cleaning the exterior. Fluid seepage can
damage internal components.
CAUTION! Do not immerse the unit in liquid. Fluid seepage can
damage internal components.
CAUTION! Do not autoclave the entire unit. Extreme heat can
damage the display and other electronic components.
Note: For autoclaving specific portions of the pipettor, refer to the
Autoclaving Procedures, or call Matrix Technologies, Technical
Service Department, for instructions.
CAUTION! Do not clean the keypad with bleach solution or other
solvents. Caustic cleaning solutions can damage the keypad.
CAUTION! Avoid excessive charging of the batteries when the
pipettor is not in use. Excessive charge to the batteries will
shorten the battery life and may damage the batteries.

15
C. PROGRAMMING AND OPERATION
Programming the IMPACT and IMPACT2 is fast and easy. Pipetting
steps and volume are entered in the sequence that they will be
performed, then the program is saved to memory. This program
will stay in memory (even if the pipettor is turned off, or the battery
runs low) until you change it. Up to 40 programming steps can be
entered and stored in the IMPACT pipettor. Five programs, each
capable of holding 40 steps, can be entered and stored in the
IMPACT2.
C.1 Programming the IMPACT
To enter a pipetting program:
1. Turn on pipettor. Press the green [On/Off] key to turn on
the pipettor. The pipettor will beep once and flash "ZERO" on
the display while resetting the pistons to zero position. The
first step of the current program is displayed.
Note: If the pipettor is being programmed for the first time,
the first step will be the fill operation, with the default fill
volume displayed (see the following table).
Handle
Volume Fill
Volume Dispense
Volume Mix
Volume
Volume Increment
(slow –> fast)
12.50 10.00 10.00 5.00 0.05 0.10 0.50
125.0 100.0 100.0 50.0 0.1 0.5 5.0
250.0 250.0 50.0 50.0 0.5 5.0 25.0
850 850 100 100 1 5 50
1250 1250 100 100 1 5 50
Table C.1: Default Programming Volumes*
*All volumes shown are in microliters (µl).

PROGRAMMING AND OPERATION
16
2. Select pipetting operation. Enter the programming mode
by pressing the [Fill] or [Mix] key.
For example, to begin programming with a filling operation,
press the [Fill] key. The display shows "Fill" with a flashing
"Vol" prompt:
Note: The displayed volume defaults to the last volume
programmed for the selected operation, or to the default
volume for the pipettor, if it is being programmed for the first
time.
Fill. The [Fill] key programs the pipettor to aspirate a volume
of liquid. A single fill step can be programmed for fluid
transfers, or a combination of fill steps can be programmed for
dilutions or supernatant collection.
Dispense. The [Disp] key programs the pipettor to dispense
a volume of liquid. The dispense volume can be the entire fill
volume, or a smaller increment for repeat pipetting. You only
have to program the dispense volume once for repeat
pipetting. The pipettor will dispense the volume each time the
trigger is pressed (or repeatedly during a paced dispense) until
the fill volume is reached, or until insufficient volume remains.
Mix. The [Mix] key programs the pipettor to perform a
combination of fills and dispenses. You can program a mix
volume or mix cycle (single fill and dispense). You can press
[Mix] once to program a mix volume, or twice to program a
mix cycle. Mix cycles from 1 to 9 are available on the
IMPACT; mix cycles from 2 to 9 are available on the IMPACT2.
The default setting is three mix cycles.
Flashing Display
This manual suits for next models
1
Table of contents
Other Matrix Laboratory Equipment manuals
Popular Laboratory Equipment manuals by other brands

KERN
KERN YDB-04 Operating and installation instructions

Ametek
Ametek mocon OX-TRAN 2/28 H Operator's manual

Thermo Scientific
Thermo Scientific gibco CTS Rotea user guide

Merck
Merck Millipore CellASIC ONIX2 user guide

Endress+Hauser
Endress+Hauser Liquistation CSF48 technical information

Advantec
Advantec STEELHEAD MARINE ES Series Installation and operation manual