LightOx PhotoReact 365 User manual

Applies to PhotoReact 365 Model
lightox.co.uk
© LightOx Limited. 2020 All rights reserved
User Manual

Contents
Introduction
Safety
System Overview
Warnings
System Components
Choosing a Location
Connecting the Power Cord and USB cable
Setup
Setting the Date/Time
Performing an irradiation experiment
Re-running an experiment
Downloading experimental data
Clearing log files
Termination, Turning the Unit “Off”
System Information
Proper Care and Handling
Cleaning, Disinfection, and Disposal
Maintenance
Troubleshooting
Technical Data
Contact
1.
2.
3.
3.1.
4.1.
4.2.
4.3.
5.1.
5.2.
5.3.
5.4.
5.5.
5.5.1.
5.6.
6.
7.
7.1.
8.
9.
10.
11.
3
4
5
6
7
8
9
10
11
12>16
17
18>20
21>22
22
23
23
23
24
24
25
26
No part of this publication may be reproduced, transmitted, transcribed, stored in a retrieval system or
translated into any language in any form by any means without the prior written consent of LightOx Limited.
Every effort has been made to ensure information in this manual is accurate, however, information in this
manual is subject to change without notice and does not represent a commitment on the part of the authors.
LightOx Limited
65 Westgate Road
Newcastle upon Tyne, NE1 1SG
United Kingdom
Trademarks
LightOx® is a registered trademark of LightOx Limited.
All other product names are trademarks of their respective owners.
Designed in the United Kingdom; manufactured in Singapore
User Manual

The PhotoReact 365 is a bench top instrument for the acceleration
of photochemical and photobiological reactions
Instrument suitable for use with a standard size culture multi-well plate
(85.5 mm x 128 mm) or single 95 mm round dish
User selected light output from 0 mW/cm2to maximum (approx. 13.0 mW/cm2)
Variance less than 1 mW/cm2(at 100% power) and 0.5 mW/cm2
(at 50% power) across the well plate surface
User control of total power output
Light intensity and temperature monitors included that records
measurements every second during operation
Data export as .csv files
Device has locking lid that reduces user exposure to harmful light rays
Technical Specifications PhotoReact 365
•
•
•
•
•
•
•
•
Key Features
The PhotoReact 365 is a benchtop
instrument that provides even, directed
and reproducible UV illumination
at 365 nm suitable for photochemical
and photobiological reactions.
1. Introduction
The user can control parameters of intensity and energy
delivery rate and time. LED health over time is monitored using
an in-built UV sensor enabling the user to produce rapid,
reproducible results. This instrument is suitable for
high-throughput screening in multiwell plates, providing
researchers with a tool to screen high numbers of compounds
and reactions essential for drug discovery.
User Manual
3

Prior to use, the operator should
thoroughly read the instructions for use.
Using this device without reading and
understanding the instructions for use
may result in operator injury or damage
to the equipment.
2. Safety
User Manual
The device contains powerful LEDs that produce bright
UV light. The device should only be used with the locking
lid in place. Do not bypass the lock activation switch
as looking into the device when activated may result
in damage to eyes or to exposed skin.
Only use the device with appropriate dishes or plates.
Proper care must be taken during setup and operation
to prevent injury to operators and other personnel or
damage to the unit.
The unit is equipped with multiple safety features
including a lock activation switch that will not permit
UV emission when the lid is not in place.
4

The PhotoReact 365 is a device that
can deliver a specific amount of light
to a sample plate in a controlled
environment. Controlling the power
(light intensity) and irradiation time
(seconds) enables specific energy
across the whole sample plate.
3. System Overview
User Manual
The PhotoReact 365 will provide an even illumination,
using light sources that allow for controlled intensity
and wavelengths to be delivered to the sample plate.
The PhotoReact 365 includes a UV sensor to monitor
the health and light output of the LEDs. LEDs will
diminish in power slowly over time and the inbuilt
sensor allows the user to monitor the functionality
of the LEDs in their instrument. The irradiance output
and UV sensor are factory calibrated. Re-calibration
of the system is possible. Contact the manufacturer
for further information.
5

User Manual
The PhotoReact 365 produces UV light. Injury to the
eyes or skin can result from UV exposure. It is the
responsibility of the user to follow all applicable safety
guidelines in prevention of injury or damage to the
unit. Never bypass the lid locking switch.
No modification of this equipment is allowed.
Never open or remove the bottom cover
of the base unit or control unit.
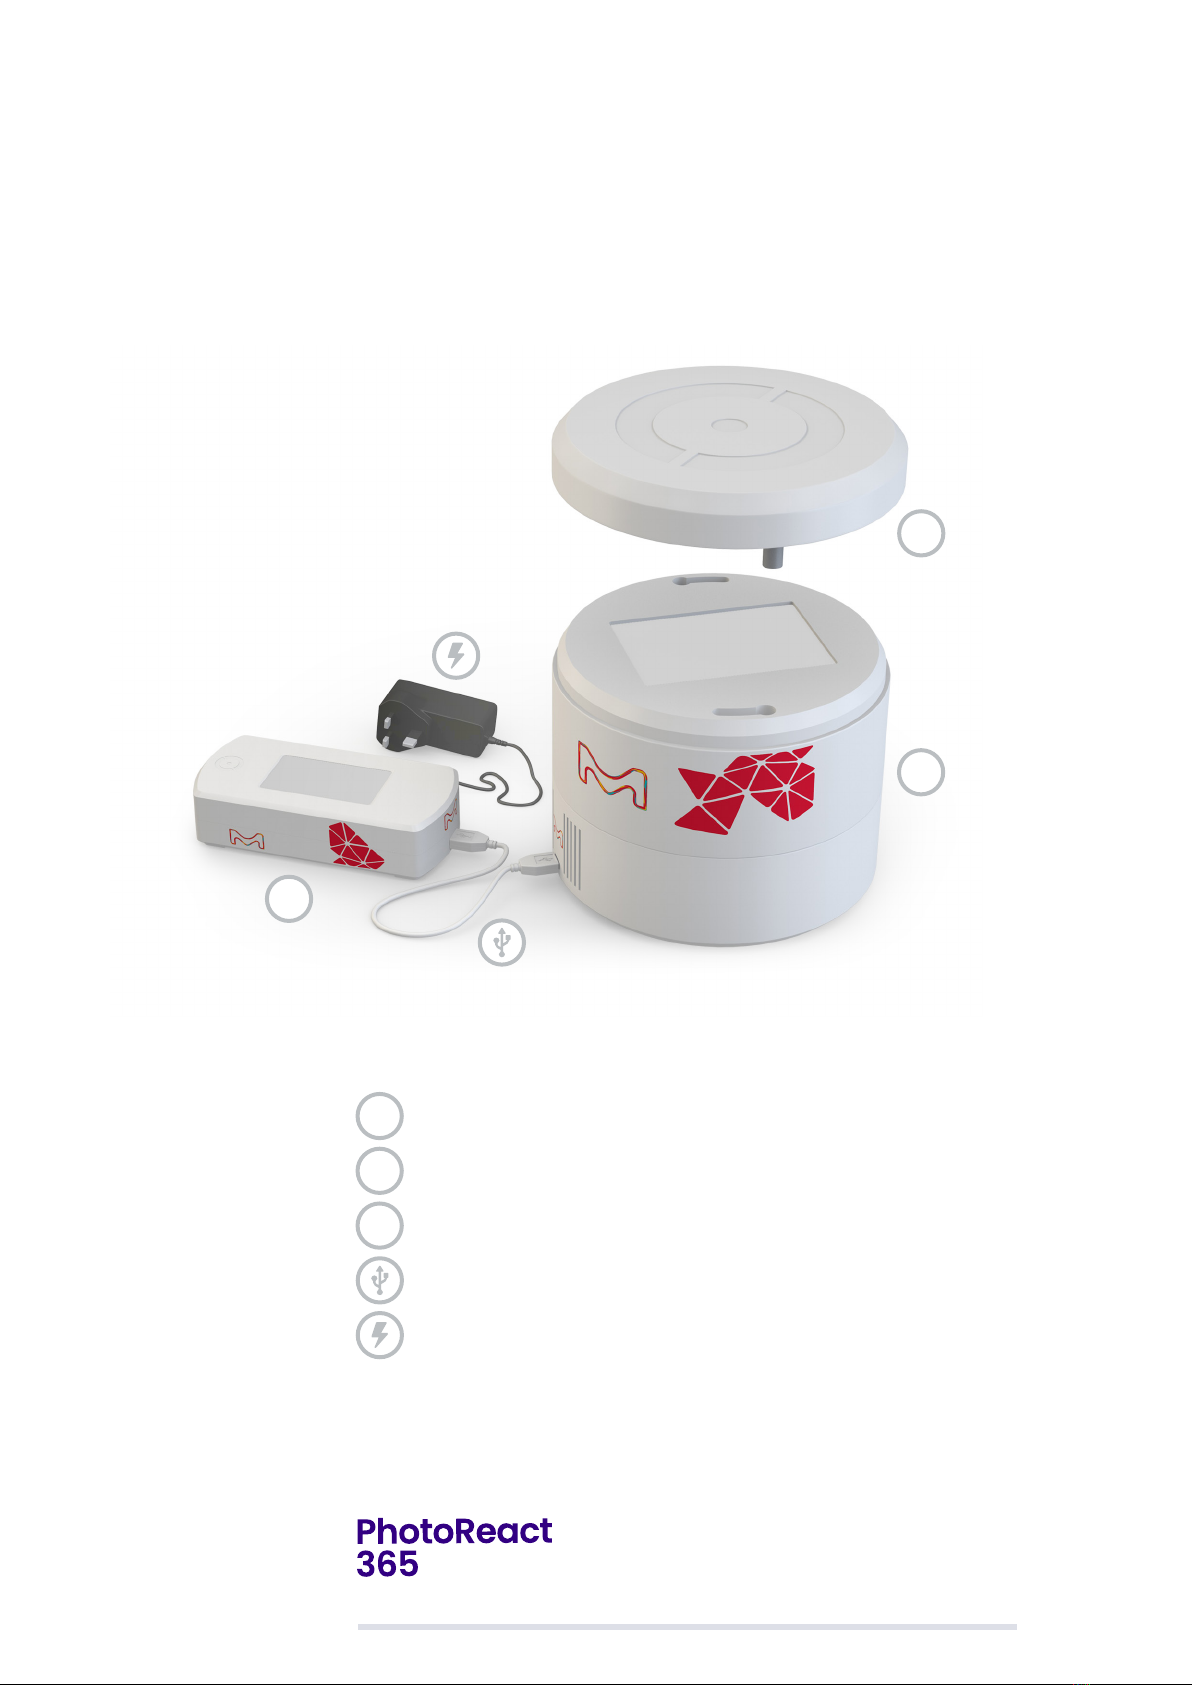
The PhotoReact 365 unit requires adequate airflow to maintain proper
cooling. Ensure the ventilation slots on the side of the unit are unobstructed.
Not for domestic use. In accordance with EN 55011: 2009 +A1:2010
the PhotoReact 365 is a Class A product. In a domestic enviroment this
product may cause radio interference in which case the user may
be required to take adequate measures.
If the PhotoReact 365 is used in a manner not specified within this
manual, the protection provided by the equipment might be impaired.
It is the responsibility of the user to follow all applicable safety
guidelines in prevention of injury or damage to the unit.
It is the responsibility of the user to assess and mitigate any hazards
that may result from experimental reactions.
It is the responsibility of the user to assess and mitigate any hazards that
may result from addition of volatile or flammable materials. Users shall
comply with all applicable safety and accident-prevention procedures
for laboratory work.
Device intended for a variety of chemical and biological reactions;
Device to be used by trained operator in a laboratory setting.
Heavy – Product with its packaging is over 7 kg.
Appropriate manual handing guidelines should be followed.
Power supply cannot be replaced.
3.1. Warnings
6

The PhotoReact 365 is comprised of the following:
Base Unit
Removable, locking lid
Control Unit
USB cable connecting Control Unit to Base Unit
Power Supply
User Manual
4. System Components
7
2
2
3
3
1
1

User Manual
Place the PhotoReact 365 on a flat surface
on its neoprene feet with at least
15 cm of space between the perimeter
of the instrument and the nearest object.
The PhotoReact 365 is designed
to work at ambient room temperature.
Transport the PhotoReact 365
in a horizontal position and avoid
significant jarring of the instrument
whilst on the worktop.
4.2. Choosing a Location
15cm 15cm
8

User Manual
Insert the one end of the USB cable from the USB port
on the right side of the Control Unit.
Insert the other end of the USB cable into the USB port
on the Base Unit.
Insert the power supply terminal into the power connector
port on the controller unit. Insert the power supply plug
into a standard mains AC outlet.
Warning: Risk of electrical shock
Before plugging into mains power visually inspect the power
supply plug and cable to ensure there is no damage.
If there are signs of damage do NOT use.
Note: There are two USB ports on the control unit. The right hand port should
be used to connect the USB cable on the control unit to the USB port on the
base unit. If the USB cable is incorrectly connected to the data port on the
back side of the control unit, the instrument will not function.
4.3. Connecting the Power Cord
and USB cable
9

User Manual
Once the power cord and the USB cables are connected
the PhotoReact 365 Base Unit and Control Unit are ready
for operation.
The display start-up screen is shown below. The touch
screen buttons are New experiment, Rerun experiment
and the system Settings button.
New experiment allows the user to input new settings.
Rerun experiment allows the user to reuse settings
from a previously run experiment.
When setting up the PhotoReact 365 for the first time,
the time and date should be set by the user. Touch
the systems setting button on the start up screen.
Operation
5.1. Setup
New experiment Rerun experiment
Settings
10

Copy logs to flash drive
Clear all logs
Set date and time
Settings (Administrator password required)
About
Back
User Manual
Select the Set date and time button and use the up and
down toggle buttons to set the date (day, month and year)
and time (hour, minute and second) in two digit format.
Select Save to save the user inputs into the memory.
Note: once the date/time is set, this action should not need to be repeated.
Operation
5.2. Setting the date/time
Set date and time
Day Month Year Hour Minute Second
Back
V
Save
00 00 00 00 00 00
11

Placing Sample Plate
User Manual
5.3. Performing an
irradiation experiment
Remove the PhotoReact 365 lid by turning the lid
counter-clockwise fully until it stops and lift the lid
upwards with two hands.
Take the lid off, place the multi-well or tissue culture plate
on top of the glass surface in preferred orientation.
Note: Please place sample plate gently as the top plate is made of glass.
Take lid off Place sample plate
12

Locking Lid
User Manual
5.3. Performing an
irradiation experiment
Replace the lid ensuring the lid locking pins align with
the round holes on the Base Unit. Turn the lid clockwise
fully to lock the lid into place.
Note: The PhotoReact 365 will not function unless
the lid is fully engaged in the lock position.
13
Lock lidReplace lid

New experiment Rerun experiment
Settings
User Manual
5.3. Performing an
irradiation experiment
Running Experiment. Step 1.
Next, on the display start-up screen of the Control Unit,
select either New experiment or Rerun experiment.
After selecting New experiment enter the experiment
name using the touch keyboard on the next screen.
Select Save to bring up the experiment settings screen
shown below.
14

User Manual
5.3. Performing an
irradiation experiment
Running Experiment. Step 2.
The following settings
can be customised.
Duration:
(Time; MM:SS) up to 30:00
Irradiance:
from 0 mW/cm2
to the maximum
(approx. 13.0 mW/cm2)
Energy:
from 0 mW/cm2
to approx. 23,400.0 mJ/cm2
Note: (Duration) X (Irradiance) = Total Energy
Note: The instrument is factory calibrated with max irradiance approx. 13.0 mW/cm2
First, enter the Duration using the top two sliders then
press the Hold button to the right of the top sliders.
Next use the middle slider to set the irradiance. The
total Energy delivered will be automatically calculated
by the software.
Alternatively, the user can set the total Energy
delivered by selecting this setting first and applying
the Hold setting. Then, using the either the Irradiance
or Duration slider to control the Irradiance or the total
time respectively. The software will automatically
calculate the third parameter and set it accordingly.
Press Run to start the set programme.
Trial
Duration: 5 minutes
Irradiance: 6.5 mW/cm2
30 seconds Hold
Back Run
Energy: 2145 mJ/cm2
15

User Manual
5.3. Performing an
irradiation experiment
Running Experiment. Step 3.
If operating correctly the fans will turn on and the
experiment run screen will be shown as above.
Warning: Risk of UV LIGHT
Exposure may result in injury to eyes or skin. Do not look
into the light, use skin and eye protection as necessary
Note: While the experiment is running, the time remaining, and
readings from the temperature and UV sensors are displayed.
Note: If the lid is removed during an experiment, the LEDs will
automatically turn off for safety, but the fans will continue
to run and the user will be prompted to re-close the lid
to continue the experiment.
After completion of the experiment the software will
automatically reset to the start screen. A log file of
experimental parameters and readings will be created
and automatically saved on the instrument.
See section 5.5 for download instructions.
Trial - 01/04/2020 10:40:03
Time remaining: 4:29
Duration:
Intensity:
Energy density:
Temp:
UV:
5:30
65 mW/cm2
2145 mJ/cm2
23C
100%
Abort
16

User Manual
5.4. Re-running an experiment
Operation
Warning: Risk of UV LIGHT
To re-run an experiment using the same experimental
parameters, select Rerun experiment on the display
start-up screen.
Select the experiment name from the list. Use the
Next button to scroll through additional pages
of experimental names.
After selecting the name, the next screen will allow the
user to modify the parameters and experimental name
by selecting the Modify button or to re-run the
experiment without changes by selecting Run.
Note: the list of names is ordered by time and date with the most
recent experiments displayed at the top of the list.
Experiment 2
Experiment 1
100%
5%
10%
25%
50%
29/04/2020 08:33:02
29/04/2020 09:24:34
26/04/2020 07:05:17
22/03/2020 06:45:06
25/03/2020 09:03:39
09/02/2020 09:34:32
09/02/2020 08:50:54
Back Next
17

Copy logs to flash drive
Clear all logs
Set date and time
Settings (Administrator password required)
About
Back
User Manual
5.5. Downloading experimental data
Copy logs to flash drive. Step 1.
To download data files to a flash drive, press the
systems setting button on the start up screen.
On the settings screen, press the Copy logs to flash
drive button, to display the export log files screen:
Export log files
Please insert USB flash drive
Cancel
18

User Manual
5.5. Downloading experimental data
Copy logs to flash drive. Step 2.
Insert a USB drive into the Data Port on the back
of the Control Unit, next to the power connector.
Once inserted, the Control Unit will automatically
start downloading log files to the USB Drive:
Export log files
Exporting file
LOG00000.csv
19

User Manual
5.5. Downloading experimental data
Copy logs to flash drive. Step 3.
Once all files are downloaded an ‘Export complete’
prompt will display:
It’s now safe to remove the USB drive, and press the Done
button to be taken back to the settings screen.
Note: The file size for each log is very small (<1Kb).
Export log files
Export complete
43 log files copied
Done
20
Table of contents