®
53350-0920
®
Mattel U.K. Ltd., Vanwall Business Park, Maidenhead SL6 4UB. Helpline 01628500303.
Mattel Australia Pty Ltd., Richmond, Victoria. 3121. Consumer Advisory Service 1 800 800 812
(valid only in Australia)
Mattel East Asia Limited, 930 Ocean Centre, Harbour City, HK, China.
CONSUMER INFORMATION
1 (800)524-TOYS
We are dedicated to quality products.
CONFORMS TO THE SAFETY
REQUIREMENTS OF ASTM F963.
MATTY MATTEL™ toys
YOU CAN TELL IT’S MATTEL!™ Call us toll-free
or write with any comments or questions about
our products or service. Monday–Friday, 8:00
a.m–6:00 p.m. Eastern Time. Outside U.S.A., see
telephone directory for Mattel listing. Consumer
Relations, Mattel, Inc., 333 Continental Blvd., El
Segundo, CA 90245 U.S.A.
2-YEAR LIMITEDWARRANTY
Mattel, Inc. warrants to the original consumer purchaser that this product will be
free of defects in material or workmanship for two years (unless specified in
alternate warranties) from the date of purchase. If defective, return the product
along with proof of the date of purchase, postage prepaid, to Consumer Relations,
636 Girard Avenue, East Aurora, NewYork 14052 for replacement or refund at our
option. This warranty does not cover damage resulting from unauthorized
modification, accident, misuse or abuse. In no event shall we be responsible for
incidental, consequential, or contingent damages (except in those states that do
not allow this exclusion or limitation). Valid only in U.S.A. This warranty gives you
specific legal rights and you may also have other rights which vary from state to
state. Some states do not allow the exclusion of incidental or consequential
damages, so the above exclusions or
limitations may not apply to you. Send
only the product to the address above.
Send all correspondence to
Consumer Relations, Mattel, Inc.,
333 Continental Blvd., El Segundo,
California 90245-5012 U.S.A. Or you
may phone us toll-free at 1-800-524-
TOYS, Monday–Friday, 8:00
a.m.–6:00 p.m. Eastern Time.
Outside U.S.A., see telephone
directory for Mattel listin
g.
ALKALINE BATTERIES RECOMMENDED:
Toy may not function or operate with other types of
batteries.
BATTERY SAFETY INFORMATION:
1. Non-rechargeable batteries are not to be
recharged.
2. Rechargeable batteries are to be removed from the
toy before being charged.
3. Rechargeable batteries are only to be charged
under adult supervision.
4. Do not mix alkaline, standard (carbon-zinc), or
rechargeable (nickel-cadmium) batteries.
5. Do not mix old and new batteries.
6. Only batteries of the same or equivalent type as
recommended are to be used.
7. Batteries are to be inserted with the correct polarity.
8. Exhausted batteries are to be removed from the toy.
9. The supply terminals are not to be short-circuited.
10. Dispose of batteries safely. Do not dispose of in a
fire as the batteries may explode or leak.
11.Products with rechargeable cells are not to be
disposed of in a fire as they may explode or leak.
Dispose of safely.
• VEHICLE CONTAINS A RECHARGEABLE
CELL. IF FLUID LEAKS, AVOID CONTACT
WITH EYES, AND DISCARDVEHICLE.
• ONLY USE CHARGER SUPPLIED WITH THIS
TOY.
• DO NOT USE ANY OTHER CHARGING
SOURCE.
• DO NOT IMMERSE INWATER.
•THIS PRODUCT IS NOT RECOMMENDED
FOR USE ON LOOSE DIRT ORWET
SURFACES.
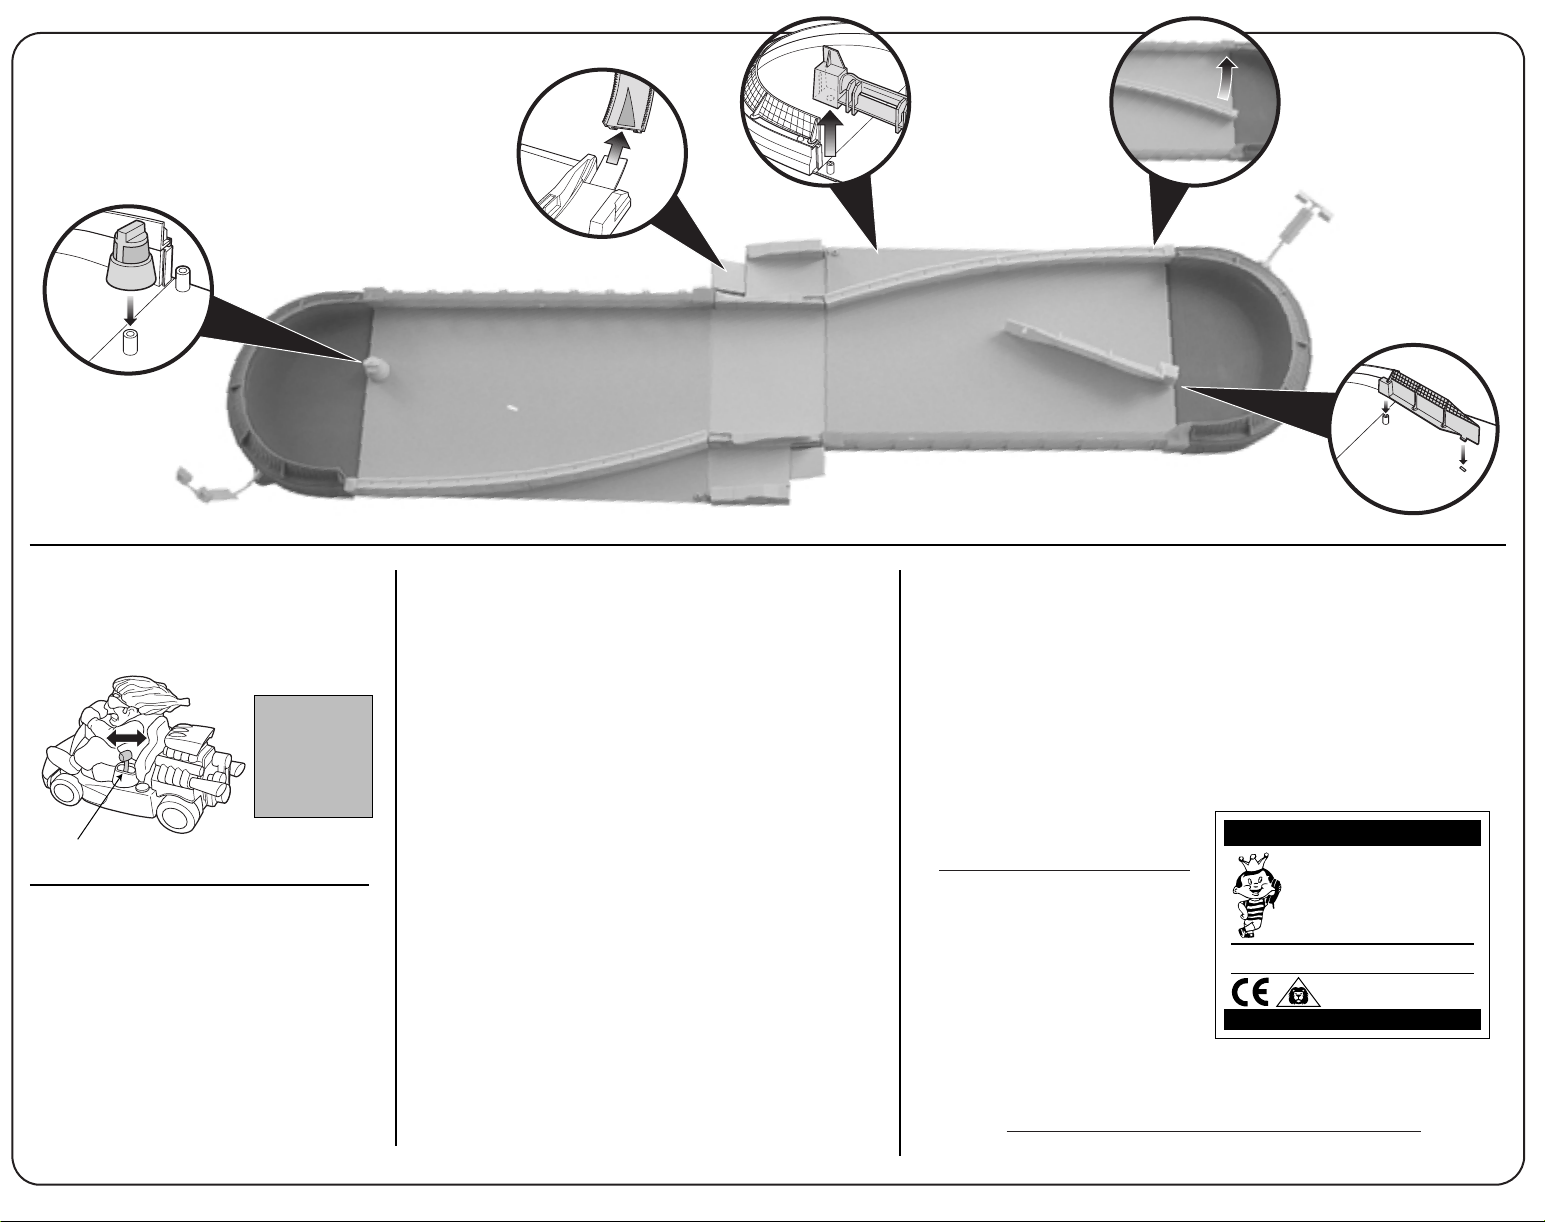
Push lever forward to activate
“FEATURE” mode. Push lever backward
to return to “NORMAL” mode.
MODE LEVER
ACTION FEATURE
Try this alternate track layout for
more Kart Maniax™ fun! 1. Remove loop and
loop connector.
2. Remove two side
rails as shown. 3. Move both center
curved rails as
shown.
4. Insert diverter
rail as shown.
5. Insert drum
as shown.
ALTERNATE LAYOUT
NOTE:
Requires 3 “AA” batteries
(not included)
.
For best performance, use alkaline batteries.
Keep these instructions for future reference
as they contain important information.
INSTRUCTIONS
CONTENTS:
Stunt Pit
WARNING:
CHOKING HAZARD – small parts.
Not for children under 3 years.
!
TM
2x
2x
2x
2x
2x
2x
2x
2x
2x
2x
LABELS
© 2001 Mattel, Inc., El Segundo, CA 90245 U.S.A. All Rights Reserved.
2.
1.
3.
Kart works
best in
“NORMAL”
mode when
used with set.