MAXTEK DH900 User manual

USER GUIDE
Wireless Amplied Headset
MODEL NUMBER: DH900
After Sales Support
UK/N.IRELAND HELPLINE NO:
REP.IRELAND HELPLINE NO:
WEBSITE:
EMAIL:
01270 508538
1800 995 036
www.quesh.co.uk

Contents
1. Welcome Section
2. General Information & Safety Instructions
3. Contents & Features
4. Controls
5. Setup
7. Using the Headset
10. Trouble Shooting
11. Specications
After Sales Support
UK/N.IRELAND HELPLINE NO:
REP.IRELAND HELPLINE NO:
WEBSITE:
EMAIL:
01270 508538
1800 995 036
www.quesh.co.uk

Welcome Section
Congratulations!
You have made an excellent choice with the purchase of this quality
MAXTEK®product.
By doing so you now have the assurance and peace of mind which
comes from purchasing a product that has been manufactured to
the highest standards of performance and safety, supported by the
high quality standards of Quesh Ltd.
We want you to be completely satised with your purchase so this
MAXTEK®product is backed by a comprehensive manufacturer’s
3 year warranty and outstanding after sales service through our
dedicated helpline.
We hope you enjoy using this product for many years to come.
If you require technical support or in the unlikely event that your
purchase is faulty, please telephone our helpline for immediate
assistance. Faulty product claims made within the 3 year warranty
period will be repaired or replaced free of charge provided that you
have a satisfactory proof of purchase (keep your receipt safe).
This does not affect your statutory rights. However be aware that the
warranty will become null and void if the product is found to have
been deliberately damaged, misused and/or disassembled.
1
After Sales Support
UK/N.IRELAND HELPLINE NO:
REP.IRELAND HELPLINE NO:
WEBSITE:
EMAIL:
01270 508538
1800 995 036
www.quesh.co.uk
General information &
Safety Instructions
Rechargeable 3.7V Polymer Li-ion 350mA battery inside headset.
Do not dispose of batteries in your household waste.
Please contact your local authority for details on safe disposal.
• Never throw batteries into a re or expose to excessive heat sources.
• If batteries are swallowed, please seek immediate medical attention.
• Always ensure correct +/- battery polarity when installing batteries.
• Do not recharge non-rechargeable batteries.
Equipment, which is marked with the WEEE logo
(as shown on the left), should not be thrown away with your household waste.
Contact your local authority waste disposal department, as they will be able to
provide details of the recycling options available in your area.
Electrical and electronic equipment (WEEE) contains materials, parts and
substances, which can be dangerous to the environment and harmful to
human health if the waste of electrical and electronic equipment (WEEE) is not
disposed of correctly.
Equipment, which is marked with the WEEE logo
(as shown on the left), should not be thrown away with your household waste.
Contact your local authority waste disposal department, as they will be able to
provide details of the recycling options available in your area.
After Sales Support
UK/N.IRELAND HELPLINE NO:
REP.IRELAND HELPLINE NO:
WEBSITE:
EMAIL:
01270 508538
1800 995 036
www.quesh.co.uk
2

3
After Sales Support
UK/N.IRELAND HELPLINE NO:
REP.IRELAND HELPLINE NO:
WEBSITE:
EMAIL:
01270 508538
1800 995 036
www.quesh.co.uk
Contents & Features
Contents
1 x Headset
1 x Pack Assorted Ear Buds
1 x Transmitter Base
1 x Mains Adaptor
1 x 3.5mm to RCA Cable
1 x 3.5mm AUX Cable
1 x 3.5mm to 6.5mm Adaptor Jack
1 x External Microphone with Adaptor & Holder
Features
• 2.4GHz RF Wireless digital technology
• Hearing enhancement for listening & communication
• Auto mute’s audio for verbal communication
• Ultra clear stereo or mono sound
• Balance control (left and right audio channels)
• Adjustable tone clarity
• Power save when headset is out of range
• Highly sensitive microphone
• Connects to most devices via AUX port
• Rechargeable Polymer Li-ion battery
• Extra battery charging compartment
• 30m Range
• 120dB maximum volume (equivalent to a loud live concert)
Please Note:
For users with pacemakers, it is recommended that you check with a medical
professional or your health advisor before using this product. Switch the device off
immediately if you notice or suspect ANY adverse effects.
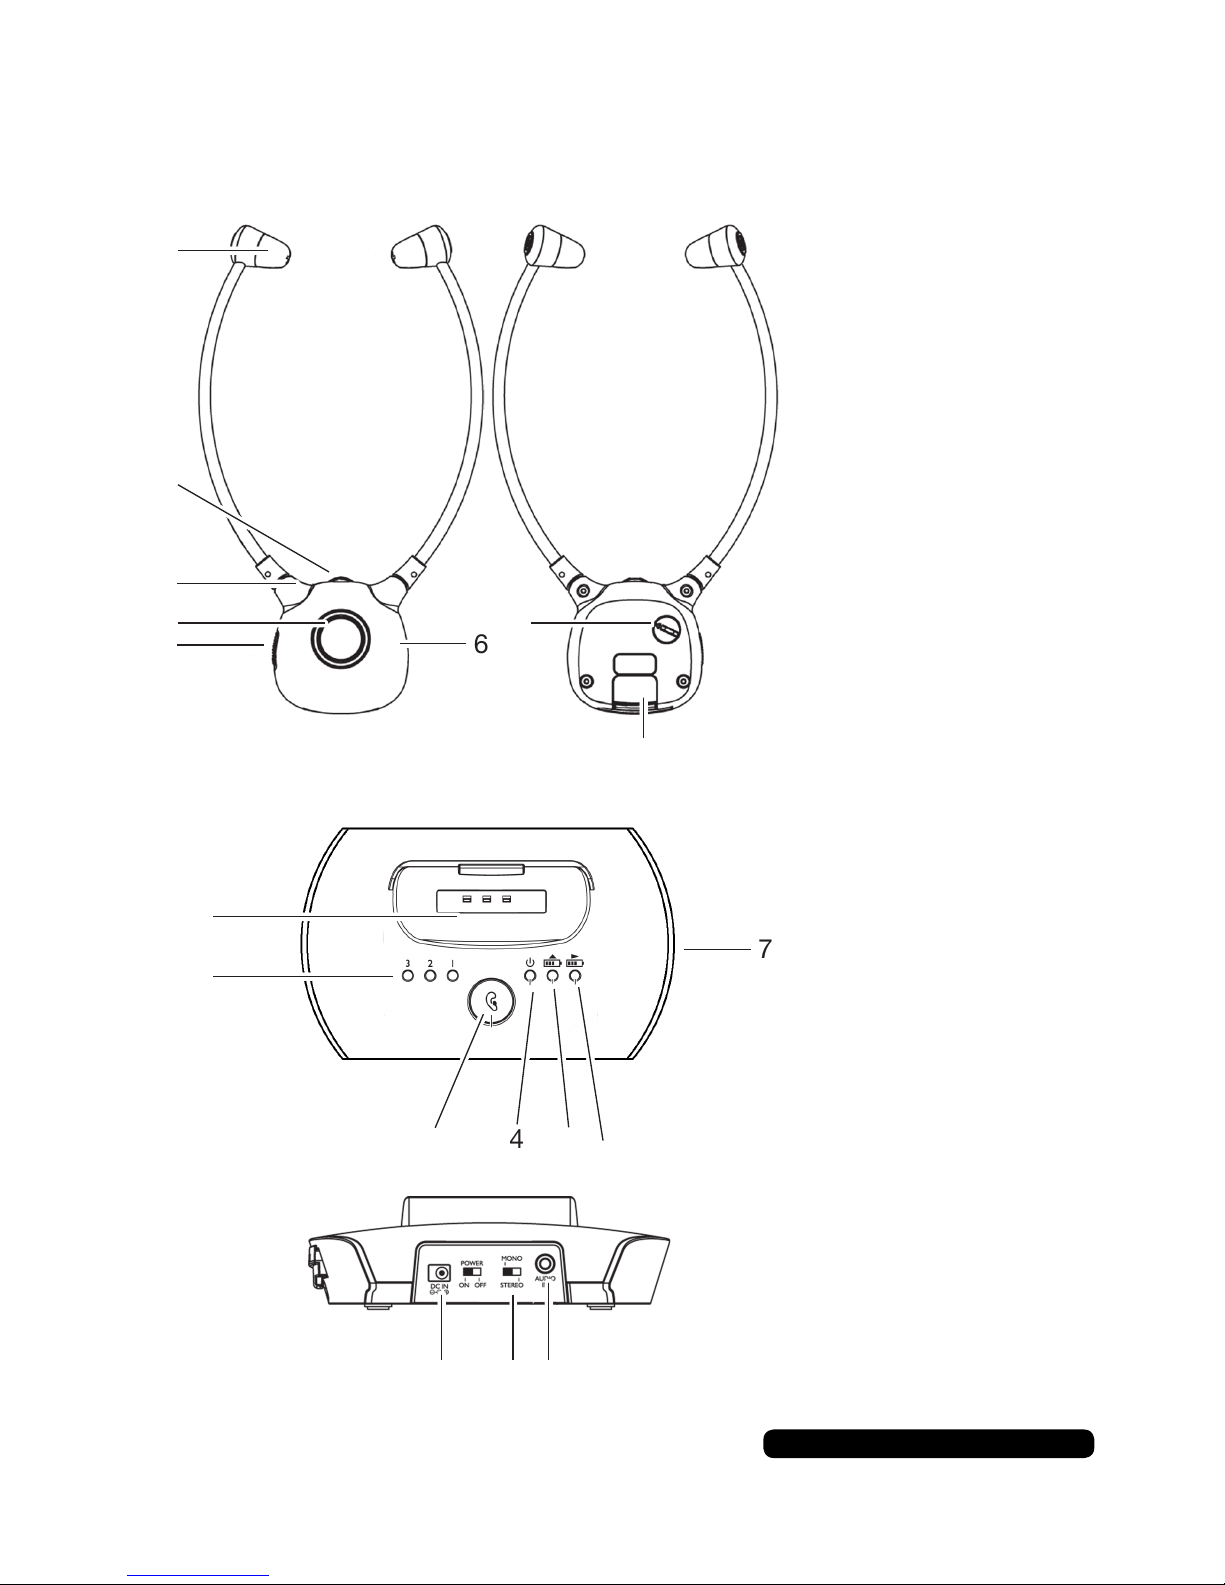
Controls
After Sales Support
UK/N.IRELAND HELPLINE NO:
REP.IRELAND HELPLINE NO:
WEBSITE:
EMAIL:
01270 508538
1800 995 036
www.quesh.co.uk
4
1
2
3
4
57
8
1.
2.
3.
4.
5.
6.
7.
8.
Ear Bud
Volume Control
Power Indicator
Talk Button
On/Off Switch
Microphone
Balance (Left/Right)
Battery
6
1
2
3 5 64
7
Headset Receiver
1.
2.
3.
4.
5.
6.
7.
8.
9.
10.
Charging Cradle
Tone LED
Tone Select Button
Power LED
Charging LED
Spare Charging LED
Charge Bay
DC In Port
Audio In Port
Stereo/Mono Switch
Transmitter Base
8 910
5
After Sales Support
UK/N.IRELAND HELPLINE NO:
REP.IRELAND HELPLINE NO:
WEBSITE:
EMAIL:
01270 508538
1800 995 036
www.quesh.co.uk
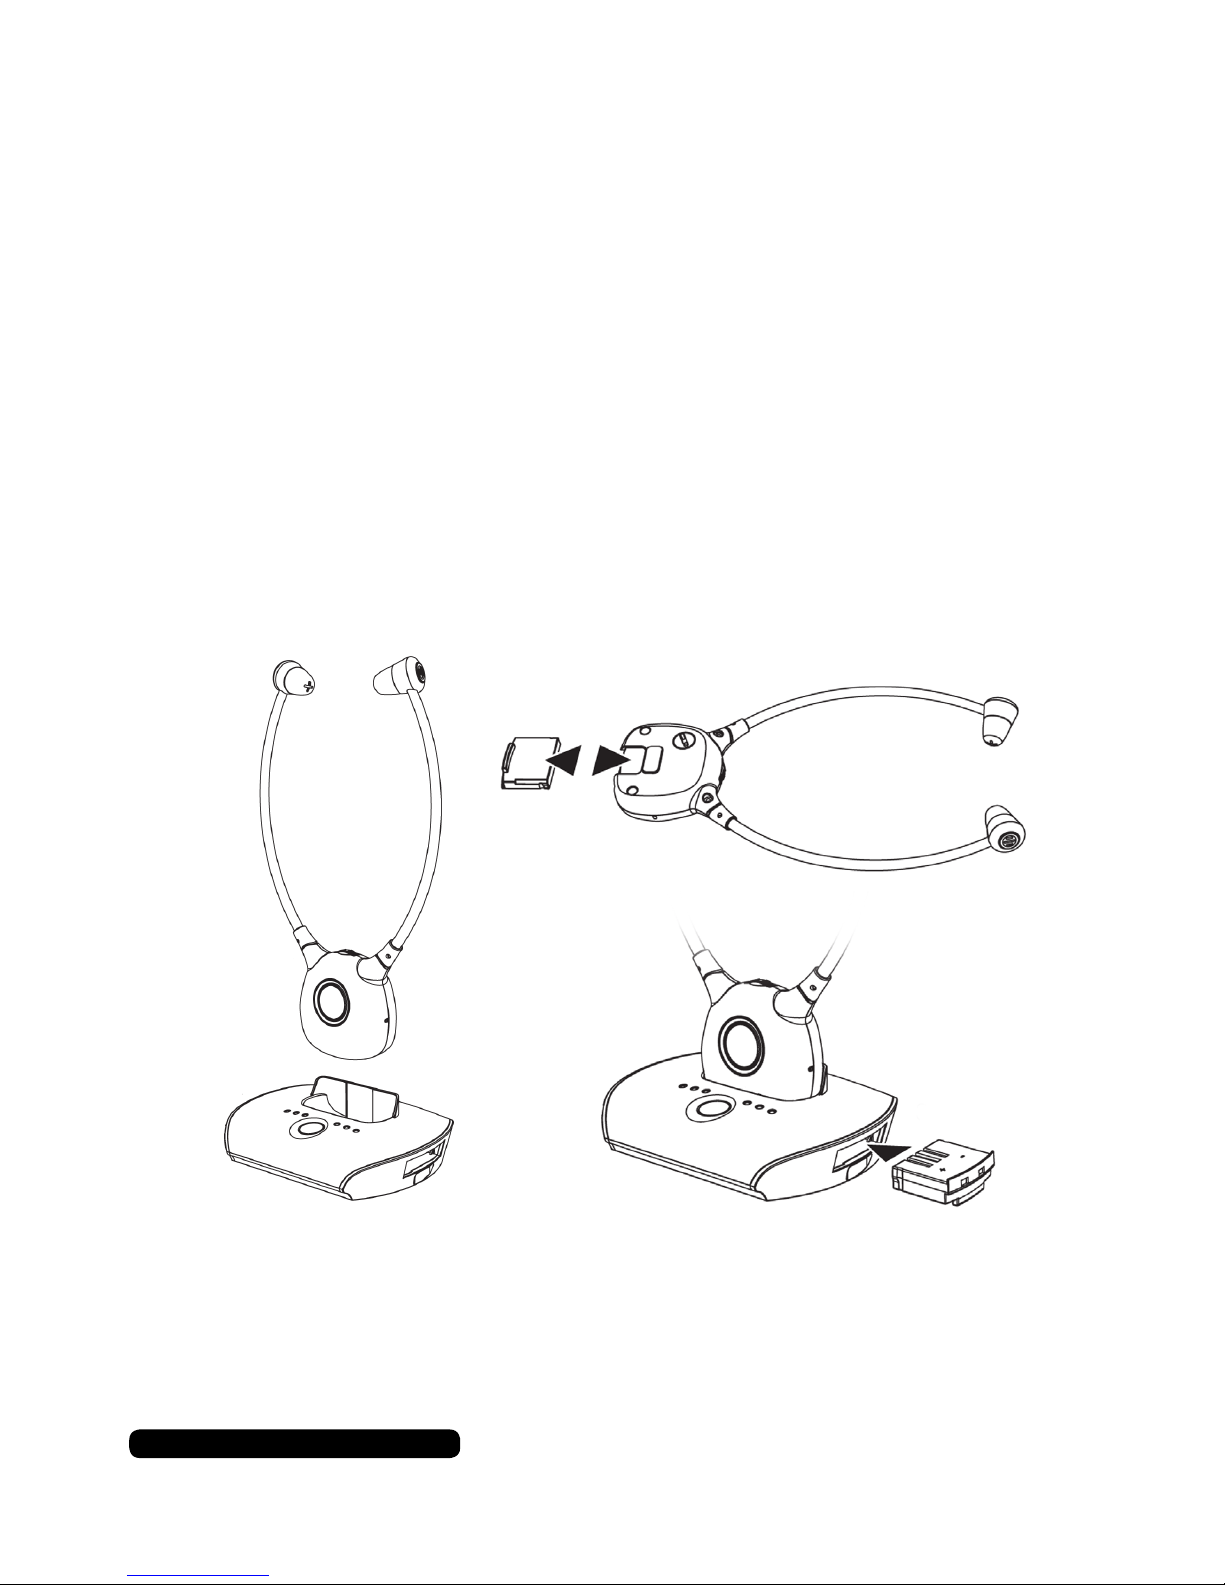
Setup
Connecting the transmitter
• Connect the power adaptor to the mains outlet and the other end
• into the ‘DC IN’ port located on the transmitter’s rear panel.
Charging receiver
• Insert the battery into the headset, making sure the batteries are in
• the correct polarity position.
• Place the headset into the charge port on the transmitter. The LED
• will light up red when charging and green once fully charged.
• This will take about 2 hours and 30 minutes.
• Insert the spare batteries into the transmitter’s charge bay located
• on the right side on the unit.
Changing the ear buds
• Select the correct size of ear buds to attach (large or small).
• Pull the ear buds off the headset.
• Push on the required ear bud on to the open end on the headset
• and let them snap into position.

Connecting direct to an audio source
• Connect the 3.5mm AUX cable to the ‘AUDIO IN’ port on the rear of
• the transmitter then choose one of the following to connect to:
• Phono/RCA (Red & White) Line out ports
• 3.5mm Headphone/Line out port
• 6.3mm Headphone/Line out port
• Microphone
• Scart
After Sales Support
UK/N.IRELAND HELPLINE NO:
REP.IRELAND HELPLINE NO:
WEBSITE:
EMAIL:
01270 508538
1800 995 036
www.quesh.co.uk
6
6.3mm Adaptor
Scart Adaptor
(Not included)
RCA Adaptor
Microphone
3.5mm AUX
Please Note:
Plugging directly into an audio port of a device may cause the device to override
it’s main speakers, so the only sound available will be heard through the headset
only. If this happens then it is best to set the microphone up.
Connecting to a T.V.

7
After Sales Support
UK/N.IRELAND HELPLINE NO:
REP.IRELAND HELPLINE NO:
WEBSITE:
EMAIL:
01270 508538
1800 995 036
www.quesh.co.uk
3.5mm AUX cable
This will connect any device that uses a 3.5mm output.
This is typically found on mobile phones, PC/laptops/tablets,
personal MP3 players, radios, portable DVD players, etc.
3.5mm to 6.3mm Adaptor
This will connect any device that uses a 6.3mm output. Connect
your ‘3.5mm AUX cable’ in to the rear of this adaptor and plug the
adaptor in to t this type of output. This type of output is typically
found on hi-’s, TV’s, electronic instruments, etc.
3.5mm to RCA cable
This will connect any device that uses an RCA or phono output.
Connect your ‘3.5mm AUX cable’ in to the port of the ‘3.5mm to
RCA cable’ to t this type of output. This is typically found on TV’s,
large hi-’s, video cameras, etc
Scart (Not included)
This will connect any device that uses a scart output. Connect your
‘3.5mm AUX cable’ in to the port of the ‘Scart cable’ to t this type
of output. This is typically found on TV’s, etc
The green LED indicator will ash as soon as you have connected
the unit to power. The green LED will stay on once an audio source
has been detected.

Connecting the microphone
If you are unable to connect directly to an audio source or the audio
source cuts off when connected so guests are unable to listen to the
audio source, then use the microphone supplied.
• Connect the 3.5mm AUX cable to the ‘AUDIO IN’ port on the rear of
• the transmitter the other end to the port on the end of the micro
• phone cable.
• Use the adhesive strip to fasten the microphone holder adjacent to
• the speaker so that the microphone can be positioned a little above
• the speaker.
• Please set the TV on to MONO and at a low volume, then adjust as
• required.
Please Note:
Before fastening down the microphone holder into position please move the
microphone around to find the best possible position for sound input. Most flat
screen TV’s have the speaker underneath the unit.
The green LED indicator will ash as soon as you have connected
the unit to power. The green LED with stay on once an audio source
has been detected.
After Sales Support
UK/N.IRELAND HELPLINE NO:
REP.IRELAND HELPLINE NO:
WEBSITE:
EMAIL:
01270 508538
1800 995 036
www.quesh.co.uk
8
Other manuals for DH900
1
Table of contents
Other MAXTEK Headset manuals


